As Solana’s ecosystem grows and keeps pushing in the leaderboards for programmable blockchains, developers need a definitive Solana API. Fortunately, Moralis’ NFT API for Solana fulfills this need. Because if you think about it, what would the best Web3 tech stack be without a Solana NFT API? As a result, developers can use Moralis to fetch various kinds of data from Solana’s blockchain for their dapps. Also, the tech stack takes one step closer to providing complete solutions for all blockchain projects. In this article, we explore Moralis’ Solana NFT API and how you can use it to fetch NFT data!
Moving forward, you will have a chance to follow along and create your own version of a neat Solana NFT dapp. To build this dapp, we will use React and Moralis. With React, we will cover all our Web3 frontend needs. Furthermore, we will easily work with on-chain data thanks to Moralis’ ultimate Solana NFT API. Nonetheless, if you are not familiar with Moralis, think of it as “Firebase for crypto“. It is the best Web3 backend platform that enables developers to start deploying killer dapps immediately. Thanks to Moralis’ single workflow, you get to cover all your backend needs with short snippets of code. In addition, Moralis is cross-chain and cross-platform interoperable; thus, it offers you many options. However, today we will be utilizing its Solana NFT API. So, make sure to create your free Moralis account and follow our lead.
Solana NFT API Utilized – Demo
Before we roll up our sleeves and start building our example Solana NFT dapp together, we want to do a quick demo of our example dapp. That way, you will get to see the finalized result in advance. Hence, you will easily decide if you want to take on this example project yourself.
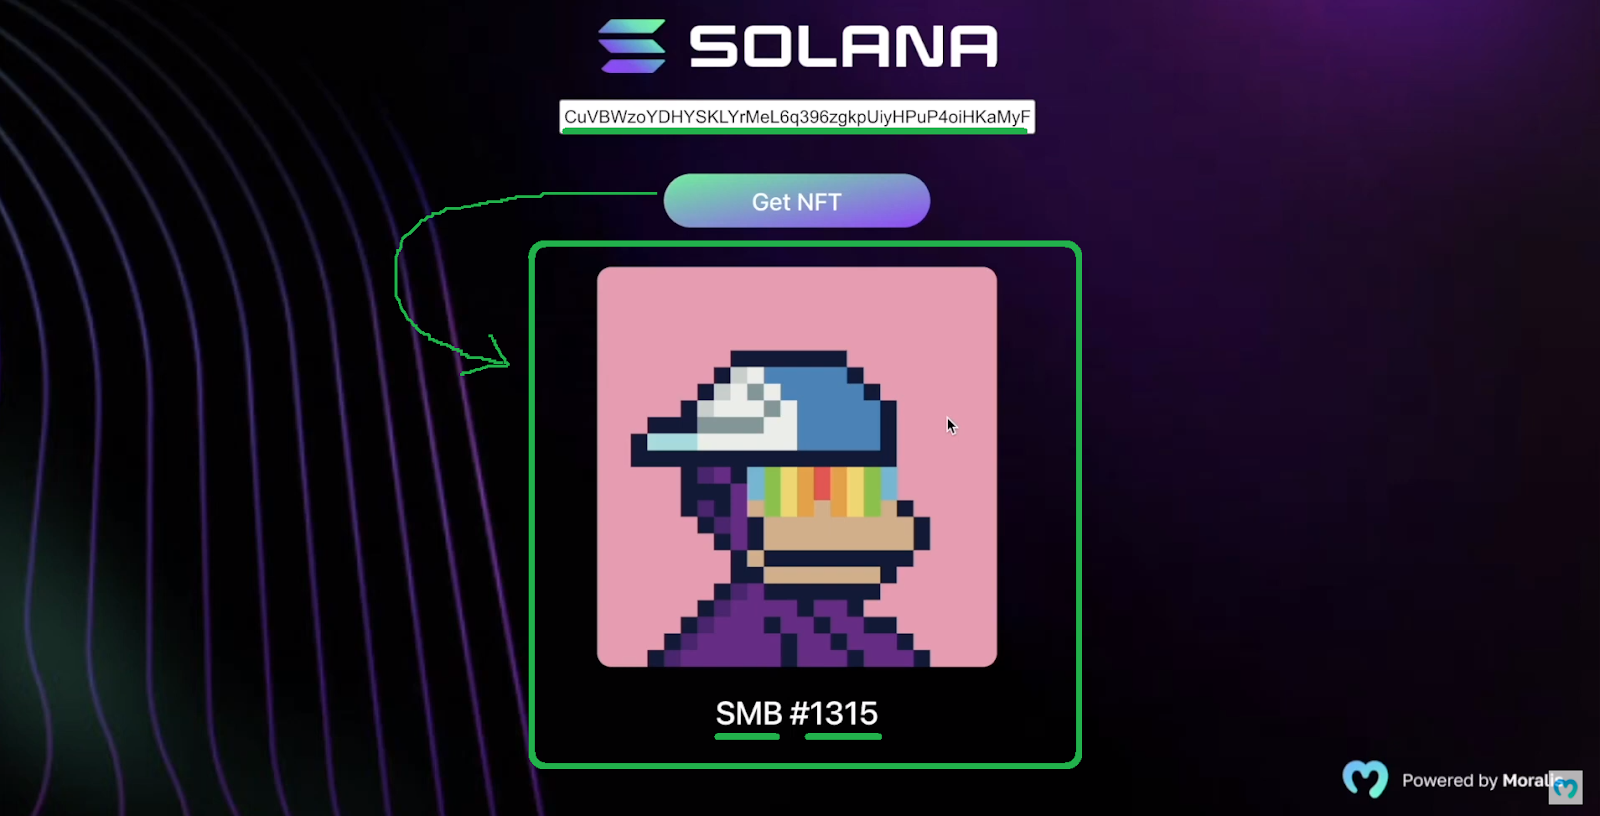
The following screenshot represents the gist of our Solana NFT dapp:

Looking at the image above, you can see the entry field at the top (just below “Solana”). This is where our dapp accepts a token address. When we click on the “Get NFT” button, the Solana NFT API collects the details related to that address. Finally, as a result, when a user performs a search, it displays the image of the NFT, the name of its collection, and its token ID. We can repeat the search as many times and for as many Solana NFTs as we want (one at a time). Here’s are a couple of other search results:
- The “Okay Bear” collection:

- The “Solana Monkey Business” (SMB) collection:
Solana NFT API Utilized – Example Project
If you are reading this, we assume you liked what you saw in the demo section and are eager to get your hands dirty. Fortunately, this is a concise and simple example project. As such, you can have it finished in less than ten minutes. Moreover, we will guide you through the process step-by-step so that even complete beginners can follow along. Nonetheless, you can take an additional shortcut by using our code that awaits you on GitHub. There, you can also find all the assets (logos, background, etc.) presented in the above section. Of course, you can also start this project from scratch.
If you’ve cloned our code, you are now looking at the layout of our project:

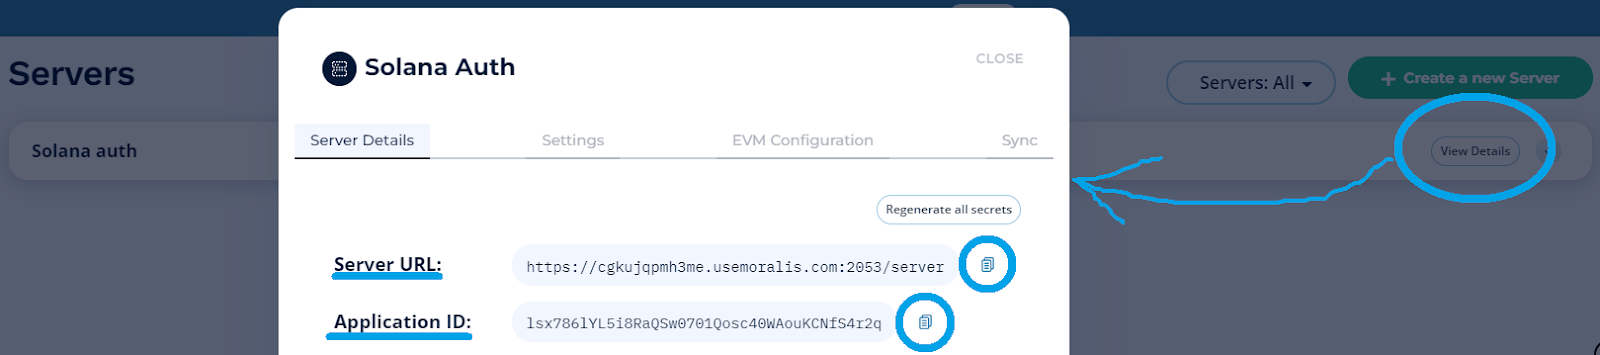
At this point, you have everything ready to build this React app. Although to access the power of Moralis’ Solana NFT API, you need to use your Moralis server’ details. Essentially, you need to paste your application ID and server URL inside the designated spots within the “index.js” file:

Note: If this is not your first time using Moralis, you probably already know how to get the required server details. As such, you may skip the following section.

Initial Moralis Setup
The initial Moralis setup is a swift and simple process, and here are the steps you need to complete:
- Create your free Moralis account or log in using your credentials if you already have a Moralis account.
- Inside your Moralis admin area, navigate to the “Servers” tab and create a new server:

- Select the server type. Note that when working on example projects and testing dapps, it is best to go with the “Testnet Server” option:

- Enter your server details: name, location, and chain. Then, spin up your server using the “Add Instance” button:

- Use the “View Details” button for your server and copy the relevant details:
- Paste the copied details into the “index.js” file.
Creating a Simple React App
After completing the above setup, you are ready to build a simple React application. As such, open the “App.js” file and first define some state variables:

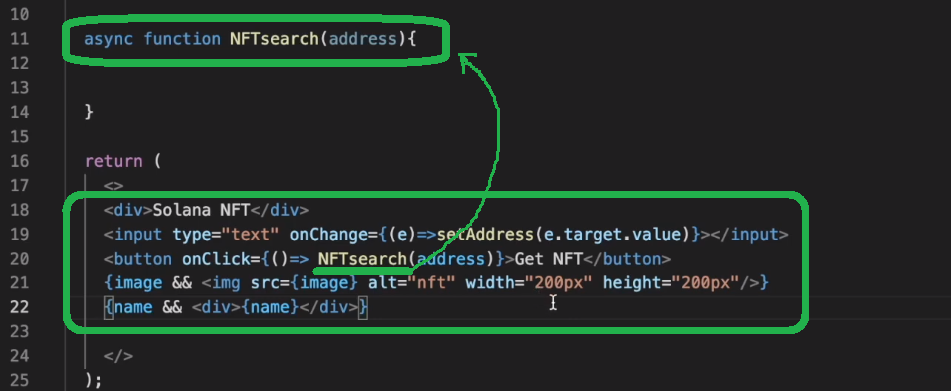
As you can see, we will use these variables to store the entered address, NFT’s name, and image. Next, we need to add the proper lines of code to create our user interface (UI). We start with the title, the address entry field, and the button to perform the search based on the entered address:
We can now run our dapp to ensure that the above lines of code work properly:

Looking at the above screenshot, you can see that we have the “Solana NFT” title, entry fields, and the “Get NFT” button ready. Of course, the layout is quite basic as we haven’t implemented any styling yet. We also haven’t utilized the Solana NFT API. So, even if we enter an address and click on the “Get NFT” button, things will not function properly. As such, we need to import the Solana API.
Importing The Solana NFT API
At the top of the “App.js” file, we need to add the following line of code:
import { useMoralisSolanaApi } from "react-moralis";
The above line of code imports the Solana NFT API. Now, we need to install “react-moralis” using the “npm i react-moralis” or the “yarn add react-moralis” command. You can enter any of these commands into the terminal on Visual Studio Code (VSC). Once that’s done, we can call the “useMoralisSolanaApi” hook with:
const SolanaApi = useMoralisSolanaApi();
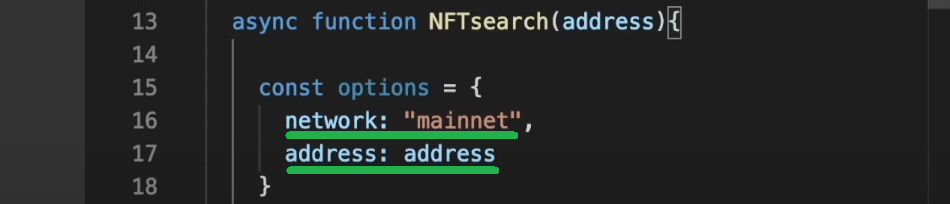
Next, we need to code the details of our “NFTsearch” function. We start by defining a network and address:
Then, we need to ensure that our function gets the NFT that corresponds to the searched address. This is where Moralis’ Solana NFT API makes things quite simple. As such, we can cover this functionality with a single line of code:
const nftResult = await SolanaApi.nft.getNFTMetadata(options);
To log the results, we also add “console.log(nftResults);”, which will enable us to use our browser’s console to see the results.
With the above functionality in place, let’s look at our dapp in action. To do this, we first go to OpenSea, where we select an example NFT and copy its token ID:

We then use that token’s ID in our dapp’s search box:

As you can see in the screenshot above, we fetch an object after clicking on the “Get NFT” button. The latter contains all the details related to the searched address:

Furthermore, there are additional details available inside “metaplex”, which also includes the history of the owners:

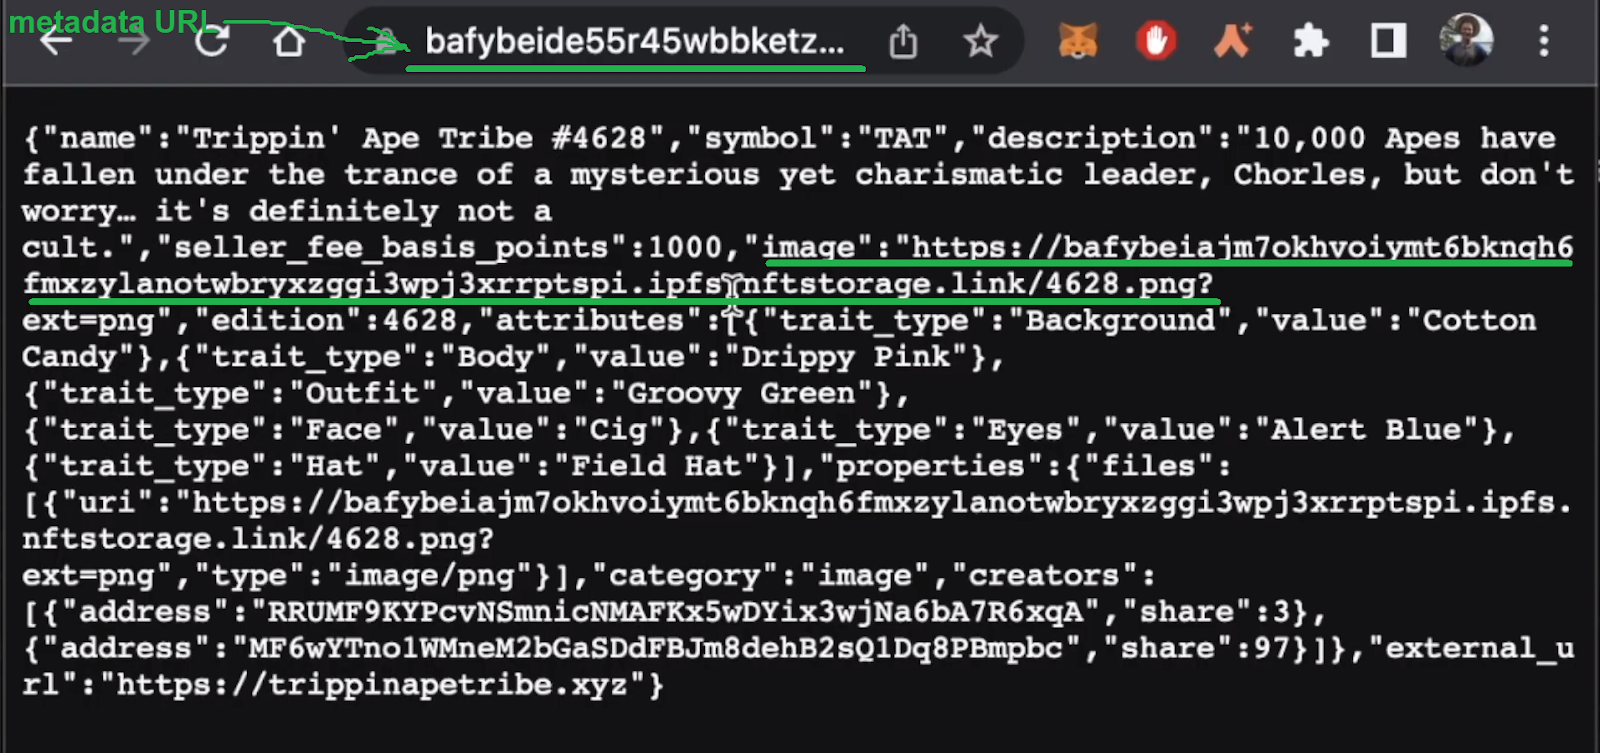
However, what interests us is the metadata, which also contains the NFT’s image URL:
Using the Solana NFT API to Implement Image and Name
The above screenshots demonstrate that we have all the details we need to populate our dapp. Recalling the above demo, you know that we will only utilize the collection name and the NFT’s ID. However, you can easily take things a lot further. For instance, you could also display an owner’s history and much more. But let’s now focus on implementing the displaying of an image and name into our example Solana NFT dapp.
As far as the NFTs’ names go, we can set “setName” to the search results:
setName(nftResult.name);
Of course, things are slightly trickier for the images. After looking at the above details, you already know that we need to extract images’ URLs, which are NFTs’ URIs, from the metadata (.JSON file). These are the lines of code that make that happen:
   let uri = nftResult.metaplex.metadataUri;

    try {
      await fetch(uri)
        .then((response) => response.json())
        .then((data) => {
          setImage(data.image);
        });
    } catch {
      console.log("couldnt get image");
    }
If we now run our dapp again, it returns the searched NFT’s name and image:

Obviously, this works for all NFTs on Solana:

At this point, our example dapp already offers the same functionality as demonstrated above. Furthermore, we are all done as far as the Solana NFT API utility goes. Of course, we encourage you also to tweak the styling and make the UI look good. Although, if you cloned our code, the styling is already applied. As such, the above looks a lot cooler; however, the functionality is the exact same:

Those of you who prefer video tutorials, make sure to watch the clip below. There, you’ll have a chance to watch an in-house Moralis expert as he completes the above-presented project.
Beyond Moralis’ Solana NFT API
Solana may not be as decentralized as Ethereum; however, it is a chain that deserves our attention. With that said, you might be willing to explore Solana development with Moralis further. If so, you should learn how to authenticate Solana users with the Phantom wallet. Moreover, make sure to explore the SPL vs ERC-20 tokens comparison. The latter might inspire you to create a Solana token. While you’re at it, why not also build a Solana token dashboard.
Keep in mind that Moralis is cross-chain interoperable. As a result, you will not be stuck with Solana even if you later decide to switch to other chains. By tweaking the code just a bit, you will be able to deploy the same dapps to other supported blockchains. These include Ethereum and several EVM-compatible chains (Avalanche, BNB Chain, Polygon, etc.). Moralis’ single workflow makes things as straightforward as possible, whatever chain you decide to utilize. It helps you take care of Web3 authentication, sync and index smart contract events (index the blockchain), and store off-chain data and on-chain data. It even assists you with your Web3 UI efforts via Moralis’ web3uikit. Thus, your frontend skills, such as JavaScript or Unity, are enough to become a Web3 developer.
Nonetheless, if you are interested in weekly challenges where you get to build with the support of experts, you ought to join Moralis Projects. In addition, you also get to earn some cool NFTs by completing various challenges.

Solana NFT API – Exploring the Ultimate NFT API for Solana – Summary
Today, you had a chance to see how easy it is to utilize the Solana NFT API using Moralis. First, you got to see a demo of our finished Solana NFT dapp. However, more importantly, you also had a chance to follow our lead and build your own Solana NFT dapp. As such, you learned how to complete the initial Moralis setup and use React to create your dapp’s frontend. Of course, you also discovered how to use the Solana NFT API to obtain the details of Solana NFTs. Nonetheless, we also offered you some suggestions if you are interested in taking Solana development further.
On the other hand, you might be interested in developing on other chains or learning about different aspects of blockchain development. If so, make sure to visit the Moralis YouTube channel and the Moralis blog. Some of the latest topics revolve around uploading Web3 Unity metadata and Unity assets to IPFS, dapp development, creating a crypto sentiment dapp, an NFT on-chain inventory system, Solidity smart contracts, building a decentralized Twitter, building a marketplace to buy NFTs in-game, and an EIP 1559 example. With a ton of valuable content, these outlets may serve as your continued and free crypto education needs.

However, you may be eager to become a blockchain developer quickly and confidently. If so, you may want to consider taking a more professional approach. This is where Moralis Academy can help you bridge the gap between where you are and where you want to be. Aside from top-tier blockchain development courses, this online academy provides you with expert mentors and a personalized study path. Nonetheless, this is also where you can find your tribe inside one of the most advancing communities in the industry.
