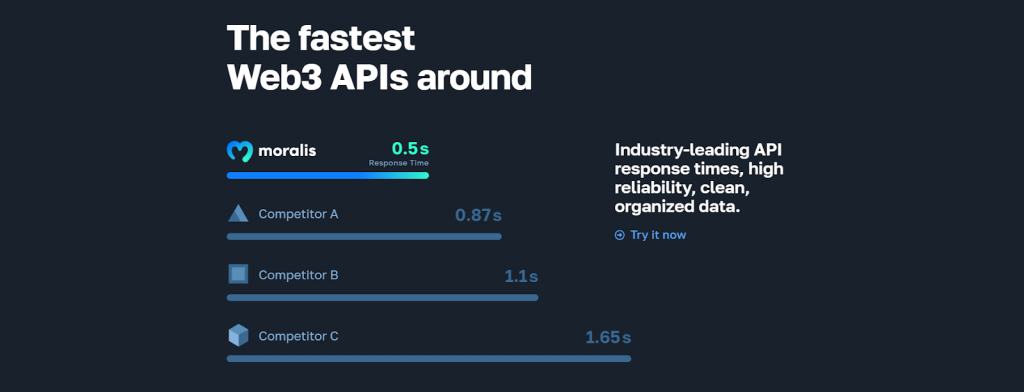
Thanks to the power of the Web3 Data API from Moralis, you can easily build a block explorer for Ethereum and other popular EVM-compatible chains. All it takes is your JavaScript proficiency and proper implementation of various endpoints. Here are the two Web3 API endpoints that cover the primary block explorer features for the backend:
getTokenPrice:
const response = await Moralis.EvmApi.token.getTokenPrice(options);
getWalletTransactions:
const response = await Moralis.EvmApi.transaction.getWalletTransactions(options);
To build a block explorer using the above two methods, you just need to initialize Moralis with your private Web3 API key:
Moralis.start({
  apiKey: MORALIS_API_KEY,
})
If you’ve worked with Moralis before, you probably know exactly how to implement the above code snippets. However, if this is your first rodeo with the fastest enterprise-grade Web3 APIs, you may need some additional guidance. In that case, make sure to take on the following tutorial and build a block explorer with NextJS and NodeJS. In the tutorial, we’ll also show you how to obtain your Web3 API key. That said, create your free Moralis account and follow our lead!
Overview
In today’s article, you’ll have an opportunity to create your own instance of a simple Etherscan clone. Now, to keep things simple, the clone focuses on pretty basic features, such as displaying ETH price and transaction details for a wallet address a user wishes to explore. In addition, to make the process even simpler for you, you’ll get to clone our code that awaits you on the “etherscan-search-clone” GitHub repo page. With that in mind, it shouldn’t take you more than ten minutes to build a block explorer following our lead. Below the tutorial, you can also get the basics under your belt by learning what a block explorer is.

Tutorial: Build an Etherscan-Like Block Explorer
Note: You can access the complete code for this block explorer project on GitHub.
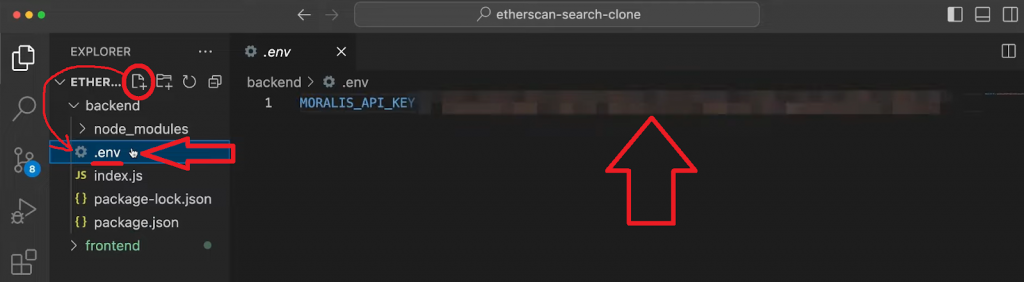
After cloning our code, open your “etherscan-search-clone” directory in Visual Studio Code (VSC). Inside that directory, you’ll see the “backend” and the “frontend” folders. First, focus on the backend folder, where you should see the “package.json”, “package-lock.json”, and “index.js” files. The latter holds the essential lines of code to build a block explorer’s backend functionality. However, essentially, all scripts together form a NodeJS dapp. Also, to make the scripts function correctly, you must install all the required dependencies (CORS, dotenv, Express, and Moralis). To do this, you can cd into the “backend” folder and run the npm install command.
You also need to create a “.env” file and populate it with your Web3 API key:
So, to get your Web3 API key, you first need to log in to your Moralis account. The free plan is all you need to complete this tutorial and start utilizing the power of Moralis. However, if you and your team want to scale your project, we encourage you to go with either the Pro, Business, or Enterprise plan:

Once inside your Moralis admin area, select the “Web3 APIs” tab from the side menu and use the “copy” icon:

With your API key in place, it’s time you explore the backend “index.js” script more closely.

Backend Code Walkthrough
At the top of the “index.js” file, our backend requires Express and defines local port 5001. This is also where the script requires Moralis, CORS, and dotenv:
const express = require("express");
const app = express();
const port = 5001;
const Moralis = require("moralis").default;
const cors = require("cors");

require("dotenv").config({ path: ".env" });
Next, the code instructs the app to use CORS, Express JSON, and obtain the Web3 API key from the “.env” file:
app.use(cors());
app.use(express.json());

const MORALIS_API_KEY = process.env.MORALIS_API_KEY;
The backend script uses your API key at the bottom, where it initializes Moralis with the following lines of code:
Moralis.start({
  apiKey: MORALIS_API_KEY,
}).then(() => {
  app.listen(port, () => {
    console.log(`Listening for API Calls`);
  });
});
Regarding the backend portion to fetch blockchain data, the two methods presented in the intro do the trick. To implement those methods correctly, we must create two endpoints: /getethprice and /address. The former will use getTokenPrice to fetch the live ETH price, while the latter will use getWalletTransactions to query all transactions for any address users enter on the frontend. So, here are the lines of code fetching the live ETH price:
app.get("/getethprice", async (req, res) => {
  try {
    const response = await Moralis.EvmApi.token.getTokenPrice({
      address: "0xc02aaa39b223fe8d0a0e5c4f27ead9083c756cc2",
      chain: "0x1",
    });

    return res.status(200).json(response);
  } catch (e) {
    console.log(`Somthing went wrong ${e}`);
    return res.status(400).json();
  }
});
Looking at the lines of code above, you can see that the method uses Ethereum’s smart contract address and chain ID (in the HEX format) as parameters. Plus, the code sends the response to the frontend client and logs potential errors.
As for the wallet transactions, the following snippet of code does all the heavy lifting:
app.get("/address", async (req, res) => {
  try {
    const { query } = req;
    const chain = "0x1";

    const response = await Moralis.EvmApi.transaction.getWalletTransactions({
      address: query.address,
      chain,
    });

    return res.status(200).json(response);
  } catch (e) {
    console.log(`Something went wrong ${e}`);
    return res.status(400).json();
  }
});
This method also takes in two parameters: address and chain. However, while the chain remains the same as we want to focus on Ethereum, the address must come from the search field on the frontend.

Frontend Code Walkthrough
Now that you understand how the backend of our Etherscan-like dapp works, it’s time to focus on the frontend. So, to build a block explorer with a legacy programming language, you can use NextJS. Aside from the styling scripts (which we won’t focus on in this tutorial), the “frontend” folder is essentially a NextJS dapp. The latter uses Moment.js and Axios dependencies you must install before moving forward. Aside from the frontend “index.js” script, the “header.js”, “search.js”, and “searchResults.js” components cover the gist of frontend functionalities. Hence, let’s go through the core aspects of these scripts.
The “index.js” Script
At the bottom of “index.js” for the frontend, you can see how it renders the Header and SearchComp components:
import Head from "next/head";
import styles from "@/styles/Home.module.css";

import Header from "../components/header.js";
import SearchComp from "../components/search.js";

export default function Home() {
  return (
    <>
      <Head>
        <title>Etherscan Search</title>
        <meta name="description" content="Generated by create next app" />
        <meta name="viewport" content="width=device-width, initial-scale=1" />
        <link rel="icon" href="/favicon.ico" />
      </Head>
      <section className={styles.main}>
        <Header />
        <SearchComp />
      </section>
    </>
  );
}
The Header Component
Among other not-so-important things, the header component is where we display the live ETH price obtained on the backend. Now, to do so properly, the “header.js” script utilizes the Header function, where Axios fetches the on-chain data from our backend Express server:
export default function Header() {
  const [ethPrice, setEthPrice] = useState("");
  useEffect(() => {
    const getEthPrice = async () => {
      const response = await axios.get(`http://localhost:5001/getethprice`, {});
      setEthPrice(response.data.usdPrice);
    };
    getEthPrice();
  });
  return (
    <section className={styles.header}>
      <section className={styles.topHeader}>
        ETH Price:{" "}
        <span className={styles.blueText}>${Number(ethPrice).toFixed(2)}</span>
      </section>
Note: The rest of the code inside the return part of the Header function focuses on displaying other menu items (at the top). However, for the sake of this tutorial, these menu items are not active:

The Search Component
This component enables users to input any address to view on-chain transactions. If you look at the return part of the “search.js” script, you can see the H3 title, “The Ethereum Blockchain Explorer”, an input field, and a button that triggers the search:
  return (
    <section className={styles.searchContainer}>
      <section className={styles.searchSection}>
        <h3>The Ethereum Blockchain Explorer</h3>
        <section className={styles.input_section}>
          <input
            className={styles.inputField}
            onChange={changeHandler}
          />
          <button className={styles.btn} onClick={handleSearch}>
The changeHandler function extracts the value from the input field and stores it under the setSearchInput state variable:
  const changeHandler = (e) => {
    setSearchInput(e.target.value);
  };
Another function, handleSearch, activates when users click on the “search” button. This function utilizes Axios to provide the backend with an address to fetch transactions. Then, this function receives the response from the backend server and stores the details under the setResult state variable, which is an array. Finally, this function uses the setShowResults state variable, which is a boolean set to false by default. Once we get the results, this variable changes to true and, in turn, the frontend displays the results:
  const handleSearch = async () => {
    document.querySelector("#inputField").value = "";

    const response = await axios.get(`http://localhost:5001/address`, {
      params: { address: searchInput },
    });

    setResult(response.data.result);
    setShowResult(true);
  };
Once setShowResults is set to true, the following line of code from the return portion of the “search.js” script renders the SearchResults component:
{showResult && <SearchResults result={{ result, searchInput }} />}
So, as for the “searchResults.js” script, the latter takes result and the searchInput parameters as props and neatly displays the transaction details. You can see how we neatly mimicked Etherscan in the demo below.
Final Build of Our Block Explorer
Using our scripts and following along in the above walkthroughs, you should now have built a block explorer without breaking a sweat. Also, if you’ve installed all the required dependencies and run the backend and frontend portions of your dapp, you should be able to take your Etherscan clone for a spin. So, by visiting “localhost:3000“, you get to interact with the frontend client:

As the above screenshot indicates, we urge you to search for any Web3 wallet address. For example, these are the results for Vitalik’s (founder of Ethereum) address:
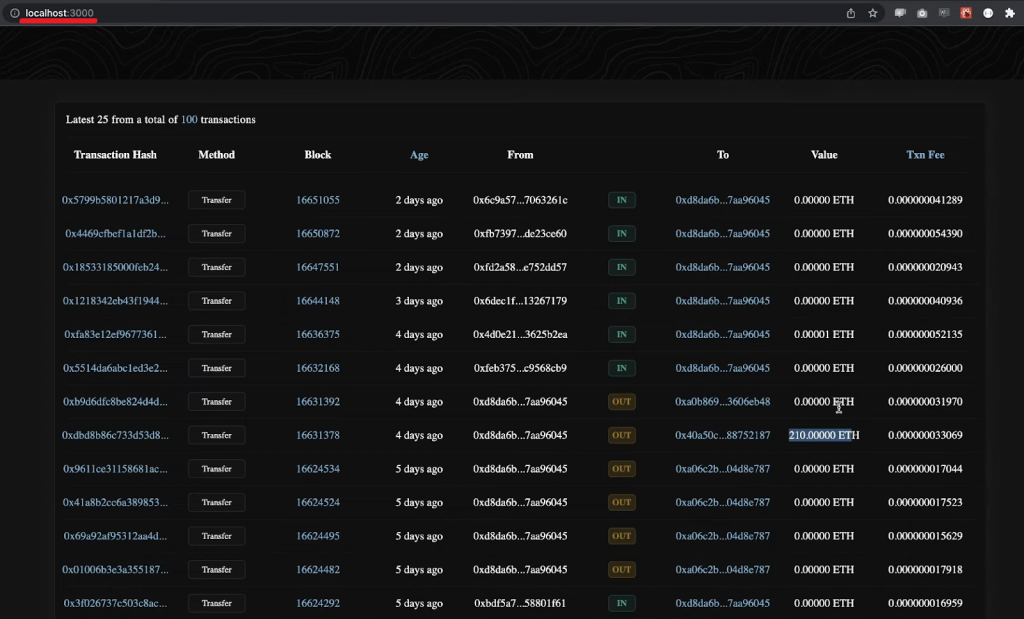
Looking at the above screenshot, you can see that we neatly displayed the details of transactions in a very similar manner as Etherscan does:
What is a Block Explorer?
A block explorer, also known as a blockchain explorer, is a special web application that enables visitors to explore on-chain data for the blockchain it serves. This means everyone with internet access can explore the publicly available details of Web3 wallets, smart contracts, transactions, and more. Some of the most popular block explorers include Etherscan for Ethereum, BscScan for BNB Chain, PolygonScan for Polygon, Snowtrace for Avalanche, FTMScan for Fantom, and Arbiscan for Arbitrum. These tools can be practical for exploring on-chain activities, viewing various portfolios, checking the validity of transactions, and much more.

Benefits of Block Explorers
Here are some benefits of using a block explorer:
- Transparency – Block explorers provide a transparent view of the blockchain network. Users can view all the transactions and track their status. This allows users to verify the integrity of the blockchain and ensure that all transactions are legitimate.
- Security – An explorer ensures the security of the blockchain network by allowing users to track transactions and detect any suspicious activity.
- Efficiency – Block explorers provide a fast and efficient way to search the blockchain network. Users can quickly search for specific transactions or addresses and get detailed information about them. This can save users a lot of time and effort compared to manually searching through the blockchain.
- Analytics – Block explorers offer powerful analytics tools that allow users to gain insights into the blockchain network. Users can analyze transaction data, track trends, and identify patterns in the blockchain. This can help users make better decisions and optimize their blockchain strategies.
- Accessibility – As mentioned previously, block explorers are available to anyone with an internet connection. As such, it makes it easy for users to access and explore the blockchain network. Moreover, this promotes greater transparency and accessibility in the blockchain ecosystem.
Specialized Blockchain Explorers
Aside from the aforementioned block explorers, there are many others, including block explorers for non-EVM-compatible chains, such as Solana and Aptos. Essentially, every chain has its official block explorer. However, while these explorers tend to be quite powerful, they offer many options that can be confusing and “over the top” for many users. Plus, they don’t offer a great UX. This is another reason why it makes sense to build a block explorer that will best serve your targeted demographics.
A great example is our in-house dapp: Moralis Money, which we built to ensure firsthand that our Web3 APIs perform flawlessly. Moralis Money is an excellent token explorer for Ethereum and other leading EVM-compatible chains, featuring advanced search filters to easily find hidden gems (such as altcoins with promising potential). Make sure to check it out – new features will roll out shortly!

As you can see in the above screenshot, just like other block explorers, Moralis Money is open to everyone. Plus, it enables you to connect your wallets (e.g., MetaMask) to explore your own portfolios in a user-friendly manner. Once connected, you also get to collect magic beans daily. To find out about the power of Moralis beans, stay tuned!
How to Build a Block Explorer – Summary
In today’s article, you had a chance to build a block explorer that mimics some of Etherscan’s functionalities. Since we provided you with our scripts, you could have your own Etherscan clone ready in minutes. Essentially, you just had to clone our code, obtain your Web3 API key and store it into a “.env” file, install the required dependencies, and run the backend and frontend. You also learned what block explorers are and why it makes sense to build specialized blockchain explorers. Additionally, you also discovered Moralis Money!
Now that you have your Moralis Web3 API key, you can make the most out of Moralis’ toolbox and take your projects to the next level. For example, you can focus on building a block explorer to serve a specific purpose. However, there are countless other dapps you can create with this powerhouse in your corner. You can build a Web3 wallet, a portfolio tracker, or an NFT marketplace. Whatever type of dapp you decide to create, the Moralis docs will help you get to the finish line. If you need some ideas or inspiration, use our Web3 development video tutorials that await you on the Moralis Web3 YouTube channel.
Also, don’t forget to expand your blockchain horizons by exploring our crypto blog. Some of our latest articles focus on explaining how to get blockchain data for various networks (e.g., the Arbitrum testnet), develop DeFi projects, use an Oasis testnet faucet or Goerli faucet, what scaling solutions for Ethereum are, and much more. By exploring these articles and taking on our tutorials, you can become a Web3 developer for free using your legacy programming skills. Join the Web3 revolution today!
