This article will dive deeper into Web3 authentication and, more specifically, how to add Coinbase Wallet login functionality. In doing so, we will create a simple authentication application allowing users to log in, sign a message, and view user information. If you would like to skip the tutorial and jump straight into the code, you can visit the following GitHub repository:
Complete Authentication Application Documentation – https://github.com/MoralisWeb3/demo-apps/tree/main/nextjs_moralis_auth
If you look closer at the GitHub repo, you will quickly notice that it is related to MetaMask. Thus, you must adjust the code and add Coinbase Wallet as the provider. If you need help with this, follow along as we explore how to easily add Coinbase Wallet login functionality.
A unified identification layer is an excellent feature of Web3 as it allows users to interact with decentralized applications and other exciting Web3 projects through their Web3 wallets. As such, to create a compelling user experience, allowing users to authenticate their Web3 identity when using your applications is essential. A prominent example of this is Coinbase Wallet, which is where we are going to direct our attention in this article. More specifically, we will illustrate how to add Coinbase Wallet login functionality to all apps using Moralis!
Web3 authentication is only one of the areas in which Moralis shines. You will also highly benefit from Moralis if you strive to become a blockchain developer. For this reason, make sure to create an account with Moralis immediately. Doing so only takes a few seconds, and you can get started entirely free! Furthermore, if you want to create dapps, you can additionally use Moralis to easily implement Web3 syncs and Web3 webhooks. Moreover, these are just some tools and features that help bridge the gap between Web2 and Web3 in an accessible way!
What is Coinbase Wallet?
Before showing you how to add Coinbase Wallet login functionality to your dapps, we need to explore Coinbase Wallet. Hence, we will take this initial section to explore the intricacies of Coinbase Wallet. So, without further ado, let’s answer the question, ”what is Coinbase Wallet?”.
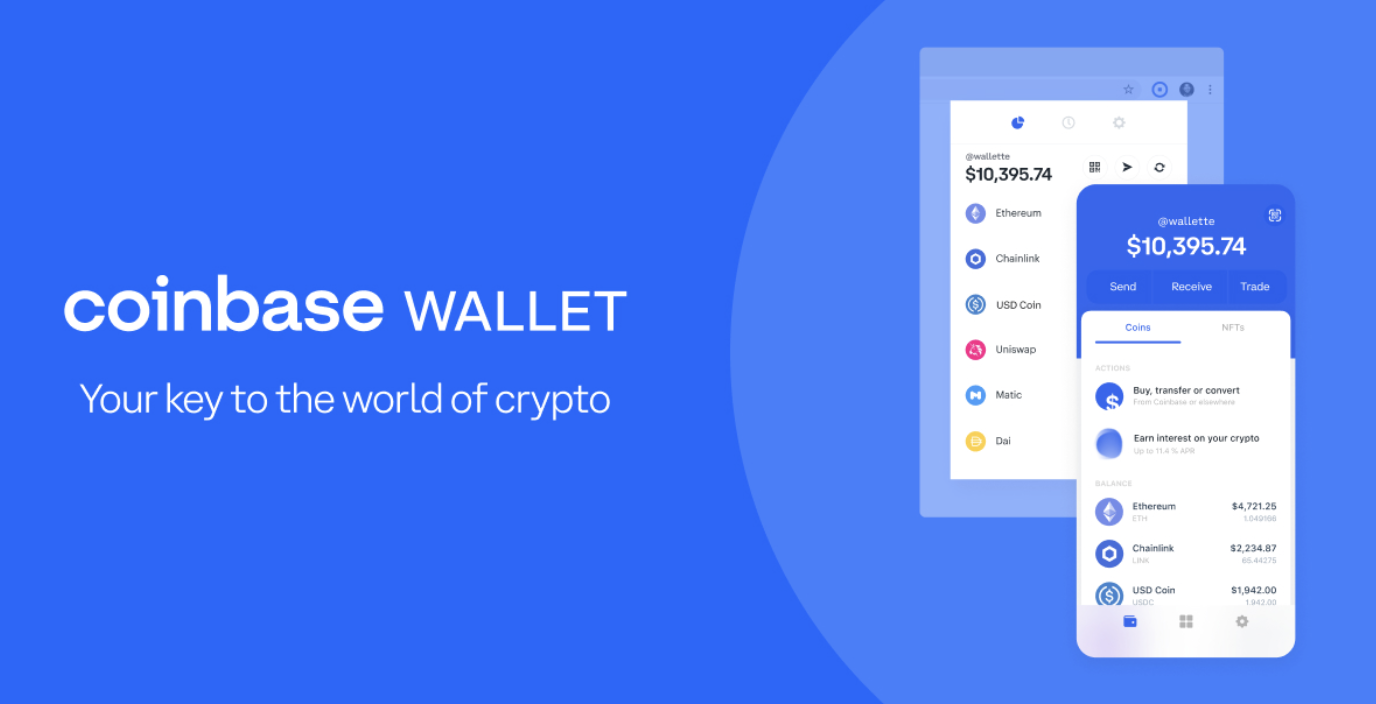
Coinbase Wallet is a multi-asset cryptocurrency wallet. Furthermore, the wallet provides a non-custodial service complementing Coinbase, a centralized cryptocurrency exchange. Also, Coinbase Wallet is one of the most significant Web3 wallets on the market, supporting hundreds of thousands of tokens and acts as a gateway to an entire ecosystem of dapps. Besides allowing you to store assets, Coinbase Wallet offers many additional features. Further, this includes an all-in-one place to sell, buy, and trade cryptocurrencies and NFTs. Moreover, as the wallet is a gateway to the Web3 realm, users have the potential to participate in play-to-earn gaming apps, vote on DAO events, earn APY on assets, etc., all through Coinbase Wallet.
As Coinbase Wallet provides a complete self-custody service, users are in full control and have unlimited access to all their assets at all times. Furthermore, Coinbase Wallet provides an intuitive user interface (UI) to handle assets and interact with Web3 dapps and services. As such, this wallet is a helpful onboarding tool for newcomers to the industry.
Coinbase Wallet is compatible with Ethereum and several other EVM-compatible chains such as BNB Chain, Polygon, Avalanche, etc. Moreover, you have the potential to interact with one Coinbase Wallet account over multiple devices. Also, you can either download and interact with the wallet as a browser extension or a mobile dapp on both iOS and Android smartphones.
With a better understanding of Coinbase Wallet, we can proceed to illustrate how you can add Coinbase Wallet login functionality with Moralis!
How to Add Coinbase Wallet Login Functionality with Moralis
In this tutorial, we will closely examine how Moralis’ Web3 authentication works. To demonstrate how easy it is to add Coinbase Wallet login functionality with Moralis’ Auth API, we are going to add secure authentication to a Next.js application. As we do so, we will walk you through creating a full-stack Web3 authentication app with the prominent Next.js framework.
The application we are looking to create will allow users to log in using Coinbase Wallet. Following the wallet authentication process, the next-auth library is responsible for creating a session cookie containing an encrypted JWT (JWE). That will include session info such as addresses, expiration times, and signed messages in the users’ browsers. Furthermore, this is a valid way of storing information regarding users without a database. Moreover, it is impossible to access or alter this data in the JWT without a key. Once a user authenticates themselves, they will receive access to a page that displays their user information.
To illustrate what we are working towards, we will supply screenshots herein showcasing the different pages:
Login Page:

User Session Page:

However, before we continue with the tutorial, you need to take care of a few prerequisites. First, you will need a Moralis account. Creating a Moralis account only requires a couple of clicks and is entirely free. With an account at hand, you need to install an IDE or integrated development environment. In this instance, we will use Visual Studio Code (VSC). Lastly, you also need a Next.js application. Moreover, if you want additional help with this, you can create the application using “create-next-app” or take a closer look at the Next.js dapp tutorial!
With all prerequisites finalized, we can take a closer look at how you can add Coinbase Wallet login functionality to your application.
Add Coinbase Wallet Login Functionality – Dependencies, Libraries, and Environmental Variables
If you have not already, the first thing you will need to do is to install a few dependencies. So, you can go ahead and install Moralis, next-auth, and axios. You can achieve this through the following command:
npm install moralis next-auth axios
To add Coinbase Wallet login functionality, you must also use a Web3 library. For this short tutorial, we will use Wagmi. As such, you will need to install a Wagmi dependency, which can be achieved through the following snippet:
npm install wagmi ethers
Furthermore, both of the previous commands are installed using npm; however, you have additional options here. For example, you can use both yarn and pnpm as well. For more information on this, please check out the documentation on how to sign in with MetaMask.
Lastly, you also need to add environmental variables to your ”.env.local” file in the application root:
APP_DOMAIN=amazing.finance
MORALIS_API_KEY=xxxx
NEXTAUTH_URL=http://localhost:3000
NEXTAUTH_SECRET=7197b3e8dbee5ea6274cab37245eec212
The ”NEXTAUTH_URL” variable in the snipper is set to ”http://localhost:3000”. This should be equal to your app address; however, you can leave it as is during the development stages.
What’s more, the ”NEXTAUTH_SECRET” variable can be set to any value and is used for encrypting JWT tokens of the users. If you would like, you can generate a value using the following link:
https://generate-secret.now.sh/32
Wrapping the App with SessionProvider/WagmiConfig and Request Message Endpoint
Now, you need to create a new “pages/_app.jsx” file. Following this, you must also wrap your pages with “SessionProvider” and “WagmiConfig“. After doing so, it should look like this in your application:
import { createClient, configureChains, defaultChains, WagmiConfig } from 'wagmi';
import { publicProvider } from 'wagmi/providers/public';
import { SessionProvider } from 'next-auth/react';

const { provider, webSocketProvider } = configureChains(defaultChains, [publicProvider()]);

const client = createClient({
  provider,
  webSocketProvider,
  autoConnect: true,
});

function MyApp({ Component, pageProps }) {
  return (
    <WagmiConfig client={client}>
      <SessionProvider session={pageProps.session} refetchInterval={0}>
        <Component {...pageProps} />
      </SessionProvider>
    </WagmiConfig>
  );
}

export default MyApp;
Once you have finalized wrapping the app with “SessionProvider” and “WagmiConfig“, you can proceed with creating a new API file, “pages/api/auth/request-message.js”. You then utilize this endpoint to send requests to “Moralis.Auth“. This will generate unique messages which are later signed on the client-side. Moreover, this is what it should look like in your repository:
import Moralis from 'moralis';

const config = {
    domain: process.env.APP_DOMAIN,
    statement: 'Please sign this message to confirm your identity.',
    uri: process.env.NEXTAUTH_URL,
    timeout: 60,
};

export default async function handler(req, res) {
    const { address, chain, network } = req.body;

    await Moralis.start({ apiKey: process.env.MORALIS_API_KEY });

    try {
        const message = await Moralis.Auth.requestMessage({
            address,
            chain,
            network,
            ...config,
        });

        res.status(200).json(message);
    } catch (error) {
        res.status(400).json({ error });
        console.error(error);
    }
}
Setting Up a Sign-In Page and NextAuth Configuration
Now that we’ve looked at the wrapping part, we can continue with the next step. Accordingly, in this section, you are going to create a sign-in page. So, you can continue by creating a new page file called “signin.jsx”, and this is the complete code for the sign-in page:
import { CoinbaseWalletConnector } from 'wagmi/connectors/coinbaseWallet'
import { signIn } from 'next-auth/react'
import { useAccount, useConnect, useSignMessage, useDisconnect } from 'wagmi'
import { useRouter } from 'next/router'
import axios from 'axios'

function SignIn() {
  const { connectAsync } = useConnect()
  const { disconnectAsync } = useDisconnect()
  const { isConnected } = useAccount()
  const { signMessageAsync } = useSignMessage()
  const { push } = useRouter()

  const handleAuth = async () => {
    if (isConnected) {
      await disconnectAsync()
    }

    const { account, chain } = await connectAsync({
      connector: new CoinbaseWalletConnector({
        options: {
          appName: 'youramazing.finance',
        },
      }),
    })

    const userData = { address: account, chain: chain.id, network: 'evm' }

    const { data } = await axios.post('/api/auth/request-message', userData, {
      headers: {
        'content-type': 'application/json',
      },
    })

    const message = data.message

    const signature = await signMessageAsync({ message })

    // redirect user after success authentication to '/user' page
    const { url } = await signIn('credentials', {
      message,
      signature,
      redirect: false,
      callbackUrl: '/user',
    })
    /**
     * instead of using signIn(..., redirect: "/user")
     * we get the url from callback and push it to the router to avoid page refreshing
     */
    push(url)
  }

  return (
    <div>
      <h3>Web3 Authentication</h3>
      <button onClick={() => handleAuth()}>Authenticate via Coinbase Wallet</button>
    </div>
  )
}

export default SignIn
In the code above, we made sure to extend the “handleAuth” functionality to call our “request-message” endpoint that we created in the earlier step. In addition, we made sure to add a “NextAuth” configuration, which we are also about to create. Accordingly, you can create another API file, “pages/api/auth/[…nextauth].js”. Moreover, it should have the following content:
import CredentialsProvider from 'next-auth/providers/credentials';
import NextAuth from 'next-auth';
import Moralis from 'moralis';

export default NextAuth({
    providers: [
        CredentialsProvider({
            name: 'MoralisAuth',
            credentials: {
                message: {
                    label: 'Message',
                    type: 'text',
                    placeholder: '0x0',
                },
                signature: {
                    label: 'Signature',
                    type: 'text',
                    placeholder: '0x0',
                },
            },
              async authorize(credentials) {
                try {
                  // "message" and "signature" are needed for authorisation
                  // we described them in "credentials" above
                  const { message, signature } = credentials;

                  await Moralis.start({ apiKey: process.env.MORALIS_API_KEY });

                  const { address, profileId } = (
                    await Moralis.Auth.verify({ message, signature, network: 'evm' })
                  ).raw;

                  const user = { address, profileId, signature };
                  // returning the user object and creating  a session
                  return user;
                } catch (e) {
                  console.error(e);
                  return null;
                }
              },
        }),
    ],
    // adding user info to the user session object
    callbacks: {
        async jwt({ token, user }) {
            user && (token.user = user);
            return token;
        },
        async session({ session, token }) {
            session.user = token.user;
            return session;
        },
    },
});
Creating a User Page
Lastly, this tutorial’s final step is creating a user page. Hence, we are going to create a new page called ”users.jsx”, and the file should look like this:
import { getSession, signOut } from 'next-auth/react';

// gets a prop from getServerSideProps
function User({ user }) {
    return (
        <div>
            <h4>User session:</h4>
            <pre>{JSON.stringify(user, null, 2)}</pre>
            <button onClick={() => signOut({ redirect: '/signin' })}>Sign out</button>
        </div>
    );
}

export async function getServerSideProps(context) {
    const session = await getSession(context);

    // redirect if not authenticated
    if (!session) {
        return {
            redirect: {
                destination: '/signin',
                permanent: false,
            },
        };
    }

    return {
        props: { user: session.user },
    };
}

export default User;
Now that is it for this short tutorial. At this point, you should know how to add Coinbase Wallet login functionality to all your future applications. However, we also need to ensure that the application works as intended. Thus, in the following section, we are going to look closer at how you can test this simple application.
Add Coinbase Wallet Login Functionality – Testing the Application
The last thing we must do is ensure that the application works as intended. So, to test the application, you can go ahead and visit the “http://localhost:3000/signin” page.
Once the application starts, you can click on the ”Authenticate with Coinbase Wallet” button on the page:

This should prompt your Coinbase Wallet and ask you to connect. Accordingly, all you need to do is press the ”Connect” button:

Following this, you need to sign the message. As soon as you sign the message and successfully authenticate, you should be redirected to the ”/user” page, which will look something like this:
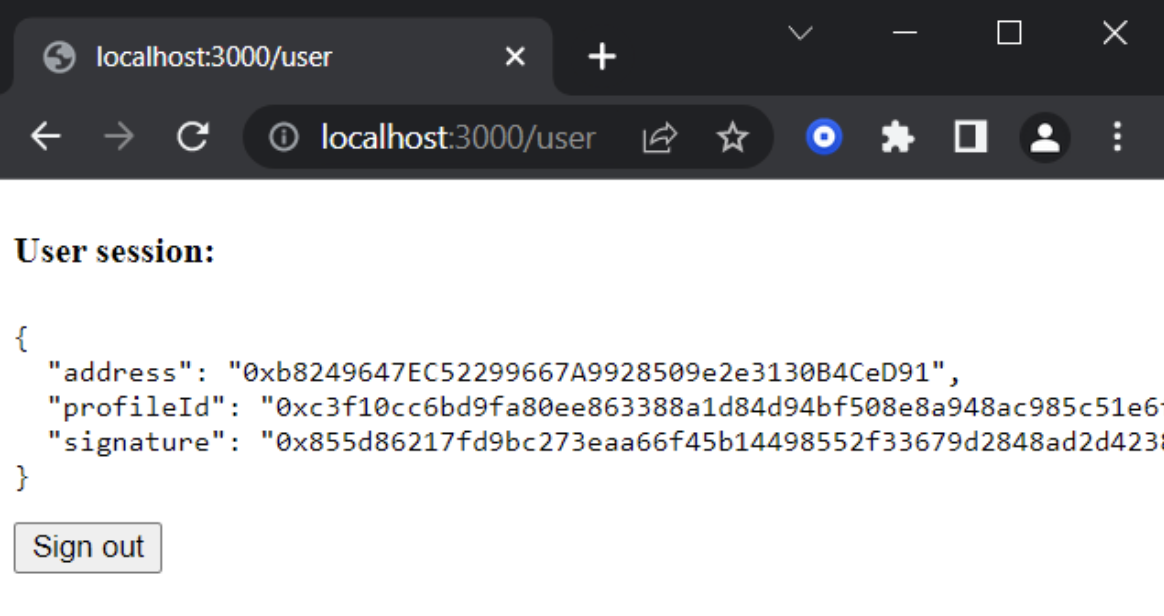
By looking at the image above, the user session includes an address, profile ID, and signature. What’s more, there is the option to sign out. You can also visit “http://localhost:3000/user” directly to ensure that there are no bugs. Furthermore, if a user is authenticated, it should display the user’s info; if not, this should direct us to the “/signin” page instead. Moreover, if you receive these results, the application works as it should. Hence, you have now successfully added Coinbase Wallet login functionality to your application. As a result, you can now add Coinbase Wallet login functionality to all future blockchain projects!
If you encounter any difficulties or issues, check out the complete GitHub repository and inspect the code in detail. What’s more, you can check out the official documentation for more information on how you can sign in with Coinbase Wallet. Moreover, if you would rather add the same functionality for other wallet alternatives, check out the official authentication docs. There, you will find further information on adding support for MetaMask, WalletConnect, RainbowKit, etc.
Add Coinbase Wallet Login Functionality – Summary
Web3 authentication, which allows users to sign in and access the extended ecosystem of dapps with their crypto wallets, is vital within the Web3 development space. Further, as an essential mechanism, we decided to dedicate this article to exploring Web3 authentication. As such, we took the opportunity to illustrate how you can add Coinbase Wallet login functionality to your applications.
In doing so, we created a simple Next.js application that allows users to sign in and authenticate themselves with their Web3 wallets. Once signed in, they could view information regarding themselves, such as an address, profile ID, and signature. Furthermore, we were able to implement this functionality with ease, thanks to Moralis’ Auth API. Accordingly, if you followed along through this tutorial, you are now hopefully capable of adding Coinbase Wallet login functionality to all your future blockchain projects.
However, Moralis’ Auth API is only one of many Moralis APIs you can explore. As such, if you are a Web3 developer, or want to become one, make sure to also check out the NFT API and EVM API. These are tools making both dapp and NFT development significantly more accessible.
What’s more, if you are interested in the latest and most relevant blockchain content, check out Moralis’ Web3 blog. For example, we recommend checking out our articles on blockchain syncs, NodeJS SDK for Web3, or how to pull data from Polygon blockchain.

Moreover, if you want to become more proficient in Web3 development, make sure to enroll in Moralis Academy. Moralis Academy offers a great selection of blockchain courses for both beginners and more experienced developers.
Nonetheless, if you want to learn more about blockchain development and become a Web3 developer, sign up with Moralis. Creating an account is free, and you can do so in seconds!
