Have you been wondering how to use a Web3 JS call contract function but couldn’t find a simple solution? If so, the following code snippet is all you need:
const response = await Moralis.EvmApi.utils.runContractFunction({
    abi,
    functionName,
    address,
    chain,
});
Thanks to the “runContractFunction” endpoint from Moralis, you can now use your JavaScript (JS) skills to interact with smart contracts. Now, if you’ve worked with Moralis before, you know exactly what to do with the above lines of code. However, if this is your first rodeo with this ultimate Web3 API provider, make sure to complete the tutorial presented in this article, which will teach you how to use a Web3 JS call contract function. To get ready for that feat, don’t forget to create your free Moralis account.
Overview
As you may know, JavaScript (JS) continues to be the most popular programming language for web development. Furthermore, thanks to exceptional solutions, like those offered by Moralis, JS is shaping to be the go-to language for decentralized applications (dapps) as well. Consequently, your JavaScript proficiency is all you need to join the Web3 revolution that’s already disrupting countless industries. Moreover, while smart contracts play a vital role in how things function on the blockchain, you don’t have to learn to write smart contracts to start creating killer dapps. Sure, down the road, you will probably tackle that aspect of Web3 development; however, you can build all sorts of dapps that interact with existing smart contracts. This is where a proper Web3 JS call contract function simplifies things.
Moving forward, we will first help you understand what a Web3 JS call contract function is in the first place. While covering that, you will also learn about “call” and “send” smart contract functions. Then, we will take you through a step-by-step tutorial to help you properly implement the above-presented code snippet. You will learn how to obtain your Moralis Web3 API key, install the JS SDK, and how to call smart contract function from JavaScript through an example NFT project. By completing this tutorial, you’ll be ready to utilize the rest of Moralis’ API. Moreover, this is where the EVM API documentation will help you take things to the next level.

JavaScript (JS) for Web3 Contract Functions
JavaScript is the leading programming language and is also quite influential and impactful. Hence, using it with Web3 programming can speed up the adoption of new technologies. However, before you start working with a Web3 JS call contract function, you need to understand what Web3 contract methods or functions are. To understand the latter, you need to know the basics of Web3 and smart contracts.
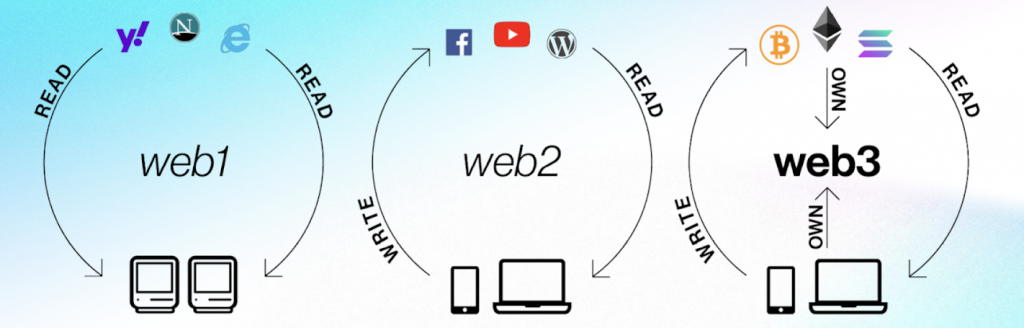
Web3’s emerging iteration of the web was initiated with the birth of blockchain technology. While Web1 was read-only, it evolved into Web2, which perfected read-write functionalities. Also, note that Web2 is the internet that most users utilize. However, Web3 is evolving fast as more and more people start to appreciate its potential. Furthermore, Web3 takes the features of Web2 and adds the ownership component through decentralized networks such as Ethereum. Of course, we are still in the early phase of the Web3 era, where mainly devs and tech-savvy individuals use the decentralized internet. That said, blockchain use cases, such as transactions via Bitcoin without intermediaries, and NFTs where users can actually own items 100%, are making a lot of noise, and mainstream adoption is poised to happen in the upcoming years.
Furthermore, programmable blockchains (Ethereum, BNB Chain, Polygon, etc.) support on-chain pieces of software or programs known as smart contracts. These Web3 contracts automate all sorts of outlined actions as predefined conditions finalize. Consequently, these on-chain contracts seem to be the key to establishing an automated, fair, and transparent future.

What is a Web3 JS Call Contract Function?
By this point, you know what JS, Web3, and smart contracts are. Hence, we only need to address the functions to complete the puzzle. However, you probably already know that functions (in programming) are sets of instructions that perform various tasks. It’s worth mentioning that while there are some technical differences between functions and methods, you’ll see the terms used interchangeably more often than not.
All in all, Web3 contract functions or methods are parts of smart contracts. At the same time, the “Web3 contract functions” term also refers to Web API functions or methods that enable interaction with smart contracts. Furthermore, “JS” indicates that you can use JavaScript to work with those functions. Nonetheless, the “call” word focuses on the “call” functions, which concentrate on particular types of smart contract functions. Now, let’s hone in on “call” and “send” functions in the following section.
Call vs Send – Their Differences and Benefits
Above, we mentioned “call” functions. These types of functions are responsible for interacting with the “read” functions of smart contracts. Essentially, these are read-only functions that do not involve the process of sending transactions. Thus, you can call them without executing a blockchain transaction. Moreover, since these functions do not involve on-chain transactions, they don’t modify the state of the blockchain (contract’s storage). Hence, we use “call” when we want to read contract data. So, a Web3 JS call contract function can be used to trigger smart contracts’ “read” functions to fetch specific storage variables of the deployed smart contract.
Note: The “Moralis.EvmApi.utils.runContractFunction” method provided at the top of the article is a Web3 JS call contract function. By definition, it can only be used to call “read” contract functions.
Smart contracts also include “write” functions, which involve sending on-chain transactions. As such, the “write” smart contract functions change the contract’s storage. They do so by executing on-chain transactions, which become part of the updated state of the blockchain. Furthermore, the Web3 JS methods that trigger “write” are known as the “send” function.

Smart Contract Example
The above definitions of “call” and “send” clarifies the core difference between the two types of functions. It also depicts the core benefit of each type – the non-invasiveness of one and the power to change the state of the blockchain of the other. In addition, a Web3 JS call contract function also doesn’t require any gas fees. Nonetheless, we believe that looking at an actual smart contract can further clear the air. That said, the contract we’ll look at is the smart contract we’ll focus on in the upcoming tutorial.
The following screenshots should be clear. Yet, we recommend visiting Etherscan to explore various smart contracts. Moreover, we randomly decided to focus on the “Cool Cats” NFT example:

When we scroll down on the above page, we get to the following menu bar:

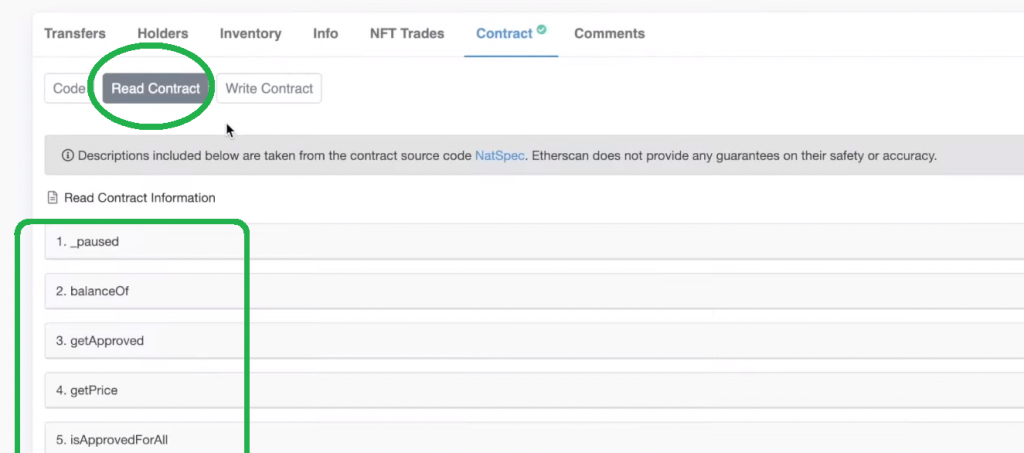
As the screenshot suggests, we need to select the “Contract” tab. By doing so, we get to see the “Code”, “Read Contract”, and “Write Contract” options. The first option lets you view the complete code of the selected smart contract. On the other hand, the second and third options enable you to interact with the contract via its “read” and “write” functions. Essentially, this section of Etherscan enables you to “manually” do what Web3 call/send contract functions automate.
If you again focus on the above image, you can see the “Connect to Web3” button. The latter appears when we select the “Write Contract” option. This is an indication that we must connect our Web3 wallet. After all, if we want to execute this function, we must pay the related transaction fees. However, when we select the “Read Contract” option, there’s no “Connect to Web3” button. Moreover, we can call any of the listed functions:
How to Use a Web3 JS Call Contract Function
Finally, it’s time we show you how to use the Web3 JS call contract function from the top of the article. If you remember, that function utilizes Moralis’ “runContractFunction” endpoint. So, we encourage you to visit that endpoint’s documentation page. However, the following screenshot shows the gist of the documentation page to run contract function:
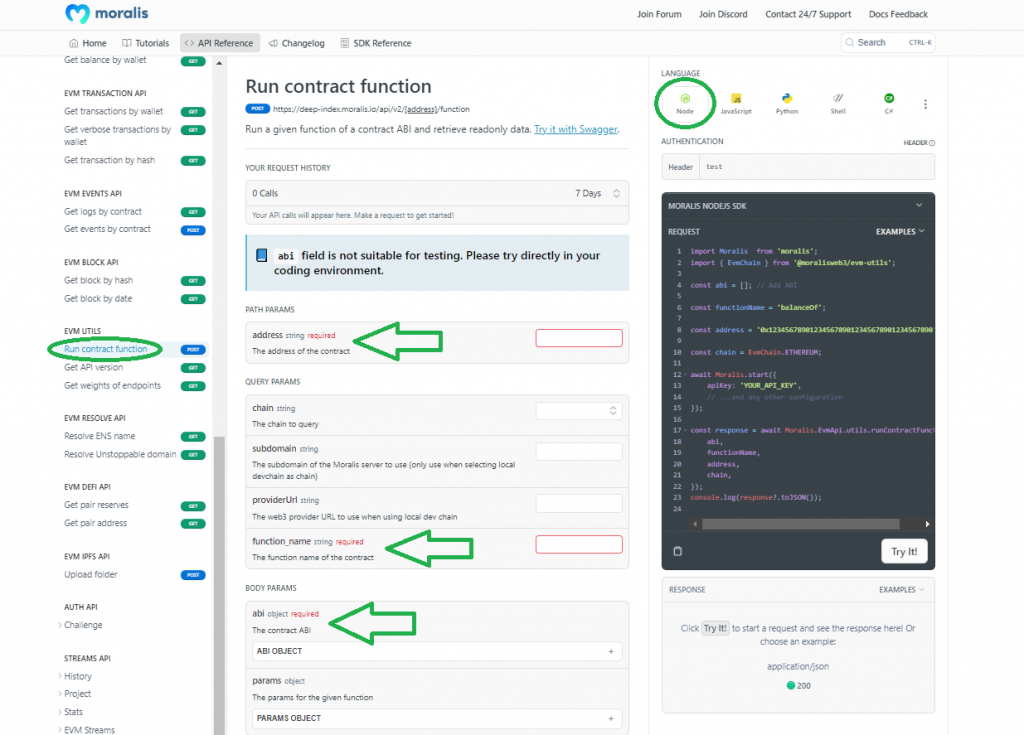
By looking at the image above, you can see that the “Moralis.EvmApi.utils.runContractFunction” Web3 JS call contract function requires three parameters. We need the address, function name, and ABI. In addition, it also takes in some other optional parameters (feel free to explore them on your own).
However, let’s now focus on implementing the code we can copy from the above “Request” field. If you decide to follow our lead, you will complete the following steps:
- Initialize a NodeJS project
- Install the Moralis SDK
- Get your Moralis Web3 API key (this is your gateway to the best Ethereum API in 2023)
- Obtain a smart contract’s ABI
- Implement the “runContractFunction” Web3 JS call contract function
Initialize a NodeJS Project
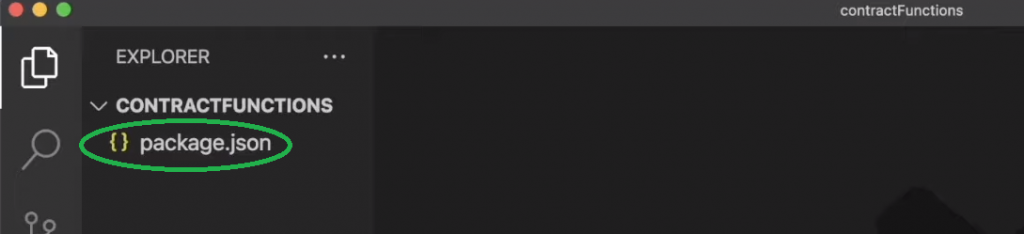
First, create your “ContractFunctions” folder and use Visual Studio Code (VSC) or your favorite code editor to open it. Next, use your terminal and enter the following command:
npm init -y
The above command will initialize a NodeJS project, which will be reflected in the newly-created “package.json” file:
Then, create a new “index.js” file in the same folder. You can do that manually or by using this command:
touch index.js
Install the Moralis SDK
The following command will install Moralis’ SDK and the “dotenv” dependency:
npm i moralis dotenv
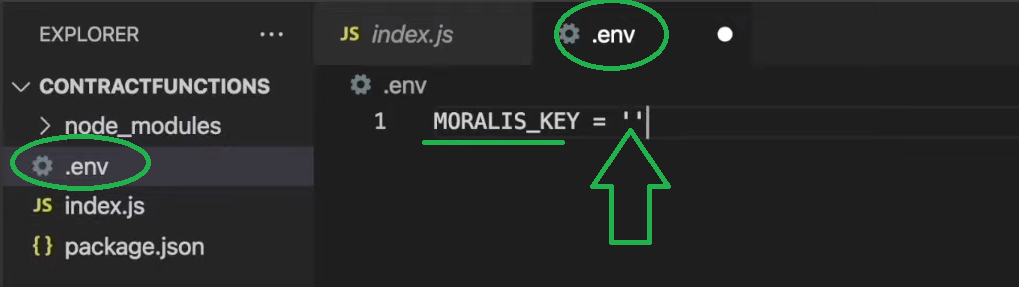
Make sure to also create your “.env” file. Don’t forget to create the “MORALIS_KEY” variable inside that file:
As the above screenshot indicates, you need to get your Moralis Web3 API key next.
Get Your Moralis Web3 API Key
In case you haven’t created your free Moralis account, make sure to do so now. With your account up and running, you’ll get to access your Moralis admin area. From there, you’ll get to obtain your Web3 API key in the following two steps:
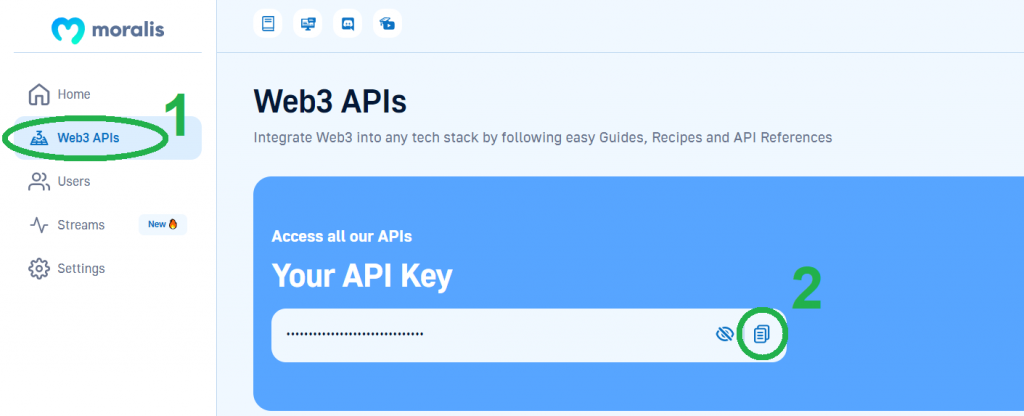
Then, simply paste the key into the “.env” file. Moving on, open your “index.js” file and implement the code that will support using the Web3 JS call contract function. So, start by importing Moralis and requiring “.env”:
const Moralis = require(“moralis”).default;
require(“dotenv”).config();
Obtain a Smart Contract’s ABI
As mentioned, we will use the “Cool Cats” NFT project as an example. So, return to the Etherscan page we explored above. This time, you need to focus on the “Code” option and scroll down to the “Contract ABI” section. Then, copy this contract’s ABI:

Moving forward, paste the above-copied ABI into a new file (“abi.json”). Next, rearrange the content into lines by pressing “Shift+Option+F” on Mac (or Windows/Linux equivalent) and save the changes. Nonetheless, you can also search for “getPrice” – this is the function name we will focus on. Moreover, this is the “read” type of the smart contract method:

Implement the “runContractFunction” Web3 JS Call Contract Function
With an example ABI set in place, you can implement the “runContractFunction” Web3 JS call contract function. Open the “index.js” file and appoint “ABI” to the above-created “abi.json” file:
const ABI = require(“./abi.json”);
Finally, you get to implement the code snippet from the top of the article. For the sake of this example project, we will do this inside “Moralis.start“, which will also initialize Moralis’ EVM API using your Web3 API key:
	Moralis.start({
		apiKey: process.env.MORALIS_KEY
	}).then(async()=>{

		const response = await Moralis.EvmApi.utils.runContractFunction({
    address: “0x1A92f7381B9F03921564a437210bB9396471050C”,
    functionName: “getPrice”
    abi: ABI
});

console.log(response.raw)

	})
The lines above were the final piece of today’s puzzle. Accordingly, you may now run your script with the following command:
node index.js
Look at your terminal to view the results, which should display the initial token price for “Cool Cats” NFTs:

Note: Do not let the above zeros fool you. They are related to the fact that the prices in ETH are displayed with 18 decimal places. Thus, the above value equates to 0.02 ETH.
If you are more of a video person, use the video below to explore today’s tutorial in depth. Starting at 6:36, you will get to use the “runContractFunction” endpoint to call another “read” contract function. Furthermore, the video will also show you how to utilize the above-presented results in one of many ways (8:45).
How to Use a Web3 JS Call Contract Function – Summary
Throughout the sections above, you had an opportunity to learn how to use JavaScript to interact with smart contract functions. Along the way, you learned the basics of Web3, smart contracts, and their “read” and “write” methods. You also learned what “call” and “send” Web3 functions are. Finally, you had an opportunity to work with Moralis’ Web3 JS call contract function.
If you enjoyed today’s tutorial, make sure to explore the Moralis docs further. Also, we encourage you to expand your blockchain development horizons by visiting the Moralis YouTube channel and the Moralis blog. These two outlets cover countless topics. For instance, some of the latest articles focus on an ethers.js tutorial and a Web3 py tutorial. In addition, you can learn how to get all transfers of an NFT and much more. Nonetheless, you can also take a more professional approach to your crypto education by enrolling in Moralis Academy. Aside from learning about blockchain fundamentals, this is also the place to master DeFi.
