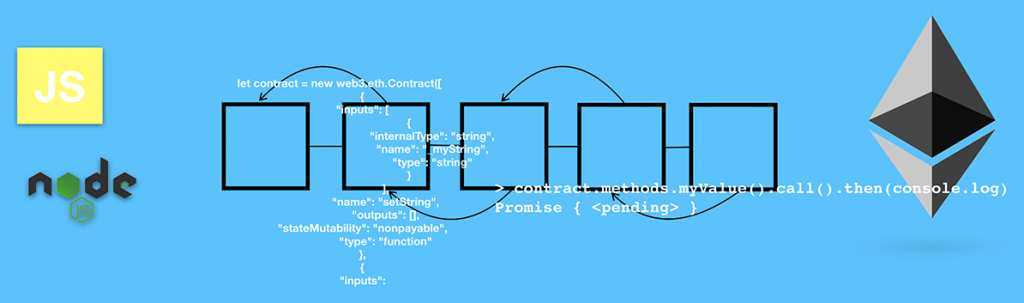
When building dapps on Ethereum, you will at some point have to deal with Web3 contracts. Thanks to Moralis, handling Web3 contract methods is easy, and with the following code snippet, you can run Web3 methods on Ethereum or execute other EVM-compatible smart contracts:
const response = await Moralis.EvmApi.utils.runContractFunction({
    abi,
    functionName,
    address,
});
If you’ve worked with Moralis before, you know exactly how to use the above lines of code. On the other hand, if you’re new to Moralis, go through the upcoming sections to master the basics. Also, make sure to complete the tutorial waiting for you herein. As a result, you’ll be able to run Web3 contract methods quickly and easily! That said, create your free Moralis account and follow our lead.
Overview
Blockchain technology is evolving fast and is shaping the new generation of the web – Web3. While we may still be in the early stages of the Web3 revolution, blockchain programming has already come a long way. Hence, we now have many excellent tools that enable devs to build decentralized applications (dapps) without reinventing the wheel. Moralis – the ultimate Web3 API provider – is one of the core tools. Thanks to its ever-evolving EVM API, Ethereum development feels like a breeze! Moreover, in this article, we’ll utilize this tool as we hone in on running Web3 contract methods.
We will start today’s topic by explaining what Web3 contract methods are and how they work. Then, we will take on a Web3 JS tutorial showing you how to utilize the “runContractFunction” EVM API endpoint. Hence, you’ll learn how to use your JavaScript proficiency to run read-only Web3 methods with your “.js” scripts.

What are Web3 Contract Methods?
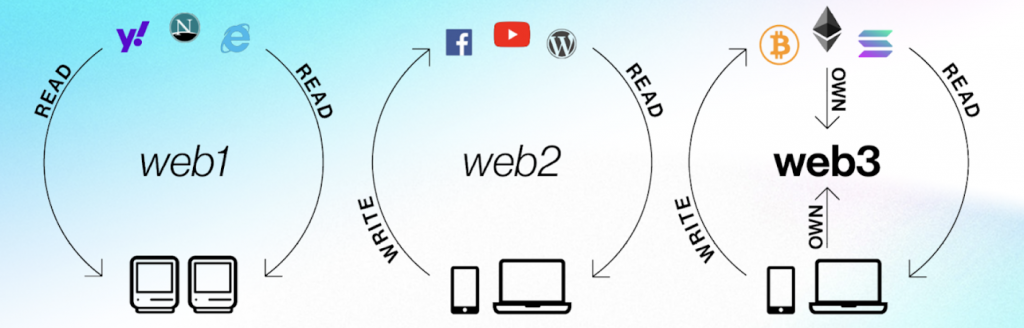
Looking at the “Web3 contract methods” phrase, you can see it consists of three words. As such, it’s important to understand what “Web3”, “contract”, and “methods” are. Then, you’ll be able to put it all together. We’ve already mentioned above that Web3 is the new iteration of the web. It is a natural evolution of the internet initiated with the implementation of blockchain technology. However, it all started with Web1, which was read-only. Next, Web2 emerged with its read-write functionality, which is still the web most people use today. However, more and more devs and users are starting to see the power of Web3, which adds the component of ownership.
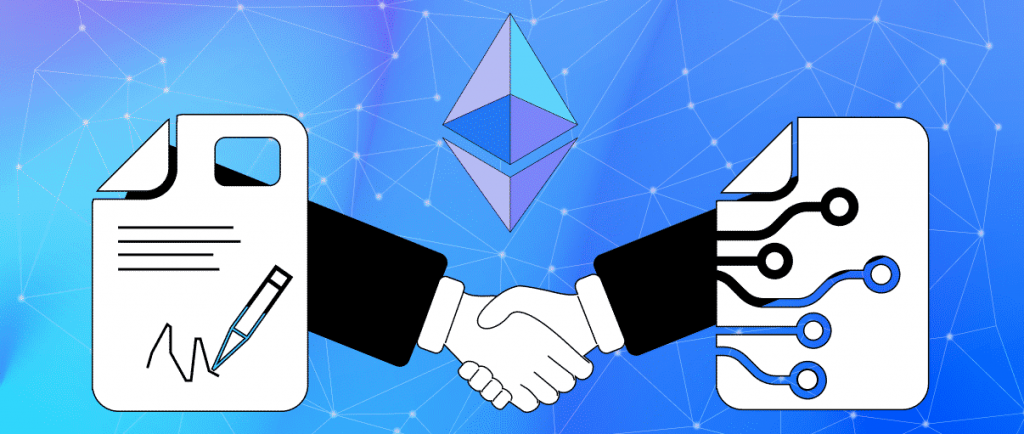
Furthermore, programmable blockchains are at the core of Web3, with Ethereum leading the pack. These programmable blockchains enable devs to deploy on-chain pieces of software or programs. The latter are known as smart contracts or Web3 contracts that automate various actions. Essentially, smart contracts trigger predefined actions as predefined conditions finalize. As such, Web3 contracts are set to be the key to automating the future in a transparent and just manner.
Nonetheless, methods are a lot like functions – they are sets of instructions that perform tasks. However, the core difference between functions and methods is that the latter are associated with objects, while functions are not. Furthermore, functions are defined outside of classes. On the other hand, methods are defined inside of classes and are a part of them. However, despite these differences, you will often see the words “functions” and “methods” used interchangeably.
So, Web3 contract methods are methods (or functions) that are part of smart contracts that can enable interaction with smart contracts. That said, in this article, we will focus on “call” methods, which do not involve sending transactions; they’re known as read-only methods.

How Do Web3 Methods Work?
In the previous section, we mentioned “call” methods, but we also have the “send” Web3 contact methods. To explain how Web3 methods work, we need to look at both of these types of methods. So, we use “call” to read contract data. This also means that these methods do not modify the contract’s storage (blockchain state). Hence, there’s no transaction involved with these methods. Essentially, they just read various storage variables of the deployed smart contract. Moreover, “Moralis.EvmApi.utils.runContractFunction” is that type of method. Among other parameters, it uses an ABI (application binary interface). With that in mind, these methods work with “read-only” functions inside smart contracts.
On the other hand, “send” methods interact with smart contracts. They change the contract’s storage by executing on-chain transactions. Accordingly, this type of method triggers “write” functions inside smart contracts.
To better understand how Web3 methods work, it helps to look into smart contracts further. Thus, we encourage you to use Etherscan and explore various smart contracts. For instance, you can look at at the “Cool Cats” NFT example:

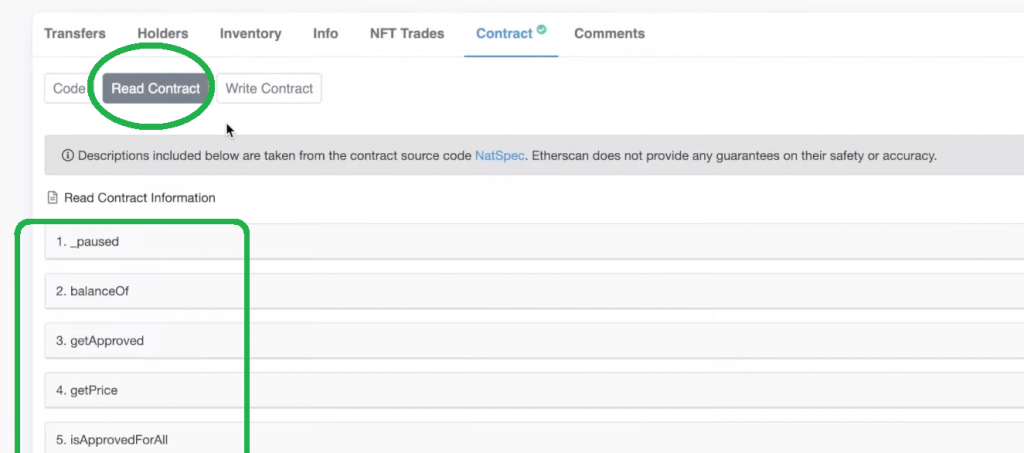
Once on the page, scroll down and select the “Contract” tab:

Looking at the above screenshot, you can see the “Read Contract” and “Write Contract” options. They correspond to the “read-only” or “read” functions and “write” functions that are inside this smart contract. Furthermore, the “Connect to Web3” button appears when you select the “Write Contract” option. This indicates you must connect your Web3 wallet to confirm the related transactions and cover their fees.
On the other hand, there’s no “Connect to Web3” button under the “Read Contract” option. However, you do get to see all the read-only Web3 contract methods that this particular smart contract includes:
Web3 Contract Methods Tutorial – How to Run Web3 Methods on Ethereum
Now that you know what Web3 contract methods are and how to explore smart contracts to know what options they offer, it’s time we focus on today’s tutorial. Accordingly, we’ll take you through the steps you need to complete to use the “runContractFunction” endpoint presented at the top of this article. Moreover, for the sake of this tutorial, we will focus on the “Cool Cats” NFT smart contract from the previous section. Of course, you can use this particular Moralis endpoint to focus on any other EVM-compatible smart contract that includes read-only functions.
Let us start by visiting the documentation page to run the contract function:
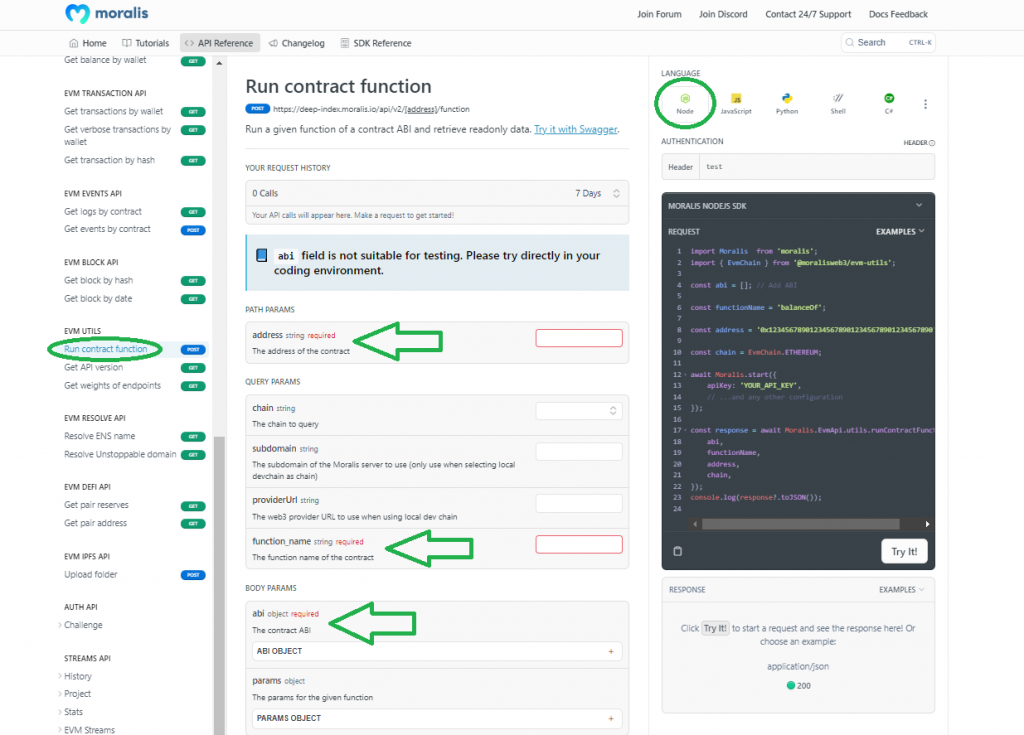
As the above screenshot indicates, to use this Web3 contract method, we need to provide the required parameters. These include a smart contract’s address, function name, and the contract’s ABI. There are some other optional parameters that you may explore on your own. Let’s just briefly talk about the chain parameter. By default, Moralis’ EVM API focuses on Ethereum, but you can use this parameter to focus on any other supported EVM-compatible chain.

All in all, the “runContractFunction” endpoint enables you to incorporate the same functionality that you can manually explore on Etherscan via the “Read Contract” option (as presented above). Furthermore, on the top-right side of the above documentation page, you can select the programming language and frameworks you want to work with. However, in this tutorial, we’ll focus on NodeJS.
Example Project: Incorporating Web3 Contract Methods in a NodeJS Dapp
This section will teach you how to create a NodeJS dapp and properly incorporate the “runContractFunction” endpoint. You will also learn how to obtain your Moralis Web3 API key – the gateway to using the best Ethereum API in 2023. So, let’s open Visual Studio Code (VSC) and dive right in.
You can follow our lead and create a “ContractFunctions” folder and open it in VSC. Then, use your terminal to initialize a NodeJS project by entering the following command:
npm init -y
As a result of running the above command, you’ll see a “package.json” file in your file tree:

Next, initialize an “index.js” file by using the command below:
touch index.js
You’ll use the “index.js” script to write the logic related to this example project. However, before you start coding, make sure to install all the required dependencies:
npm i moralis dotenv
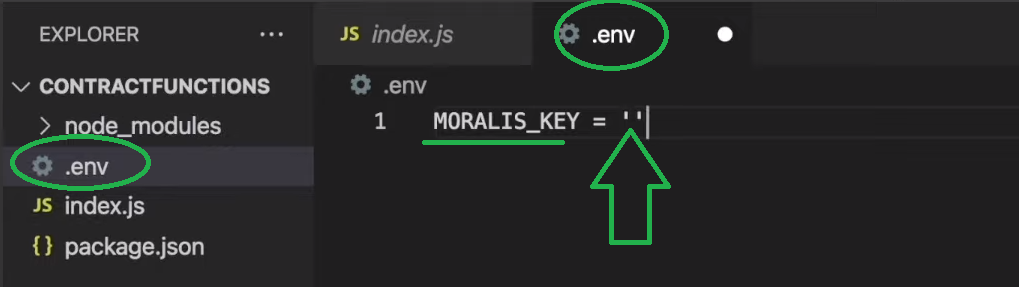
Nonetheless, also create your “.env” file and populate it with “MORALIS_KEY = ””:
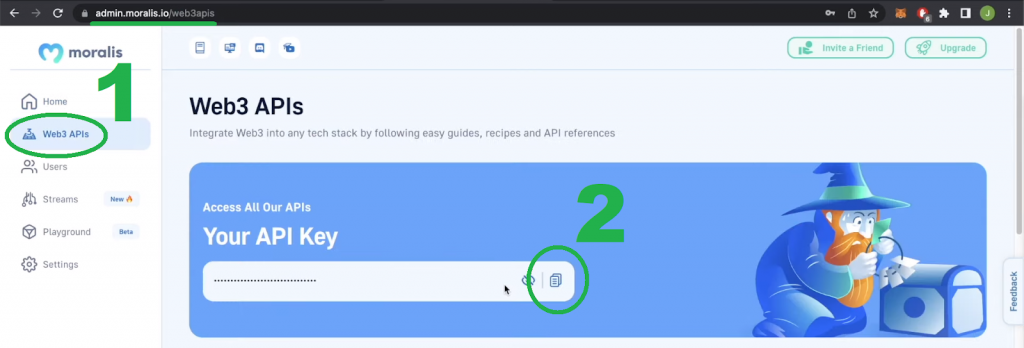
As the value for this environment variable, you need to enter your Moralis Web3 API key, which you can obtain in two simple steps (see the image below). However, before you can access your Moralis admin area, you need to create your free Moralis account. So, in case you haven’t done so yet, use the link in the introduction or visit Moralis’ homepage and click on the “Start for Free” button.
With your Moralis API key in place, open your “index.js” file. Then, import Moralis and require “.env”:
const Moralis = require(“moralis”).default;
require(“dotenv”).config();
The next step is to define the ABI you want to focus on. We recommend you follow our lead and use the “Cool Cats” contract.
Obtaining a Smart Contract’s ABI
Revisit the “Cool Cats” contract’s Etherscan page and select the “Code” option next to the above-covered “Read Contract” and “Write Contract” options:
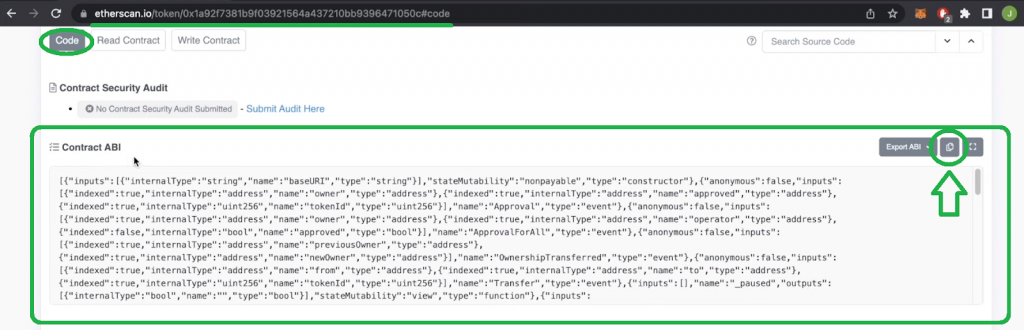
By scrolling down the “Code” page, you’ll get to the “Contract ABI” section (see the image above). Then, use the copy icon to copy this ABI. Next, return to VSC and create a new file. You can call it “abi.json” and paste the copied ABI into that file. Moving on, press “Shift+Option+F” on Mac (or Windows/Linux equivalent) to rearrange the content into lines. Once you’ve saved the changes, you can search for “getPrice“, and you can locate one of this contract’s Web3 contract methods or functions:

Furthermore, “getPrice” is the first method we will focus on when implementing the “runContractFunction” endpoint.
Implementing the “runContractFunction” Endpoint
Return to your “index.js” file and create a new “ABI”:
const ABI = require(“./abi.json”);
Next, you will initialize Moralis using your Web3 API key and create an async function. Inside the latter, you’ll use the “runContractFunction” endpoint and the “Cool Cats” contract’s details. So, these are the lines of code you need to add:
Moralis.start({
 apiKey: process.env.MORALIS_KEY
}).then(async()=>{

const response = await Moralis.EvmApi.utils.runContractFunction({
 address: “0x1A92f7381B9F03921564a437210bB9396471050C”,
 functionName: “getPrice”
 abi: ABI
});

console.log(response.raw)

})
With the above lines of code in place, you are ready to use the following command to run your script:
node index.js
As a response, you should see the initial token price for “Cool Cats” NFTs in your terminal:

When we also consider that the prices in ETH are displayed with 18 decimal places, the above result tells you that the initial price was 0.02 ETH.
If you want to learn how to use the “runContractFunction” endpoint for the “tokenURI” function, use the video below (starting at 6:36). Moreover, you’ll learn how to properly work with its kinds of methods since that Web3 contract method uses an additional parameter.
Last but not least, starting at 8:45, the video will demonstrate a neat example of how you can use the above-obtained initial price in combination with Moralis’ “getNFTLowestPrice” NFT API endpoint. Of course, that’s just one of the countless options to further utilize the power of “runContractFunction“. When combining all Web3 contract methods with Moralis’ Ethereum Web3 API, the sky’s the limit.
Exploring Web3 Contract Methods – How to Run Web3 Methods on Ethereum – Summary
In today’s article, we took on quite a journey. First, we ensured we got you all on the same page by covering the basics. As such, we explained what Web3 contract methods are and how they work. Then, you had a chance to follow our lead and create a simple NodeJS dapp. The latter focused on the “Cool Cats” contract’s “getPrice” call method. By completing this challenge, you now know how to use Moralis’ EVM API to call read-only Web3 contract methods.
If you are serious about using Moralis to develop dapps the easy way, make sure to dive deep into the ultimate EVM API documentation. This is the place to test all of Moralis’ Web3 API endpoints and tackle the widest scope of Web3 tutorials. In addition, we recommend exploring other blockchain development topics covered by the Moralis YouTube channel and our crypto blog. For example, some of the latest articles compare ethers.js vs Web3 streams and Web3.js vs ethers.js. Plus, you can read up on getting the token balance of an address, getting all tokens owned by a wallet, how to listen to the blockchain, and much more.
However, if you are interested in going full-time crypto with confidence and credibility, you should consider enrolling in Moralis Academy. This is the place where you and your entire team can become blockchain-certified and future-proof your business. You can find many courses at the academy, and we recommend starting with the fundamentals. That said, given the financial crises that the world is facing, now might be the best time to master DeFi.
