If you want to get into Web3 development and start building dapps, you’re in the right place, as this comprehensive Web3 JavaScript tutorial breaks down the entire process of creating a dapp using JavaScript (JS) from scratch. In addition to breaking down the process, we’ll first look at some basics regarding Web3 and JS. However, if you have prior experience with these, feel free to jump straight to the “Blockchain Developers Web3 JS Tutorial” section and learn how to create a dapp immediately!
Furthermore, the ”Blockchain Developers Web3 JS Tutorial” section illustrates how to build a dapp for fetching and displaying the native token, ERC-20 token, and NFT balances of a specified Web3 wallet. Also, to make the process straightforward, this article splits the tutorial into three steps:
- Creating a NodeJS dapp, installing Moralis, and setting up an Express server
- Integrating Moralis’ services
- Reading blockchain data
If the above steps look intriguing, follow along as we tackle this Web3 JS tutorial and show you how to build a dapp quickly!
Additionally, if you have further interest in Web3 development, check out more content here at Moralis’ Web3 blog. For example, read more about the Sui blockchain or learn how to upload files to IPFS! Moreover, if you want to become a Web3 developer and unlock the power of blockchain technology, sign up with Moralis. In doing so, you will access a more seamless developer experience, and integrate industry-leading Web3 infrastructure, allowing you to build faster and smarter!
Getting Started in Web3 Using JavaScript
If you are just starting to get familiar with the Web3 development space, you should know that there are several similarities between Web2 and Web3 development practices. Consequently, if you are an experienced developer, you will likely be able to use programming languages that you are already proficient in, and a prominent example is JavaScript (JS)!
On the other hand, if you are entirely new to the development space in general, it can be highly beneficial to start learning JS. Knowing how to use JS provides a good foundation for any development endeavors and is a great way to get started in Web3! If this sounds interesting, we highly recommend enrolling in Moralis Academy. The academy offers a selection of great blockchain courses for new and more experienced developers. For instance, check out the following JS course to kickstart your Web3 journey: ”JavaScript Programming 101”.
Furthermore, with JS proficiency, you can combine your programming language knowledge with Moralis’ excellent development tools – such as the various Web3 APIs – to create sophisticated blockchain projects. For example, with Moralis’ Web3 Streams API, you can easily stream blockchain data into the backend of your projects using webhooks.
Moreover, this article will show you the easiest way to get started in Web3 using JS to create a dapp that fetches blockchain data from a particular Web3 wallet. However, before doing so, we will return to basics and answer the question, ”what is Web3?”.
What is Web3?
Defining Web3 is not necessarily the easiest task, as many slightly contradictory definitions exist on the internet. However, a common denominator is that most people generally refer to Web3 as the ”third generation of the internet”. Nevertheless, to adequately answer the question, ”what is Web3?” and understand the benefits of this new phase, it is a good idea to start by explaining the preceding ”generations”.
- Web1 – Web1 was the initial generation of the internet, a phase characterized by the static delivery of information. Consequently, Web1 lacked interactive elements, and the internet was mainly a source for acquiring data and information.
- Web2 – With the introduction of social media, the web moved away from the static nature of Web1 and evolved into Web2. Web2 is still the predominant phase, and instead of being static, Web2 shifted the internet to be more dynamic by providing a more interactive web experience.
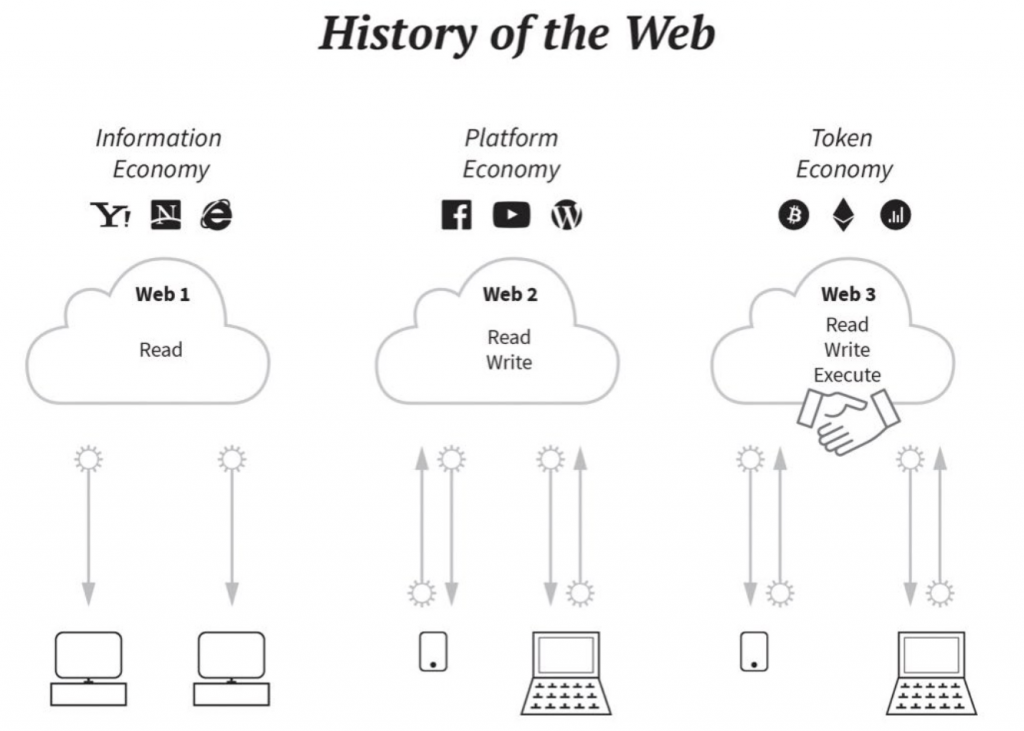
However, along with introducing a more dynamic web experience, Web2 is additionally characterized by centralization. Unfortunately, this has some negative drawbacks relating to, for example, transparency, privacy, and single points of failure.
The aforementioned issues are some of the factors currently driving the shift towards Web3, which instead is characterized by decentralization. Consequently, Web3 aims to realize a decentralized web powered by blockchain technology. Along with blockchain technology, Web3 additionally features dapps and smart contracts. These are two essential components for the Web3 ecosystem, which is why this article focuses on the former and outlines a Web3 JS tutorial for building dapps!
Before moving on to the central part of this tutorial, we will explore more about JavaScript, as this is one of the most commonly used languages, both within Web2 and Web3 development!
What is JavaScript?
JavaScript (JS) is an object-oriented programming language primarily used for web-based development. Furthermore, JS is well-established and currently one of the most popular languages within Web2 and Web3 development!
JS is often referred to as ”the third layer of the web” as the language can update CSS and HTML code. Consequently, JS allows developers to add interactive elements to websites/applications. As such, whenever you come across a webpage or app doing more than just displaying static content, you can almost always be certain that JS code is involved.
In addition, JS is text-based, making both using and learning the language relatively intuitive. Nevertheless, you can create dynamically updated content by using JS in your Web3 development endeavors. As a result, JS enables you to provide a more sophisticated user experience and increase user engagement!
JavaScript Web3 Example
With a more profound understanding of Web3 and JavaScript, it is almost time to delve deeper into the main part of this tutorial and show you how to create a dapp. However, before doing so, this section briefly covers the features of a straightforward dapp, as this shows an excellent example of how a JavaScript Web3 dapp can function. This is also the application you will learn to create if you follow along in the next sections!
Thanks to Moralis, you can develop dapps and other Web3 projects efficiently. The various tools of Moralis, such as the Web3 Authentication API, make it possible to quickly build multiple projects ranging from DEXs (decentralized exchanges) to NFT-related platforms.
However, for this Web3 JS tutorial, we will create a straightforward NodeJS dapp. More specifically, to showcase the accessibility of Moralis, you will learn to create a dapp for fetching and displaying the native token, ERC-20 token, and NFT balances of a particular crypto wallet. Furthermore, thanks to Moralis’ cross-chain capabilities, this JS tutorial works for almost any blockchain, including Polygon, Ethereum, BNB Chain, and several others!
If you complete the Web3 JS tutorial and create the application, you will have the opportunity to apply the same principles to any future projects. Moreover, you will learn how to set up a server-side JS dapp that can query any on-chain data, such as NFTs, tokens, balances, transactions, transfers, and more!
Nevertheless, let us jump straight into the tutorial and look closer at the necessary steps for creating this dapp!
Web3 JS Tutorial – A Step-by-Step Guide for Blockchain Developers
The following sections explore the central part of this tutorial to show you how to create your own dapp from scratch, and it’s divided into the following three steps to make it easier to follow along:
- Creating a NodeJS dapp, installing Moralis, and setting up an Express server
- Integrating Moralis’ services
- Reading blockchain data
However, before diving into this Web3 JavaScript tutorial, you must consider a few prerequisites. First up, you will need a Moralis account to join along. As such, if you have not already, sign up with Moralis straight away!
In addition to a Moralis account, you also need an IDE (integrated development environment). In our case, we will be using VSC (Visual Studio Code). If you opt for another IDE, note that the process might differ occasionally. Finally, you also need to install NodeJS. You can find the latest version of the NodeJS installer here.
That is it for the prerequisites! We can now progress and jump into this Web3 JS tutorial, starting by showing you how to create a NodeJS dapp!
Step 1: Creating a NodeJS Dapp, Installing Moralis, and Setting Up an Express Server
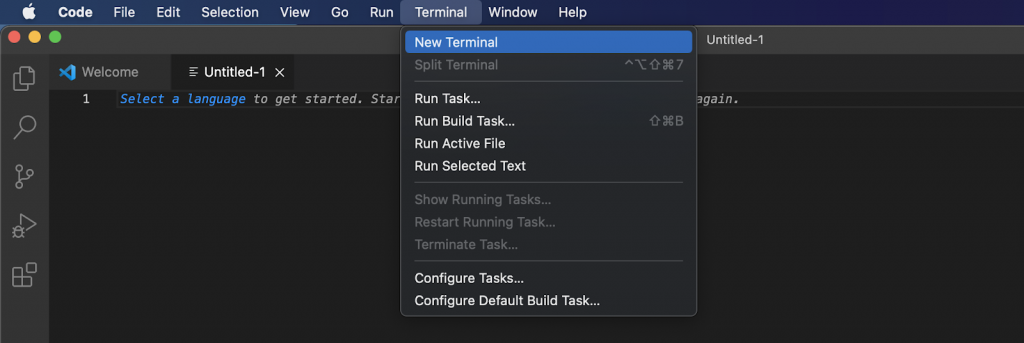
To kick things off, you can begin by setting up a new folder for your project. From there, open the folder in VSC (or any other IDE you might prefer) and initialize a new project. You can initialize the project by opening a new terminal and running ”npm init”. If you, like us, use VSC, open a new terminal by clicking on ”Terminal” at the top, followed by ”New Terminal”:
Once you run the command, name the file and fill in the details you want. When you hit enter for the final option, it should set up a new ”package.json” file in your local directory, which should contain code similar to the snippet below:
{
  "name": "simple-nodejs-demo",
  "version": "1.0.0",
  "description": "",
  "main": "index.js",
  "scripts": {
    "test": "echo \"Error: no test specified\" && exit 1"
  },
  "author": "",
  "license": "ISC"
}
With the project setup, progress by running the following command to install the Moralis and Express dependencies:
npm install moralis express
Lastly, set up an Express server by creating a new file called ”index.js” and adding the following content:
const express = require('express')
const app = express()
const port = 3000

app.get('/', (req, res) => {
  res.send('Hello World!')
})

app.listen(port, () => {
  console.log(`Example app listening on port ${port}`)
})
From there, add the script below to the ”package.json” file:
"scripts": {
  "start": "node index.js"
},
You should then be able to run the server by inputting the command below into your terminal and hitting enter:
npm run start
If everything worked correctly, you should now be able to launch the dapp by clicking on the following link: ”http://localhost:3000“. Currently, the dapp should only display the ”Hello World!” message!
That covers the first step of this Web3 JavaScript tutorial. The following step will show you how to integrate Moralis’ services!
Step 2: Integrating Moralis’ Services
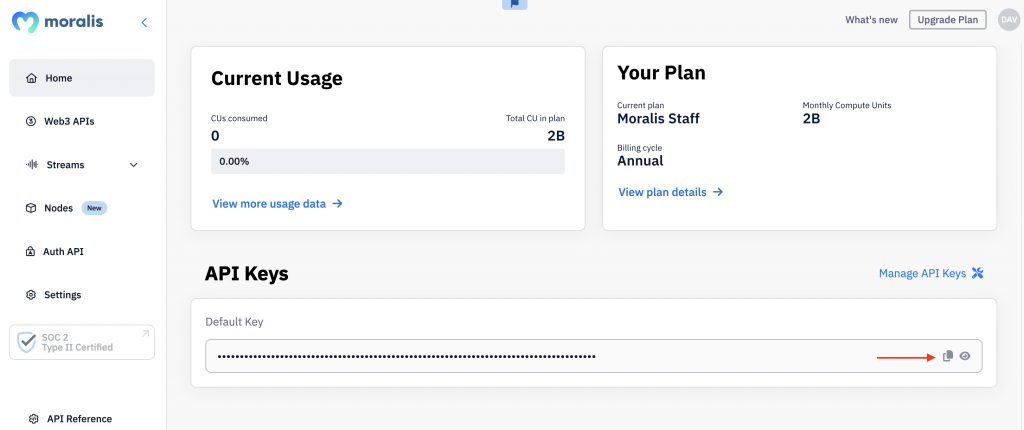
Now that you have a standard ”Hello World!” project at your disposal, it is time to add Moralis to your dapp. To do so, the first thing you will need is your Moralis Web3 API key. You can find the key by logging into Moralis and going to the “Home” tab:
With the API key, open your IDE and navigate to the ”index.js” file. From there, you can import and initialize Moralis by inputting the following code:
const express = require('express')
// Import Moralis
const Moralis = require('moralis').default
// Import the EvmChain dataType
const { EvmChain } = require("@moralisweb3/evm-utils")

const app = express()
const port = 3000

// Add a variable for the API key, address, and chain
const MORALIS_API_KEY = "replace_me"
const address = "replace_me"
const chain = EvmChain.ETHEREUM

app.get('/', (req, res) => {
  res.send('Hello World!')
})

// Add this a startServer function that initializes Moralis
const startServer = async () => {
  await Moralis.start({
    apiKey: 'xxx',
  })

  app.listen(port, () => {
    console.log(`Example app listening on port ${port}`)
  })
}

// Call startServer()
startServer()
As you will quickly notice, if you inspect the code snippet above, you will need to add some information to the code. First, make sure to add your API key to the ”MORALIS_API_KEY” variable and inside the ”Moralis.start()” function.
Additionally, add the address of the crypto wallet you want to monitor and receive blockchain data from. You also have the option to add other chains to the code if you would like. If this is the case, you can, for instance, replace ”EvmChain.ETHEREUM” with ”EvmChain.ROPSTEN” or ”EvmChain.BSC”.
This covers all the necessary configurations to the code for integrating Moralis. Now, all that remains is to add the functionality for fetching the on-chain data!
Step 3: Reading any Blockchain Data
With the Moralis services integrated, you can easily use Moralis’ Web3 APIs to fetch on-chain data. As such, it is now time to add functionality for fetching and displaying the native token, ERC-20 token, and NFT balances.
Thanks to Moralis, this is quite a straightforward task, and you can fetch all this data by creating a ”getDemoData()” function and adding it to the ”index.js” file just below the ”chain” variable. This is the entire code for the function:
async function getDemoData() {
  // Get native balance
  const nativeBalance = await Moralis.EvmApi.balance.getNativeBalance({
    address,
    chain,
  })

  // Format the native balance formatted in ether via the .ether getter
  const native = nativeBalance.result.balance.ether

  // Get token balances
  const tokenBalances = await Moralis.EvmApi.token.getWalletTokenBalances({
    address,
    chain,
  })

  // Format the balances to a readable output with the .display() method
  const tokens = tokenBalances.result.map((token) => token.display())

  // Get the nfts
  const nftsBalances = await Moralis.EvmApi.nft.getWalletNFTs({
    address,
    chain,
    limit: 10,
  })

  // Format the output to return name, amount and metadata
  const nfts = nftsBalances.result.map((nft) => ({
    name: nft.result.name,
    amount: nft.result.amount,
    metadata: nft.result.metadata,
  }))

  return { native, tokens, nfts }
}

app.get("/demo", async (req, res) => {
  try {

    // Get and return the crypto data
    const data = await getDemoData()
    res.status(200)
    res.json(data)
  } catch (error) {
    // Handle errors
    console.error(error)
    res.status(500)
    res.json({ error: error.message })
  }
})
If you followed the steps of this Web3 JS tutorial, your ”index.js” file should now look something like this:
const express = require("express")
const Moralis = require("moralis").default
const { EvmChain } = require("@moralisweb3/evm-utils")

const app = express()
const port = 3000

const MORALIS_API_KEY = "replace_me"
const address = "0x9e8f0f8f8f8f8f8f8f8f8f8f8f8f8f8f8f8f8f8f"
const chain = EvmChain.ETHEREUM

async function getDemoData() {
  // Get native balance
  const nativeBalance = await Moralis.EvmApi.balance.getNativeBalance({
    address,
    chain,
  })

  // Format the native balance formatted in ether via the .ether getter
  const native = nativeBalance.result.balance.ether

  // Get token balances
  const tokenBalances = await Moralis.EvmApi.token.getWalletTokenBalances({
    address,
    chain,
  })

  // Format the balances to a readable output with the .display() method
  const tokens = tokenBalances.result.map((token) => token.display())

  // Get the nfts
  const nftsBalances = await Moralis.EvmApi.nft.getWalletNFTs({
    address,
    chain,
    limit: 10,
  })

  // Format the output to return name, amount and metadata
  const nfts = nftsBalances.result.map((nft) => ({
    name: nft.result.name,
    amount: nft.result.amount,
    metadata: nft.result.metadata,
  }))

  return { native, tokens, nfts }
}

app.get("/demo", async (req, res) => {
  try {

    // Get and return the crypto data
    const data = await getDemoData()
    res.status(200)
    res.json(data)
  } catch (error) {
    // Handle errors
    console.error(error)
    res.status(500)
    res.json({ error: error.message })
  }
})

const startServer = async () => {
  await Moralis.start({
    apiKey: MORALIS_API_KEY,
  })

  app.listen(port, () => {
    console.log(`Example app listening on port ${port}`)
  })
}

startServer()
That’s it for this Web3 JavaScript tutorial! You now know how to create a JavaScript application with Moralis. If you still have questions regarding the Web3 JS tutorial or if you have experienced trouble at any point, check out Moralis’ official documentation!
Additionally, if you are looking for a more detailed guide for setting up a full-stack Web3 dapp, consider the Moralis YouTube video below. This clip provides a complete breakdown for creating a full-stack Web3 app using Moralis, React, NodeJS, and web3uikit!
Summary – Web3 JS Tutorial for Developers
In this Web3 JavaScript tutorial, you learned how to create a straightforward JS dapp that could query on-chain data, such as the native token, ERC-20 token, and NFT balances of a specific wallet. Moreover, thanks to the accessibility of Moralis, we were able to break down this Web3 JS tutorial into the following three steps:
- Creating a NodeJS dapp, installing Moralis, and setting up an Express server
- Integrating Moralis’ services
- Reading blockchain data
If you found the tutorial helpful, consider checking out more exciting Moralis guides. For example, learn how to mint a coin on Solana or build a Solana NFT explorer. Moreover, if Solana development excites you, check out Moralis’ Solana API. This tool allows you to create all sorts of interesting Solana Web3 projects!
Nonetheless, no matter what project you want to create, sign up with Moralis and start building dapps in no time! What’s more, you can create a Moralis account entirely for free and receive access to the various Web3 APIs immediately!
