Solana has become one of the leading programmable blockchains thanks to its speed and low transaction fees. As a result, many projects focusing on NFTs have decided to utilize Solana, and at this point, there are numerous Solana NFTs (non-fungible tokens) worth exploring. That said, if you are an NFT developer, knowing how to present various NFTs in a dapp on the Solana blockchain is crucial. In this article, we will present a dapp that can do just that – showcasing NFTs on Solana. What’s more, in the upcoming sections, we will illustrate how to build a Solana NFT explorer quickly and easily with the help of Moralis. Thanks to Moralis’ Solana API, you can easily fetch NFT metadata and then use the image URL to display NFTs neatly. Furthermore, you can also build a Solana NFT explorer with additional filters, thanks to Moralis.
With that in mind, now’s a great time to learn more about programming on the Solana chain. Furthermore, by learning how to build a Solana NFT explorer, you will also get familiar with Moralis. Moving forward, we’ll show you how to set up your account and obtain your Moralis Web3 API key. Hence, you’ll then be able to use Moralis for all sorts of dapp development endeavors.
Since Moralis is all about cross-platform interoperability, you’ll be able to use it with popular Web2 development platforms. For example, you can use Firebase, Supabase, or Unity to join the Web3 revolution. Additionally, you are never stuck to a particular blockchain when using Moralis. Although we’re building a Solana NFT explorer herein, we could’ve focused on any other leading network. After all, Moralis is also cross-chain interoperable. So, create your free Moralis account and follow our lead.

Build a Solana NFT Explorer Like Ours – Demo
Before we show you how to build a Solana NFT explorer, let’s take a look at our example dapp. As such, you will see what to expect from today’s tutorial. You’ll also be able to decide if you want to roll up your sleeves and build your own instance of our Solana NFT explorer.
The following screenshots represent the gist of our Solana NFT explorer dapp. Initially, our example dapp is empty:

Moreover, looking at the image above, you can see the title of our dapp, the Moralis logo, the entry field, and the “Search” button. Furthermore, you can also see that it already populated the entry field with an example NFT collection address. Moreover, we just need to click on the “Search” button to get the results:

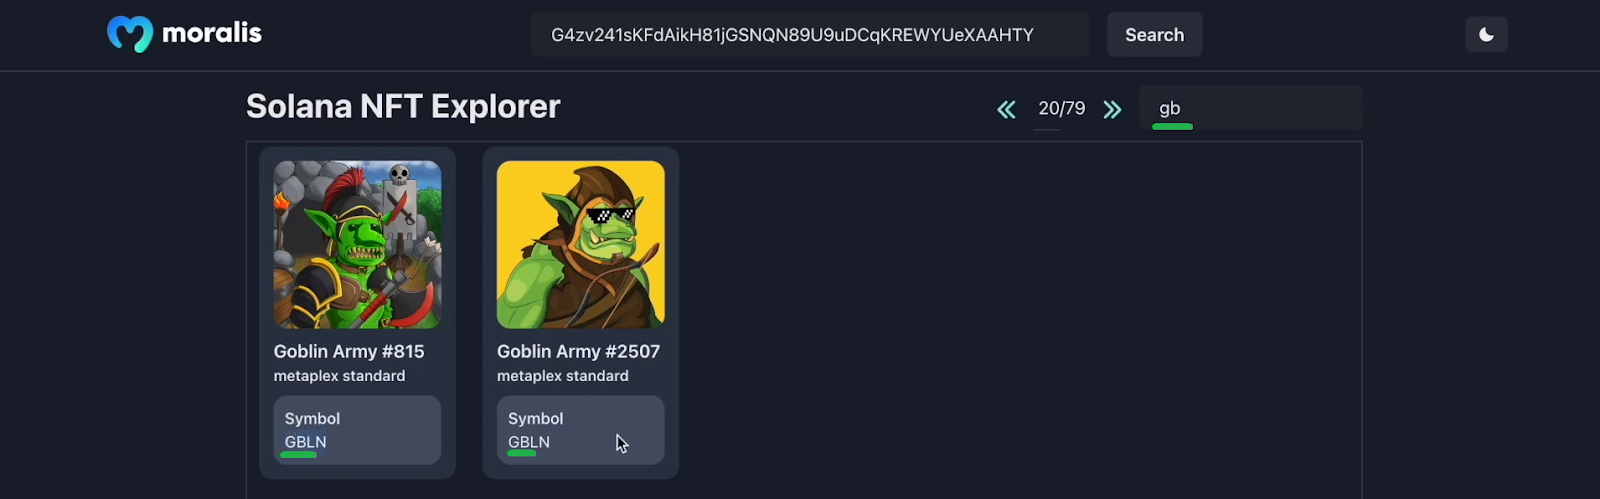
The results are neatly displayed in two rows. Also, for each NFT, you have the image at the top, its name, and we can see its symbol at the bottom. Moreover, you can see that with the results displayed, two additional options appear. At the top of our dapp, on the right-hand side of the “Solana NFT Explorer” title, we now have a page navigator and a filter entry field. With the former, we get to move to the next or previous page using the arrows. Or, we can also enter the page number which we want to visit:

As far as the filter goes, we need to click on the entry field, and then we can search NFTs by symbols:
So, now you know what to expect moving forward. Suppose you want to learn how to build a Solana NFT explorer presented above, then move on to the next section. There, you’ll first learn how to obtain your Moralis Web3 API key.
How to Build a Solana NFT Explorer with NextJS and Moralis
As the title suggests, the main tools used to build the above-presented dapp are Moralis and NextJS. We also used the ultimate Ethereum boilerplate as a starting point, which made things much simpler. However, you can save even more time by simply cloning our finished code, which awaits you on GitHub:
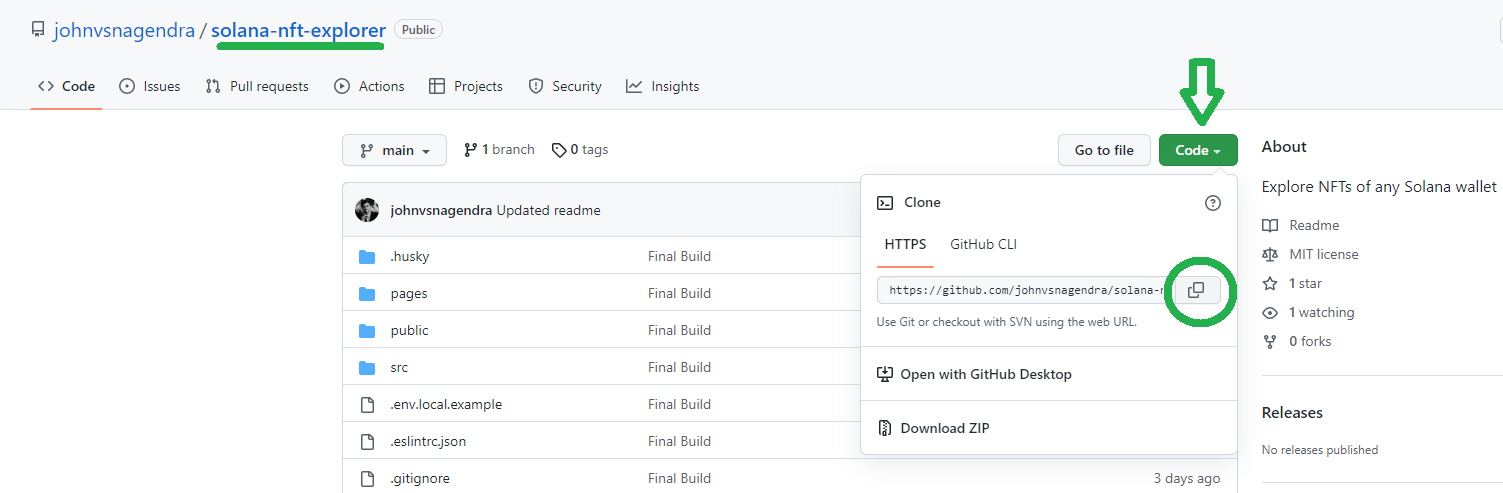
So, after cloning our code, you’ll be looking at the following layout:

We will walk you through the code momentarily, but as you can see in the image above, you first need to obtain your Moralis Web3 API key.
Obtaining Your Moralis Web3 API Key
If you haven’t done so yet, create your free Moralis account by clicking here. Alternatively, you can visit the official Moralis website and click on the “Start for Free” or “Try for FREE” buttons:

Any of these options will take you to the signup page:

As you can see in the above screenshot, on the signup page, you need to enter your email address and create your password. You can also use your Google account to speed up the signup process. In case you go with your email and password, don’t forget to confirm your account. To do this, you’ll need to click on the confirmation link that will arrive in your email inbox.
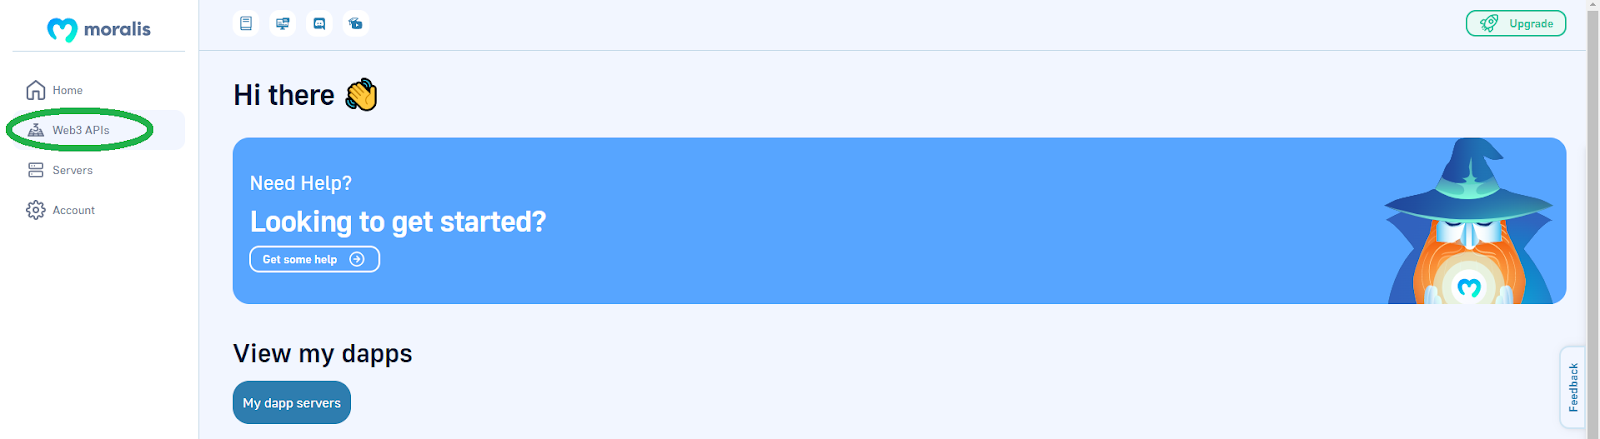
Once you successfully set up your Moralis account, which shouldn’t take more than a minute, you can access your Moralis dashboard. This is where you’ll see the “Web3 APIs” tab in the side menu:
On the “Web3 APIs” page, you’ll be able to use the “copy” icon to copy your Moralis Web3 API key:

Furthermore, you can access all your Moralis keys, including the Web3 API key, inside your account settings. To get there, you need to click on the “Account” option in the side menu. Once on the “Account Settings” page, select the “Keys” tab and then copy your Web3 API key:

Finally, you can return to your “.env copy.example” file and replace “xxx” with your key. Then, rename that file to “.env.local”. That wraps up the initial setup!
Build a Solana NFT Explorer with the Ultimate Solana API
Thanks to the enterprise-grade Web3 APIs and SDK provider, Moralis, we will easily implement the blockchain-related backend functionality. In fact, we will only need two particular endpoints to create the above-presented dapp. So, to build a Solana NFT explorer, “account/{network}/{address}/nft” and “nft/{network}/{address}/metadata” will do the trick. So, let’s do a quick overview of these two endpoints. However, you can explore them in more detail using the Moralis documentation.
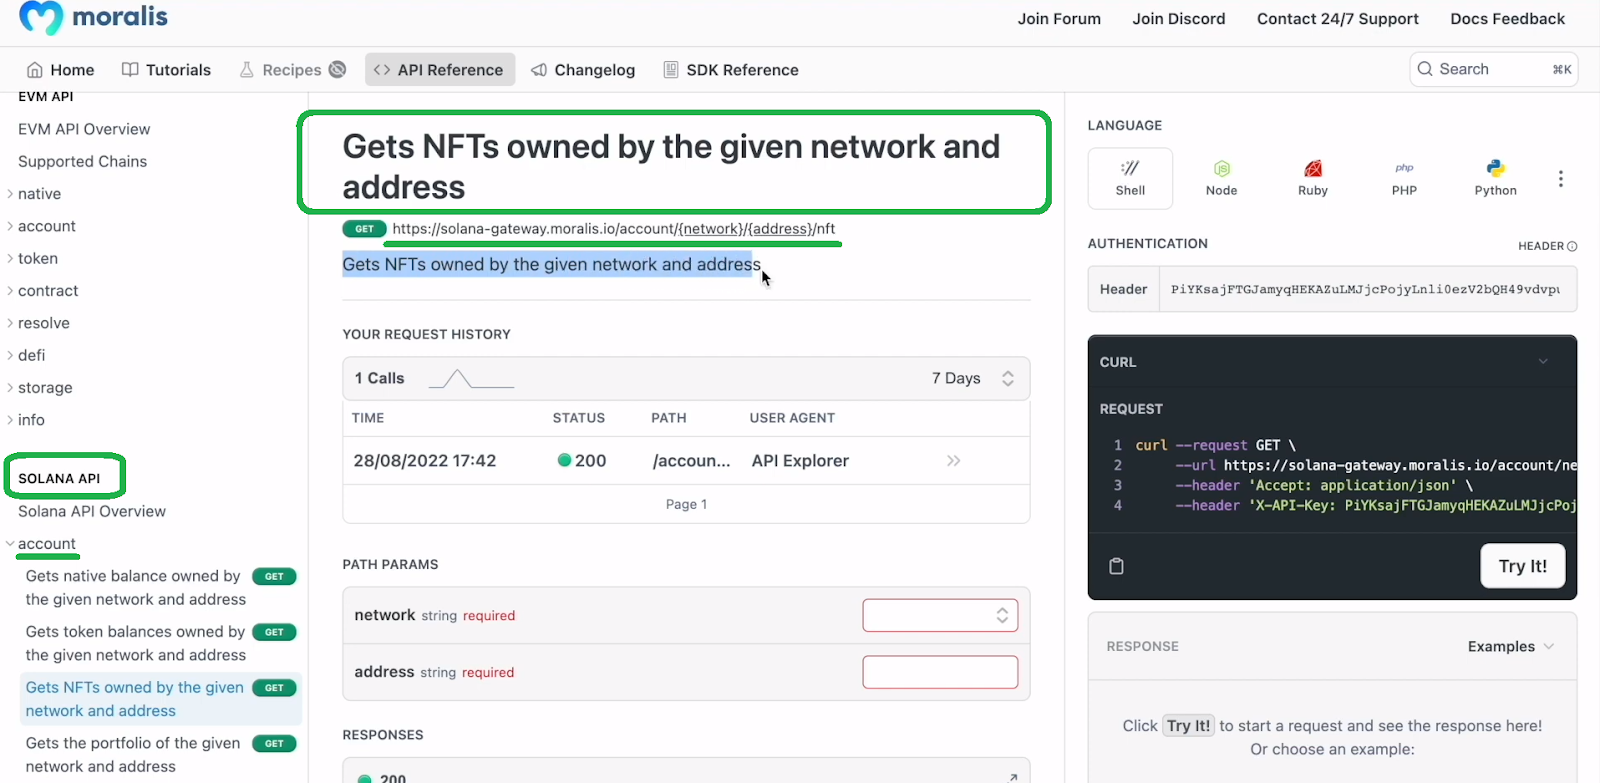
First, we use “account/{network}/{address}/nft” to get NFTs owned by the given network and address. This API takes in the “network” and “address” parameters:

For the “network” parameter, we get to choose between the “mainnet” and “devnet” options. With both parameters in place, we can try the code and get the response. This is where we see the “mint” values. These values are nothing but the NFT token addresses. As such, we get to use these values in “nft/{network}/{address}/metadata“:
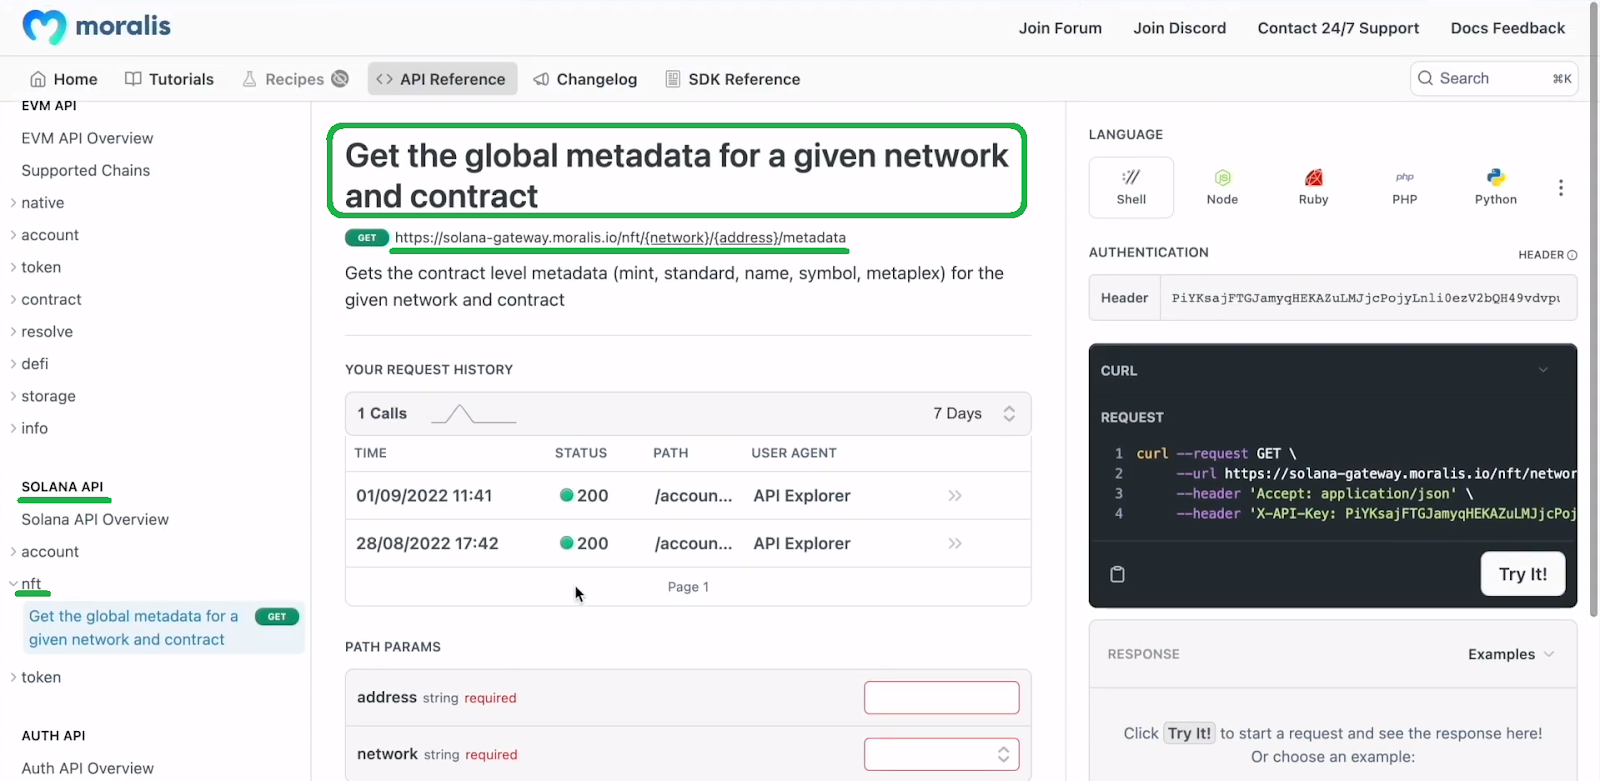
If we now paste the above-copied “mint” address in the “address” entry field of “path params” and again go with the mainnet, the code returns all the NFT’s metadata:

Moreover, this is all the backend we need to build a Solana NFT explorer.
Build a Solana NFT Explorer – Code Walkthrough
To see how we used the above-presented APIs, access the “getNFTs.js” and “getNFTMetadata.js” files. Both of these JavaScript (JS) files are located inside the “api/SolAPI” folder:

So, if we first look at the “getNFTs.js” file, it contains the following lines of code:
import Moralis from 'moralis';

export default async function handler(req, res) {
  const { address, network } = req.body;
  await Moralis.start({ apiKey: process.env.MORALIS_API_KEY });

  try {
    const data = await Moralis.SolApi.account.getNFTs({
      network,
      address,
    });
    res.status(200).json(data);
  } catch (error) {
    res.status(400).json(error);
  }
}
At the top, we first import Moralis, which is one of the keys that enable you to build a Solana NFT explorer dapp. Next, we use the “handler” async function, which contains all we need to obtain NFT addresses. As you can see, we also initiate the Moralis SDK using the “MORALIS_API_KEY” variable from the “.env.local” file. Nonetheless, all the heavy lifting is performed by the “getNFTs” Solana API endpoint from the “account” type of endpoints.
On the other hand, the “getNFTMetadata.js” file uses similar lines of code:
import Moralis from 'moralis';

export default async function handler(req, res) {
  const { address, network } = req.body;
  await Moralis.start({ apiKey: process.env.MORALIS_API_KEY });

  try {
    const data = await Moralis.SolApi.nft.getNFTMetadata({
      network,
      address,
    });
    res.status(200).json(data);
  } catch (error) {
    res.status(400).json(error);
  }
}
Essentially, the only difference is that we utilize the “getNFTMetadata” endpoint. Moreover, the latter is a part of the “NFT” type of endpoints.
Frontend Components
You probably have some experience with frontend development; however, let’s still take a closer look at the code behind our dapp’s UI components. Let’s start with the “NFTCard.jsx” script:

The “NFTCard” component takes in “nftAddress” and “filterQuery“. The former is the “mint” address, and the latter is what users enter into the filter’s entry field. Moreover, “nftAddress” is used to get the NFT’s metadata. Also, this is where we use “getNFTMetadata“.
Furthermore, it’s worth pointing out that by using “axios.get“, we get to extract images’ URLs from the metadata URI. Here’s an example metadata URI and its image URL within:

Next, we use “setNftData” to set all the fetched NFT data into the “nftData” state variable. The latter includes the contract type, name, symbol, and metadata. Moreover, it is the “src={resolveIPFS(nftData?.metadata?.image)” line of code that renders the NFT image. It uses the same principle for other NFT data (see video below at 7:49).
Another important part of the “NFTCard” component is the “apiPost” function (8:01). By using this function, we just need to give it the endpoint and the parameters that interest us to call the specific API.
On the other hand, the logic for our example dapp is contained inside the “index.jsx” file. Thus, let’s take a closer look at that script.

UI Logic – “index.jsx”
So, “index.jsx” takes care of the UI logic. Further, this file ensures that all components are displayed as presented in the demo above, including the Moralis logo, the “Solana NFT Explorer” title, and the address search bar. Obviously, the latter is the key that provides our dapp with the required data to process. Moreover, our example dapp takes in an address and then does its magic utilizing Moralis’ Solana API. For that purpose, “index.jsx” uses “inputHandler“, which updates the “searchInput” state variable.
Our UI logic also includes the “nftSearch” button. So, every time a user clicks on this button, the “nftSearch” function activates, which resets the “search” input, and then displays the first page of results. Furthermore, it also calls the “apiPost” function using the “solApi/account/getNFTs” endpoint. Last but not least, the “nftSearch” function also sets the search results in the “searchResults” state variable.
Next, the UI logic uses the “loadPage” function that sets page results so that ten NFTs are displayed per page. This also triggers “setPageResult” which updates the “pageResult” state variable. Moreover, every time “pageResult” is updated, this renders the above-presented “NFTCard” component.
The “prevPage” and the “nextPage” functions are activated by the “arrow” button, which takes care of the page navigation. Finally, we also use “queryHandler“, which ensures that whatever users enter into the filter’s entry field is used to render relevant results.
For a detailed code walkthrough, use the video below starting at 3:19.
How to Build a Solana NFT Explorer – Summary
Using today’s article, you were able to learn how to build a Solana NFT explorer dapp. You first had a chance to see our example dapp’s demo. Then, we provided you with a GitHub link where you could obtain the finished code. By cloning that code, you had a chance to create your own instance of the Solana NFT explorer dapp. All you needed to do was to get your Moralis Web3 API key and paste it into the “.env.local” file. Nonetheless, we walked you through the code, where you also had an opportunity to dive even deeper using our in-house expert’s video tutorial.
If you enjoyed today’s article, make sure to take your Solana programming to the next level. This is where the Moralis documentation, the Moralis YouTube channel, and the Moralis blog will provide you with all the guidance you need. Of course, you can also use these valuable resources to focus on other programmable chains. Aside from Ethereum, Moralis already supports all the leading EVM-compatible chains, including BNB Chain, Avalanche, Polygon, Cronos, and Fantom.
We should also point out that Web3 development is still in its early stages and offers countless opportunities. Hence, this might be the best time to go full-time crypto. If that interests you, make sure to consider becoming blockchain certified by enrolling in Moralis Academy. This will greatly increase your chances of landing your crypto dream job. Aside from top-tier crypto development courses, Moralis Academy is also the place to get expert mentorship. In addition, this online academy provides you with a personalized study path and membership in one of the most advancing communities in the industry.

