Did you know that Moralis offers the most accessible way to integrate blockchain functionality into any Python application? If you want to learn more about this, join us throughout this article as we explore the intricacies of Web3 Python development. The accessibility originates from the Moralis Python SDK, allowing you to implement Web3 functionality into Python apps in two steps:
- 1. Install Moralis’ Python SDK by running the following command:
pip install moralis
- 2. Make a Moralis Web3 API call. The following is an example of what it can look like for fetching NFT metadata:
import json
from moralis import evm_api

api_key = "YOUR_API_KEY"

params = {
    "address": "0xb47e3cd837dDF8e4c57F05d70Ab865de6e193BBB",
    "token_id": "3931",
    "chain": "eth",
    "format": "decimal",
    "normalizeMetadata": True,
}

result = evm_api.nft.get_nft_metadata(
    api_key=api_key,
    params=params,
)

print(json.dumps(result, indent=4))
If you are looking for additional examples and more detailed information regarding the process, consider checking out Moralis’ Web3 Python SDK documentation! However, if you’d like to know more about how to implement Web3 using Python and follow along in a step-by-step process, read on!
Overview
Python is a prominent, high-level, object-oriented, and general-purpose programming language with many different use cases. It is one of the most popular programming languages today, featuring an easy-to-learn syntax, contributing to its high adoption. What’s more, if you are a Python developer looking to enter the blockchain space, it is now easier than ever, thanks to Moralis. If this sounds exciting and you want to learn more, join us as we explore Moralis’ Python SDK, which is the easiest way to integrate Web3 functionality into Python applications!
The article begins with a quick Python introduction, where you gain an overview of the programming language. Following this, the next section highlights Python in a Web3 context. From there, the next part introduces Moralis and the Python SDK. Lastly, we will put Moralis’ Python SDK to use by showing you how to create a Web3 Python application. Furthermore, to make the tutorial as straightforward as possible, it is divided into the following three sections:
- Application Demo – What Are You Working Towards?
- Building the Python Flask App
- Setting Up the React Frontend App
By completing this tutorial, you will learn how to utilize Moralis’ Python SDK to implement Web3 authentication mechanisms in any Python application. In combination with the development kit, you will learn how Moralis’ Auth API works. Moreover, in this tutorial, we will integrate MetaMask authentication; however, you can implement several auth methods with only single lines of code with the API. If you want to learn more about this, check out our guides on how to add a RainbowKit sign in or add Coinbase Wallet login functionality!
Now, before moving forward, sign up with Moralis, as you need an account to follow along!
What is Python?
Python is an object-oriented programming language with dynamic semantics. It includes high-level data structures, dynamic binding, dynamic typing, and several other prominent features. Since Python is a so-called ”general purpose” programming language, it has abundant use cases, ranging from building simple applications to machine learning.
Python features a straightforward, easy-to-learn syntax emphasizing readability, contributing to the language’s high adoption. Since Python is relatively easy to grasp, it is a top choice for entry-level coders. Moreover, it has even been adopted by many non-programmers alike, including scientists and accountants leveraging Python for everyday tasks!
Python provides many advantages and benefits, and in the list down below, you will find three prominent examples:
- Open-Source – The programming language is open-source. Consequently, it is free to use and distribute, even in commercial contexts.
- Modules and Libraries – Python supports packages and modules, which enables program modularity and code reuse.
- Community – Python has an extensive community contributing to the pool of libraries and modules, which is an excellent asset for other developers.
That covers this brief initial introduction to Python. In the following section, we will look closer at what the language entails in a Web3 context!
Can You Use Python for Web3?
Now, with a more profound understanding of what Python is, this section will take a look at this prominent programming language in a Web3 context. As such, we will set out to answer the question, ”can you use Python for Web3?”.
The straightforward answer to the aforementioned question is: yes, you can use Python for Web3! However, when it comes to the blockchain development space, you might want to master libraries such as “Web3.py”. Furthermore, “Web3.py” is a Python-based library that makes interacting with the Ethereum blockchain easier. As such, even though there are many similarities between Web2 and Web3 Python development, there are minor differences you need to consider!
What’s more, there are additional development tools that can aid in your Web3 Python endeavors to facilitate a more seamless developer experience. If you want to learn more about this, follow along in the next section, where we explore the ultimate Python Web3 development tool!
The Ultimate Python Web3 Development Tool
If you are looking for a more seamless Web3 development experience, you need to know about Moralis! Moralis is a prominent Web3 infrastructure provider supplying enterprise-grade development tools such as Web3 APIs, SDKs, etc. Consequently, with Moralis, you can fully unlock the power of blockchain technology to create sophisticated Web3 dapps (decentralized applications)!
Among the prominent features of Moralis, you will find the Moralis Python SDK! This ultimate Python Web3 development tool makes blockchain-related Python development more accessible.
With the Python SDK, you can easily integrate blockchain and Web3 functionality into any Python app. Furthermore, thanks to the synergies between all Moralis’ tools, you can combine the SDK with any of Moralis’ Web3 APIs, such as the Solana API, Streams API, NFT API, etc., to create more complex projects!
In addition, thanks to the cross-chain capabilities of Moralis, you can use the Python SDK to develop dapps quickly on several networks, including Solana, Cronos, Ethereum, and many more, that can, for example:
- Get native balances
- Acquire all NFTs from a collection
- Fetch NFT metadata
- Get all NFTs from a particular wallet
Nevertheless, now that you are more familiar with Moralis’ Python SKD, let us take a closer look at how it actually works by exploring a Python Web3 example!
Web3 Python Tutorial – Exploring a Python Web3 Example
Now that you are more familiar with Python and Moralis’ Python SDK, the following sections illustrate how to use the development kit in practice by exploring a Web3 example. Specifically, this tutorial teaches you how to handle Web3 authentication flows with Moralis’ Python SDK to make API calls via a Flask server app. What’s more, you will learn how to quickly set up a React frontend application showing the authentication flow in action!
Moreover, to make the tutorial as straightforward as possible, it is divided into the following three sections:
- Application Demo – What Are You Working Towards?
- Building the Python Flask App
- Setting Up the React Frontend App
By covering the aforementioned parts, you will learn how to use Moralis’ Python SDK to make Web3 API calls. As a result, you can easily integrate Web3 and blockchain functionality into any server-side Python application to query on-chain data! With that said, if you prefer watching videos to learn, you can also check out the video below from the Moralis YouTube channel, covering the entire Web3 Python tutorial in further detail:
However, you can also join us here as we break down the entire process from start to finish. So, without further ado, let us take a closer look at what you are working towards with a quick walkthrough of how the final application works!
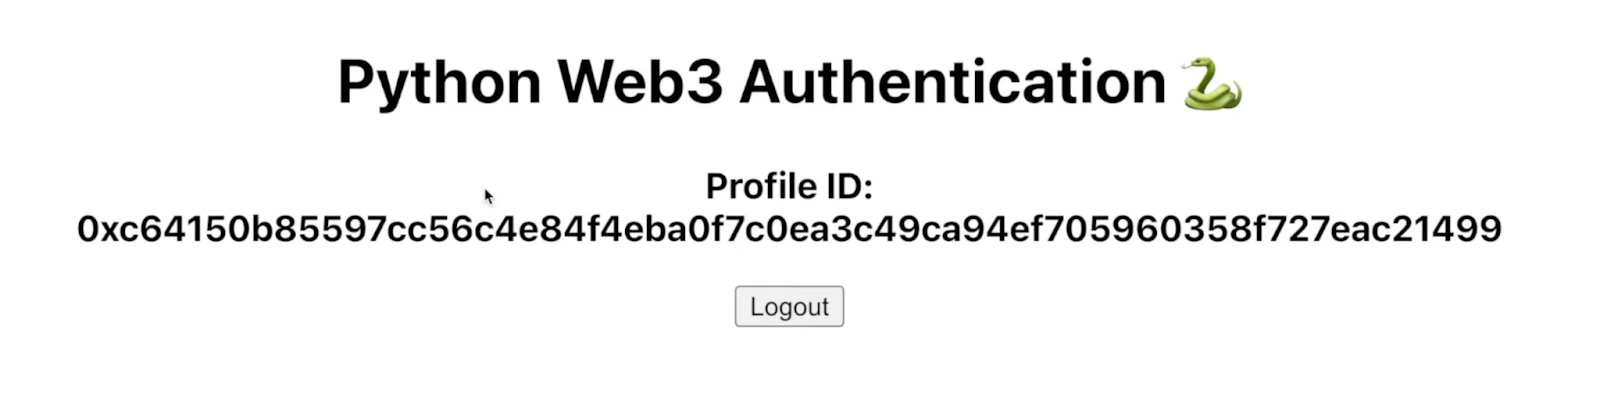
Application Demo – What Are You Working Towards?
The application that this Web3 Python tutorial illustrates how to create is relatively straightforward. The landing page features a ”Python Web3 Authentication” heading along with a single ”Login” button:

When clicking on this button, it will autonomously trigger your MetaMask, asking you to connect with your Web3 wallet. Once you connect your account, it will autonomously send a ”challenge” request to the app’s Python backend to ask Moralis’ Auth API to generate a new Web3 login challenge.
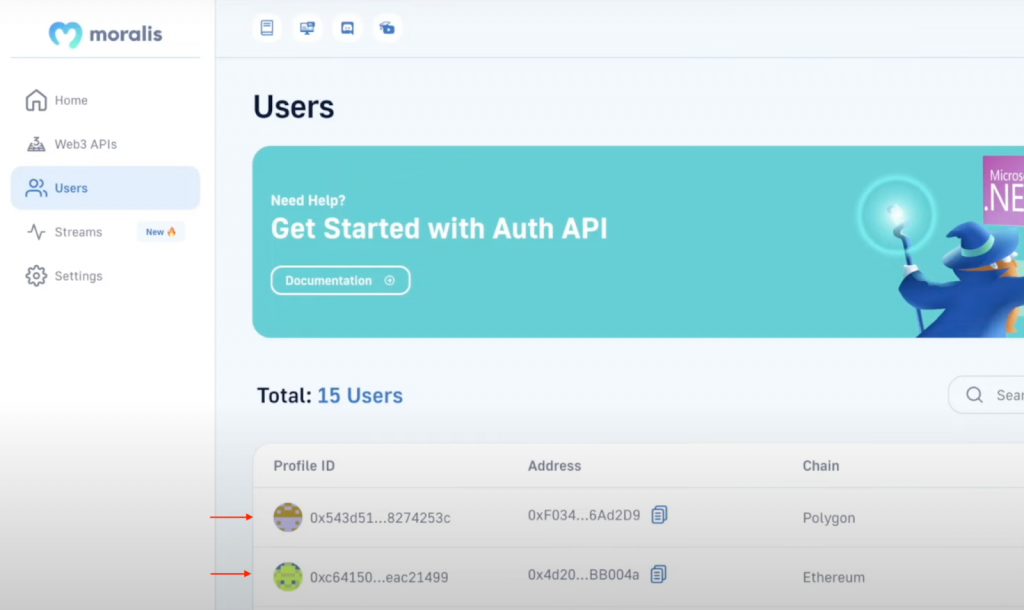
From there, the application sends another request to validate the signature. If it is correct, it generates a new user ID, which is displayed on the frontend:
Once you successfully authenticate new users, they are automatically added to your ”Users” tab on your Moralis admin panel:
This covers the application demo, and if you want to learn how to create this project, join us as we show you how to create a Python Flask app for your backend in the next section!
Building the Python Flask App
To kick things off, the initial part of this section revolves around setting up the Web3 Python project. Furthermore, to illustrate the process, we will use Visual Studio Code (VSC) throughout the tutorial. That said, note that the process might occasionally differ if you opt for another environment. Now, you can start by opening your preferred integrated development environment (IDE).
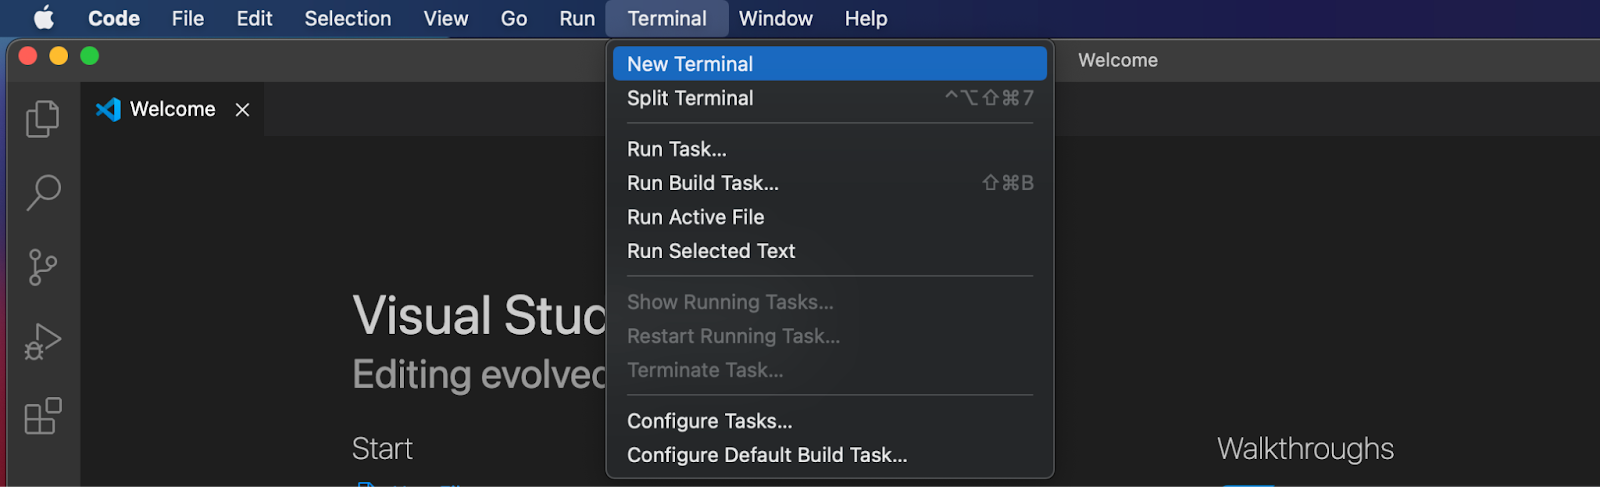
Once you launch your IDE, go ahead and create a new ”PythonSDK” project folder and open a new terminal. If you, like us, went for VSC, you can do so by clicking on ”Terminal” at the top, followed by the ”New Terminal” alternative:
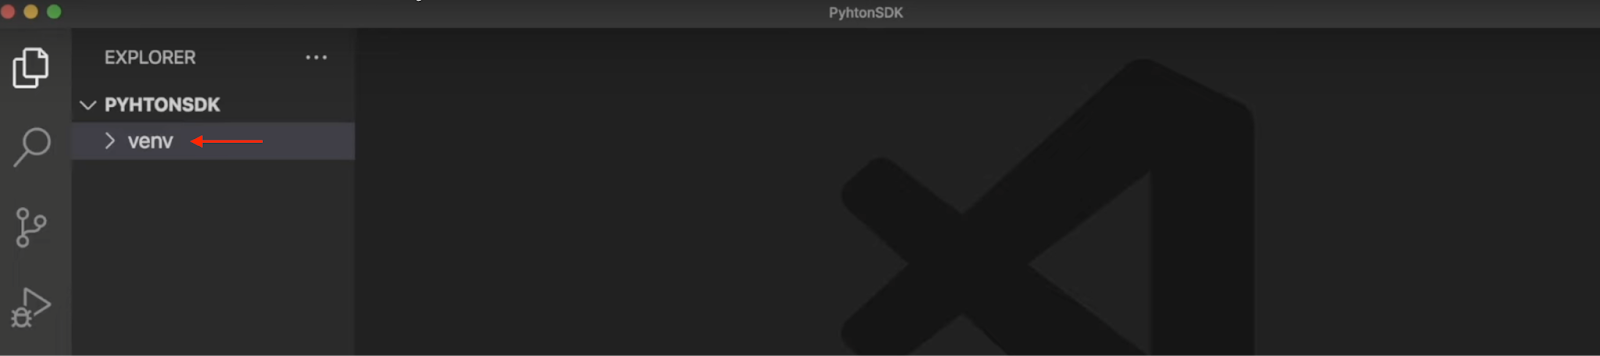
From there, ”cd” into the project’s root folder and create a new virtual environment by running the command below in the terminal:
python3 -m venv venv
When running the command above, it results in a new ”venv” folder, which you should be able to find in your local directory:
Next up, you need to initialize this virtual environment, and you can do so through the following terminal command:
source venv/bin/activate
Now that you have initialized the virtual environment, the next step is to ensure that you have the latest ”pip” version. You can check the current version and install any recent updates by inputting and running the code below:
pip install --upgrade pip
Lastly, you must install the necessary dependencies, and there are three in total. Down below, you will find the appropriate commands for doing so. Input each command and run them consecutively:
pip install flask
pip install flask_cors
pip install moralis
That covers the initial project setup! In the following sub-section, we will closely examine the application code!
Python Flask Application Code
With the barebones state of the Web3 Polygon project at hand, this section focuses on the application code. As such, we will now show you how to add the required endpoints and functions!
To begin, create a new file called ”app.py” in the project’s root folder and open it. The first thing you need to do is import the dependencies, which you can do by adding this code snippet to the top of the file:
from flask import Flask
from flask import request
from moralis import auth
from flask_cors import CORS
Next, add the snippet below to initialize the app and wrap it in ”CORS”:
app = Flask(__name__)
CORS(app)
From there, add your Moralis API key to the code:
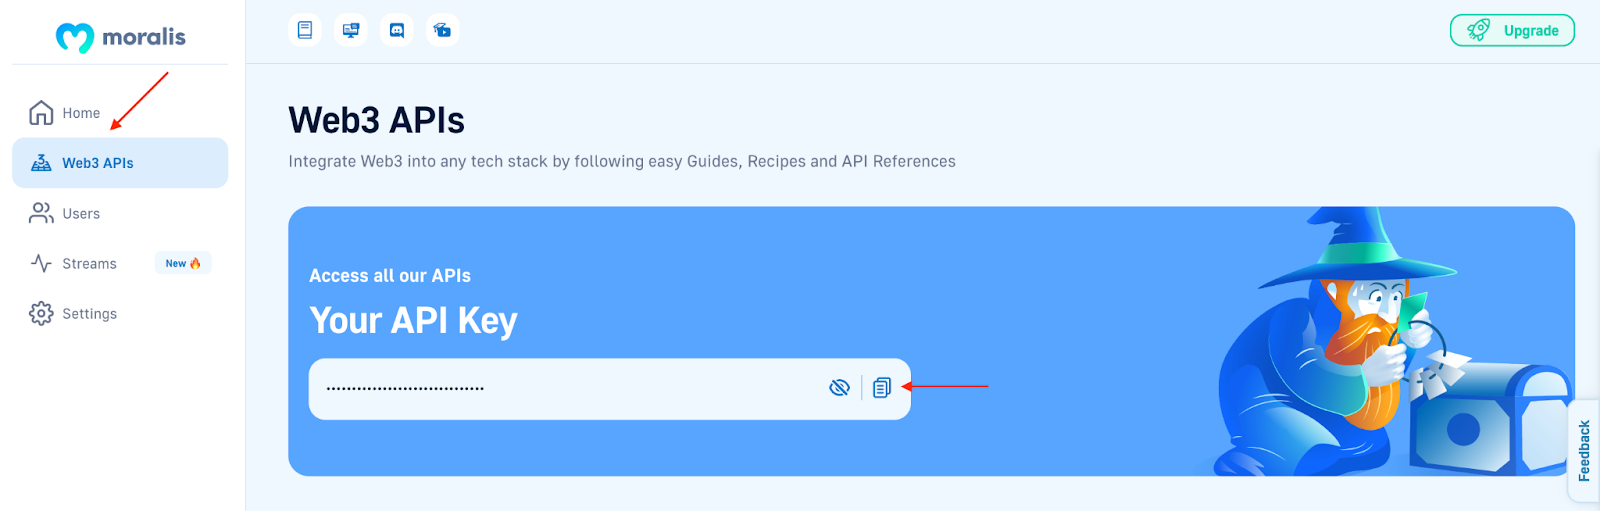
api_key = "xxx"
However, make sure to replace ”xxx” with your actual key. To get the key, you must possess a Moralis account. So, if you have not already, create a Moralis account immediately! When you eventually log in, navigate to the ”Web3 APIs” tab, which is where you can find the key:
To top things off, you must create two routes: ”/requestChallenge” and ”/verifyChallenge”.
- “/requestChallenge“ – Whenever a user wants to authenticate themselves, they need to request a challenge from Moralis, which is what this initial route is responsible for. This route contains a ”reqChallenge()” function that acquires the request arguments, creates a ”body” variable, fetches the results from the ”/requestChallenge” endpoint, and finally passes it to the client:
@app.route('/requestChallenge', methods=["GET"])
def reqChallenge():

    args = request.args
    body = {
        "domain": "my.dapp",
        "chainId": args.get("chainId"),
        "address": args.get("address"),
        "statement": "Please confirm login",
        "uri": "https://my.dapp/",
        "expirationTime": "2023-01-01T00:00:00.000Z",
        "notBefore": "2020-01-01T00:00:00.000Z",
        "resources": ['https://docs.moralis.io/'],
        "timeout": 30,
    }

    result = auth.challenge.request_challenge_evm(
        api_key=api_key,
        body=body,
    )

    return result
- “/verifyChallenge“ – When a user signs the message, the result is returned to the backend and verified using the second ”/verifyChallenge” route. The route has the ”verifyChallenge()” function, which gets the arguments from the request, creates a ”body” variable, acquires the results from Moralis’ Auth API endpoint, and finally returns it to the client:
@app.route('/verifyChallenge', methods=["GET"])
def verifyChallenge():

    args = request.args
    body={
        "message": args.get("message"),
        "signature": args.get("signature"),
    }

    result = auth.challenge.verify_challenge_evm(
        api_key=api_key,
        body=body
    )

    return result
Lastly, add the final code snippet specifying where you want to run the app:
if __name__ == "__main__":
    app.run(host="127.0.0.1", port=3000, debug=True)
That covers the code for ”app.py”, and all in all, the file should now look like this:
from flask import Flask
from flask import request
from moralis import auth
from flask_cors import CORS

app = Flask(__name__)
CORS(app)

api_key = "xxx"

@app.route('/requestChallenge', methods=["GET"])
def reqChallenge():

    args = request.args
    body = {
        "domain": "my.dapp",
        "chainId": args.get("chainId"),
        "address": args.get("address"),
        "statement": "Please confirm login",
        "uri": "https://my.dapp/",
        "expirationTime": "2023-01-01T00:00:00.000Z",
        "notBefore": "2020-01-01T00:00:00.000Z",
        "resources": ['https://docs.moralis.io/'],
        "timeout": 30,
    }

    result = auth.challenge.request_challenge_evm(
        api_key=api_key,
        body=body,
    )

    return result


@app.route('/verifyChallenge', methods=["GET"])
def verifyChallenge():

    args = request.args
    body={
        "message": args.get("message"),
        "signature": args.get("signature"),
    }

    result = auth.challenge.verify_challenge_evm(
        api_key=api_key,
        body=body
    )

    return result


if __name__ == "__main__":
    app.run(host="127.0.0.1", port=3000, debug=True)
Starting the App
With the code for the Web3 Python Flask application all complete, the last thing that remains is to run the project. To do so, once again, open a new terminal and run the command below:
python3 app.py
That’s it! It should now spin up your application on local host 3000, which you previously specified! However, if you plan on launching the application at some point, you might also want to add some error handling. Unfortunately, we will not show you how this is done since it falls outside the scope of this article!
Nevertheless, now that we are done with the Web3 Python Flask application, let us dive into the frontend section, where we will quickly set up a React app for testing the endpoints!
Setting Up the React Frontend App
With the Web3 Python example application all complete, the last thing you need to do is set up a frontend application from which we will call the endpoints and handle the Web3 authentication. As such, in this section, we will briefly show you how to create a React frontend app!
To make things as straightforward as possible, we will use an already-prepared React application. Hence, all you need to do is visit the GitHub repository below and clone the project to your local directory:
Complete Web3 Python Example Documentation – https://github.com/MoralisWeb3/youtube-tutorials/tree/main/Web3AuthPython
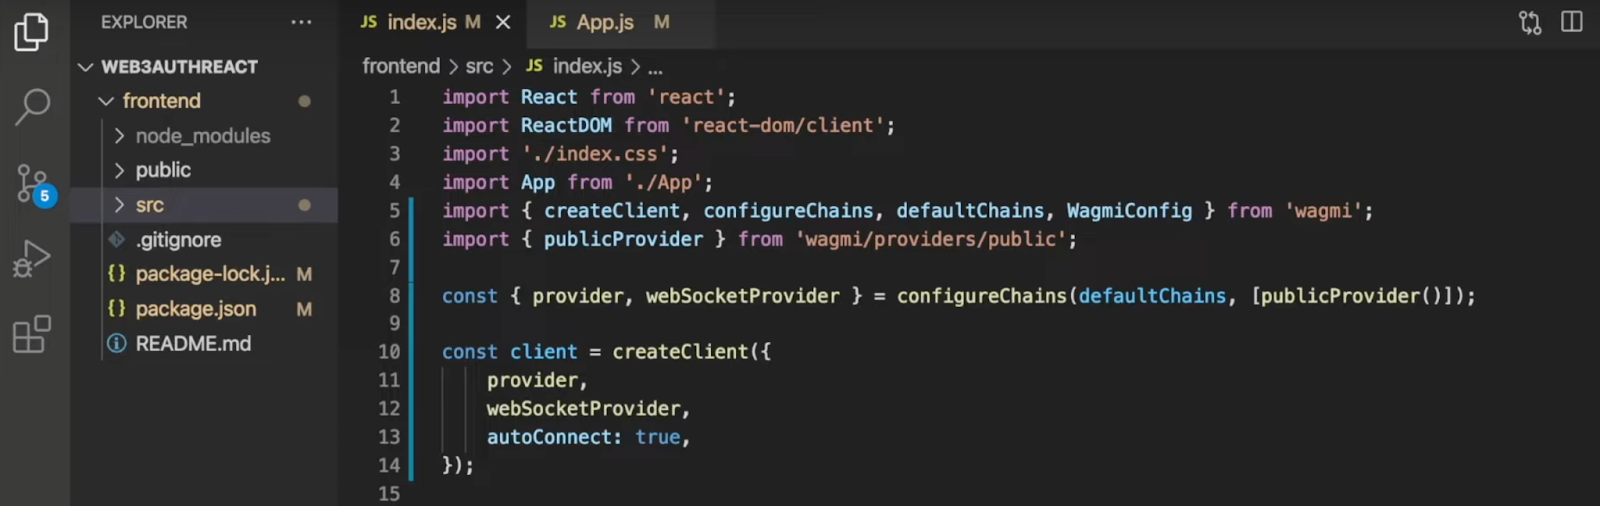
Once you clone the repository, you should find yourself with a file structure similar to the one shown in the image below:
From there, you should now be able to start the application. To do so, open a new terminal and run the following command:
npm run start
Now that is it for this Web3 Python example tutorial! If you want a more detailed breakdown of the React application, check out the video from the ”Web3 Python Tutorial – Exploring a Python Web3 Example” section.
Moreover, if you have followed along this far, you can now use Moralis’ Web3 Python SDK to authenticate users. If you want additional information about the capabilities of this development kit, check out Moralis’ Web3 Python SDK documentation!
Web3 Python Development – Summary
In this article, we demonstrated the accessibility of Moralis’ Python SDK by showing you an example of how to create a Web3 Python application. Moreover, to make the tutorial as straightforward as possible, it was divided into these three sections:
- Application Demo – What Are You Working Towards?
- Building the Python Flask App
- Setting Up the React Frontend App
If you joined us this far, you now know how to implement Web3 functionality into Python applications. Moreover, if you found this tutorial helpful, check out additional blockchain development content here at Moralis’ Web3 blog. For example, learn how to create an AWS Lambda function or explore Amazon GameSparks!
Nevertheless, if you want to create Web3-compatible Python applications, sign up with Moralis immediately. In doing so, you can fully take advantage of blockchain technology to build Web3 projects more seamlessly!
