Are you interested in learning how to create an AWS Lambda function? If this is the case, you are in luck! This article provides a comprehensive tutorial for creating a Lambda function. To illustrate the process, we will show you how to integrate Moralis’ NodeJS SDK with AWS by creating and deploying a Lambda application with multiple functions. What’s more, thanks to the accessibility of Moralis, you will be able to do so in only three steps:
- Prerequisites
- Configuring AWS and Setting Up a Project
- Creating the Lambda App
By following the steps above, you will learn how to create, test, deploy, and run an AWS Lambda function. As a result, you will be able to run JavaScript code directly through Lambda! If you are eager to jump into the tutorial immediately, feel free to skip to the “Lambda Function Example – Demonstration of How to Create an AWS Lambda Function” section. You can also find the complete code for the project in the following GitHub repository:
Overview
Amazon Web Services (AWS) is one of the most well-established and comprehensive cloud computing platforms used by millions of customers. AWS features an extensive ecosystem of web-related services, one of which is AWS Lambda. AWS Lambda is an event-driven, serverless computing service allowing you to run code without worrying about the underlying infrastructure. Consequently, to run programs, all that is required of you is to upload the code in the form of AWS Lambda functions. However, what are they, and how do you create an AWS Lambda function?
If you want the answer to the question above, read on as we explore the intricacies of Lambda functions and how to create them. By following along in this article, you will soon learn how to run JavaScript code via AWS Lambda! However, suppose you need to familiarize yourself further with what this service entails and are looking for a more detailed breakdown. In that case, we highly recommend checking out our guide on AWS Lambda and what it is used for before continuing!
If you already know how to create an AWS Lambda function but have further interest in Web3 development, check out additional Moralis content here at our Web3 blog. For example, learn to create Polygon webhooks or read up on Web3 for enterprise!
Nevertheless, if you want to join us in this tutorial, sign up with Moralis, as you need an account to create an AWS Lambda function!

What is AWS Lambda and Lambda Functions?
AWS Lambda is a serverless and event-driven computing service supplied by Amazon Web Services (AWS). Lambda allows you to run code from any backend service or application without the necessity to provision or manage servers. Consequently, AWS Lambda takes care of the complete computing infrastructure, and you only need to provide the code you want to execute!
All code supplied to AWS Lambda is organized into ”Lambda functions”. Lambda functions contain configuration information such as resource requirements, a name, an entry point, etc. Moreover, since Lambda features an event-driven architecture, the service runs the functions in response to events. Some prominent examples of events can be HTTP requests, DynamoDB table updates, object modifications in Amazon S3, etc.
Since the functions are triggered based on events, Lambda only invokes them when requested. This, combined with the ”pay-as-you-go” payment structure, ensures you only pay for the computing resource you consume. Consequently, you can gain several advantages from Lambda, such as reduced costs and more flexible scalability opportunities!
If you want to know more about the ins and outs of this service, we highly recommend our article explaining AWS Lambda functions and architecture in further detail.
Nevertheless, with a better understanding of what this service entails, the following section dives deeper into the process of creating a Lambda function!
The Process of Creating a Lambda Function
Now that you are more familiar with AWS Lambda, this section provides a “process overview” of creating a Lambda function. That said, there are many ways to create an AWS Lambda function, and you have several options. In fact, you can author functions in the following four ways:
- AWS Command Line Interface (CLI) – Your first option for creating a Lambda function is through the AWS CLI. The CLI supports macOS, Windows, and Linux (more on how the CLI is used in the ”Lambda Function Example…” section).
- AWS Management Console – The second option is to use the web-based AWS Management Console tool. The Lambda console supplies a code editor allowing you to test and modify code quickly.
- CloudFormation – It is possible to use AWS CloudFormation, an infrastructure-as-code (IaC) service, to create templates that define functions.
- AWS SDKs – Your final option is to use AWS SDKs. This is a good option if you want to directly create an AWS Lambda function using language-specific APIs.
Nevertheless, that covers four ways to create an AWS Lambda function. However, the following section breaks down a Lambda function example to make this even more understandable. As such, if you want a demonstration of how to create an AWS Lambda function, read on!
Lambda Function Example – Demonstration of How to Create an AWS Lambda Function
With a more profound understanding of AWS Lambda and the intricacies of the service’s functions, it is time to dive into the central part of this tutorial. As such, the following sections will illustrate how to create a Lambda function. Furthermore, to demonstrate the process, this tutorial will show you how to effortlessly integrate Moralis’ NodeJS SDK with Lambda. It is possible to do so in multiple different ways; however, for this guide, we will be developing and deploying a Lambda application featuring two blockchain-related functions: ”getNativeBalance()” and ”getWalletNfts()”.
As Moralis makes Web3 development significantly more accessible, you can create an AWS Lambda function in three straightforward steps:
- Prerequisites
- Configuring AWS and Setting Up a Project
- Creating the Lambda App
By following these steps, you will learn how to seamlessly integrate Moralis’ NodeJS SDK with AWS to create an AWS Lambda function in no time. As a result, you gain the ability to run Web3 JavaScript functions with Lambda, which will most likely prove helpful in future blockchain development endeavors!
If this sounds exciting, join us and learn how to create an AWS Lambda function in the following sections. To kick things off, let us start by covering the mandatory prerequisites!
Step 1: Prerequisites
To create an AWS Lambda function, you need to cover the following seven prerequisites:
- Setting Up a Moralis Account – To begin with, the first thing you need is a Moralis account. So, if you have not already, sign up with Moralis straight away!
- Creating an AWS Account – In addition to signing up with Moralis, you need an AWS account to create an AWS Lambda function.
- Installing an IDE – To write the code for the app, you need to install an IDE. If you are unsure what IDE to go for, consider VSC, the environment used during this tutorial.
- Installing NodeJS – With an IDE at hand, you also need to install the NodeJS runtime environment, which you can download by clicking here.
- Setting Up the AWS CLI – Next up, install and set up the AWS CLI.
- Installing Serverless Framework – Install Serverless Framework, as this is used to set up the project.
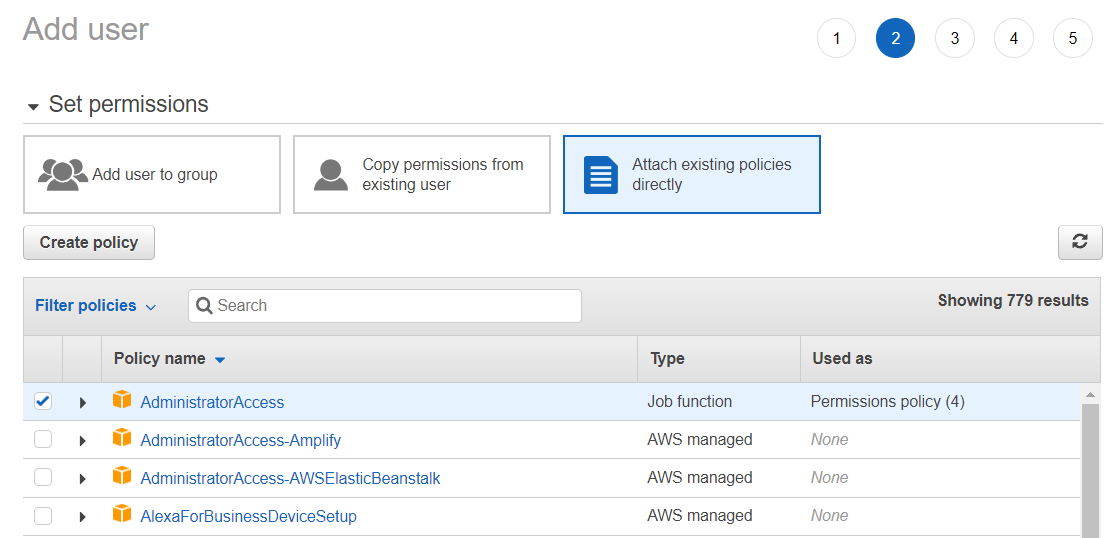
- Creating an IAM User – Lastly, you must create an IAM user. To do so, log in to AWS and open the IAM console. From there, click on ”Users” and ”Add user” in the navigation bar, taking you to the following page:
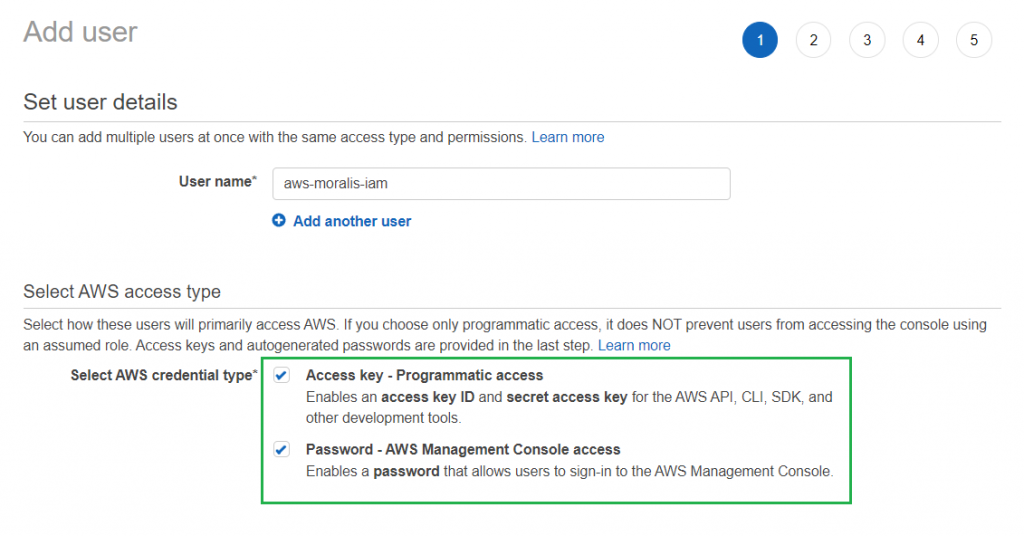
You need to add a username and check the boxes for each credential type. From there, move on to the second part and attach ”AdministratorAccess” as a policy:
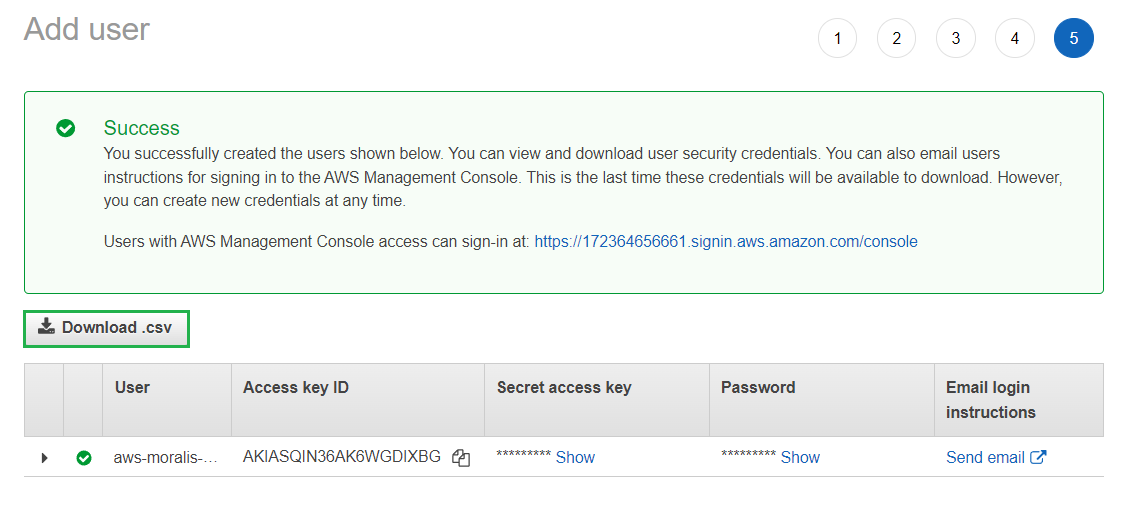
Finally, cover each remaining step and configure the IAM user according to your preferences. However, once you reach the final part, note that you need to download your AWS credentials as a ”.csv” file:
Step 2: Configuring AWS and Setting Up a Project
Now that you have covered the mandatory prerequisites, this step revolves around configuring AWS and setting up a new project. The section starts with the former, showing you how to configure your AWS credentials!
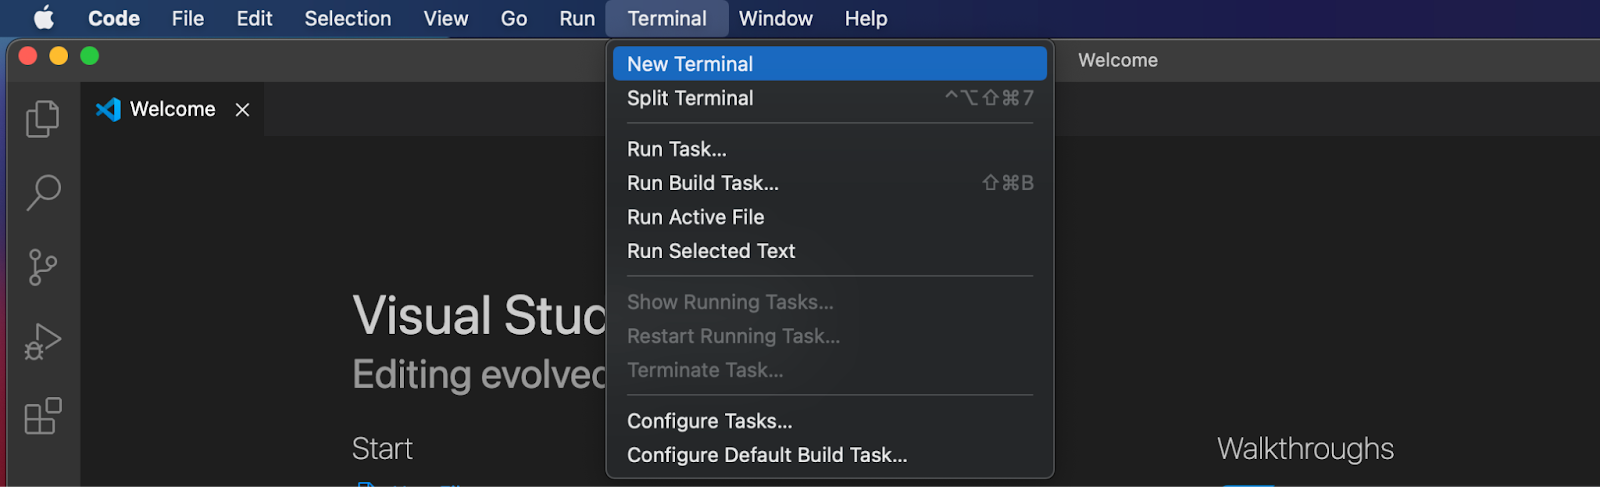
To kick things off, you need to open a new terminal. If you decided to go for VSC as your IDE, you could do so by clicking on ”Terminal” at the top, followed by ”New Terminal”:
As soon as the terminal launches, go ahead and run the command below:
aws configure
This will autonomously prompt your terminal, and you need to add your ”AWS Secret Access Key” and ”AWS Access Key ID”. In the end, it should look something like this:
AWS Access Key ID [None]: AKIAIOSFODNN7EXAMPLE
AWS Secret Access Key [None]: wJalrXUtnFEMI/K7MDENG/bPxRfiCYEXAMPLEKEY
Default region name [None]: ENTER
Default output format [None]: ENTER
That covers the AWS credential configurations. The next subsection shows you how to set up a new project with Serverless Framework!
Setting Up a Project
To set up the project, start by creating a new folder. From there, open the folder with your IDE and run the command below in the terminal:
serverless
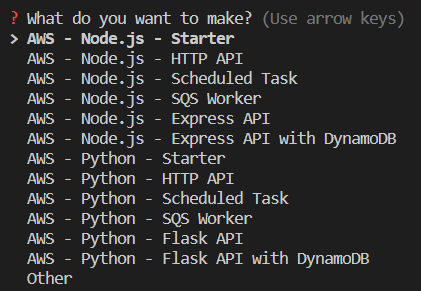
When you run the ”serverless” command, the terminal provides you with a few options. In this instance, you want to choose the ”Starter” alternative:
Next up, add a name to the project, which you can do by immediately hitting enter to set a default name. However, you can also input a custom name yourself:

Once you name the project, a new Serverless Framework template will automatically download to your local repository. When the download completes, the terminal will prompt you to log in. However, for this tutorial, it is not necessary, and you can progress by inputting ”n” and hitting enter:
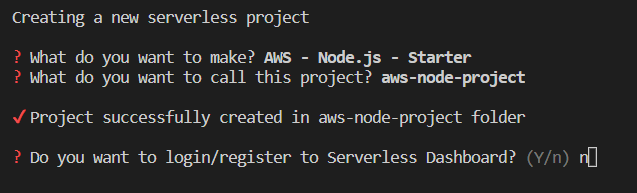
The terminal will then ask if you want to deploy the project. You can hold off on that for now. Continue by inputting ”n” again and then hit enter:

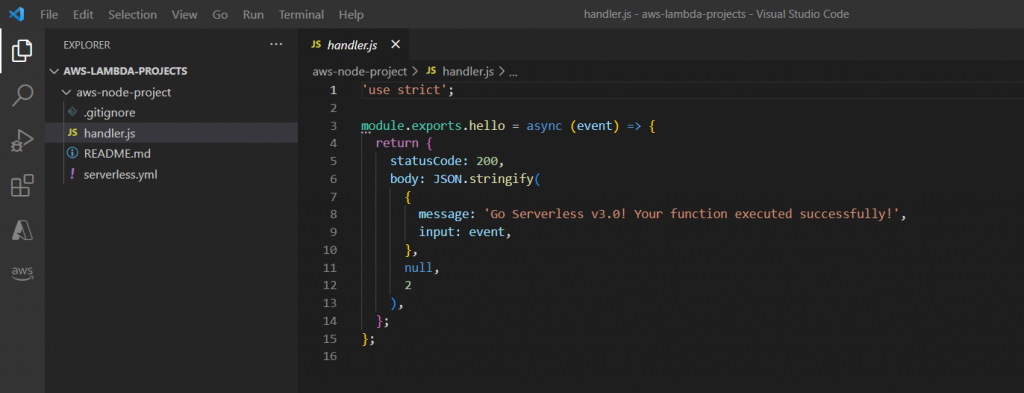
Once you hit enter, you should find yourself with a sample project in the IDE similar to the one below:
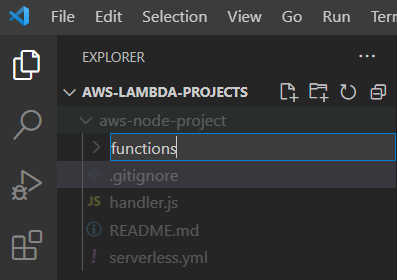
However, before continuing to the third step, you need to make a few configurations for the project. To begin with, create a new folder called ”functions”:
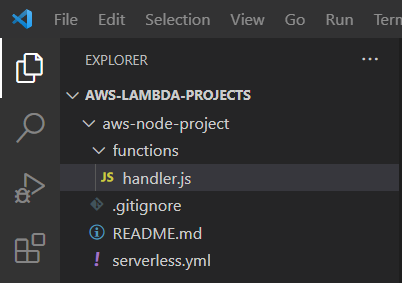
From there, move the ”handler.js” file into ”functions”:
You can then open ”serverless.yml” and set a new location for the ”handler.js” file:
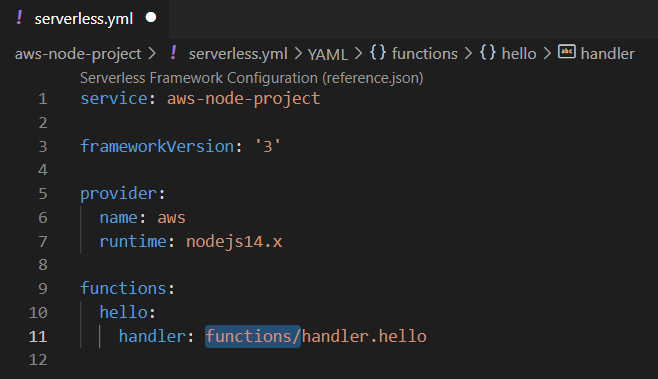
Lastly, you must add your Moralis API key by replacing the code in the ”serverless.yml” file with the contents below:
service: aws-node-project

frameworkVersion: '3'

provider:
  name: aws
  runtime: nodejs14.x
  environment:
    MORALIS_API_KEY: 'replace_me'

functions:
  hello:
    handler: functions/handler.hello
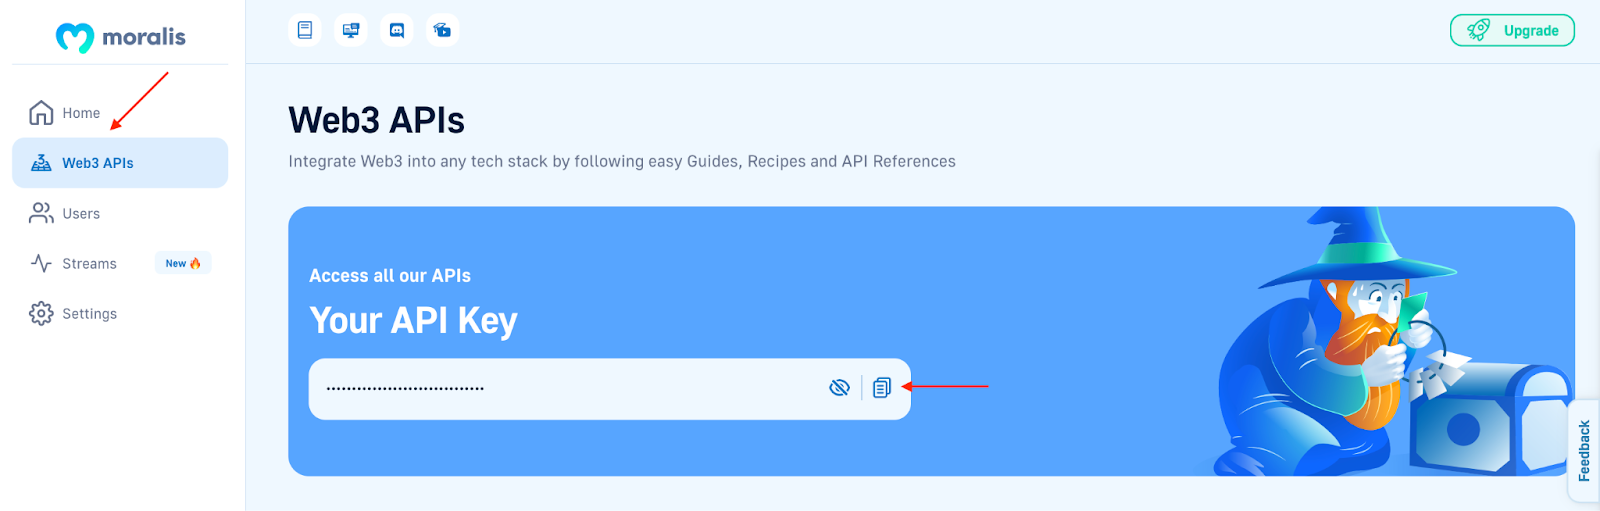
Moreover, if you inspect the code above, you will quickly notice that you need to replace the ”replace_me” parameter with your Web3 API key. You can find the key by logging into Moralis and navigating to the ”Web3 APIs” tab:
Step 3: Creating the Lambda App
Now, with the initial template at your disposal, it is time to take a closer look at the central part of this tutorial and show you how to create a Lambda function. To begin with, you need to install the Moralis dependencies. As such, open a new terminal and ”cd” into the root folder of the project. From there, install Moralis by running the command below:
npm install moralis
In the following subsections, we will cover the two functions of the app: ”getNativeBalance()” and ”getWalletNfts()”. The first function will fetch the native token balance of a Web3 wallet; meanwhile, the second returns the wallet’s NFTs. Nonetheless, let’s start with ”getNativeBalance()”.
The “getNativeBalance()” Function
First up, go ahead and change the name of the existing ”handler.js” file to ”getNativeBalance.js”:

Next up, continue by opening the file and replacing ”module.exports.hello” with ”module.exports.handler”:
Also, make sure to change the function name and handler in “serverless.yml”:

From there, you need to add Moralis’ ”getNativeBalance” functionality. To do so, start by inputting the Moralis requirements at the top of the file:
const Moralis = require('moralis').default;
You can then proceed by initializing Moralis with your API key by adding the following code snippet:
const startMoralis = async () => {
  await Moralis.start({
    apiKey: process.env.MORALIS_API_KEY
  });
};

startMoralis();
Finally, replace the ”module.exports.handler” part of the file with the code below, which implements the SDK method for fetching the native balance of a wallet:
module.exports.handler = async (event) => {
  // Get native balance
  const nativeBalance = await Moralis.EvmApi.balance.getNativeBalance({
    address: event.address,
    chain: event.chain
  });

  // Format the native balance formatted in ether via the .ether getter
  const nativeBalanceEther = nativeBalance.result.balance.ether;

  return {
    result: nativeBalanceEther
  }
};
Ultimately, this should be the final state of the ”getNativeBalance.js” file:
'use strict';
const Moralis = require('moralis').default;

const startMoralis = async () => {
  await Moralis.start({
    apiKey: process.env.MORALIS_API_KEY
  });
};

startMoralis();

module.exports.handler = async (event) => {
  // Get native balance
  const nativeBalance = await Moralis.EvmApi.balance.getNativeBalance({
    address: event.address,
    chain: event.chain
  });

  // Format the native balance formatted in ether via the .ether getter
  const nativeBalanceEther = nativeBalance.result.balance.ether;

  return {
    result: nativeBalanceEther
  }
};
That is it for the first function! Let’s follow the same steps to implement the ”getWalletNfts()” function in the section below!
The “getWalletNfts()” Function
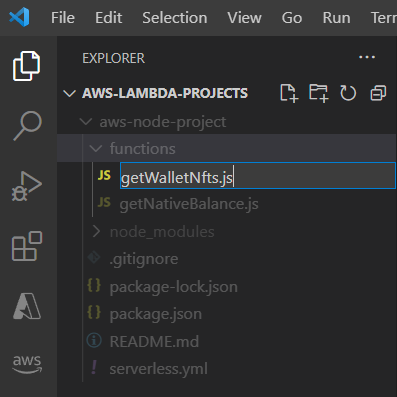
To create the ”getWalletNfts()” function, you need to add a new file to the ”functions” folder and name it ”getWalletNfts.js”:
From there, open the file and add the following code:
'use strict';
const Moralis = require('moralis').default;

const startMoralis = async () => {
  await Moralis.start({
    apiKey: process.env.MORALIS_API_KEY,
  });
};

startMoralis();

module.exports.handler = async (event) => {
  // Get wallet NFTs
  const nfts = await Moralis.EvmApi.nft.getWalletNFTs({
    address: event.address,
    chain: event.chain,
    limit: 10
  });

  return {
    result: JSON.stringify(nfts)
  }
};
Lastly, to top things off, open the ”serverless.yml” file and add the code snippet below to the ”functions” section of the file:
getWalletNfts:
    handler: functions/getWalletNfts.handler

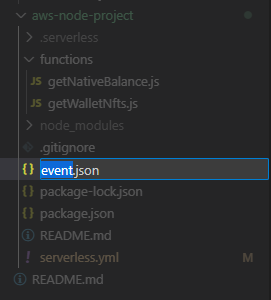
Congratulations! You have now completed the process of creating a Lambda function! However, before moving on, it is a good idea to run a test to ensure everything works. As such, progress by creating a new ”event.json” file in the root folder of the project:
You then need to add ”address” and ”chain” parameters to the file, which will look something like this (make sure to add the address you want to query information from and the correct chain ID):
{
    "address": "0x99EXAMPLEADDRESS",
    "chain": "chain_id"
}
Next up, you can test either of the functions by opening a terminal and running the command below:
serverless invoke -f FUNCTION_NAME --path event.json
However, notice that you must replace ”FUNCTION_NAME” with one of the functions’ names. Consequently, if you decide to test ”getNativeBalance()”, the terminal should return the following message if the function works:

That’s basically it! All that remains from here is deploying the application to AWS Lambda, and we will cover this in the following bonus step!
Bonus Step: Deploy Your AWS Lambda Function
Now that you are successful in creating a Lambda function, all that remains is uploading the project to AWS Lambda. Fortunately, deploying AWS Lambda functions is relatively simple. Open a terminal, ensure that you are in the project’s root folder, and run the following command:
serverless deploy
If the application successfully deploys, the terminal should return a message similar to the one below:

That covers the entire AWS Lambda NodeJS tutorial from start to finish! You now know how to create an AWS Lambda function and deploy it to the service. As such, you can now run JavaScript code via Lambda and use your newly acquired skills in all future Web3 development endeavors!
If you experienced trouble during the tutorial, make sure to check out Moralis’ AWS Lambda Web3 documentation. The docs cover the process from start to finish and will most likely answer any questions you might have!
Summary – How to Create an AWS Lambda Function
In this tutorial, you learned how to create an AWS Lambda function, and thanks to Moralis, you were able to do so in only three steps:
- Prerequisites
- Configuring AWS and Setting Up a Project
- Creating the Lambda App
Following the tutorial, you can easily build, test, deploy, and run JavaScript code through AWS Lambda. As such, now that you are familiar with creating AWS Lambda functions, you can combine your newly acquired knowledge with additional Moralis tools to build sophisticated Web3 projects!
If this sounds interesting, consider checking out other Moralis tools, like the various Web3 APIs. Among them, you will find the Auth API. With this tool, you can easily implement multiple authentication mechanisms into your blockchain projects. If this sounds exciting, check out our articles on how to add a sign in with RainbowKit or add Coinbase Wallet login functionality! So, if you want to access a more seamless developer experience and use tools like Moralis’ Web3 APIs, sign up with Moralis immediately!
