Storage solutions for NFT metadata vary, ranging from popular centralized storage services to excellent decentralized storage solutions. In this article, we’ll focus on a decentralized alternative that stands out from the crowd – IPFS. Also, we’ll look at how devs can create an “IPFS NFT” as a result of using the following endpoint:
const response = await Moralis.EvmApi.ipfs.uploadFolder({ abi });
If you’ve used Moralis before, you probably know how to implement the above code snippet. However, this might be your first time hearing about Moralis. If so, complete today’s “NFT IPFS” tutorial and learn how to use IPFS for NFT metadata. Furthermore, to complete this tutorial, you’ll need a free Moralis account and about five minutes of your time.
Overview
In the upcoming sections, we’ll first make sure that you all know what NFTs, NFT metadata, and IPFS are. After all, if you want to confidently answer the “what is an IPFS NFT?” question, you need to understand these concepts. We will also inform you whether or not to focus on IPFS NFTs. As such, by the time you get to today’s tutorial section, you’ll know the ins and outs of NFTs and IPFS. In turn, you’ll be able to decide if you want to use the NFT IPFS storage solution for your future projects.
If you decide to complete today’s tutorial, you will learn how to create and upload IPFS NFT metadata using JavaScript (JS) or TypeScript (TS). First, you’ll learn what prerequisites you need to take care of. Then, we’ll take you through the three steps involved in the process. Moreover, we’ll provide you with all the command lines and an example script to get to the finish line without breaking a sweat. Ultimately, you’ll get to upload example NFT metadata to IPFS by simply copy-pasting our lines of code and our commands.
Exploring NFTs and IPFS
As mentioned above, you need to know what NFT and IPFS are to properly understand an IPFS NFT. Therefore, we will use the next three sections to ensure you get a clear picture of where IPFS and NFTs intersect. So without further ado, let’s begin by looking closer at NFTs, NFT-representing files, and NFT metadata!
NFTs, NFT-Representing Files, and NFT Metadata
Non-fungible tokens, or NFTs, are special kinds of crypto assets. Unlike fungible tokens, they are non-interchangeable since every NFT possesses a unique on-chain signature. As such, it shouldn’t come as a surprise that NFTs are used to represent digital art and digital collectibles. However, it’s worth pointing out that NFTs can represent any unique digital or physical item. This representation is typically done by assigning NFT-representing files to NFTs. However, it’s important to note that these files are not stored on the blockchain. After all, that would have economic and technical consequences since blockchains are not designed to store large files.
Instead, devs store files representing NFTs using cloud storage solutions. IPFS is one of the best decentralized options for that purpose (more on that below). Furthermore, after properly storing the files, devs obtain their URLs and add them to NFT metadata. Moreover, the latter includes some other details about NFTs and usually comes in the form of JSON files. Just like NFT-representing files, devs tend to store NFT metadata files in the same manner. As such, IPFS NFT metadata storing tends to be the most common solution.
The details actually included in the NFT smart contracts are the links to NFTs’ metadata (URIs). Of course, smart contracts include other standardized pieces of information as well. However, the details depend on the type of NFT (ERC-721, ERC-1155, SPL, etc.). Finally, once Web3 devs deploy the NFT smart contracts, they create (mint) NFTs. During that process, an on-chain transaction stores the NFT metadata links (URIs) on the blockchain.
Now that you have a better understanding of what NFTs, NFT-representing files, and NFT metadata are, it’s time to explore IPFS.
What is IPFS?
InterPlanetary File System, or IPFS, is a distributed system for uploading, storing, and accessing websites, applications, data, and files. Furthermore, Protocol Labs developed this peer-to-peer (P2P) hypermedia protocol to preserve and grow humanity’s knowledge. After all, IPFS makes the web more resilient, upgradeable, and open.
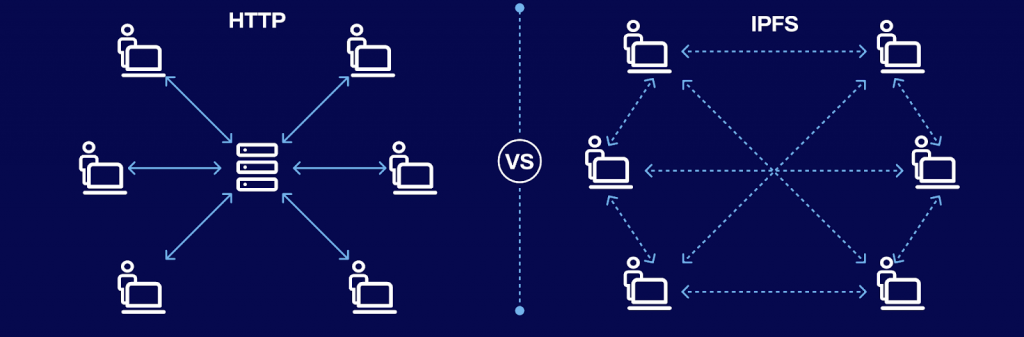
Moreover, as a P2P file-sharing protocol, IPFS enables users to host and access content in a decentralized manner. In addition, user operators host a portion of the overall data, which creates a unique and innovative system for storing and sharing files or other content. Also, note that IPFS is not location-based, like the traditional HTTP system. Instead, it utilizes a content-addressing strategy. Hence, all pieces of content within the IPFS ecosystem have a unique hash that serves as a content identifier (CID). As a result, IPFS users can find any file, website, data, etc., based on its contents rather than location. Essentially, to find specific data, IPFS utilize cryptographic hashes unique to the requested content. Moreover, IPFS also identifies content by linking it together.
How IPFS Works
If you want to dive deeper into how IPFS operates, make sure to use this protocol’s documentation. However, quickly covering the following three principles will help you appreciate IPFS NFTs:
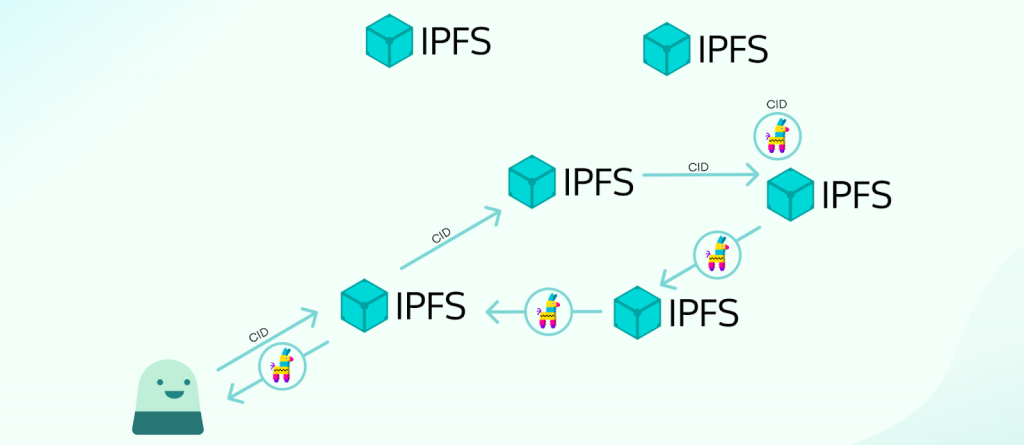
- Identification via Content Addressing – When using IPFS, the content is found by “what is in it” rather than “where it is located”. This is possible because every piece of content within the IPFS protocol has a CID (a unique hash to the content’s origin).
- Content Linking Through DAGs (Directed Acyclic Graphs) – IPFS uses Merkle DAGs, in which all nodes have an identifier in the form of a hash of the node’s contents. Furthermore, IPFS generally splits the users’ content into various parts of blocks to build Merkle DAG representations. This means that different file parts can come from multiple sources and still authenticate efficiently. In a way, this is similar to using BitTorrent, which lets you fetch a file from several peers simultaneously.
- Content Discovery via DHTs (Distributed Hash Tables) – IPFS utilizes a DHT to find out what peers are hosting the content that users query. Moreover, since hash tables are essentially databases of keys to values, a DHT is a table split across the peers in a distributed network. Hence, to find the content, you query these peers.
What is an IPFS NFT?
By this point, you know what NFTs and IPFS are. Hence, you probably already have a solid idea of what IPFS NFTs are. However, since the term “IPFS NFT” can be a bit confusing, understanding what an NFT is and what IPFS entails may not be enough. Thus, a word of explanation is in order.
An IPFS NFT is not a non-fungible token “owned” or “minted” by IPFS. Instead, the term “IPFS NFTs” refers to all NFTs that use IPFS to store the files representing NFTs, NFT metadata, or both. Additionally, in the same manner, “IPFS NFT metadata” focuses on the NFT metadata files that are stored using IPFS.
Should You Use IPFS for NFT Storage?
There are some specific projects and NFT utilities that can actually provide additional value to users by using a centralized storage solution for NFT-representing files and/or NFT metadata files. However, everyone involved in Web3 development should strive for a proper level of decentralization. Accordingly, we believe decentralized storage solutions are the way to go. When it comes to these solutions, IPFS tends to be the best option. Now, before you start using the NFT IPFS solution, make sure you understand the main pros and cons of using IPFS for NFT storage. One of the main downsides of IPFS is that it doesn’t permanently store the files as it doesn’t use blockchain technology. However, this is where Filecoin complements IPFS neatly.

On the other hand, IPFS comes with some clear upsides:
- Efficiency and Low Price – IPFS’ P2P system retrieves content from a multitude of nodes simultaneously, which makes it highly efficient. This also enables substantial bandwidth savings. After all, the boost in efficiency contributes to a cheaper system.
- Resilience – IPFS provides a highly resilient system by making it simple to create networks for mirroring data. In addition, thanks to content addressing, the content of IPFS is autonomously versioned.
- Decentralization – Censorship of information and issues with single points of failure are the core problems of centralized storage solutions and Web2 in general. Hence, the decentralized nature of IPFS removes these problems by providing a flat and open web.
- Availability – By facilitating the creation of resilient networks, IPFS makes for more persistent availability. For example, this results in increased connectivity for the developing world or those slow coffee shop WiFi connections.

IPFS NFT – How to Use IPFS for NFT Metadata Storage with Moralis
It’s time to initiate the action steps for this tutorial! We’ll take you through a simple three-step process that will enable you to create and upload IPFS NFT metadata in a matter of minutes. If you remember the code snippet from the top of the article, you probably already know that the main protagonist of this part is Moralis’ “uploadFolder” IPFS API endpoint. The latter makes NFT IPFS storing even simpler and is a useful tool for NFT development.
However, before we give you a chance to follow our lead and upload the example metadata, make sure to complete these prerequisites:
- Install Node v.14 or higher.
- Get your favorite code editor or IDE ready. We tend to use Visual Studio Code (VSC).
- Install your favorite package manager (“npm”, “yarn”, or “pnpm”).
Step 1: Obtain Your Web3 API Key and Install the Moralis SDK
In case you haven’t done so yet, create your free Moralis account now. By doing so, you’ll get to access your admin area, where you get to obtain your Web3 API key:

We’ll show you where to paste the above-copied API key shortly. But let’s first ensure you install the Moralis SDK for your project focusing on NFT and IPFS. Fortunately, you get to do that with a single command (use the one that matches your package manager):
npm install moralis
yarn add moralis
pnpm add moralis
Step 2: Use an Example “Index.js” Script
With the Moralis SDK in place, you can create an “IPFS NFT metadata” script that properly incorporates the “uploadFolder” endpoint. Here are the lines of code that will do the trick:
const Moralis = require('moralis').default;
const { EvmChain } = require('@moralisweb3/evm-utils');

const runApp = async () => {
  await Moralis.start({
    apiKey: "YOUR_API_KEY",
    // ...and any other configuration
  });

    const abi = [
    {
        path: "metadata.json",
        content: {
        name: "NFT Name",
        description: "This will be the NFT description.",
        image: "ipfs://bafybeihewi4brhhmjqvquwdqnlzhnamfh26txwmw2fe4nfswfckpthowna/brandResoursesMage2.svg",
        attributes: [
          {
            "trait_type": "Base",
            value: "Starfish"
          },
          {
            "trait_type": "Eyes",
            value: "Big"
          },
          {
            "trait_type": "Mouth",
            value: "Surprised"
          },
      },
    },
    ];

  const response = await Moralis.EvmApi.ipfs.uploadFolder({ abi });

  console.log(response.toJSON());
}

runApp();
To use the above lines of code, you must replace the “YOUR_API_KEY” placeholder with your Web3 API key obtained in step one. Moreover, looking at the lines of code above, you can see the details of “abi“. This is where we define the path and content and all the details related to our example IPFS NFT metadata.
Furthermore, the above script also includes an example image, which we already uploaded to IPFS. You can use the Brave browser to view it:
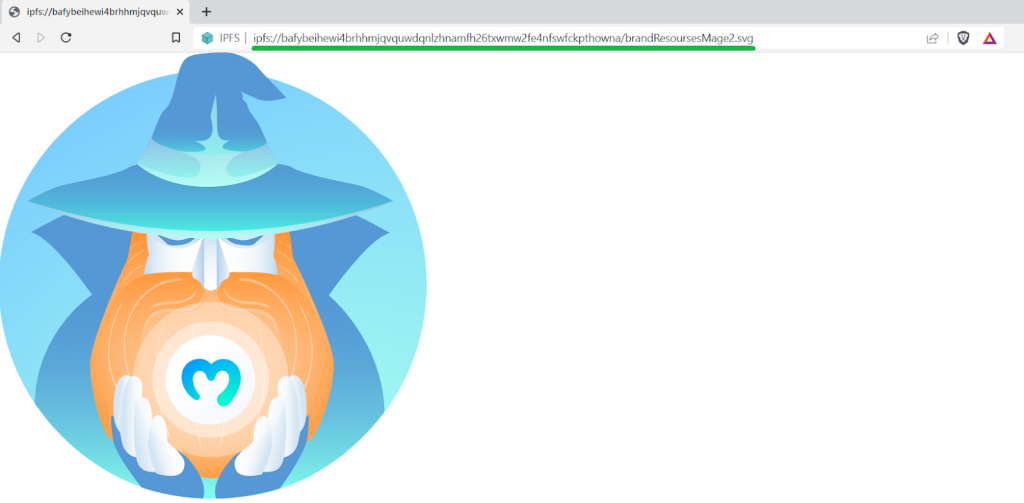
Of course, if you were to use the above example script to upload your IPFS NFTs, you’d want to replace the placeholders indicating the name, description, and NFT attributes. In addition, you’d also want to use your own image, upload it to IPFS, and replace the above IPFS address with it.
Note: The above lines of code focus on using JavaScript. However, you can visit the documentation page to upload NFT metadata to IPFS and copy the lines of code in TypeScript.
Step 3: Execute the Example NFT and IPFS Program
You’ve reached the final stage of this “NFT IPFS” tutorial. Presuming that you are using the above JavaScript example script, you just need to enter the following command in your terminal:
node index.js
Note: In case you are using the “index.ts” script, you will need to use the “npx ts-node index.ts” command instead.
Finally, use your terminal to explore the results. Make sure to copy the path it returns and use the Brave browser to view your NFT’s metadata.
IPFS NFT – How to Use IPFS for NFT Metadata – Summary
We covered quite a distance in today’s article. We started by explaining the basics required to understand what IPFS NFTs are. Hence, you now know what NFTs, NFT metadata, and IPFS are. You also learned the gist of how IPFS works. To help you decide whether you should use IPFS for NFT storage or not, we also looked at some main pros and cons of this decentralized storage solution. Finally, we took you through our “NFT IPFS” three-step tutorial, where you learned how to create and store IPFS NFT metadata.
To make the most out of the knowledge and skills obtained herein, we encourage you to try and create your own example NFT(s). Then, take things to the next level by building a dapp (decentralized application) that incorporates those NFTs using the Moralis Web3 Auth API, NFT API, and Streams API. Of course, you can find the exact instructions on how to do that in the Moralis docs, the Moralis YouTube channel, and the Moralis blog. The two latter outlets are also great for expanding your blockchain development horizons. For instance, some of the latest topics focus on how to get NFT metadata, get all NFTs from a collection in three steps, how to get all NFTs owned by address, the easiest way to create NFTs on Solana, and much more.
Nonetheless, you might be eager to go full-time crypto as soon as possible. If so, you can significantly increase your chances of landing your dream job in this disruptive industry by becoming blockchain-certified. Hence, make sure to enroll in Moralis Academy and start by mastering Ethereum fundamentals.
