When creating an NFT project, tools that streamline NFT-related tasks, such as getting NFT metadata, are essential. Thanks to the ultimate NFT API from Moralis, a developer can easily get the metadata of an NFT when using the “getNFTMetadata” endpoint:
const response = await Moralis.EvmApi.nft.getNFTMetadata({
    address,
    chain,
    tokenId,
});
So, how to get NFT metadata? It’s as simple as using the code snippet above! Now, if you’ve worked with Moralis‘ Web3 APIs before, odds are you know how to incorporate the above lines of code in your scripts correctly. As such, simply use the documentation link below to get started! However, if you are new to Moralis, make sure to finish this article’s tutorial. By doing so, you’ll learn how to get NFT metadata the easy way. You’ll just need your free Moralis account and a few minutes of your time to get to the finish line.
Overview
So far, JPEGs have been the most common files representing NFTs, but these files can come in all sorts of formats and types. That said, these files are not the real value NFTs bring to the table. The ultimate treasure of NFTs lies in their unique encryption, which makes them ideal for representing unique digital or physical items. Moreover, metadata hides in tokens’ on-chain signatures; hence, it’s important to know how to get NFT metadata as a developer. That’s exactly why you should learn to work with the Moralis “getNFTMetadata” endpoint.
However, before we take a closer look at this awesome NFT API endpoint and how to utilize it, we need to cover some basics. As such, we’ll first ensure you know what NFT metadata is and where it is stored. With this theory under your belt, you’ll be able to appreciate the ease of today’s task with the above-mentioned endpoint.
What Exactly is NFT Metadata?
By definition, metadata is data that provides information about other data. Accordingly, NFT metadata provides information about the data related to a non-fungible token. That said, you must understand what NFTs are to understand NFT metadata properly.
Non-fungible tokens (NFTs) are unique types of blockchain assets that are not interchangeable, as “non-fungible” suggests. Each NFT has a unique token ID, even if they use the same NFT-representing file. Furthermore, every NFT’s on-chain data is unique, which makes them perfect for digital art, digital collectibles, ownership proofs, certificates, etc.
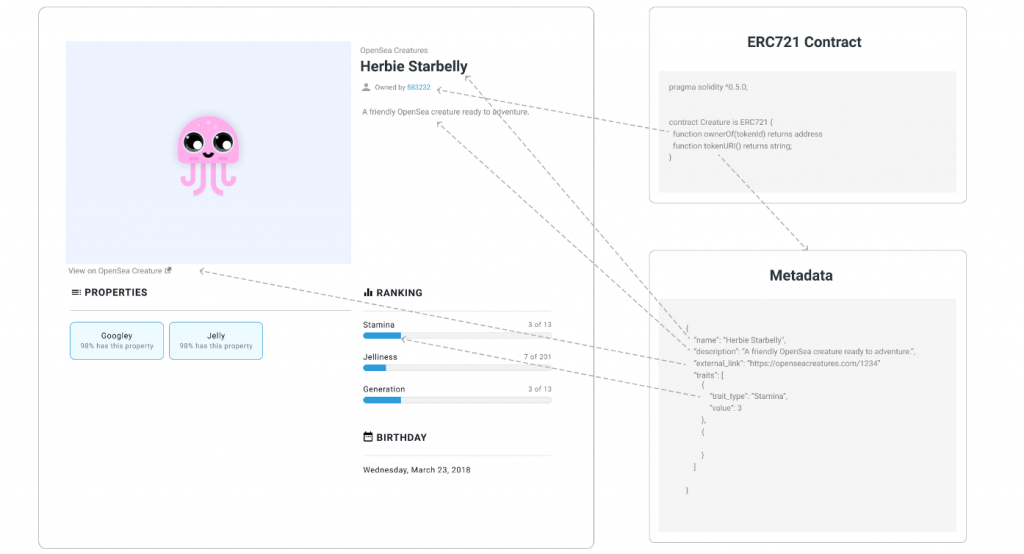
Now, we suggest you take a look at the above image to get an even better sense of what kind of details NFT metadata includes. Note that the NFT-representing files are too large for us to store them directly on the blockchain, both from technical and financial perspectives. Thus, we use cloud storage solutions (decentralized ones, ideally) to store these files. Then, we use the files’ location links (URLs) and include them inside the NFT metadata. So, when you learn to get the data, you also learn to get the NFT-representing files.
Of course, there are other pieces of information about NFTs in their metadata files, which normally come in JSON format. The exact details that a specific metadata file includes vary depending on the NFT type. However, certain NFT standards (ERC-721, ERC-1155, SPL, etc.) are set in place to provide guidelines. In addition, there are some mandatory pieces of information and some optional ones inside NFT metadata. For instance, in the case of ERC-721 or ERC-1155 NFTs, metadata usually includes a description, a name, and an NFT-representing file destination, and you can even add attributes to NFTs or traits.
Where is the Metadata of an NFT Stored?
Above, we mentioned that files representing NFTs are too large to be stored on a blockchain. While NFT metadata files are typically a lot smaller, it is still not practical to store them directly on the blockchain. Instead, when minting NFTs (deploying NFT smart contracts), we save the NFT metadata links (URIs) on the blockchain. We also use cloud storage solutions to save the NFT metadata files.

Furthermore, it’s worth pointing out that everyone involved in Web3 development should aim for the highest level of decentralization. Thus, ideally, NFT developers should store all files and NFT metadata files using decentralized storage solutions. However, there are certain instances where a project can add value to its users by actually using a centralized NFT metadata storage option. With that said, the exact location of files representing NFTs and NFT metadata varies from project to project.

For instance, NFT projects that take decentralization seriously store their NFT-representing files and their NFT metadata in some sort of decentralized cloud storage solution. A popular choice is the InterPlanetary File System (IPFS) solution. On the other hand, a more centralized NFT project would store its NFT files and metadata using one of the centralized cloud storage services. Nonetheless, a sort of hybrid between centralized and decentralized NFT projects is also possible. In such cases, NFT metadata could be stored in a decentralized manner, while NFT-representing files would be stored using a centralized storage solution or vice versa.
Furthermore, it’s worth pointing out that no matter where you store files and NFT metadata, the actual tokens are still minted on a blockchain. Thus, their contract addresses and IDs are immutable. Moreover, when you want to get NFT metadata, you do not need to know where it’s stored.
How to Get NFT Metadata
Thanks to the above-covered details about NFT metadata, you now know that to get NFT metadata, you need to look for NFTs’ URI links that point to JSON files. Furthermore, you also know that those URIs contain all the details, including the URLs of the associated NFT-representing files. As such, if you are not planning to do any programming around NFTs, you can simply use blockchain explorers or NFT marketplaces to get the metadata of an NFT. Nonetheless, you can also use the Moralis “getNFTMetadata” endpoint’s documentation page. Since we’ll use that endpoint in the upcoming tutorial, let’s take a closer look at it together:
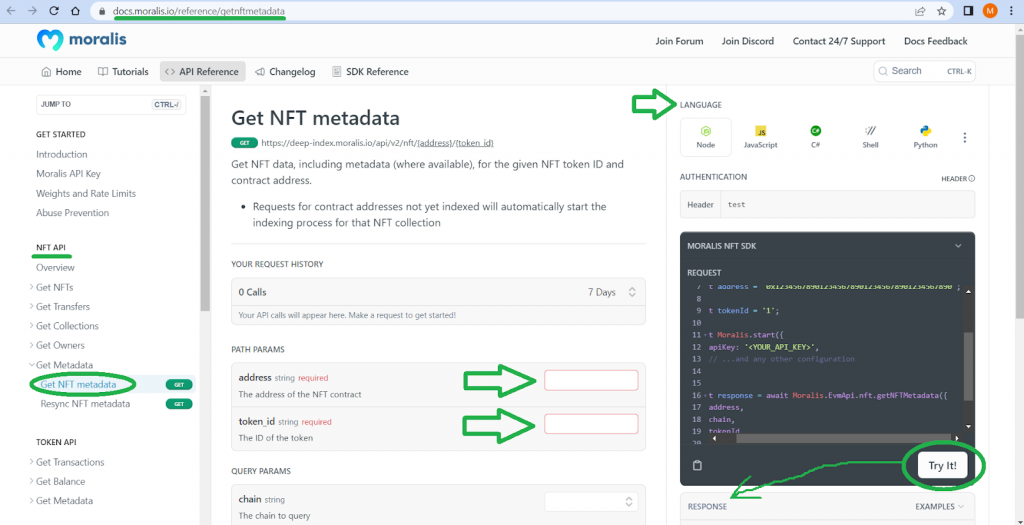
Looking at the above screenshot, you can see that this endpoint lets you test the script and copy the snippet of code that matches your preferred programmable language. Also, you can see that in order to get the NFT metadata of an NFT, you need to enter some parameters. An NFT smart contract address and token ID are required, while “chain“, “format“, and “normalizeMetadata” are optional. So, make sure to obtain your Moralis Web3 API key (see the “Step 1: Set Up Moralis” section below) and take the “getNFTMetadata” endpoint for a spin.
Nonetheless, note that “getNFTMetadata” is just one of the ultimate NFT API endpoints. Hence, we encourage you to explore the Moralis documentation to learn more about this powerful tool. After all, these endpoints are your ticket to building all sorts of NFT dapps the easy way. Aside from getting NFT metadata, you can also get ownership data, NFT transfer data, NFT prices, and more. To offer your users a neat way to authenticate themselves, make sure to check out the Moralis Web3 Auth API. Also, with Web3 streams, users can stream blockchain data straight to their backend!

Tutorial – How to Get the Metadata of an NFT
Now that you know the theory behind getting NFT metadata, it’s time you get your hands dirty. So, make sure to complete the three steps outlined in the following sections. However, before you can tackle those steps, you need to complete the following prerequisites:
- Install your favorite package manager (npm, yarn, or pnpm).
- Prepare your favorite IDE or code editor. We prefer to use Visual Studio Code (VSC).
- Install Node v.14 or higher.
If you have all of the above tools in place, you are ready to use the “getNFTMetadata” endpoint to get the metadata of an NFT.
Step 1: Set Up Moralis
You need your Moralis Web3 API key to use the ultimate NFT API. Fortunately, you get to obtain that key from your Moralis admin area. To access the latter, you need to create a free Moralis account. Hence, use the “free Moralis account” link stated at the outset of this article or click on the “Start for Free” button in the top-right corner of the Moralis homepage:

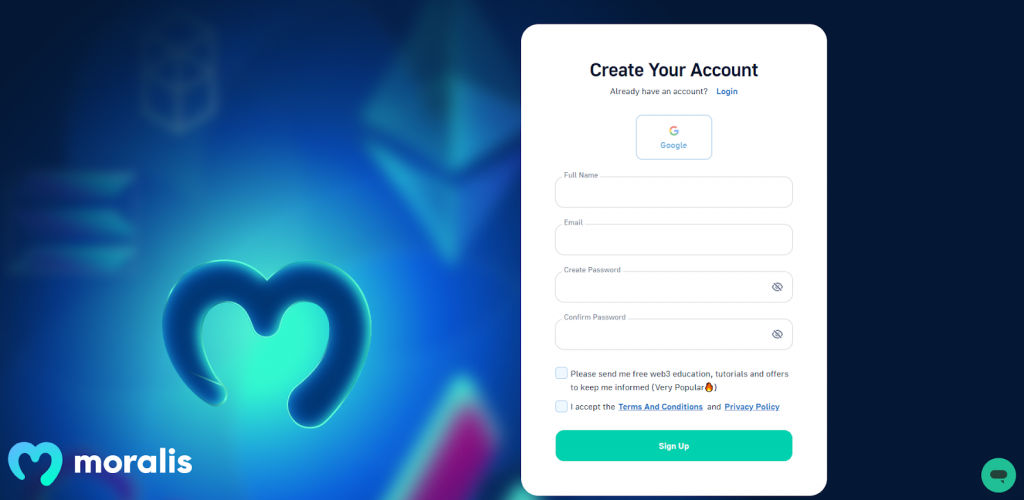
Whichever path you choose, you’ll land on the register page. There, simply enter your details. With your full name, email address, and password in place, accept the terms and conditions and click on the “Sign Up” button:
Last but not least, don’t forget to confirm your account via the confirmation link that awaits you in your email inbox.
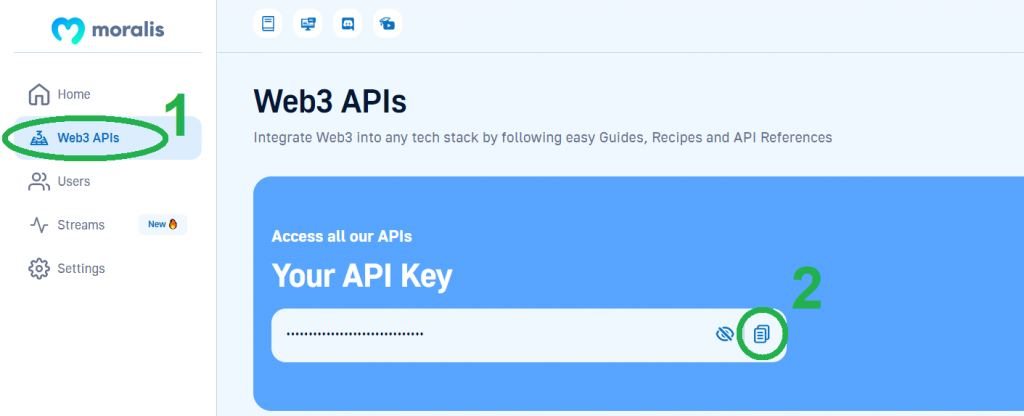
With your account up and running, you get to access your Moralis admin area. From there, you’ll be able to copy your Web3 API key in the following two steps:
Hold on to your API key for now. First, install the Moralis SDK by running one of the commands below. Choose the one that matches the package manager that you are using:
npm install moralis
yarn add moralis
pnpm add moralis
Step 2: Using an Example Script
In this section, we’ll provide you with an example script that enables you to get the metadata of an NFT with just a few lines of code. As such, this is an example “index.js” script that fetches NFT metadata:
const Moralis = require("moralis").default;
const { EvmChain } = require("@moralisweb3/evm-utils");

const runApp = async () => {
  await Moralis.start({
    apiKey: "YOUR_API_KEY",
    // ...and any other configuration
  });

  const address = "0xb47e3cd837dDF8e4c57F05d70Ab865de6e193BBB";

    const chain = EvmChain.ETHEREUM;

  const tokenId = 3931;

  const response = await Moralis.EvmApi.nft.getNFTMetadata({
      address,
      chain,
      tokenId,
  });

  console.log(response);
}

runApp();
Note: If you’d rather work with TypeScript, follow the “documentation page” link above and select “index.ts”.
Looking at the above lines of code, you can see “EvmChain.ETHEREUM“. If you remember, this is an optional parameter that the “getNFTMetadata” endpoint takes in. Furthermore, this parameter defines the chain the NFT we target is stored on. Since we are focusing on a CryptoPunk NFT with ID 3931, we need to focus on the Ethereum chain. However, if you were to explore NFTs on other chains, you’d simply need to replace “ETHEREUM” with another chain. In that case, make sure to check out Moralis’ supported EVM-compatible chains.
Also, don’t forget to paste your Moralis Web3 API in the “YOUR_API_KEY” parameter.
Step 3: Executing the Program to Get NFT Metadata
At this point, you should have your “index.js” or “index.ts” file ready. As such, you can execute the program to get NFT metadata for a specific address and NFT token ID. To do so, use your terminal and enter one of these two commands:
For JavaScript:
node index.js
For TypeScript:
node index.ts
Once you execute the appropriate command, look at your terminal to see what the code returns. If you used the “0xb47e3cd837dDF8e4c57F05d70Ab865de6e193BBB” address and 3931 token ID, you should see these results:
{
  "token_address": "0xb47e3cd837ddf8e4c57f05d70ab865de6e193bbb",
  "token_id": "3931",
  "transfer_index": [
    13868997,
    30,
    36,
    0
  ],
  "owner_of": "0x1cf2b8c64aed32bff2ae80e701681316d3212afd",
  "block_number": "13868997",
  "block_number_minted": "5754322",
  "token_hash": "3c86855c82470edd82df190019e83f16",
  "amount": "1",
  "contract_type": null,
  "name": "CRYPTOPUNKS",
  "symbol": "Ͼ",
  "token_uri": "https://www.larvalabs.com/cryptopunks/details/3931",
  "metadata": "{\"image\":\"https://www.larvalabs.com/cryptopunks/cryptopunk3931.png\",\"name\":\"CryptoPunk 3931\",\"attributes\":[\"Vampire Hair\",\"Goat\"],\"description\":\"Male\"}",
  "last_token_uri_sync": null,
  "last_metadata_sync": "2022-05-12T18:00:22.340Z",
  "minter_address": "0xc352b534e8b987e036a93539fd6897f53488e56a"
}
Looking at the results above, you can see that thanks to the power of “getNFTMetadata“, you get the NFT’s metadata URI and all the details included in the NFT metadata. As such, you can now easily utilize these details in various NFT dapps.

Get NFT Metadata – How to Get the Metadata of an NFT – Summary
Today’s article demonstrated how to get NFT metadata with just a few lines of code. You also had a chance to learn what NFT metadata is and where we store it. As such, you now know that you can store metadata in the form of JSON files with centralized or decentralized storage solutions. Then, you use the URI links to the metadata when minting the NFTs. Hence, NFT metadata itself is not stored on the blockchain but only its URI link. Moreover, you also saw that by using the Moralis “getNFTMetadata” endpoint, you could extract all the details from inside the metadata. Hence, you are now ready to create some killer NFT dapps.
If you need some practice or guidance with creating your dapps, make sure to use Moralis’ resources. Use the Moralis docs to explore the ultimate Web3 API. There, you can also find various beginner-friendly tutorials. However, if you are interested in learning more about blockchain development, the Moralis YouTube channel and the Moralis blog are the places to be. There we cover countless topics that can help you become a Web3 developer for free. For instance, some of our latest articles revolve around building a Discord bot for on-chain events, Solana smart contract examples, how to get all NFTs from a contract, crypto wallet integration, integrating Web3 infrastructure, what Ethereum webhooks are, and much more!
It’s also worth pointing out that the blockchain industry offers countless job opportunities, and you can greatly improve your chances of going full-time crypto by becoming blockchain-certified. If that interests you, make sure to consider enrolling in Moralis Academy. There, you’ll find all sorts of blockchain development courses, from beginner to advanced. That said, we recommend starting with blockchain and Bitcoin fundamentals.