How do I get the latest block in Web3? If this is a question you have been asking yourself, then you are exactly where you need to be! This Web3 tutorial will show you how to get the current block by timestamp using Moralis. In fact, thanks to Moralis’ EVM API, all it takes is a single call to the ”get_date_to_block” endpoint while passing a date and chain as parameters:
from moralis import evm_api

api_key = "YOUR_API_KEY"

params = {

    "date": "",

    "chain": "eth",

}

result = evm_api.block.get_date_to_block(

    api_key=api_key,

    params=params,

)

print(result)
When working with the number one Web3 infrastructure provider, it does not have to be more challenging to get the current block based on a timestamp than the above! If you want to learn more about the ”get_date_to_block” endpoint, check out Moralis’ get block by date Web3 documentation.
For a more detailed breakdown of how to implement this functionality into an app, read on as we show you how to do so through an Ethereum Python implementation. What’s more, remember to register with Moralis if you plan to join us throughout this tutorial. Signing up is free, and you need an account to follow along!
Overview
In today’s Web3 tutorial, we will illustrate how to get any block by building a Python application in three steps:
- Using a Web3 get block function – Moralis’ ”get_date_to_block” endpoint
- Setting up the Web3 get block by timestamp backend
- Building the Web3 get block frontend
By the end of this tutorial, you’ll have your own Python app finalized, enabling you to continuously get blocks based on timestamps. If this sounds interesting and you want to get going immediately, click here to jump straight into the Web3 get block feature tutorial!
When building decentralized applications (dapps), platforms, and other Web3 projects, you will quickly realize that you need access to on-chain data. Since the Web3 industry is blockchain-based, you can imagine that one piece of such information is block numbers. Getting this data can help you to, for instance, access transactional data at given times. For this reason, this Web3 tutorial will show you how to get a block by a timestamp using Moralis!
To make this process as accessible as possible, we will be utilizing Moralis’ EVM API and the ”get_date_to_block” endpoint. This is one of many Web3 APIs offered by Moralis, and if you are serious about getting into the space, consider checking out additional Moralis tools. For instance, a great example is the Web3 Streams API, allowing you to stream on-chain data into your projects via Moralis webhooks!
Here at the blog, you can also explore topics beyond getting blocks based on timestamps. For instance, read about BNB testnet faucets or check out our guide on Web3.py vs Web3.js!
Now, before you proceed, remember to sign up with Moralis, as you need to have an active account to follow along. Setting one up is free and only takes a few seconds!
Web3 Get Block Feature Tutorial
In the next sections, we will kickstart this Web3 tutorial illustrating how to get a block number from any chain. More specifically, we will show you how to create a Python application enabling you to get the current block based on a timestamp!
To illustrate what you will be working towards, you can find a print screen of the app’s landing page down below:
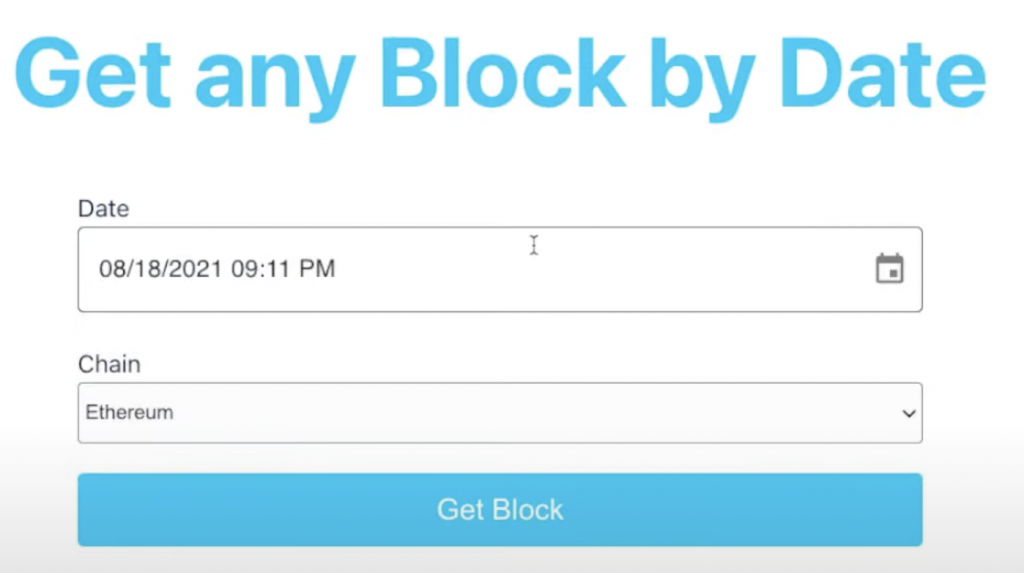
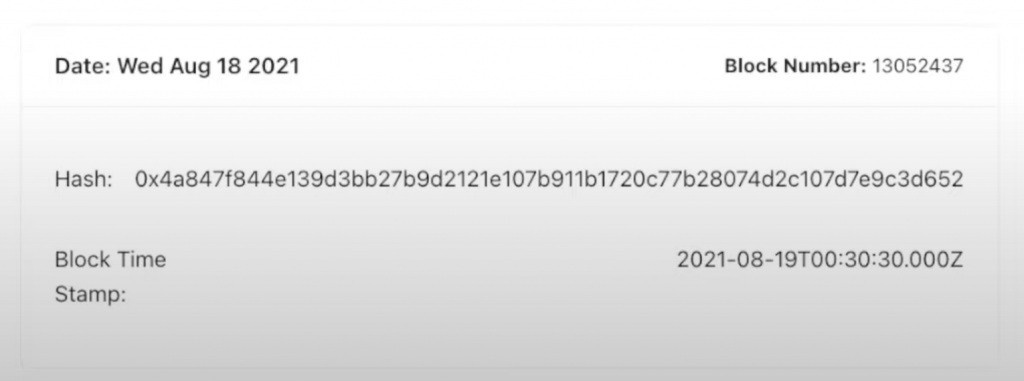
The app features three core elements: two input fields and a ”Get Block” button. To use the app, all you need to do is select a time, date, and chain, followed by hitting the button. In return, you should receive a response similar to the one shown below:
To be able to seamlessly get the current Web3 block, we will be using Moralis’ EVM API and the ”get_date_to_block” endpoint to create this app. If this sounds exciting, join us as we cover the complete process from start to finish!
If you prefer watching videos to learn, you can also check out the clip below from Moralis’ YouTube channel. In the video, one of our Web3 developers provides a comprehensive walkthrough of each step:
Now, let’s say you are unsure what a Web3 get block feature is. If so, you can read more about Moralis’ ”get_date_to_block” endpoint below the third step. Otherwise, join us as we start by covering the required prerequisites in the following sub-section!
Prerequisites
Before diving into this Web3 tutorial on how to get the current block by timestamp, you must have the following ready:
- Install Moralis – Open a new terminal and install Moralis by running the following command:
pip install moralis
- Install Django and the Rest Framework – Run the terminal inputs below to install Django and Rest:
pip install django
pip install djangorestframework django-cors-headers
- Get a Moralis Account – If you have not already, sign up with Moralis straight away!
Step 1: Using a Web3 Get Block Function – Moralis’ ”get_date_to_block” Endpoint
In this initial step, we will provide a quick demo of Moralis’ ”get_date_to_block” endpoint. This will show you how to seamlessly use a Web3 function to get a block by timestamp!
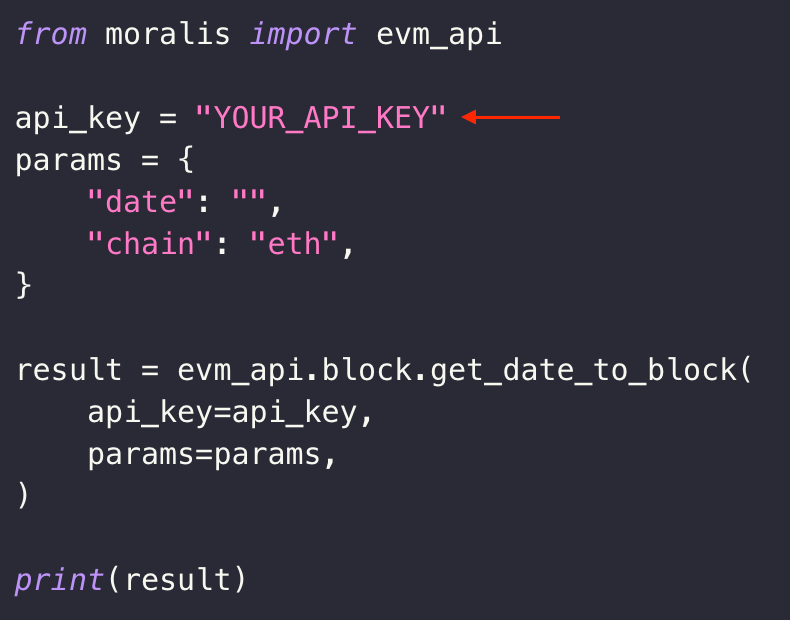
To get going, start by setting up a new Django Python project. Next, create a ”services.py” file and add the code below:
from moralis import evm_api

api_key = "YOUR_API_KEY"

params = {

    "date": "",

    "chain": "eth",

}

result = evm_api.block.get_date_to_block(

    api_key=api_key,

    params=params,

)

print(result)
From there, you need to configure the code by replacing ”YOUR_API_KEY” with your Moralis API key:
You can fetch your key by logging in to the Moralis admin panel and navigating to the ”Web3 APIs” tab:
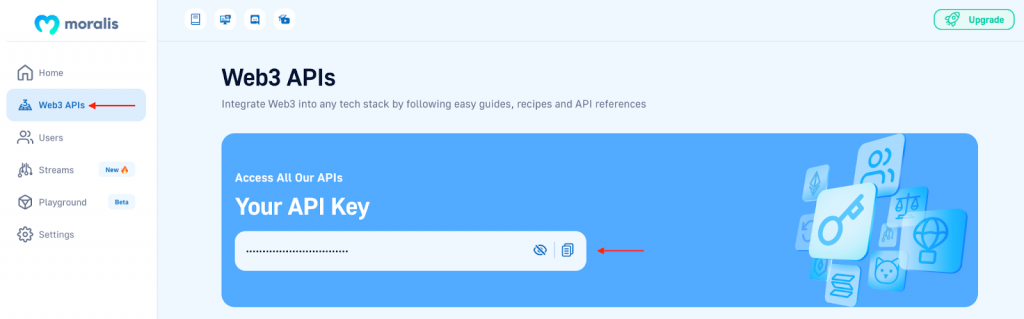
Copy your key and input it into the code. Lastly, you also need to add a date to the ”date” parameter. This must be a “Unix date” in milliseconds or a date string. For instance, it can look something like this: ”1667823435”.
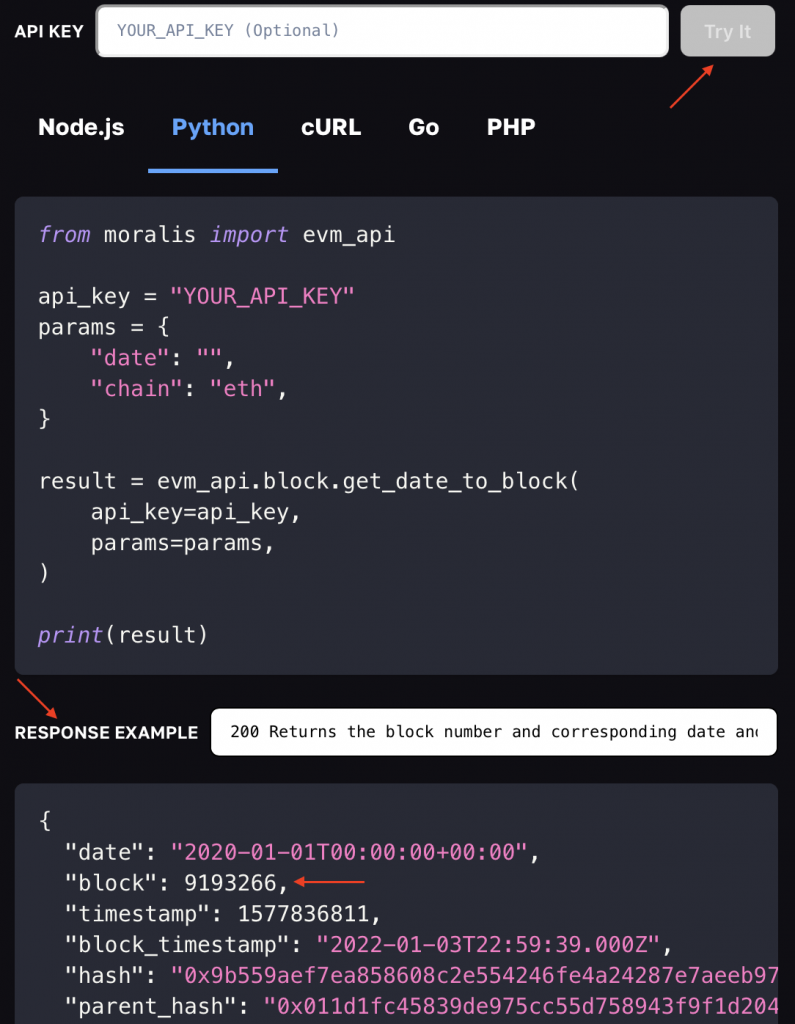
Once you are done configuring the code, all that remains is running the script. To do so, open a new terminal, input ”python services.py”, and hit enter. This should return a response similar to the one shown below. Among other things, the response contains the number of the block closest to the timestamp, which is the second parameter:
{

  "date": "2020-01-01T00:00:00+00:00",

  "block": 9193266,

  "timestamp": 1577836811,

  "block_timestamp": "2022-01-03T22:59:39.000Z",

  "hash": "0x9b559aef7ea858608c2e554246fe4a24287e7aeeb976848df2b9a2531f4b9171",

  "parent_hash": "0x011d1fc45839de975cc55d758943f9f1d204f80a90eb631f3bf064b80d53e045"

}
That’s it! Congratulations, you now know to use a Web3 function to get a block by timestamp!
In the remaining two steps, we will show you how to implement this functionality into an application. If this sounds interesting, join us in the next section as we cover the backend code!
Step 2: Setting Up the Web3 Get Block By Timestamp Backend
To create the Web3 app used to get a block by timestamp, we will be using an already-developed Python application template. So, the first thing you need to do is visit the GitHub repository down below and clone the project:
Full Web3 Get Block App Documentation – https://github.com/MoralisWeb3/youtube-tutorials/tree/main/get-block-by-date
With a copy of the project in your local directory, let us break down the backend code! First, we can go to ”services.py” to see how the code differs from the initial step:
from moralis import evm_api

from dotenv import load_dotenv

import os

load_dotenv()
api_key = os.getenv("MORALIS_API_KEY")

def get_block_by_date(date, chain):

    params = {

        "date": date,

        "chain": chain,

    }

    result = evm_api.block.get_date_to_block(

        api_key=api_key,

        params=params,

    )

    return result
The code in ”services.py” is still responsible for calling Moralis’ ”get_date_to_block” endpoint. However, we modify it by defining the ”get_block_by_date()” function, making the code more dynamic.
The ”get_block_by_date()” function takes two variables as arguments: ”date” and ”chain”. As such, we can implement logic enabling app users to specify both these parameters.
We also remove the API key from this file, as displaying this value is a security risk. As such, you need to set up a ”.env” file in your directory and create a new environment variable:
export MORALIS_API_KEY = ”REPLACE_ME”
In the snippet above, Do not forget to replace ”REPLACE_ME” with your actual key.
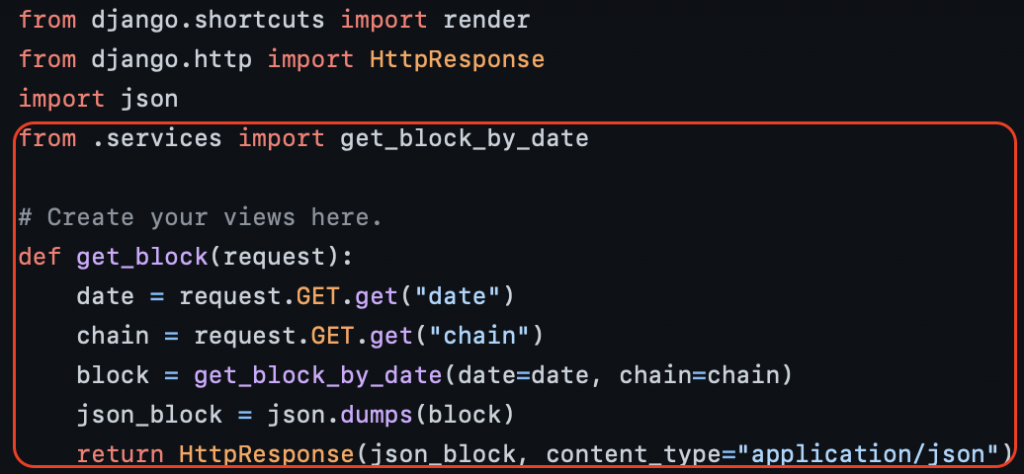
With the ”services.py” script ready, we also make sure to add it to ”views.py”:
Lastly, from there, we open the ”urls.py” file and finally add a new path:

Nevertheless, that covers the essential parts of the backend code! Let us move on to the third step of this Web3 get block tutorial and look closer at the frontend!
Step 3: Building the Web3 Get Block Frontend
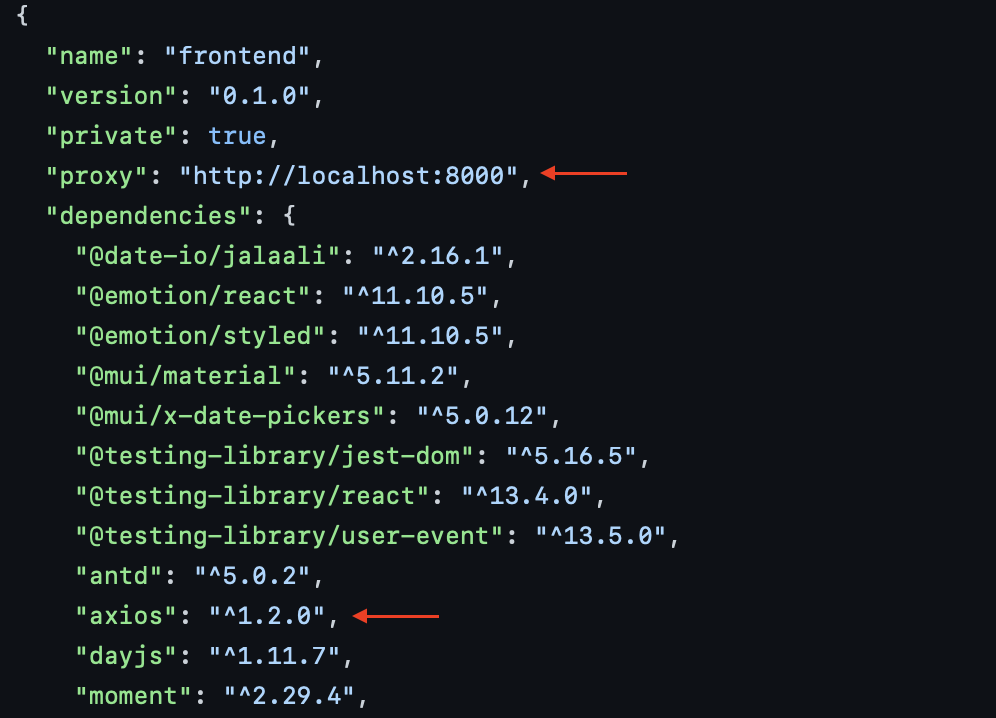
The first thing we do is open the ”package.json” file, where we make sure to add ”proxy” and ”axios”:
Next, let us examine the code in ”App.js”. Here, the central function is ”refreshBlockByDate()”:
const refreshBlockByDate = async () => {

    await axios

      .get(`/get_block?chain=${params.chain}&date=${date}`)

      .then((res) => {

        setBlockByDate(res.data);

      })

      .catch((err) => console.log(err));

};
First, we use “axios” to connect to the backend, enabling us to call the ”get_block” endpoint while passing the chain and date as parameters. These two variables are fetched from the app’s UI, allowing users to select a chain and date. From there, the remainder of the code is responsible for calculating the Unix time, rendering the response and presenting it to the users, etc.
Lastly, before launching and testing your Web3 get block app, you need to open a new terminal, ”cd” into the frontend folder, and install the “axios” dependencies with the following command:
npm axios
Congratulations! You have now created a Web3 Python application that can get a block by timestamp!
If you at any point during this Web3 get block tutorial experienced any trouble, please check out the video at the start of the article, as this will answer any of your questions. You can also check out Moralis’ get block by date Web3 documentation, explaining the ”get_date_to_block” endpoint in further detail!
What is a Web3 Get Block Feature?
As we briefly discussed in the introduction, you generally need on-chain data when developing dapps and other projects. One such piece of data is block numbers, which can be advantageous in several ways. For instance, block numbers can help you get transaction data at specific points in time.
However, querying the block number at a point in time is a challenging task, which is why developers benefit from “Web3 get block” features. A Web3 get block feature can help you to easily fetch any block based on a timestamp, and the best alternative is Moralis’ ”get_date_to_block” endpoint.
When working with Moralis, you only need a single API call to the ”get_date_to_block” endpoint. By visiting the official get block by date Web3 documentation, you can try it out yourself directly in the browser, and it looks like this:
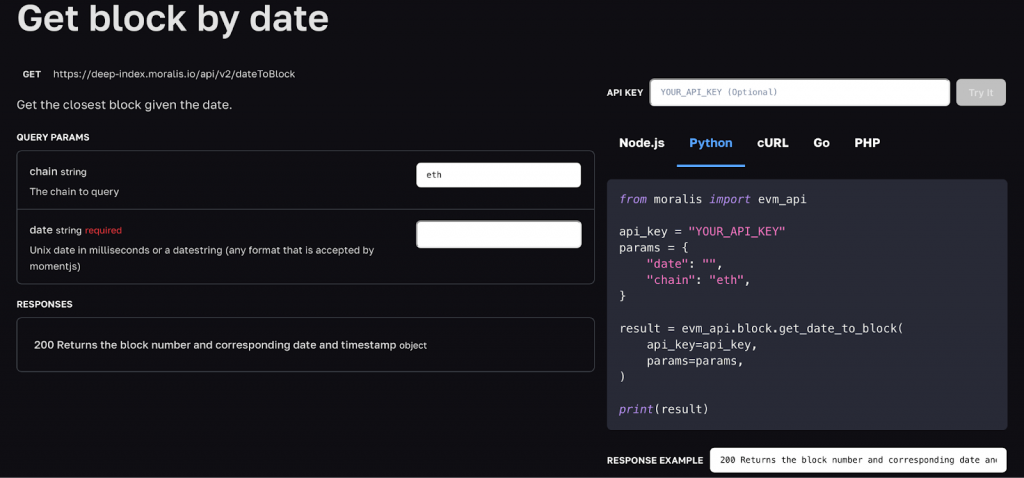
All you need to do is input a chain and a date:
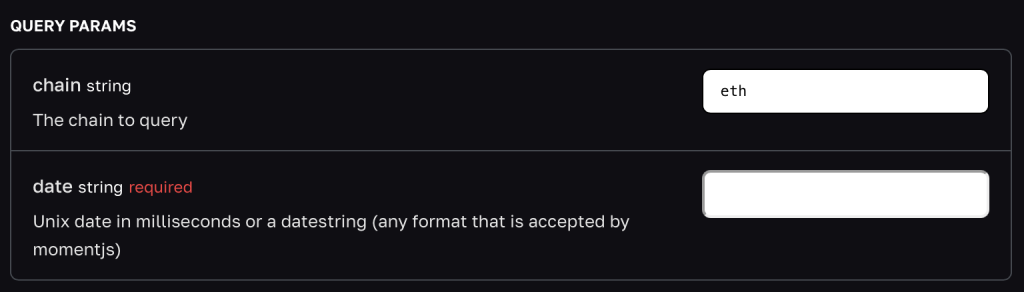
From there, you can click on the ”Try It” button and receive a response in return:
If you liked this Web3 get block tutorial and what to check out similar content, we have a couple of articles just for you. Learn how to get Ethereum transaction details, or read our ENS resolver tutorial! Also, explore how to implement Supabase authentication or learn how to use the best Polygon Mumbai faucet to execute test transactions before launching on the mainnet!
Summary – Web3 Get Block Feature
How do you get the latest block on Ethereum? The answer to this question is Moralis’ EVM API and the ”get_date_to_block” endpoint! Thanks to these development resources, you can create a Web3 Python application allowing you to get any block in three straightforward steps:
- Using a Web3 get block function – Moralis’ ”get_date_to_block” endpoint
- Setting up the Web3 get block by timestamp backend
- Building the Web3 get block frontend
In this tutorial, we covered the steps above. Consequently, if you have followed along this far, you now know how to get any block by a timestamp and implement this functionality into a Web3 app. From here, you can now use your newly acquired knowledge to implement similar functionality into any future project!
If you enjoyed this Web3 tutorial, check out other outstanding guides here on Moralis’ Web3 blog. For instance, consider reading our NodeJS Telegram bot tutorial or our excellent guide answering the question, ”what is a Solana wallet?”. Additionally, if you are new to the industry and want to learn more about the underlying technology, the following is the guide for you: ”What is Web3 technology?”.
Also, consider enrolling in Moralis Academy, as this is the best way to become a more proficient Web3 developer. The academy offers excellent blockchain courses on all levels. As such, it does not matter if you are new to the space or have prior experience; Moralis Academy has you covered. For instance, check out the beginner course on Ethereum fundamentals to kickstart your journey!
Lastly, before concluding this article, if you are serious about becoming a blockchain developer, sign up with Moralis now. With an account, you can leverage the full power of Web3 technology to build smarter and faster!
