Whether you’re building a wallet tracker or any other dapp (decentralized application), integrating the “Ethereum get transaction details” feature – where you can get details by transaction hashes – is crucial. Thanks to the power of Moralis, we can accomplish this using a simple code snippet:
const response = await Moralis.EvmApi.transaction.getTransaction({
    transactionHash,
    chain,
});
In addition, the same line of code enables you to query other EVM-compatible chains. For example, you can get transaction details for BNB Chain, Polygon, Avalanche, and many others. After all, Moralis is all about cross-chain interoperability. So, if you are ready to master the “Ethereum get transaction details” topic, create your free Moralis account and follow our lead.
Overview
Moving forward, we’ll first make sure you’re all caught up with the basics. As such, we’ll explain what Ethereum transaction details are in general and what “transaction details by hash” actually mean. Then, we’ll get more practical and show you how to get Ethereum transaction details and explore some of the must-have tools for that task. Furthermore, we’ll take on a straightforward tutorial to teach you how to build a simple “Ethereum get transaction details” dapp. Then, we’ll use that dapp to fetch details for an Ethereum transaction example. Furthermore, although we looked at it earlier, the heart of today’s tutorial is the following snippet of code:
const response = await Moralis.EvmApi.transaction.getTransaction({
    transactionHash,
    chain,
});
Looking at the above code, you can see that the “getTransaction” Ethereum API endpoint – provided by Moralis – will be the main protagonist of the upcoming tutorial. Even so, we’ll also be using NodeJS and NextJS to build our example dapp. However, since Moralis is fully cross-platform interoperable, you could use other popular Web2 dev frameworks and programming languages. For example, you could use Python and Web3 py. Essentially, Moralis bridges the development gap between Web2 and Web3. In turn, Moralis is one of the leading blockchain infrastructure companies.
What are Ethereum Transaction Details
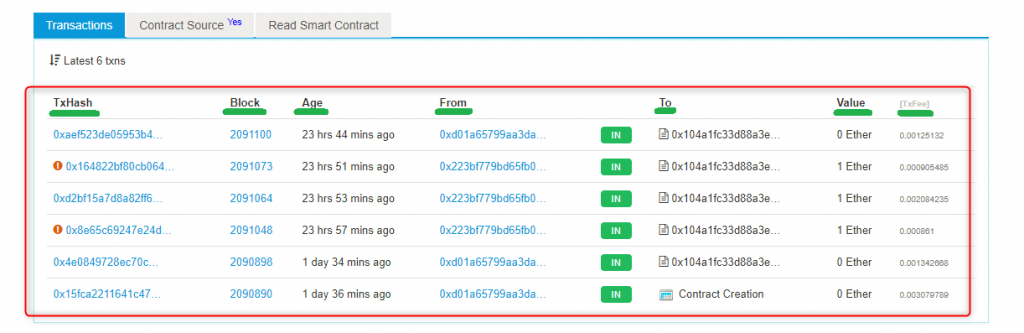
Ethereum transaction details are just that – the details of any particular transaction on the Ethereum chain. So, the real question is, “what do Ethereum transaction details entail?”. As you may know, Etherscan is Ethereum’s dedicated blockchain explorer. As such, the latter enables you to explore all Ethereum transactions and their details. Moreover, as indicated by the above image, every Ethereum transaction example includes the following details:
- Transaction hash (txhash)
- Block number (block)
- Timestamp of the transaction (age)
- Address that initiated the transaction (from)
- Address that received the transaction (to)
- Value of transaction
- Transaction fee (txfee)
Whenever you search for any particular transaction or click on any particular transaction hash on Etherscan, you can see that transaction’s “Transaction Details” page. In fact, here’s an Ethereum transaction example:
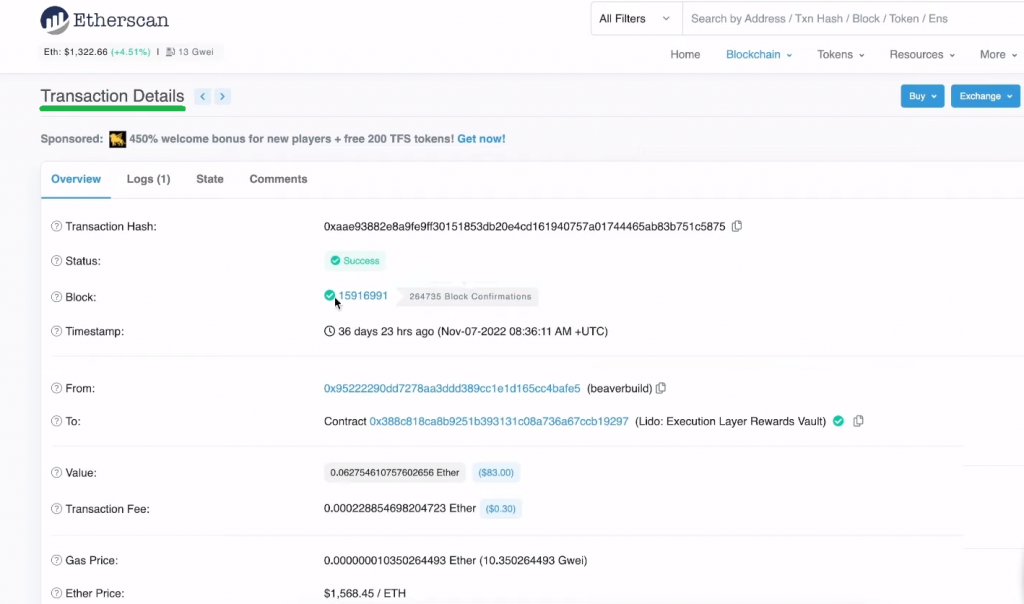
Aside from the above-listed details, Ethereum transaction details can be even more specific. They may also include gas limit and “usage by transaction” (txn), gas fees, burnt and txn savings fees, and other attributes (txn type, nonce, and position in block):
What are Transaction Details by Hash?
Now that you know what pieces of information are available in the first place, the “Ethereum get transaction details” task starts to make more sense. After all, you can probably imagine countless use cases where including all or some of those details could add value and be an essential part of specific functionalities. The transaction hash is basically the transaction’s fingerprint. It is unique for every transaction, which is why we search for transaction details by txn hashes.
Furthermore, with a powerful tool such as Moralis’ EVM API, you can even search for transactions by address. Moreover, you can include some of the above-presented details as optional parameters to target those specific transactions, and whenever you have multiple transactions, you can’t focus on their details. That said, the only way to get Ethereum transaction details in their full scope is to search by transaction hash.
Ethereum Get Transaction Details – How to Get Details for an ETH Transaction?
In this section, we are starting today’s “Ethereum get transaction details” tutorial. However, before we invite you to roll up your sleeves, we want to do a quick demo of our example dapp. That way, you’ll know what to expect moving forward, which will help you decide whether or not you want to build your own instance of our dapp.
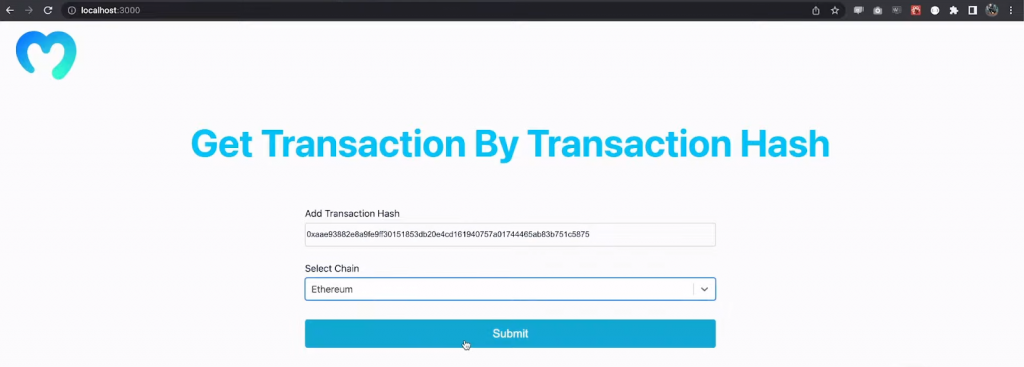
So, here’s a screenshot of our dapp:
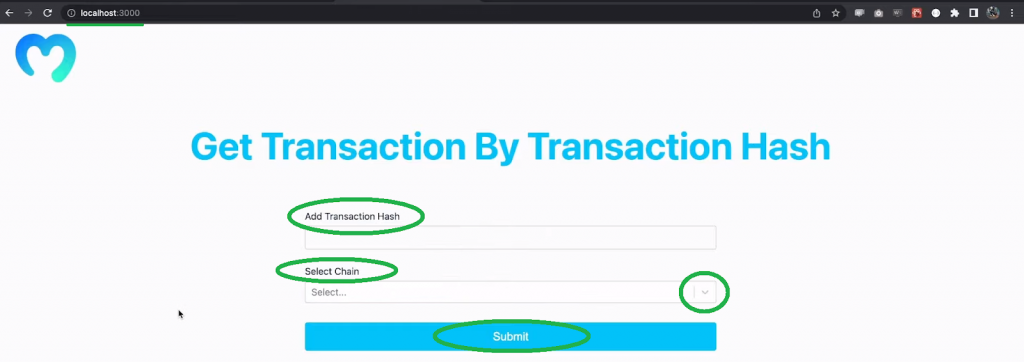
As you can see, we are running our dapp on “localhost 3000“. Furthermore, our dapp includes the “Get Transaction By Transaction Hash” title, the “Add Transaction Hash” entry field, the “Select Chain” drop-down menu, and the “Submit” button.
If we now focus on an Ethereum transaction example, we must paste that transaction’s hash in the entry field. Next, we select the Ethereum network and hit the submit button:
By hitting the “Submit” button, our dapp returns transaction details that we decided to focus on and clears the entry field and chain selection:
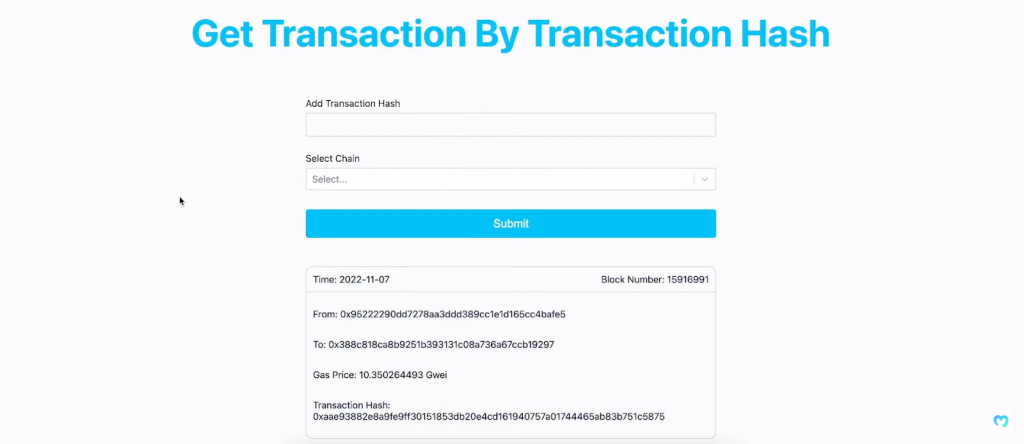
Looking at the above screenshot, you can see that the results include transaction time, block number, “from” and “to” addresses, gas price in gwei, and transaction hash. The latter matches the hash we searched for using the details of that Ethereum transaction example.
That’s the gist of our dapp! Now, if you want to build it following our lead, you must utilize suitable tools. Thus, let’s briefly look at these!
Tools
When discussing Ethereum transaction details above, we already mentioned Etherscan. Another powerful tool that is extremely handy is the Moralis API references. These types of Moralis documentation pages enable you to run all of Moralis’ Web3 API endpoints to see what results they provide. Moreover, since our aim is to get Ethereum transaction details, let’s together look at the documentation page to get transaction by hash:
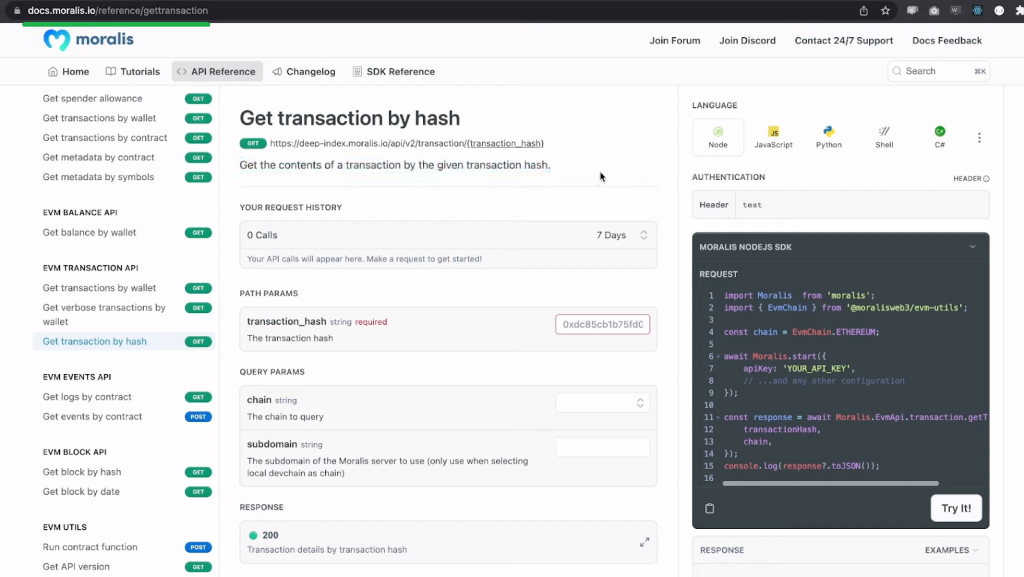
The “get transaction by hash” endpoint includes one required parameter – a transaction hash. Moreover, this endpoint has optional “chain” and “subdomain” parameters. Although the default chain option is Ethereum, the former parameter enables you to query other supported EVM-compatible chains. In addition, you may use the “subdomain” parameter when selecting local devchain networks.
Furthermore, if you look at the top-right side of the above documentation page, you’ll see the “language” section. This is where you can select the programming language or framework you prefer to work with. As you can see, we selected the “NodeJS” option, which is the environment we will use as our backend for our example dapp. Nonetheless, if we enter a transaction hash, we can hit the “Try It!” button at the bottom of the “REQUEST” window. Then, we get to see the results in the “RESPONSE” section below:
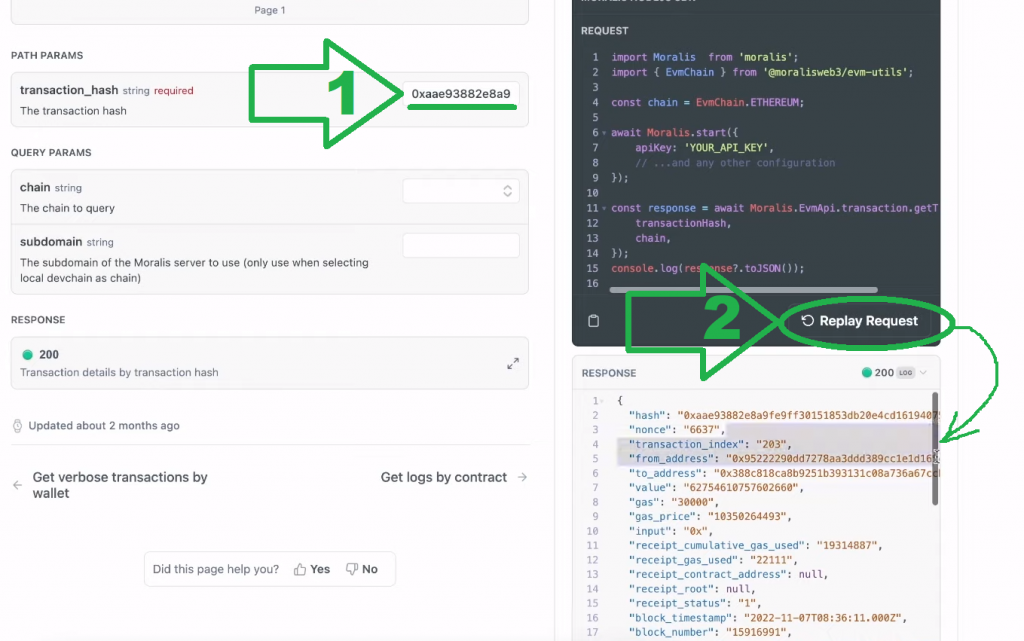
If you inspect the response, you’ll see that it contains all the details of that Ethereum transaction example.
Nonetheless, here are other tools you’ll be using in today’s tutorial:
- Moralis’ SDK,
- NodeJS,
- NextJS,
- Visual Studio Code (or your favorite code editor),
- Express, and
- several frontend and backend dependencies.
How to Get Ethereum Transaction Details by Hash
You now know that you can get Ethereum transaction details by hash using Etherscan and Moralis. You can also build your own instance of the above-presented dapp that will complete the “Ethereum get transaction details” task. Of course, today’s tutorial aims to teach you how to work with the “get transaction by has” endpoint. Then, you’ll be able to use this skill to create unique dapps that incorporate transaction details in any way you prefer. So, if you are ready to get your hands dirty, follow our lead throughout the upcoming sections. We’ll first focus on the backend and then on the frontend code of our dapp.
Note: You can access our full frontend and backend code on GitHub.
Initial Setup
Start by creating a route folder and call it “get-transaction-by-hash”. Inside that folder, create the “backend” and “frontend” folders. First, open the “backend” folder and install the required dependencies. These include “cors“, “dotenv“, “express“, and “moralis” (you can see that in the “package.json” file). Moreover, the exact command line will depend on the package manager you are using.
Note: If you’ve never initiated a NodeJS project before, make sure to follow our “NodeJS” tutorial in the “Your First Dapp” section of the Moralis documentation.
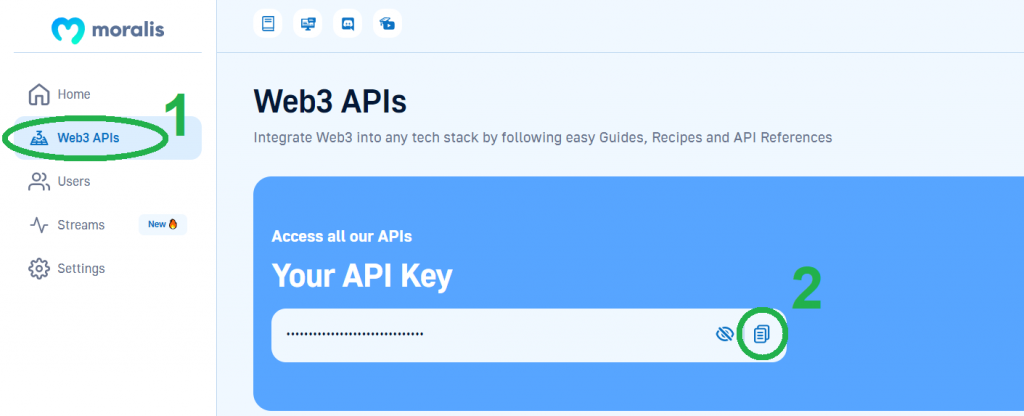
The next essential step revolves around your Moralis Web3 API key. The latter is your gateway to the power of Moralis. Moreover, since this is a private key, we encourage you to store it in a separate “.env” file inside the “backend” folder. However, you must first obtain your API key from your Moralis admin area. You need your Moralis account to do so. Thus, in case you haven’t created it yet, do so now. Then, copy your API key from the “Web3 APIs” page:
Next, paste the above-copied key into your “.env” file next to the “MORALIS_API_KEY” variable:
Ethereum Get Transaction Details – Backend Script
With all the dependencies installed and your Moralis Web3 API key in place, you can focus on the core backend script (“index.js”). At the top of that script, you need to import some of the dependencies:
const express = require("express");
const app = express();
const port = 5001;
const Moralis = require("moralis").default;
const cors = require("cors");
Next, you also want to require your “.env” file, use “cors” and “express“, and introduce your API key into that script. These are the lines of code that need to follow the above ones:
require("dotenv").config({ path: ".env" });

app.use(cors());
app.use(express.json());

const MORALIS_API_KEY = process.env.MORALIS_API_KEY;
Then comes the part that includes the snippet of code presented at the outset and in the “Overview” section. This is where you implement the “get transaction by hash” endpoint:
app.get("/txhash", async (req, res) => {
  try {
    const { query } = req;

    const response = await Moralis.EvmApi.transaction.getTransaction({
      transactionHash: query.txHash,
      chain: query.chain,
    });

    return res.status(200).json(response);
  } catch (e) {
    console.log(`Something went wrong ${e}`);
    return res.status(400).json();
  }
});
Looking at the above lines of code, you can see that the method queries its “transactionHash” and “chain” parameters from the frontend. Moreover, if there’s an error, the code “consoles” the “Something went wrong” message. However, if all goes smoothly, it passes the response to the frontend.
Lastly, you need to start Moralis by adding the following lines of code at the bottom of your backend script:
Moralis.start({
  apiKey: MORALIS_API_KEY,
}).then(() => {
  app.listen(port, () => {
    console.log(`Listening for API Calls`);
  });
});
Note: You can access the complete backend “index.js” file in the “backend” directory of our GitHub repo.
Ethereum Get Transaction Details – Frontend Script
Now that you’ve finished your backend, you must first “cd” into your “frontend” folder and install the following dependencies: “axios” and “react-select“. The “next“, “react“, and “react-dom” dependencies should automatically install as you initialize your NextJS project.
Note: If you’ve never initiated a NextJS project before, make sure to follow our “NextJS” tutorial in the “Your First Dapp” section of Moralis’ docs.
Moreover, the homepage of your instance of our “Get Transaction By Transaction Hash” dapp is another “index.js” file (frontend). The latter renders two components: “Header” and “Main“. The first one is coded in the “header.js” file and contains the logo and the title. However, it is the second component (“main.js“) where the action happens. As such, make sure to explore this file in more detail by clicking on the “main.js” link or watching the video below (5:04).
One thing that we want to point out is the “Select Chain” drop-down menu. The lines of code representing the options this menu offers are as follows:
const valueOptions = [
  { value: "0x1", label: "Ethereum" },
  { value: "0x5", label: "Goerli" },
  { value: "0x13881", label: "Mumbai" },
];
So, if you decided to include other supported chains, you’d need to add them to the above lines of code. Moreover, you can find chain IDs on the documentation page:
Furthermore, below is another snippet of code that we’d like to point out:
const response = await axios.get(`http://localhost:5001/txhash`, {
  params: { txHash, chain },
});
As you can see, we are using “axios” to send the “txHash” and “chain” parameters to the backend. That way, any Ethereum transaction example reaches the “Moralis.EvmApi.transaction.getTransaction” method in the backend “index.js” script.
Finally, here’s the video version of today’s tutorial:
Transaction Details by Hash – How to Get Ethereum Transaction Details – Summary
In today’s article, you were able to learn how to get Ethereum transaction details in multiple ways. As such, you now know that you can take any Ethereum transaction example hash and fetch its details with Etherscan or with the help of Moralis’ “Get transaction by hash” API reference page. However, you also had a chance to practice your NodeJS and NextJS skills and create a simple dapp. Along the way, you also learned the basics regarding Ethereum transaction details and why you need to search for them using transaction hashes. Nonetheless, you learned how to obtain your Moralis Web3 API key, which means you now have access to all Moralis Web3 APIs.
With that power at your disposal, you are probably eager to build some killer dapps. If you have your own ideas and the required skills, by all means, start “BUIDLing” right away! However, if you need more practice, make sure to explore our other tutorials. For instance, you can learn how to fetch NFT collection data, use AWS Lambda Web3, run Web3 contract methods on Ethereum, and much more. Moreover, we encourage you to dive into the content that awaits you on the Moralis YouTube channel and the Moralis blog. After all, these two outlets can help you become a Web3 developer for free. Additionally, you can take a more professional approach to your crypto education by enrolling in Moralis Academy. You’ll find a wide range of courses once you enroll. However, we recommend you start with blockchain and Bitcoin fundamentals.
