Are you looking for a seamless way to create a NodeJS Telegram bot? If so, you are precisely where you need to be! This NodeJS Telegram bot tutorial will show you how to create one for relaying real-time blockchain transfer events! Thanks to Moralis, you will be able to build this NodeJS Telegram bot in only three steps:
- Creating a Backend Server
- Setting Up a Moralis Stream
- Building the NodeJS Telegram Bot
If you would like to jump straight into the code, check out the NodeJS Telegram bot GitHub repository below:
Full NodeJS Telegram Bot GitHub Repo – https://github.com/MoralisWeb3/youtube-tutorials/tree/main/automated-telegram-nft-transfer-bot
Overview
We will start off this article by diving into the intricacies of Telegram bots. From there, we will briefly examine the tools and resources required for building a NodeJS Telegram bot. As such, we’ll focus on Moralis and the Web3 Streams API. Next, we jump straight into the NodeJS Telegram bot tutorial, covering the process of building one from start to finish. So, if you want to create your very own NodeJS Telegram bot, follow along throughout this article!
If you have further interest in the Web3 development space, we recommend exploring Moralis further. The Streams API is only one tool that can aid your development endeavors. Another example is the NodeJS EVM API, which can come in handy whenever creating EVM-compatible projects. In combination with its Web3 APIs, Moralis offers additional Web3 resources, such as excellent blockchain development content. If this interests you, check out our guides on the Verse programming language or learn how Web3 get event logs to work!
Before continuing, sign up with Moralis, as you need an account to follow along in this NodeJS Telegram bot tutorial. Creating an account is free, and you can immediately leverage the power of blockchain technology!

What is a Telegram Bot?
Before showing you how to create a NodeJS Telegram bot, the article will initially explore the ins and outs of these bots. So, what exactly is a Telegram bot?

In short, a Telegram bot is a program that acts like a conventional chat partner but comes equipped with additional functions. Bots can perform predefined tasks without any user involvement. Furthermore, a Telegram bot can do everything a human chat partner does either automatically or on particular requests. This includes basic functionality such as relaying information like text messages, videos, images, or any other files.
Consequently, with a Telegram bot, it is possible to automate real-time alerts to notify users when something of interest happens, which is exactly what we will show you how to do in this article!
How Can You Build a Telegram Bot?
With a brief introduction to Telegram bots, you might ask yourself, ”can I build a Telegram bot with JavaScript?”. Well, the answer to this question is yes! To show you how this is done, we will demonstrate how to create a straightforward NodeJS Telegram bot that listens to and relays real-time data regarding blockchain events using Moralis!
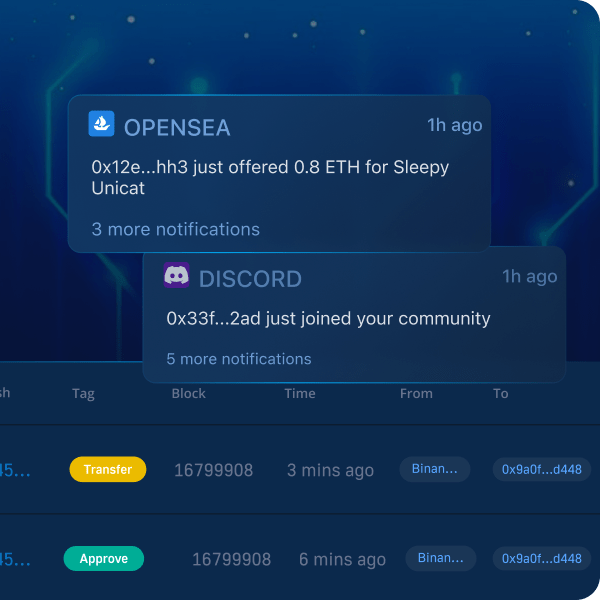
In order to get the information relating to the on-chain events, we will use the Web3 Streams API. With this development tool, you can stream blockchain data directly into your backend server via Web3 webhooks. From there, we will teach you how to send notifications about these events through a Telegram bot!
So, if you want to learn how to create a Telegram bot, join us in the following NodeJS Web3 tutorial as we break down the process from start to finish!
Tutorial: Build a NodeJS Telegram Bot
With a more comprehensive understanding of Moralis’ Streams API, this section will dive into the central part of this article. The NodeJS Telegram bot we’re about to build utilizes a Web3 stream to monitor EVM events and autonomously send messages to your Telegram channel. Moreover, in this tutorial, we will show you how to listen to all transfers of the “Doodles NFT” smart contract.
Thanks to the accessibility of Moralis, the Streams API, and the NodeJS SDK for Web3, you will be to build this Telegram bot in three straightforward steps:
- Creating a Backend Server
- Setting Up a Moralis Stream
- Building the NodeJS Telegram Bot
By following along in this NodeJS Telegram bot tutorial and completing the aforementioned steps, you will learn how to monitor blockchain events and receive messages related to on-chain occurrences. From there, you can follow the same workflow to monitor any smart contract events on all blockchain networks!
Nevertheless, if you prefer watching videos to educate yourself, you can also check out the clip below from Moralis’ YouTube channel. In this video, one of Moralis’ talented software engineers takes you through the entire process from start to finish:
Now, before jumping into the first step of this NodeJS Telegram bot tutorial, the next section briefly covers the end results. Doing so gives you a more profound understanding of what you are working towards, making it easier to visualize what the code does!
Build a NodeJS Telegram Bot – What Are You Working Toward?
Before showing you how to set up the backend for the NodeJS Telegram bot, we will initially show you how it works. As such, let us immediately take a closer look at the end result:
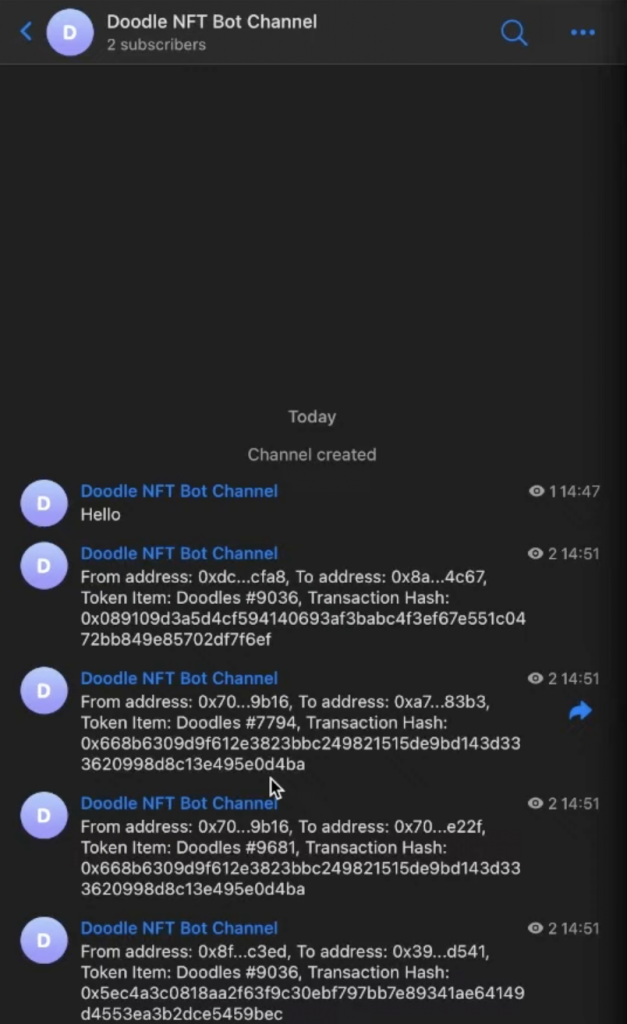
As the image above illustrates, you will set up a new Doodle NFT bot channel, to which the bot returns the response from the Web3 stream. You can also see a couple of transactions sent to the channel. These responses contain from/to addresses, a token item, and a transaction hash. However, this is only a selection of data returned from the Web3 stream. As such, you can choose from the response to customize the messages as you see fit.
Nonetheless, that covers the end results, and you now know what you are working toward. If you found this interesting and want to create your own NodeJS Telegram bot, join us as we jump straight into the first step of the tutorial!
Step 1: Creating a Backend Server
To kickstart this NodeJS Telegram bot tutorial, start by launching your preferred integrated development environment (IDE), set up a new NodeJS project, and create a folder called ”backend”. You can then add a new file called ”index.js” to the aforementioned folder and input the following contents:
require("dotenv").config();
const express = require("express");
const app = express();
const port = 5001;

app.use(express.json());

app.post("/webhook", async (req, res) => {
  const webhook = req.body;

  console.log(webhook);

  return res.status(200).json();
});

app.listen(port, () => {
  console.log(`Listening for NFT Transfers`);
});
With this code, we initially require the necessary dependencies and specify that your Express server will run on “localhost 5001“. What’s more, the code at the far end also ensures that we listen to this server by calling the ”app.listen()” function while passing the ”port” variable as an argument. The code also introduces the ”/webhook” endpoint, which you need to start on your device. However, before doing so, we must ensure we can post to this webhook. You can accomplish this by using “ngrok” to create a tunnel to your local machine, meaning anyone can access the endpoint over the internet.
To do so, you initially need to install ngrok, which you can do by opening a new terminal and running the following command:
brew install ngrok/ngrok/ngrok
From there, you must also install the ngrok dependencies in your ”backend” folder. As such, ”cd” into ”backend”, input this command, and hit enter:
npm i ngrok
With the dependencies installed, the next thing you need to do is run the following command using port 5001:
ngrok http 5001
This will return a URL, which you need to copy and save for the next step:

However, before concluding this initial step of the NodeJS Telegram bot tutorial, you must run the Express server. As such, open a new terminal, ”cd” into the backend folder, and start by installing the required dependencies using this command:
npm i dotenv express node-telegram-bot-api nodemon
Next, all that remains is for you to launch the server by inputting the following and hitting enter:
npm run start
Step 2: Setting Up a Moralis Stream
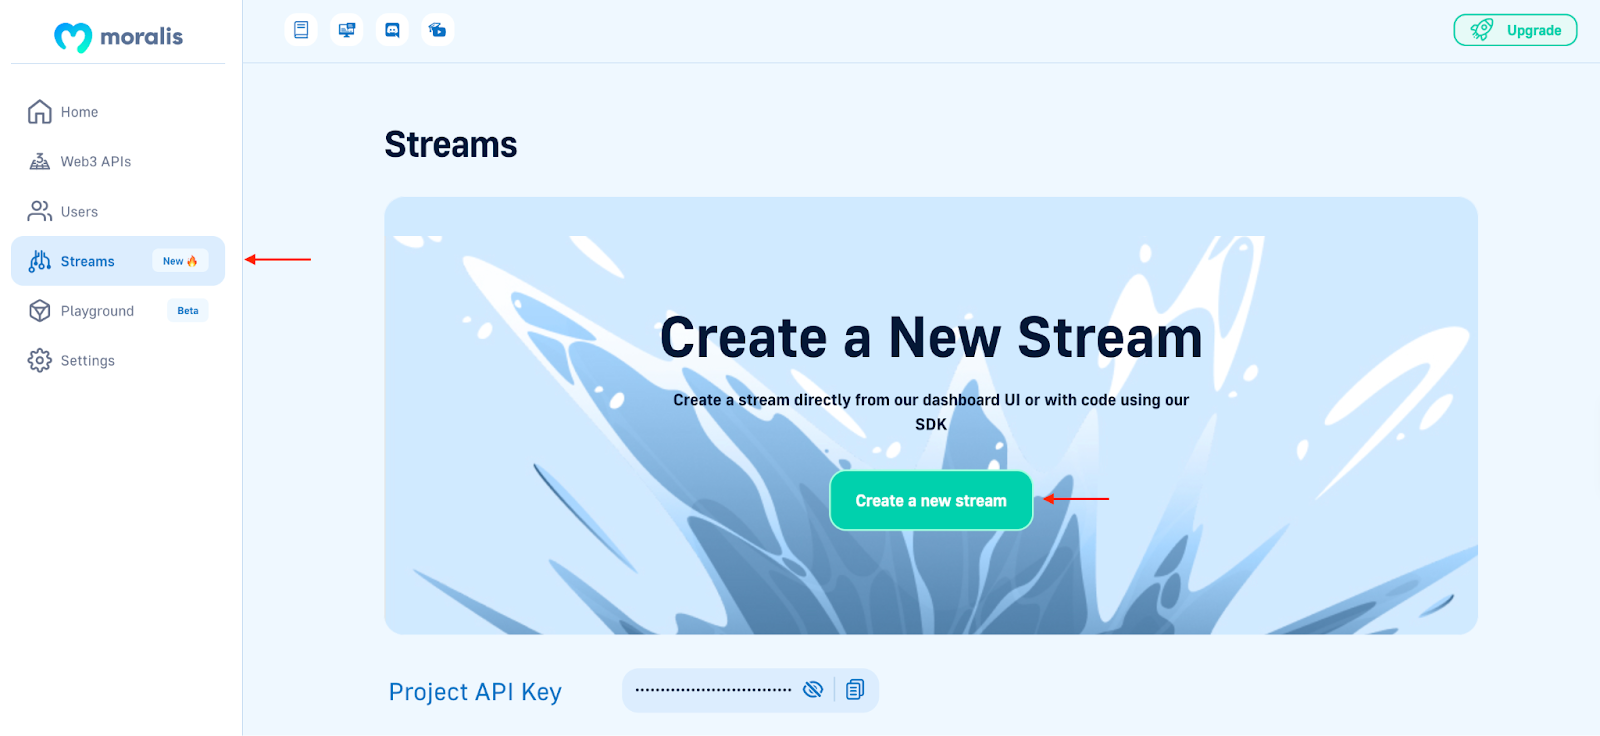
With the server up and running, the next step is to create a new Moralis stream. As such, if you have not already, sign up with Moralis immediately and log in to the admin panel. You can then click on the ”Streams” tab and select ”Create a new stream”:
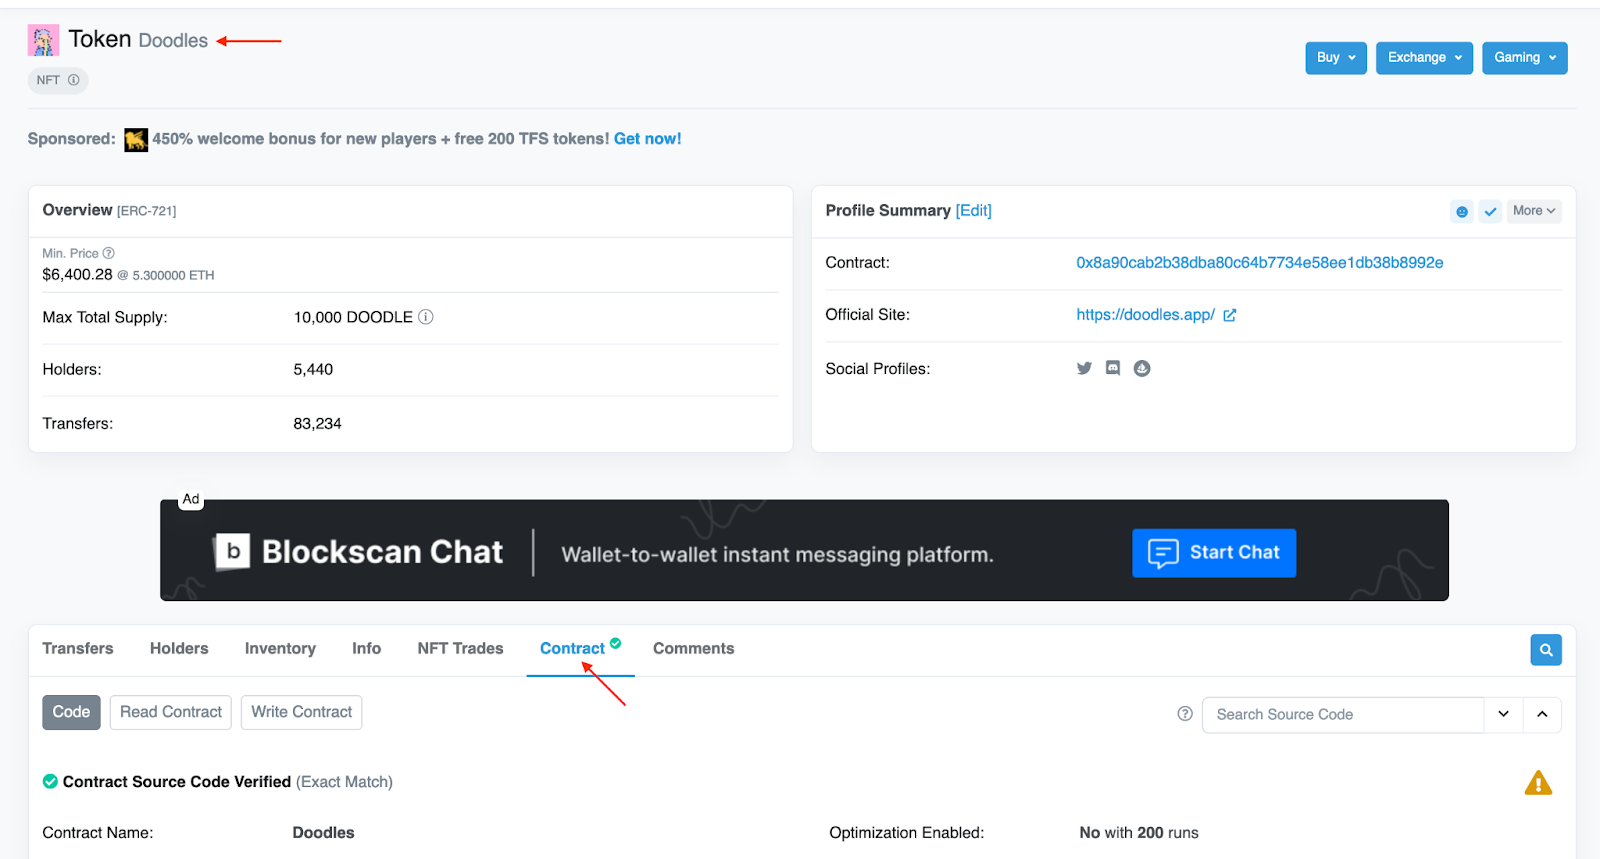
Next, pick the ”Create it from Admin” option and input the address of the smart contract you are looking to monitor (in our case, we fetch the Doodles contract address from Etherscan):

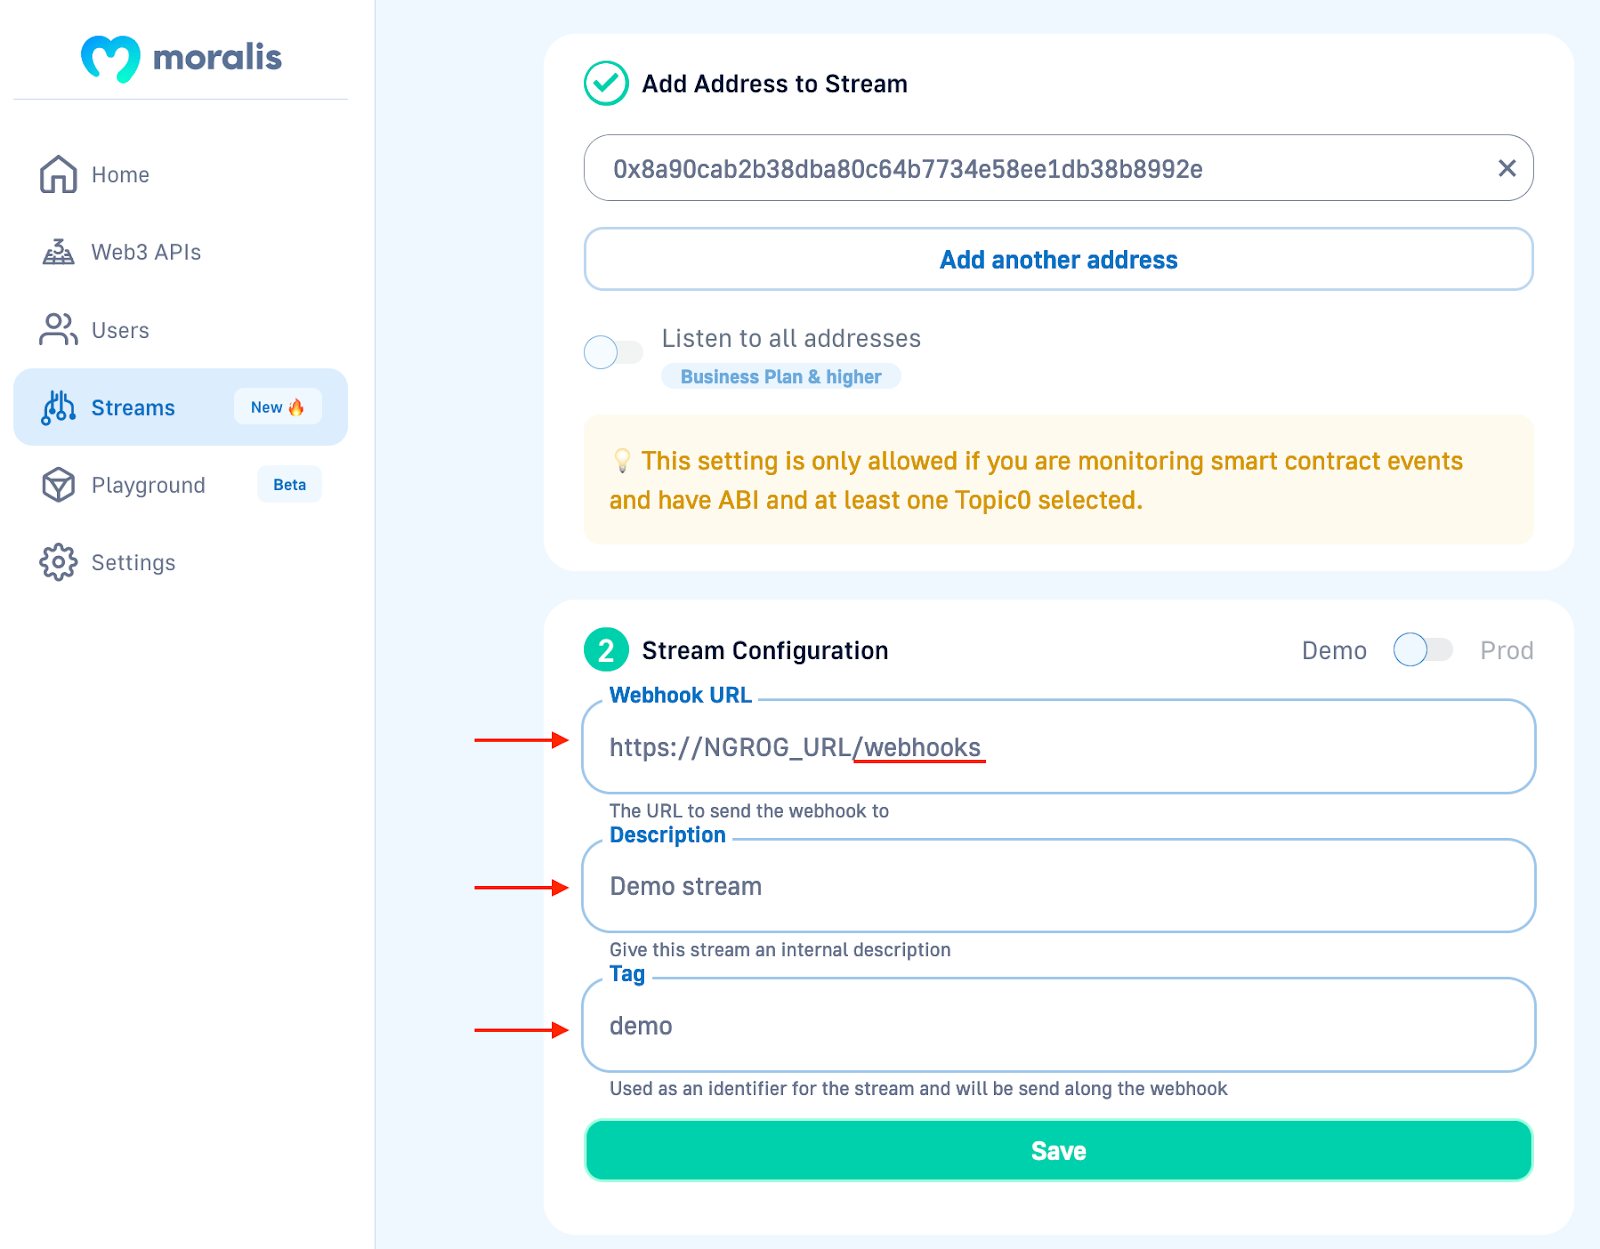
From there, progress to the ”Stream Configurations” part and fill in the input fields. To begin with, add the ngrok URL from the previous step to the ”Webhook URL” field and include the ”/webhook” endpoint. Next, add a description and tag of your choice:
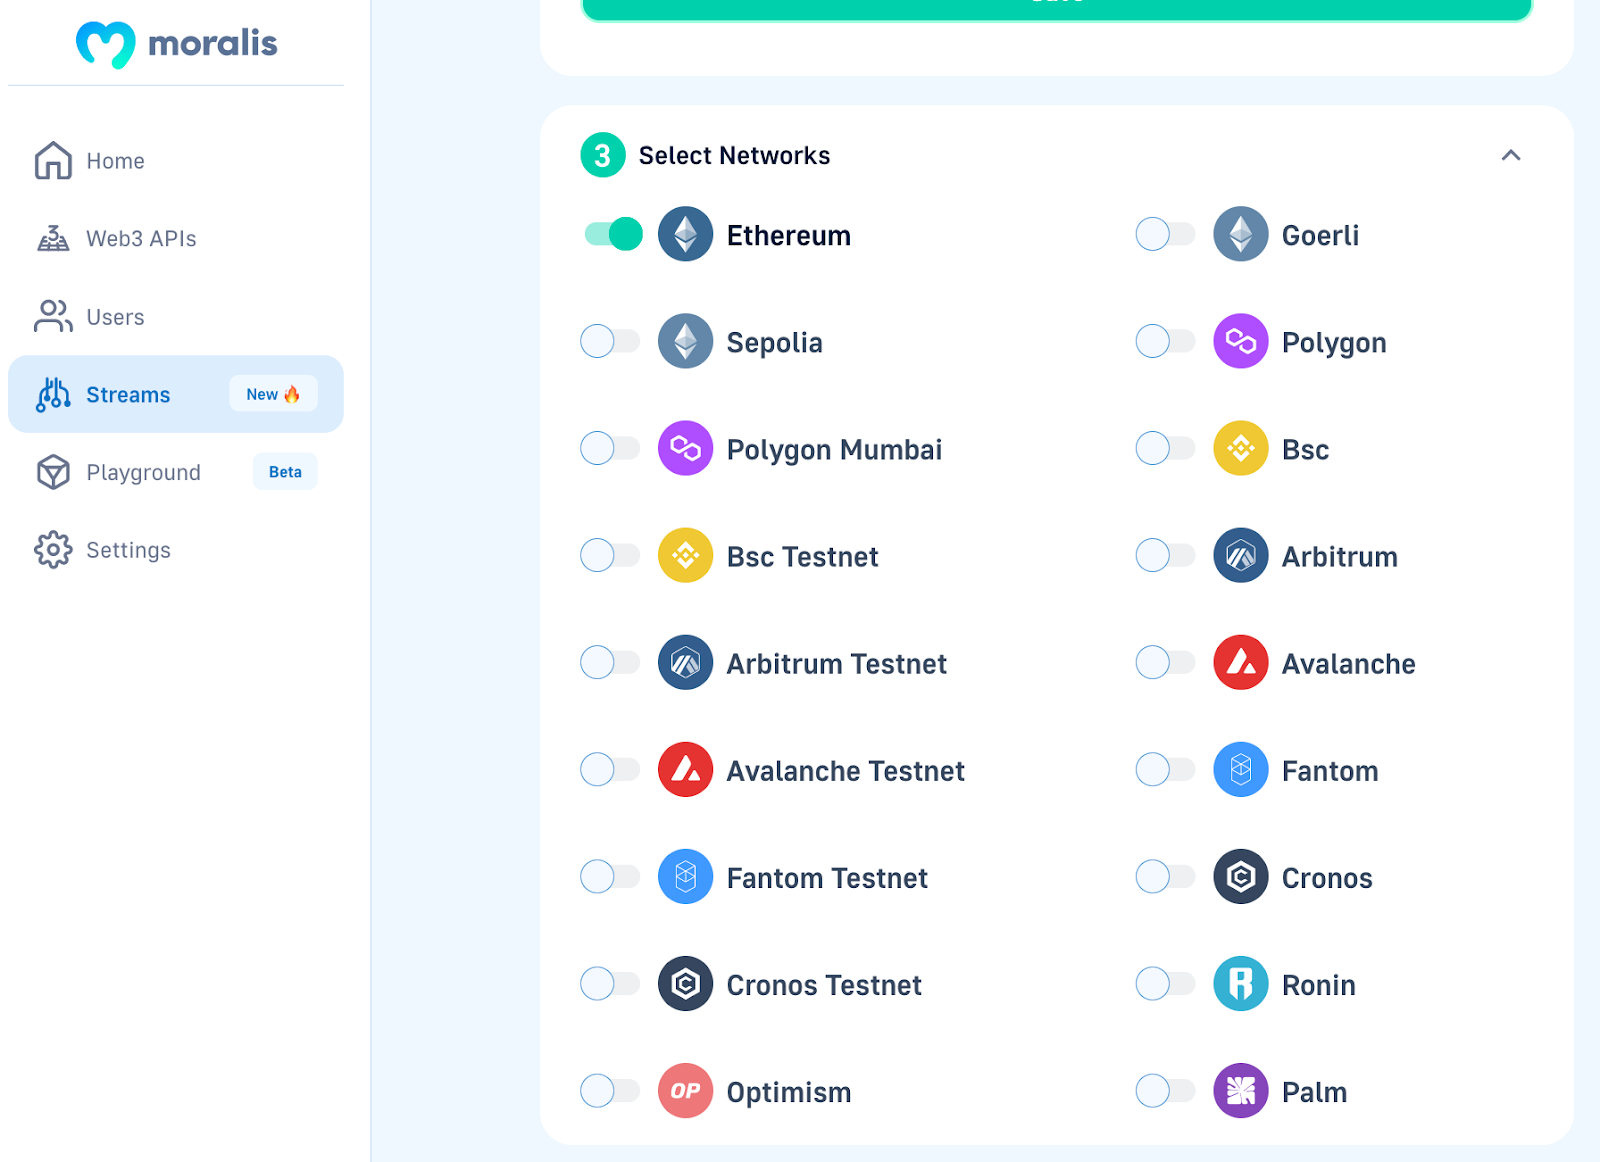
Once you finish the stream configurations, choose the network you wish to monitor. In this case, we will opt for the Ethereum mainnet:
Once you have selected the network you are interested in, move on to the fourth step, and check the ”Contract interactions (logs)” box for the address activity:

Finally, for the last step, you must add the ABI of your contract. If you need help fetching this information, you can go to Etherscan, navigate to the contract you are interested in, click on the ”Contract” tab, and scroll down to the ”Contract ABI” part:
Once you paste the ABI, Moralis will autonomously show you the topics you can stream. In this case, since you want to monitor the transfers of the Doodles contract, check the ”Transfers(address,address,uint256)” box:

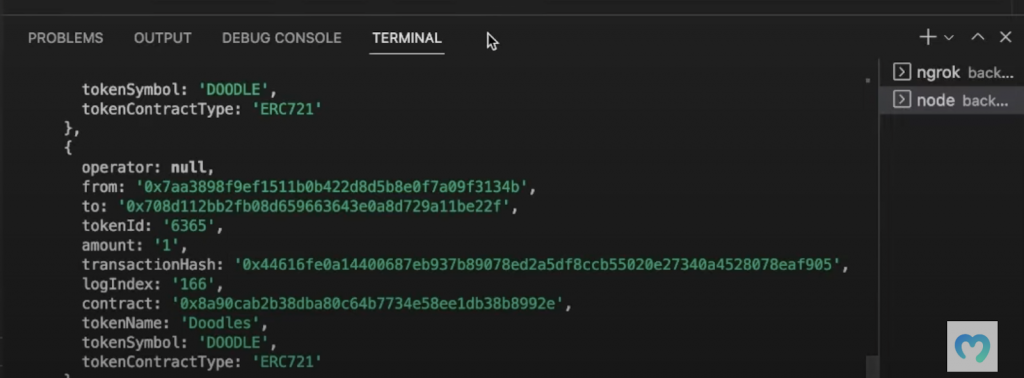
That’s it for the stream! As soon as you launch it, you can move back your IDE, open a new terminal, and you should shortly be receiving responses consisting of various transfer events:
Step 3: Building the NodeJS Telegram Bot
With the responses trickling into the backend server via the Moralis stream, it is time to set up the NodeJS Telegram bot. This third step of this tutorial is divided into two sections:
- Creating the Bot
- Connecting it with the Code
As such, without further ado, let us jump straight into the process of setting up the bot!
Creating the Bot
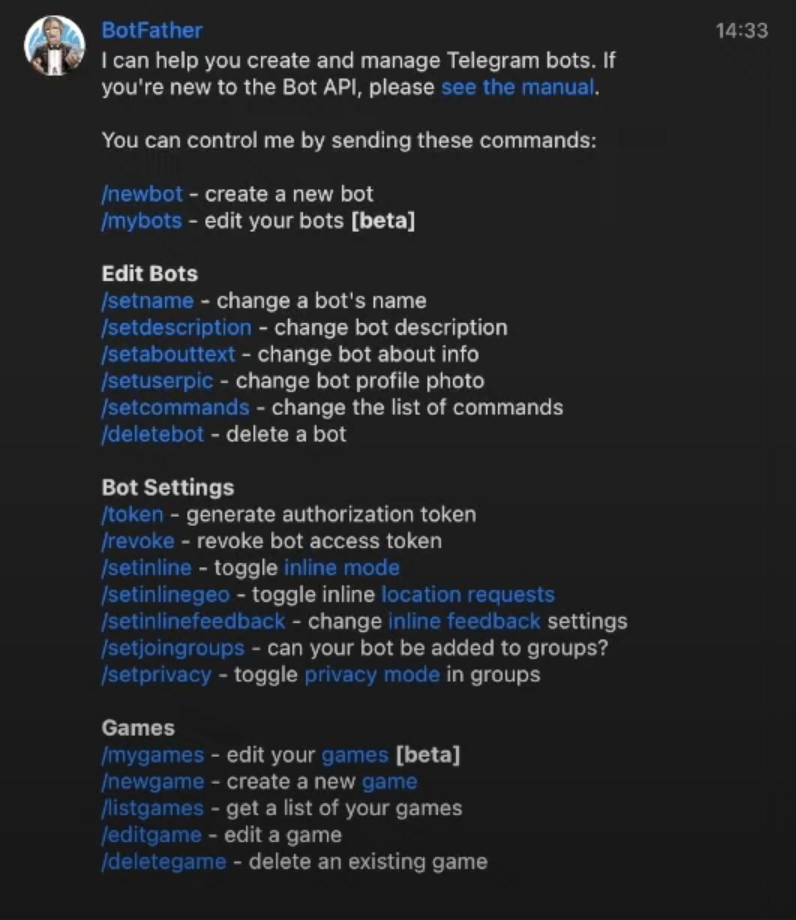
The first thing you must do is open Telegram, search for ”Bot Father”, and start a conversation. As soon as you start the conversation, you should find a start button at the bottom of the interface. Once you hit this button, it should result in an interface similar to the one shown below:
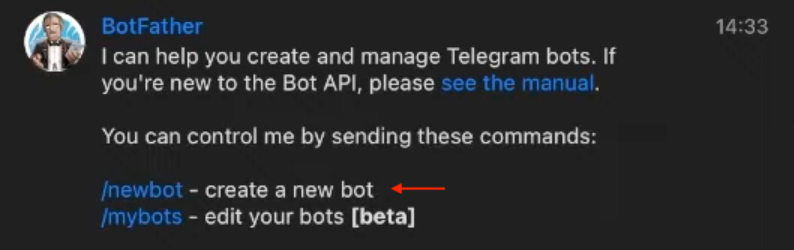
From there, you can create a new bot by hitting ”/newbot” and choosing an appropriate name:
Next, ”Bot Father” will query you for a username, and it needs to end with ”_bot”:
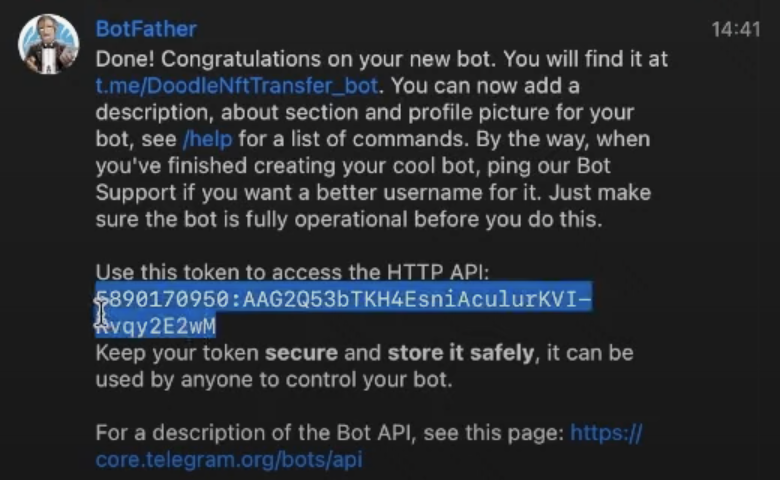
You will immediately find a token API when you hit enter and create the bot. Copy this value and save it for later:
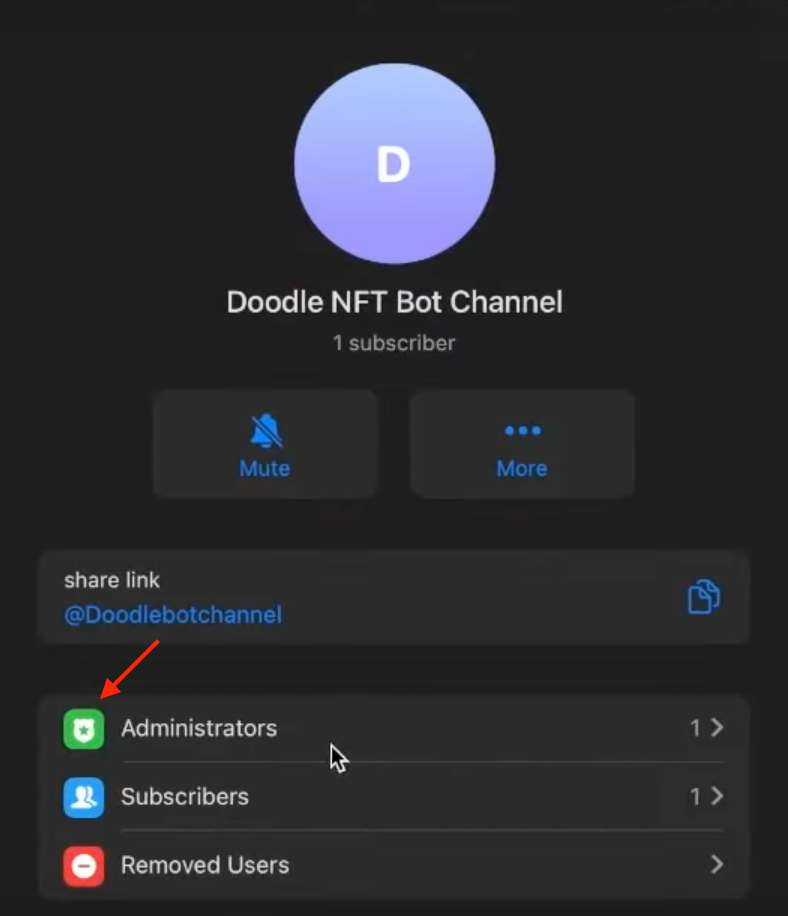
Lastly, create a new Telegram channel and add the bot as an administrator. You can do so by clicking on the three dots at the top, hitting ”Info”, selecting ”Administrator”, and lastly, hitting ”Add Admin”:
That’s it for the bot itself! All that remains from here is connecting it with the code and the Web3 stream!
Connecting it with the Code
Now that you have the bot at your disposal, you must also add it to the code. To do so, start by creating a new ”.env” file and adding the access token as an environment variable. It should look something like this:
TELEGRAM_BOT_TOKEN = “589017050…”
From there, replace the contents of ”index.js” with the following code snippet:
require("dotenv").config();
const express = require("express");
const TelegramBot = require("node-telegram-bot-api");
const app = express();
const port = 5001;

const TELEGRAM_BOT_TOKEN = process.env.TELEGRAM_BOT_TOKEN;

const bot = new TelegramBot(TELEGRAM_BOT_TOKEN, { polling: true });

app.use(express.json());

app.post("/webhook", async (req, res) => {
  const webhook = req.body;

  for (const nftTransfer of webhook.nftTransfers) {
    const fromAddress = `From address: ${nftTransfer.from.slice(
      0,
      4
    )}...${nftTransfer.from.slice(38)}`;
    const toAddress = `To address: ${nftTransfer.to.slice(
      0,
      4
    )}...${nftTransfer.to.slice(38)}`;
    const tokenItem = `Token Item: ${nftTransfer.tokenName} #${nftTransfer.tokenId}`;
    const transactionHash = `Transaction Hash: ${nftTransfer.transactionHash}`;

    const chatId = “REPLACE_ME”;
    const text = `${fromAddress}, ${toAddress}, ${tokenItem}, ${transactionHash}`;

    bot.sendMessage(chatId, text);
  }

  return res.status(200).json();
});

app.listen(port, () => {
  console.log(`Listening for NFT Transfers`);
});
Lastly, the final step is replacing ”REPLACE_ME” on line 29 with your chat ID. To get this ID, go to the endpoint down below:
https://api.telegram.org/botTOKEN_API/getUpdates
However, make sure to replace ”TOKEN_API” with your actual token API. Doing so should take you to a page looking something like this:

As such, all you need to do from there is copy the chat ID, input it into the code, and start the server once again with the following terminal input:
npm run start
Congratulations! You now know how to set up a NodeJS Telegram bot from scratch! If everything works as intended, all transfer events should be relayed and sent to the Telegram channel.
If you had trouble at any point during this guide, please check out the video from the ”Tutorial: Build a NodeJS Telegram Bot” section. This video breaks down the code in further detail, hopefully answering any of your queries. You can also find the complete NodeJS Telegram bot GitHub code down below:
Complete NodeJS Telegram Bot GitHub Repository – https://github.com/MoralisWeb3/youtube-tutorials/tree/main/automated-telegram-nft-transfer-bot
Summary – How to Build a Telegram Bot Using NodeJS
In this article, we began by covering the ins and outs of Telegram bots. From there, we explored Moralis and the Streams API, as this is one of the tools used throughout this tutorial. From there, we dove straight into the NodeJS Telegram bot tutorial, where we demonstrated how to create one in only three steps:
- Creating a Backend Server
- Setting Up a Moralis Stream
- Building the NodeJS Telegram Bot
As such, if you have followed along this far, you now know how to create a NodeJS Telegram bot relaying information regarding blockchain events! What’s more, if you want to check out the full code, visit the NodeJS Telegram bot GitHub repository!
If you found this tutorial instructive, feel free to learn Web3 programming further here at Moralis’ Web3 blog. For instance, check out our articles on how to create a blockchain Discord bot or read about the intricacies of danksharding.
Nevertheless, it does not matter if you are looking to build a NodeJS Telegram bot or any other Web3 projects; sign up with Moralis now! You can create your account for free, and it only takes a couple of seconds!