Do you want to know how to get all tokens owned by a wallet? If so, you are in the right place, as this tutorial demonstrates how to do so using Moralis! Thanks to Moralis’ Token API, you can get all tokens owned by a wallet in five straightforward steps:
- Create a project
- Install Moralis by running the following command in the terminal:
npm install moralis @moralisweb3/common-evm-utils
- Set up a new file
- Input the following contents (add a Moralis API key, address, and the desired chain):
const Moralis = require('moralis').default;
const { EvmChain } = require('@moralisweb3/common-evm-utils');

const runApp = async () => {
  await Moralis.start({
    apiKey: "YOUR_API_KEY",
    // ...and any other configuration
  });

  const address = '0xBf6521AF44F5D56813A93dCE548E6594Daa00794';

  const chain = EvmChain.ETHEREUM;

  const response = await Moralis.EvmApi.token.getWalletTokenBalances({
    address,
    chain,
  });

  console.log(response.toJSON());
}

runApp();
- Call the ”getWalletTokenBalances” endpoint by running the program with this terminal command:
node “FILE_NAME”
Once you execute the program, you receive a response containing all tokens owned by the specified wallet. It should look something like this:
{
    "token_address": "0xff20817765cb7f73d4bde2e66e067e58d11095c2",
    "name": "Amp",
    "symbol": "AMP",
    "logo": "https://cdn.moralis.io/eth/0xff20817765cb7f73d4bde2e66e067e58d11095c2.png",
    "thumbnail": "https://cdn.moralis.io/eth/0xff20817765cb7f73d4bde2e66e067e58d11095c2_thumb.png",
    "decimals": 18,
    "balance": "24109691515670000000000"
  }
For additional information, check out the official endpoint documentation to get the balance by wallet!
Overview
Developing decentralized applications (dapps) and other Web3 projects requires relevant on-chain data. As such, Web3 developers desperately need a quick and effective way to query blockchain networks, which is where Moralis enters the equation. With Moralis’ Web3 APIs, you can seamlessly query any blockchain for data and receive real-time responses. To demonstrate the accessibility of Moralis, we will in this article show you how to use the Token API to get all tokens owned by a wallet. If this sounds interesting, join us in this tutorial, as we will cover this process from start to finish!
To show you how Moralis’ Token API works in practice, the article demonstrates how to build an application where users can input an address and click on a button to query the wallet’s token balance. However, before diving deeper into the central part, the article briefly recaps what a token wallet is. So, if you are already familiar with token wallets, feel free to skip straight into the ”Application Demo” section.
What’s more, the Token API is only one of many tools Moralis offers. There are several other prominent features to discover, which we recommend you do if you are serious about getting into Web3 development. For example, check out the Auth API, allowing you to seamlessly integrate blockchain-based authentication into your projects with only single lines of code. If this sounds interesting, you can, for instance, learn how to add a sign in with RainbowKit!
Nevertheless, no matter what blockchain development endeavor you embark on, sign up with Moralis now to leverage the full potential of blockchain technology!

What is a Token Wallet?
If you want to get into the Web3 space, the first step is to acquire a token wallet. People use token wallets to store digital assets such as fungible and non-fungible tokens (NFTs). In combination with the ability to hold assets, token wallets also generally feature additional functionality. Among other things, this includes sending, buying, selling, and swapping assets. In turn, you can fully manage your digital assets through a token wallet.

Along with providing an easy way to manage your assets, token wallets open the door to the blockchain realm. Accordingly, wallets are gateways to the Web3 ecosystem, enabling anyone to interact with dapps and platforms on various blockchain networks. As such, token wallets play an essential role in blockchain!
Here are some prominent examples of token wallet providers that you can consider:
- MetaMask
- Coinbase Wallet
- Phantom
- Argent
- Trust Wallet
What’s more, if you want to learn more about token wallets, check out our guide here on the Web3 blog exploring Web3 wallets!
Nevertheless, now that you are more familiar with token wallets, it is almost time to dive into the central part of this tutorial. However, before doing so, we provide a quick demo of the application you will learn to create in this article!
Get All Tokens Owned by a Wallet – Application Demo
This tutorial teaches you how to create a straightforward NextJS application from which users can get all tokens owned by a wallet. That said, before jumping into the tutorial, this section provides a quick application demo. By covering the intricacies of the app, you gain a better understanding of what you are working towards!
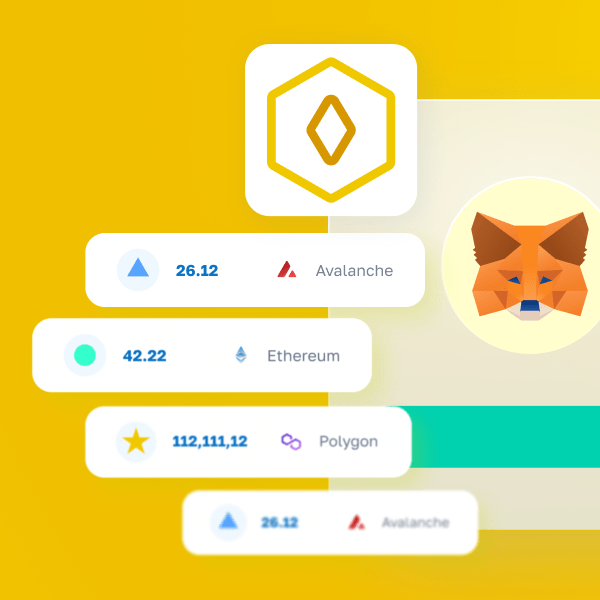
Nevertheless, you can find a screenshot of the app’s landing page down below:

The application features three main components: a heading, an input field, and a ”Submit” button. The field takes a Web3 wallet address as input, and once you click on the ”Submit” button, it returns a table presenting all tokens owned by the specified wallet:
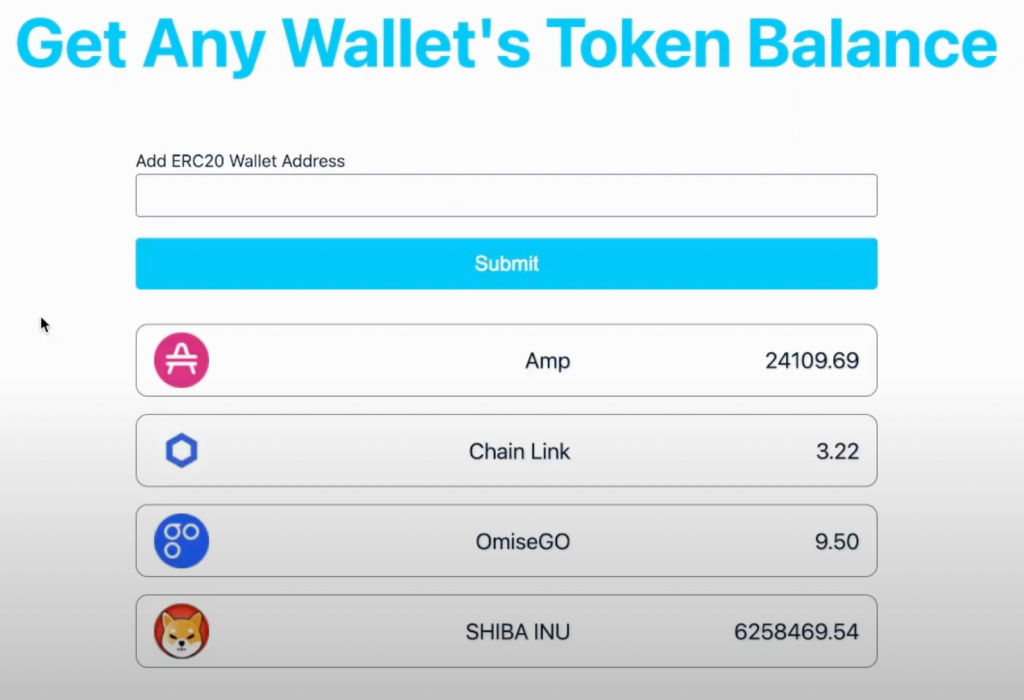
As the image above illustrates, the app returns the thumbnail, name, and USD balance for all tokens within the wallet. However, Moralis’ Token API provides additional information, such as each token’s address and symbol. (we’ve just decided not to display this information on the app’s user interface [UI]).
If you want to learn how to build this application, join us in the following section, where we show you how to get all tokens owned by a wallet in only five straightforward steps!
5-Step Breakdown – How to Get All Tokens Owned By a Wallet
With a more profound understanding of what you are working towards, it is time to show you how to get all tokens owned by a wallet. Moreover, to do so, the following sections teach you how to create a straightforward NextJS application where you can input an address and get all tokens from a specified wallet in return. What’s more, thanks to Moralis’ Token API, you will be able to create this application in only five straightforwards steps:
- Completing Prerequisites and Setting Up a Moralis Account
- Get Your Moralis API Key
- Project Setup
- Code Breakdown: ”index.js” and ”header.js”
- Code Breakdown: ”main.js”
By completing the steps above, you will learn how Moralis’ Token API works and how to get all tokens owned by a wallet. By the end of this tutorial, you will have the knowledge to add similar functionality to your future dapps!
Nevertheless, without further ado, let us jump straight into the first step and cover the required prerequisites!
Step 1: Completing Prerequisites and Setting Up a Moralis Account
To kick things off, you initially need to deal with a couple of prerequisites in this first step. Specifically, you need to ensure that you have installed NodeJS and npm. You can get these two components by visiting the NodeJS website and installing the newest version.
Along with NodeJS and npm, you must sign up with Moralis. If you have not already, create a Moralis account right now. Setting up an account only takes a couple of minutes and is entirely free!
Step 2: Get Your Moralis API Key
The main reason why you need to sign up with Moralis is that you need access to an API key. As we previously mentioned, you will use Moralis’ Token API to get all tokens owned by a wallet. But, to interact with the various endpoints of this API, you need a Moralis Web3 API key. So, where can you get one?
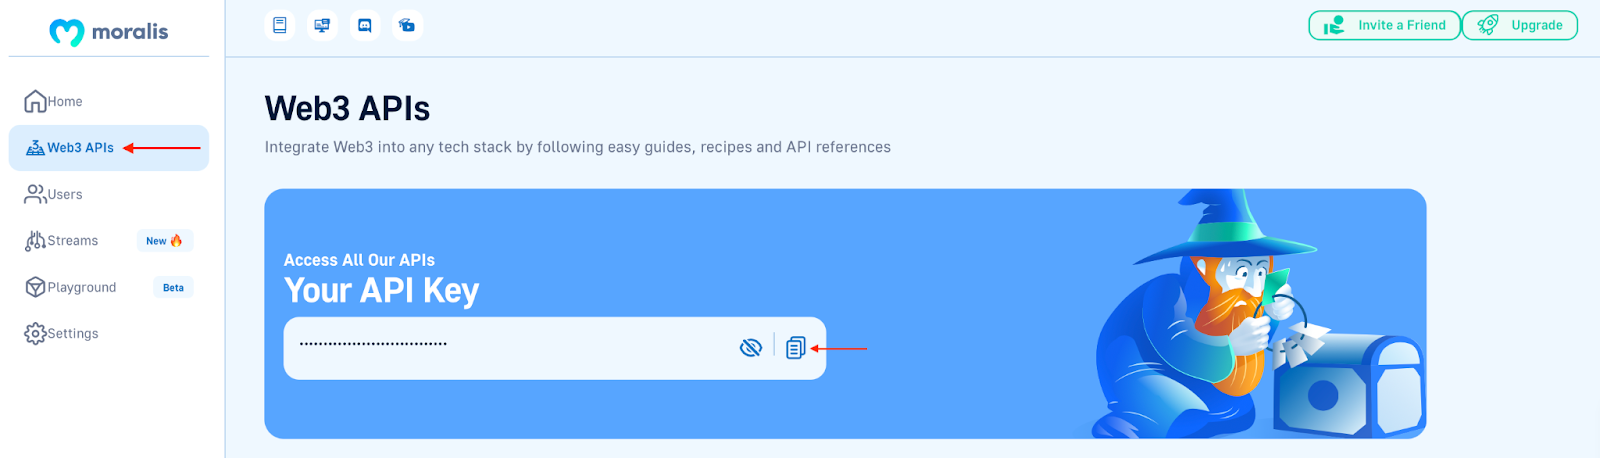
Once you have an account at your disposal, log in to the Moralis admin panel. Click on the ”Web3 APIs” tab and locate your API key. What’s more, go ahead and copy the API key by clicking on the ”Copy” button, as you need the key for the next step:
Step 3: Project Setup
In this third step, it is time to set up the application. To make this tutorial as accessible as possible, we will use an already pre-made project. You will find the complete application code in the GitHub repository down below:
Get All Tokens Owned by a Wallet Repo – https://github.com/MoralisWeb3/youtube-tutorials/tree/main/get-any-wallets-token-balance
You can open the repository and clone the project to your local directory. Doing so should provide you with a local copy of the code, and you should find yourself with a file structure similar to the one in the image below:

From here, open a new terminal, ”cd” into the project’s root folder, and run the command below to install the Moralis SDK:
npm install moralis @moralisweb3/common-evm-utils
Next up, create a new file called ”.env.local” and add an environment variable for your Moralis API key. It should look something like this (replace “YOUR_API_KEY” with the actual key):
NEXT_PUBLIC_MORALIS_API_KEY=”YOUR_API_KEY”
That covers the necessary steps in making the application operational. However, we have yet to explain how the application works or how you can get all tokens. As such, we break down the code in the following two steps and explore the application logic in further detail. This provides insight into how Moralis’ Token API works, allowing you to use the same fundamental principles for any future Web3 projects!
Step 4: Code Breakdown: ”index.js” & ”header.js”
With a local copy of the project at your disposal and the necessary configurations all complete, we will take the following section to explore two files: ”index.js” and ”header.js”. So, let us kick things off by diving into the code of the ”index.js” file!
- ”index.js” – The code contained within the ”index.js” file is responsible for rendering the app’s homepage. The contents of the file are relatively straightforward, and it looks like this:
import Head from "next/head";
import styles from "../styles/Home.module.css";

import Header from "../components/header";
import Main from "../components/main";

export default function Home() {
  return (
    <section className={styles.container}>
      <Head>
        <title>Get Token Price</title>
        <meta name="description" content="Generated by create next app" />
        <link rel="icon" href="/favicon.ico" />
      </Head>

      <main className={styles.main}>
        <Header />
        <Main />
      </main>
    </section>
  );
}
At the bottom of the file, you will find the code responsible for rendering two components: ”Header” and ”Main”, which make up the two additional files we will dive deeper into. So, let’s progress by taking a brief look at ”header.js”.
- ”header.js” – The code of the ”header.js” file is quite straightforward and is solely responsible for the app’s title and logo displayed on the UI:
import Image from "next/image";
import styles from "../styles/Home.module.css";

import Logo from "../public/assets/Moralis_logo.png";

export default function Header() {
  return (
    <section className={styles.header}>
      <Image src={Logo} alt="Logo image" width="102" height="82" />
      <h1 className={styles.title}>Get Any Wallet's Token Balance</h1>
    </section>
  );
}
In the next step, we will dive into ”main.js”, which is where we find the application logic!
Step 5: Code Breakdown: ”main.js”
The ”main.js” file contains the logic for the application and the code enabling us to get all tokens owned by a wallet. This one is quite extensive if we compare it to the other files we saw in the previous step. Consequently, we will split the file into smaller sections and focus on the core parts, making it easier to follow along. So, to begin with, let us briefly cover the initial four lines of the file:
import { useState } from "react";
const Moralis = require("moralis").default;
const { EvmChain } = require("@moralisweb3/common-evm-utils");
import styles from "../styles/Home.module.css";
These initial lines are responsible for the necessary imports. This is also where you install Moralis and the EVM utils. Following the imports, the remainder of the code is the ”header()” function. This function does, in turn, feature ”handleSubmit()”, containing the logic for acquiring the tokens owned by a wallet:
const handleSubmit = async () => {
    address = document.querySelector("#walletAddress").value;
    const chain = EvmChain.ETHEREUM;

    await Moralis.start({
      apiKey: process.env.NEXT_PUBLIC_MORALIS_API_KEY,
    });

    const response = await Moralis.EvmApi.token.getWalletTokenBalances({
      address,
      chain,
    });

    console.log(response.toJSON());
    setResult(response.toJSON());
    setShowResult(true);
    document.querySelector("#walletAddress").value = "";
  };
In the first part of the ”handleSubmit()” function, you acquire the wallet address from the UI, which we store in the ”address” variable. Next, the code specifying the ”chain” variable to equal ”evmChain.ETHEREUM” indicates that you want to query an address on the Ethereum network.
From there, the code initializes Moralis using the ”Moralis.start()” function, passing your API key as an argument. Finally, through the ”getWalletTokenBalances()” function, you call the Moralis Token API endpoint and store the results in the ”response” variable.
The remainder of the code renders the app’s UI elements and decides what data to display to the users:
return (
    <section className={styles.main}>
      <form
        className={styles.getTokenForm}
        name="create-profile-form"
        method="POST"
        action="#"
      >
        <label className={styles.label} htmlFor="walletAddress">
          Add ERC20 Wallet Address
        </label>
        <input
          className={styles.walletAddress}
          type="text"
          id="walletAddress"
          name="walletAddress"
          maxLength="120"
          required
        />
      </form>
      <button className={styles.form_btn} onClick={handleSubmit}>
        Submit
      </button>
      <section className={styles.result}>
        {showResult &&
          result.map((token) => {
            return (
              <section
                className={styles.tokenContainer}
                key={result.indexOf(token)}
              >
                <img src={token.thumbnail} />
                <p className={styles.name}>{token.name}</p>
                <p className={styles.amount}>
                  {(token.balance / 10 ** token.decimals).toFixed(2)}
                </p>
              </section>
            );
          })}
      </section>
    </section>
  );
That covers the central part of the application code! For a more detailed breakdown, check out the video from Moralis’ YouTube channel below. In this clip, you will find a video tutorial covering the entire process in further detail:
In addition, check out the official “getWalletTokenBalances” endpoint documentation and the complete Token API documentation for more information about the Token API and the endpoint used in this tutorial!
Get All Tokens Owned by a Wallet – Summary
In this article, you saw how to get all tokens owned by a wallet, thanks to Moralis’ Token API. To show this API in action, the article demonstrated how to create a straightforward NextJS dapp allowing anyone to query a wallet’s token balance based on its address. What’s more, thanks to the accessibility of Moralis, you were able to create this app in only five steps:
- Completing Prerequisites and Setting Up a Moralis Account
- Get Your Moralis API Key
- Project Setup
- Code Breakdown: ”index.js” & ”header.js”
- Code Breakdown: ”main.js”
If you found this article helpful, there are other exciting guides for you to check out on Moralis’ Web3 blog. For example, explore the intricacies of Ethereum webhooks or learn how to get NFT collections using Python! Moreover, if Ethereum development interests you the most, check out our articles exploring how to get the balance of ERC20 tokens, the ultimate ERC20 token API, and the best ERC20 token balance API for dapp development!
Nevertheless, if you want to fully leverage the power of blockchain, sign up with Moralis immediately. You can set up your account for free, and it only takes seconds, so you have nothing to lose!