Today’s tutorial will teach you how to create a Twitter bot for crypto using Python, Moralis, and Twitter’s developer portal. Thanks to Moralis’ Streams API, you can listen to on-chain events in real-time, which you can use to trigger your Twitter bot and tweet the details related to the targeted on-chain events. For the sake of this tutorial, we’ll focus on using a Twitter bot to post whale alerts.
Now, to create this bot, you must obtain specific details from the developer portal and then use those details to authenticate Twitter in your script. But essentially, you can create the bot with these three lines of code:
def send_tweet(tweet):

    api.update_status(tweet)

    print("Tweeted: {}".format(tweet))
To turn your bot into a Twitter bot for crypto, the power of Moralis’ Streams API and Flask will do the trick. Additionally, the following filter will enable you to focus on transfers of one million Tether (USDT) or more:
[

   {

      “topic0”: “Transfer(address,adress,uint256)”,

      “filter”: {

         “gt”: [

            “value”,

            1000000000000

         ]

      }

   }

]
If you have some experience with Python and have worked with Moralis’ Streams API before, you probably already know how to implement the above snippets of code. However, if you need some help, make sure to follow our lead. In case you’re new around here, do not forget to create your free Moralis account!

Overview
We will start this article by diving straight into the tutorial on how to create a Twitter bot for crypto. This is where we’ll cover all the steps you need to complete from start to finish. Furthermore, we will show you how to get started with Twitter’s developer portal, what settings you need to tweak, and how to obtain the necessary details. Then, we’ll guide you through the process of creating a Twitter bot using the above-presented lines of code. Of course, we will also show you how to set your key and token in place. This is also where you’ll learn how to use the Tweepy Python library to access the Twitter API. At that point, you will know how to create a Twitter bot.
Our objective will be for our bot to focus on blockchain events. Now, to create a Twitter bot for crypto, you’ll want to use Moralis’ Streams API to start listening to the desired on-chain events. Finally, we’ll show you how to tie it all together with a simple Python script.
Below the tutorial, you’ll also find sections covering theoretical aspects of today’s topic. This is where you can learn what a Twitter bot is, the gist of Moralis, and what makes Moralis the best crypto tool for Web3 devs.

Tutorial: How to Create a Twitter Bot for Crypto
As explained above, our tutorial will go through the following four steps:
- Setting up your Twitter developer portal account, creating a new app, and tweaking the appropriate settings. This is where you’ll generate your Twitter API key and token.
- Using Python and the Tweepy library to create your Twitter bot.
- Creating a new stream to fetch real-time, on-chain data regarding large transfers of USDT using Moralis’ admin UI.
- Using Flask and the information your stream provides you with to create a Twitter bot for crypto whale alerts.
Step 1 – Twitter Developer Portal Setup
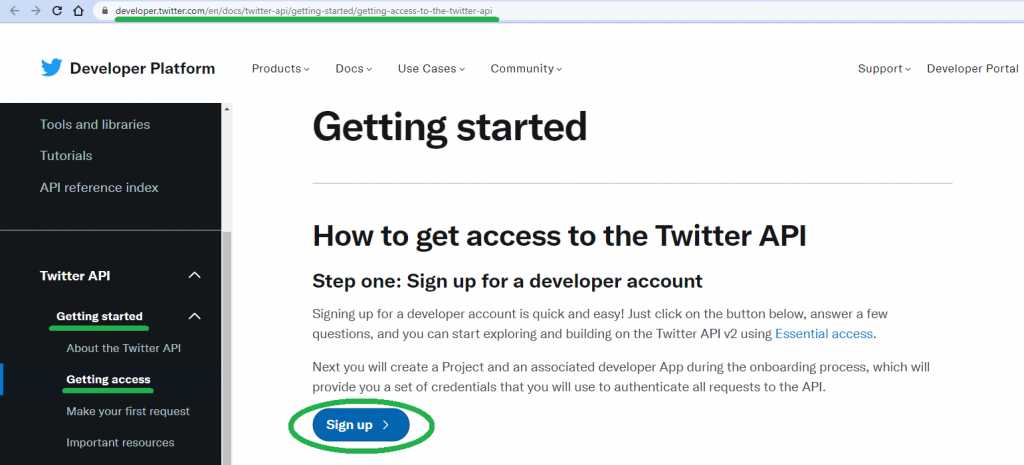
Start by signing up for a Twitter developer account. Visit “developer.twitter.com“ and click on the “Sign up” button on the “Getting started” page:
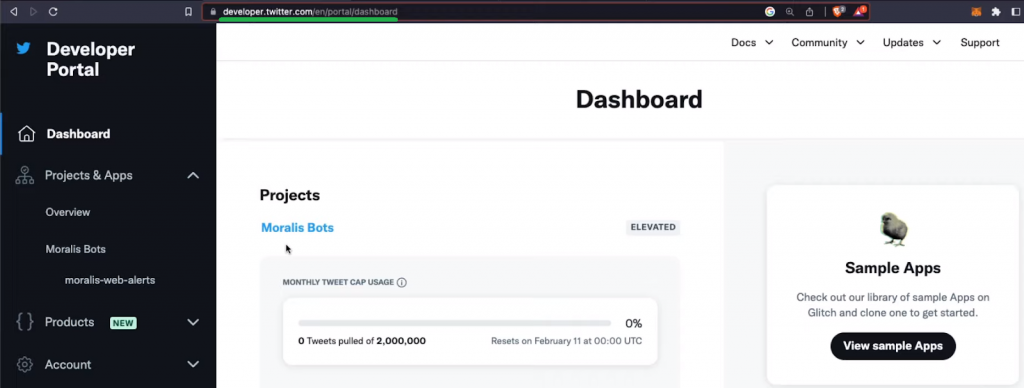
Once you successfully sign up, you’ll be able to access your developer portal panel:
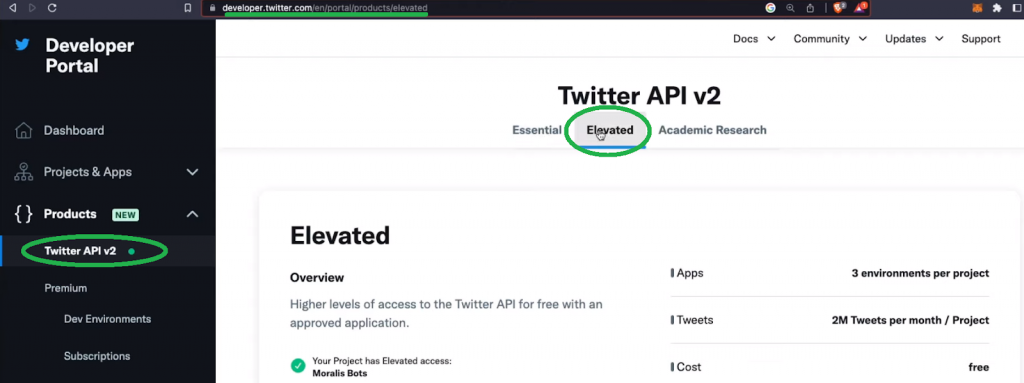
Since you want your bot to be able to post tweets, you also need to enable elevated access. To do this, select the “Twitter API v2” option under “Products” and go to the “Elevated” tab to enter the necessary details:
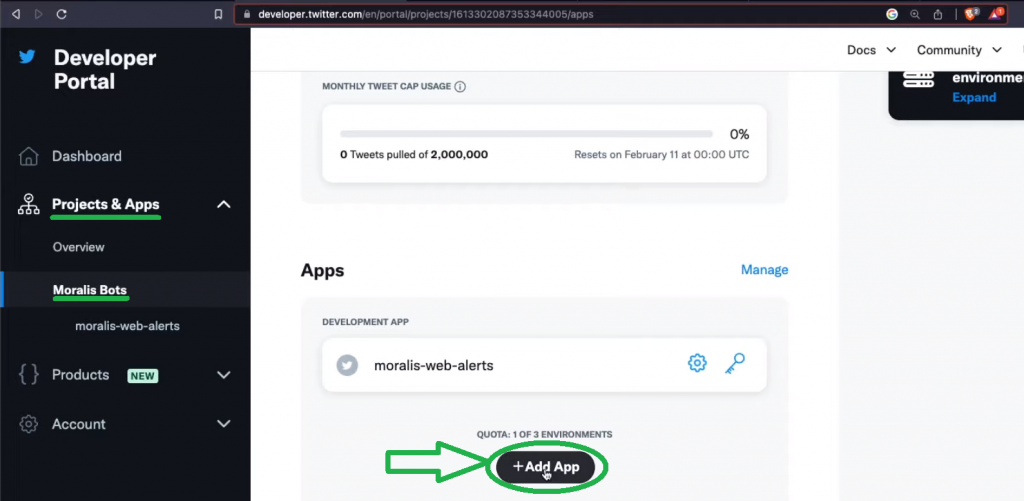
As you can see in the above two screenshots, we have already created the “Moralis Bots” project. You can follow our lead naming your project the same way or use any other name. Once on your project page, scroll down and hit the “Add App” button:
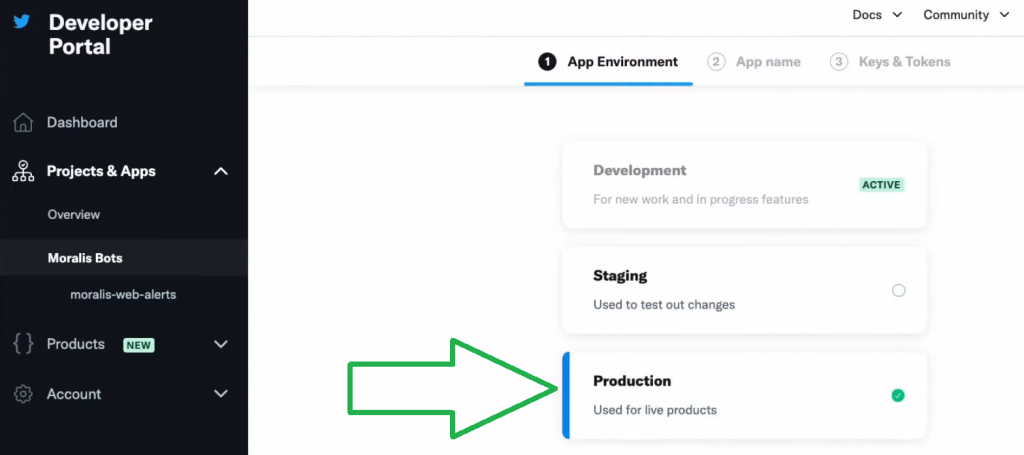
Next, select the “Production” option:
Then, name your app (again, feel free to use the same name as ours):

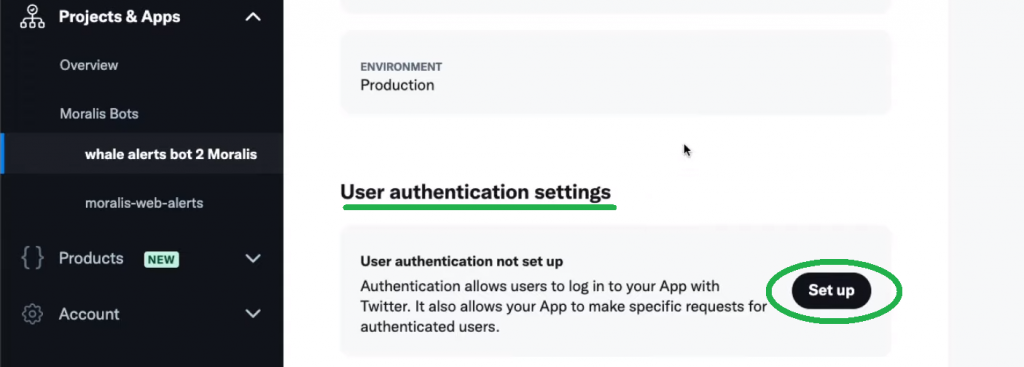
On the third step of your app setup, you’ll be able to see your API key and API key secret. However, you’ll need to generate new ones after changing some parameters. So, click on the “App setting” button. On the next page, scroll down and hit “Set up” under “User authentication settings”:
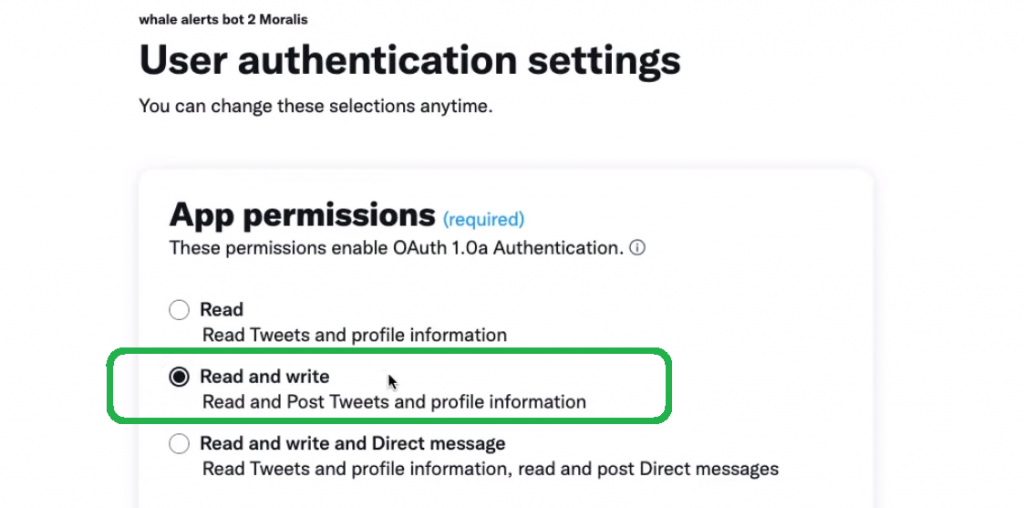
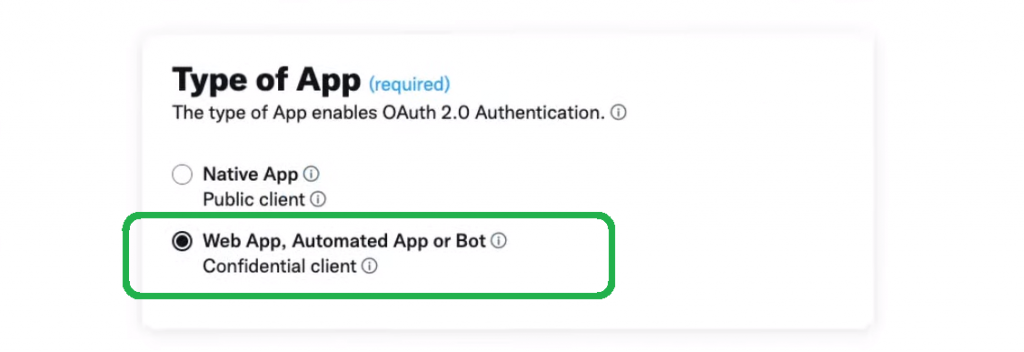
On the user authentication settings page, select the “Read and write” option:
Next, select the “Web App, Automated App or Bot” option:
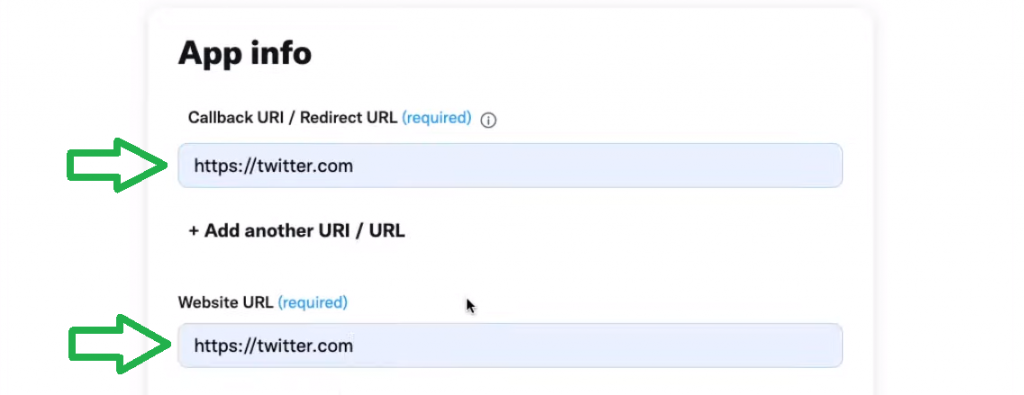
In the “App info” section, use Twitter’s URL for both of the following options:
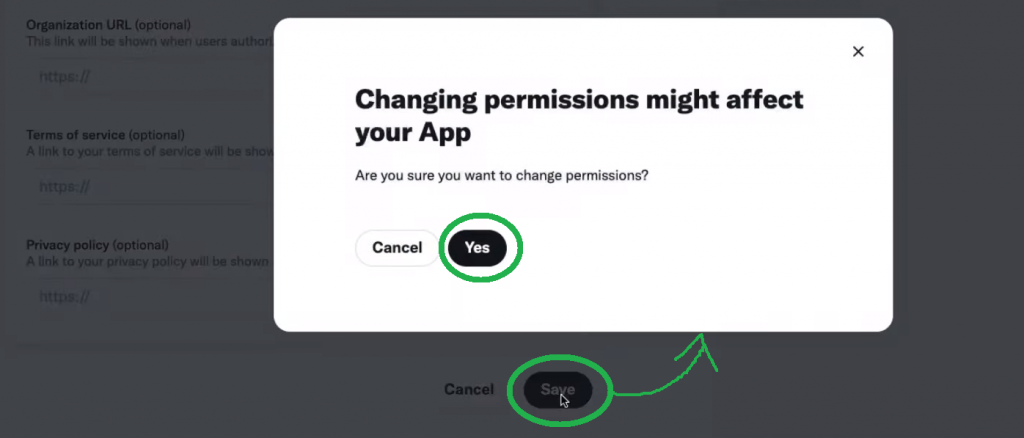
Scroll to the bottom of the page and click on “Save” followed by “Yes”:
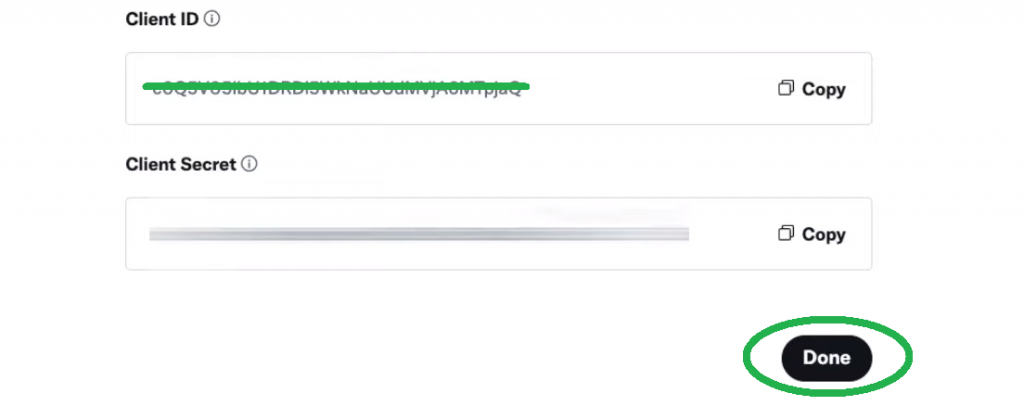
Note: We won’t be using “Client ID” and “Client Secret” in today’s tutorial; however, we recommend copying these two details somewhere safe before clicking on “Done”:
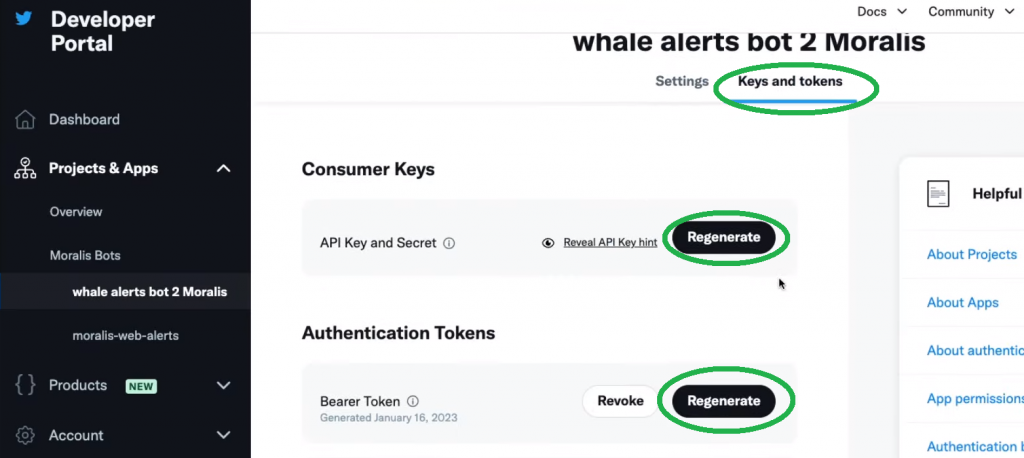
Moving on, select the “Keys and tokens” tab, where you need to regenerate your Twitter API key and your authentication tokens:
Step 2 – Create Your Twitter Bot with Python and Tweepy
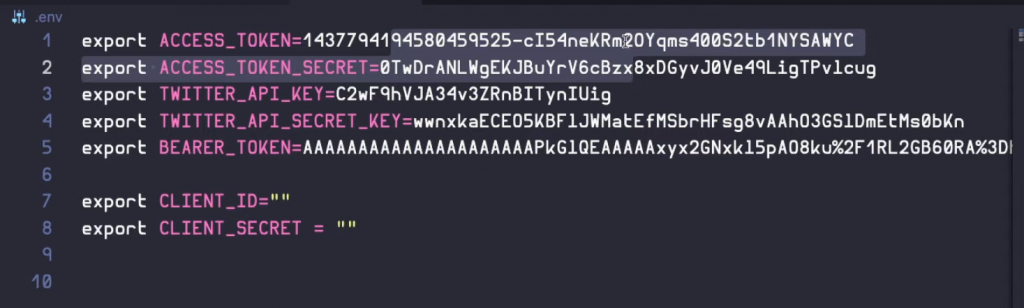
First, create your “.env” file and populate it with the above-obtained key and token details:
Note: Always keep your keys and tokens private. We showed them to you because we’ll delete our bot once we publish this tutorial.
Next, create a “twitter_bot.py” file. Both the above “.env” and “twitter_bot.py” files should be inside the same project folder (e.g., “twitter-bot-whale-alerts”). At the top of this new Python script, import Tweepy, “dotenv”, “os”, and load “dotenv”. Here are the lines of code that cover that:
import tweepy

from dotenv import load_dotenv

import os

load_dotenv()
Also, do not forget to install the Tweepy library using the following command:
pip install tweepy
Next, you need to add the keys and tokens you stored in the “.env” file:
CONSUMER_KEY = os.getenv("TWITTER_API_KEY")

CONSUMER_SECRET = os.getenv('TWITTER_API_SECRET_KEY')

ACCESS_TOKEN = os.getenv('ACCESS_TOKEN')

ACCESS_TOKEN_SECRET = os.getenv('ACCESS_TOKEN_SECRET')
With the above details in place, you’ll be able to access the Twitter API with these lines of code:
auth = tweepy.OAuthHandler(CONSUMER_KEY, CONSUMER_SECRET)

auth.set_access_token(ACCESS_TOKEN, ACCESS_TOKEN_SECRET)

api = tweepy.API(auth)
Finally, you have everything ready to use the snippet of code provided in the intro, which will create your Twitter bot:
def send_tweet(tweet):

    api.update_status(tweet)

    print("Tweeted: {}".format(tweet))
Note: You can access a complete script via the “twitter_bot.py” link above. Also, if you wish to test your code at this stage, use the video at the top of the article, starting at 5:49.
Step 3 – Obtain Real-Time, On-Chain Data with Moralis Streams
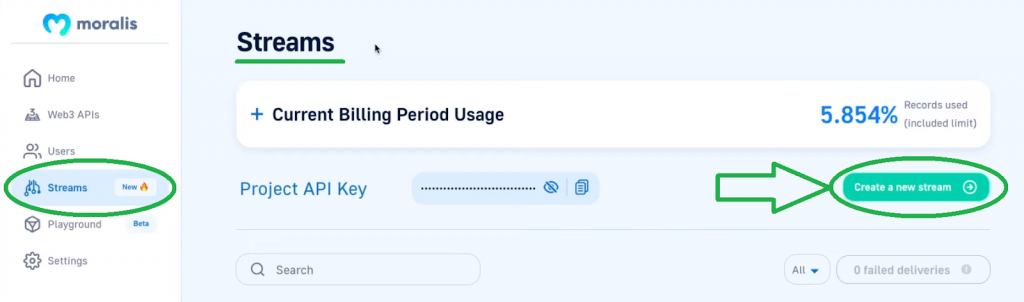
To use Moralis’ Streams API, you need a Moralis account. So, in case you haven’t done so yet, use the “create your free Moralis account” link in the intro. With your account ready, you’ll be able to access your admin area. There, select the “Streams” tab. Next, click on the “Create a new stream” button:
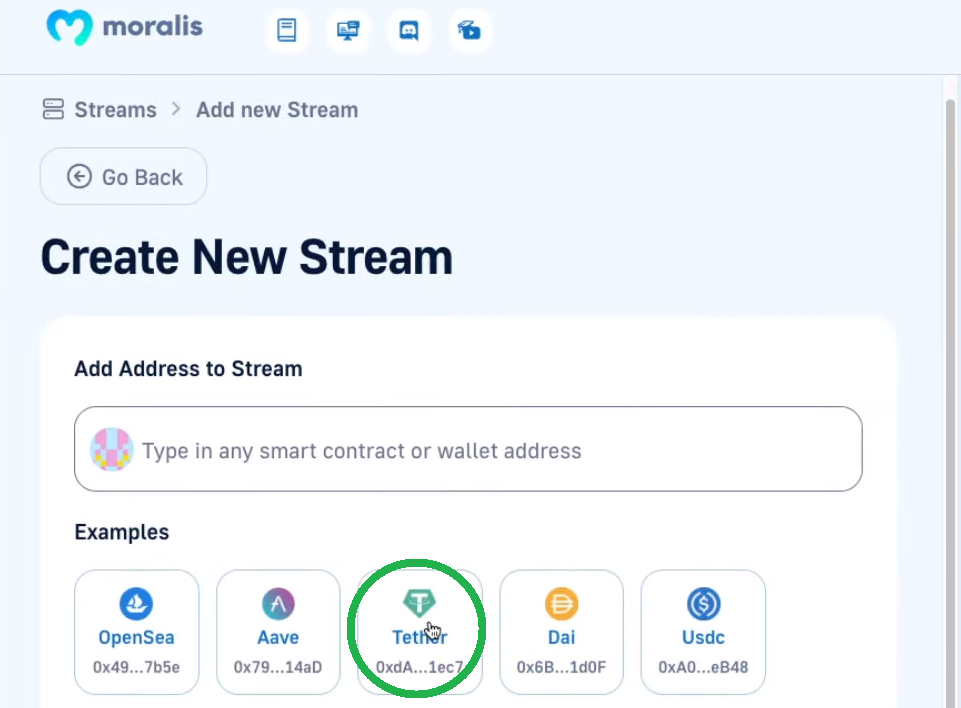
Then, paste in the Tether smart contract address (in this case, you can simply select it among the given examples):
Next, you need to provide some details inside the “Stream Configuration” section:
You’ll be tying your stream and your Twitter bot together in the next section using the “index.py” script. However, at this point, you need to obtain your webhook URL. As such, run that script (not yet in its final form) to create a simple server. These are the lines of code you need at this stage in your “index.py” script:
import json

from flask import Flask, request

import locale

from twitter_bot import send_tweet

locale.setlocale(locale.LC_ALL, 'en_US.UTF-8')

app = Flask(__name__)

@app.route("/webhook", methods=["POST"])

def webhook():

    # Process the request data here

    webhook = request.data.decode("utf-8")

    json_object = json.loads(webhook)

    print(json_object)

    return "OK"

if __name__ == "__main__":

    app.run(port=5002)
Use the following command to run the above script:
python index.py
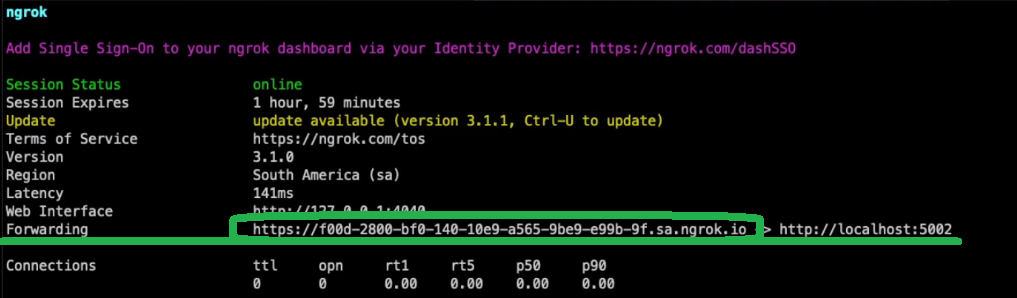
As a result, you will have a simple server running on localhost 5002:

To finally get your webhook URL, you can use ngrok for the above port (5002) with this command line:
ngrok http 5002
The above command will create a tunnel to your localhost and provide you with a URL address that you can use as your webhook URL:
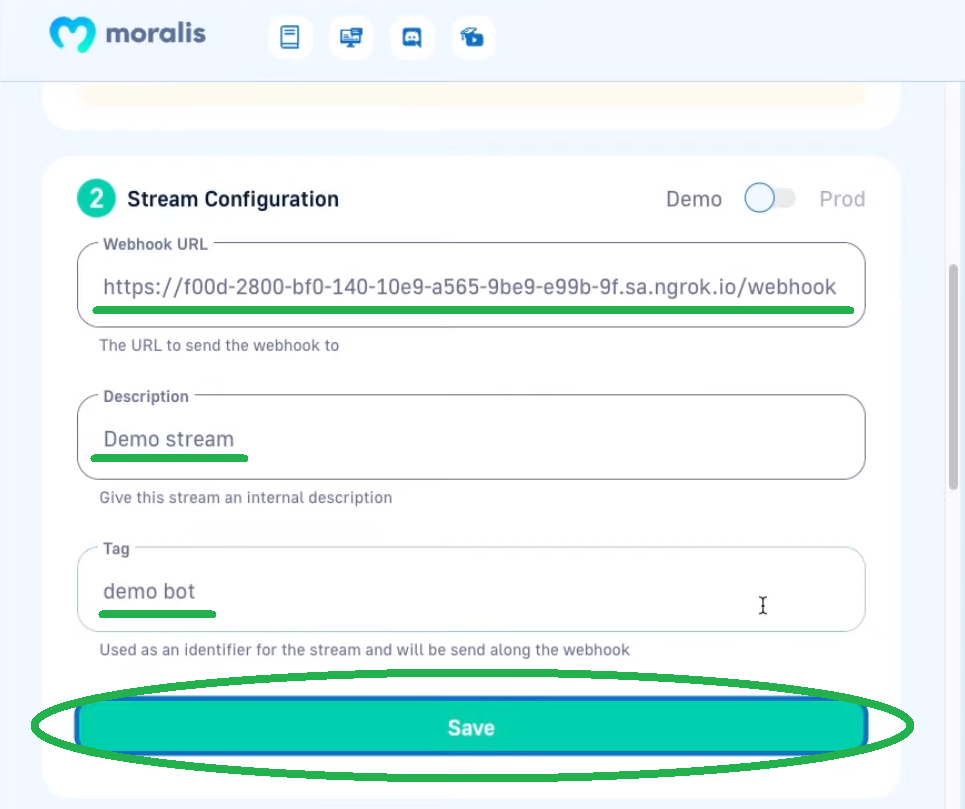
Copy the address and paste it into the “Webhook URL” entry field (add “/webhook”). Also, enter a description and tag:

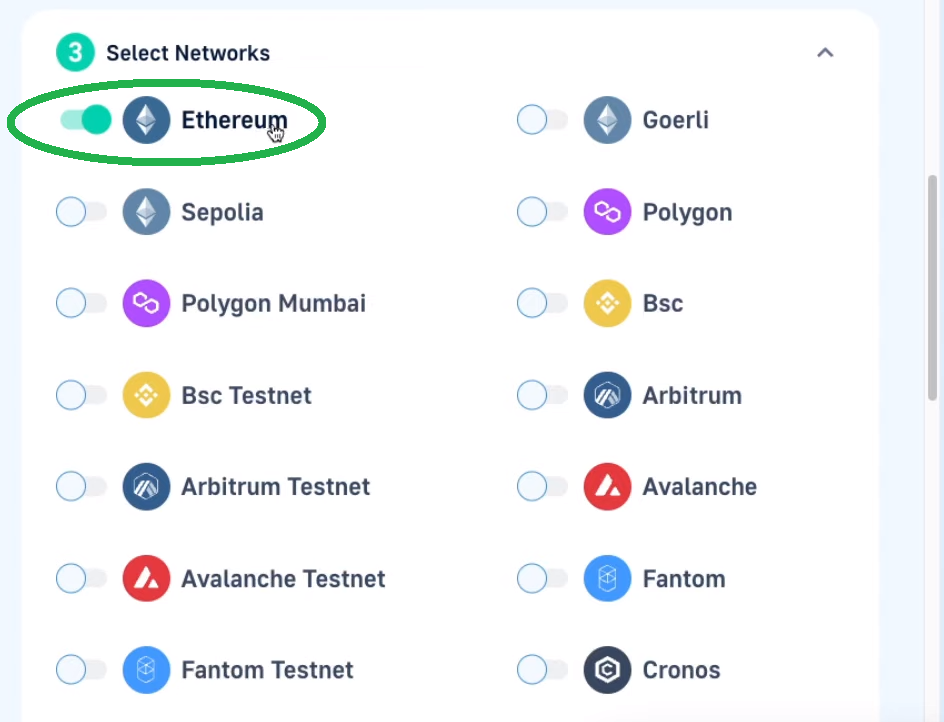
Select the Network and Obtain the Smart Contract ABI
In the third step of your stream setup, you get to select networks. Since Ethereum is toggled by default, you don’t have to do anything. After all, Tether is an ERC-20 token based on the Ethereum blockchain. However, if you were to target other chains, you’d need to toggle them in this step.
Next, make sure you only select the “Contract Interactions” option:

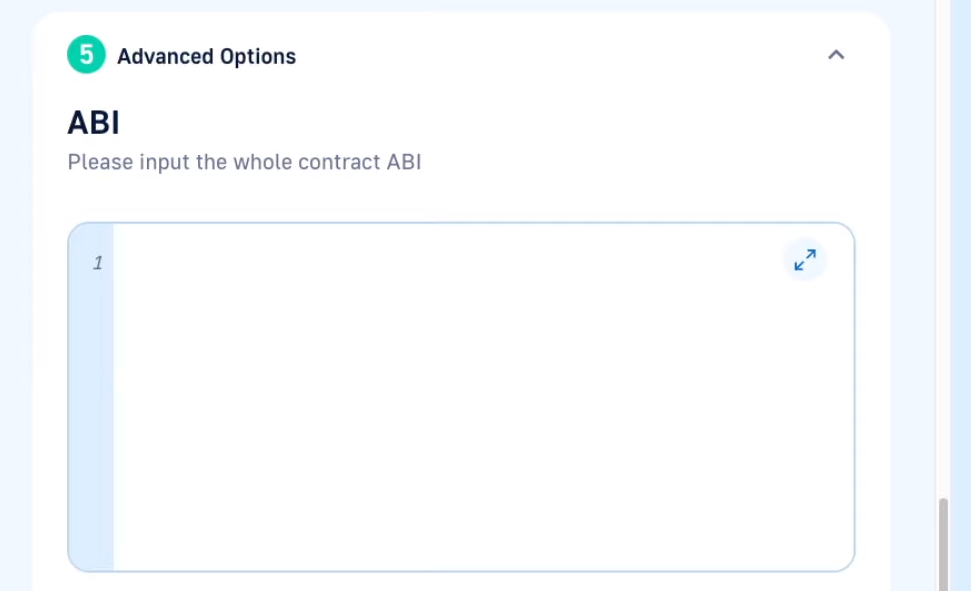
In the “Advanced Options” section, you need to input your smart contract’s ABI (the one you want to listen to):
So, use the Tether address and paste it into Etherscan’s search bar:

Then, select the “Contract” tab:
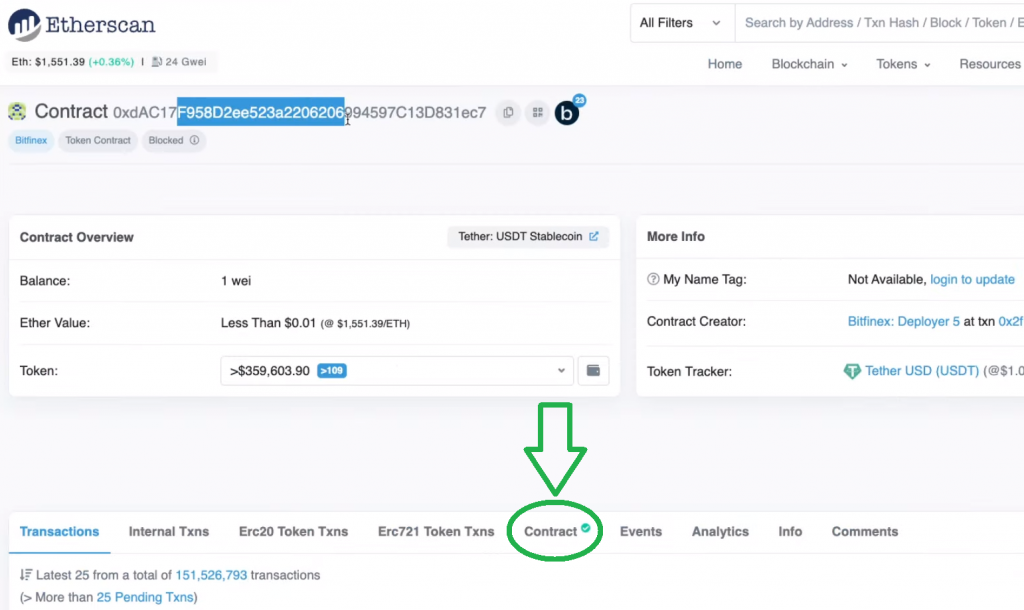
Once on the “Contract” tab, scroll down until you see “Contract ABI”, which contains the details you need to copy:

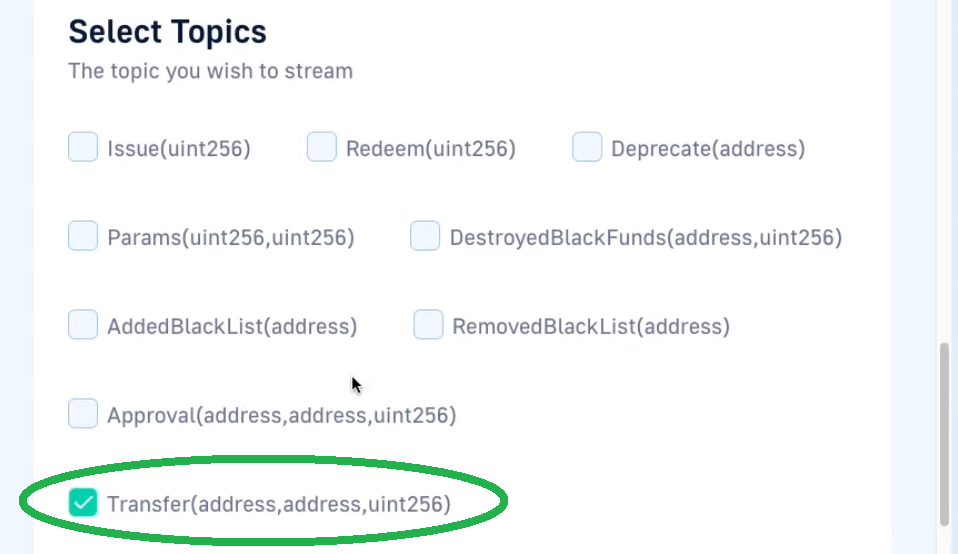
As soon as you paste the ABI into the entry field in the “Advanced Options” section, Moralis provides you with the available topics. Since we want to focus on USDT transfers, we need to select the “Transfer” function:
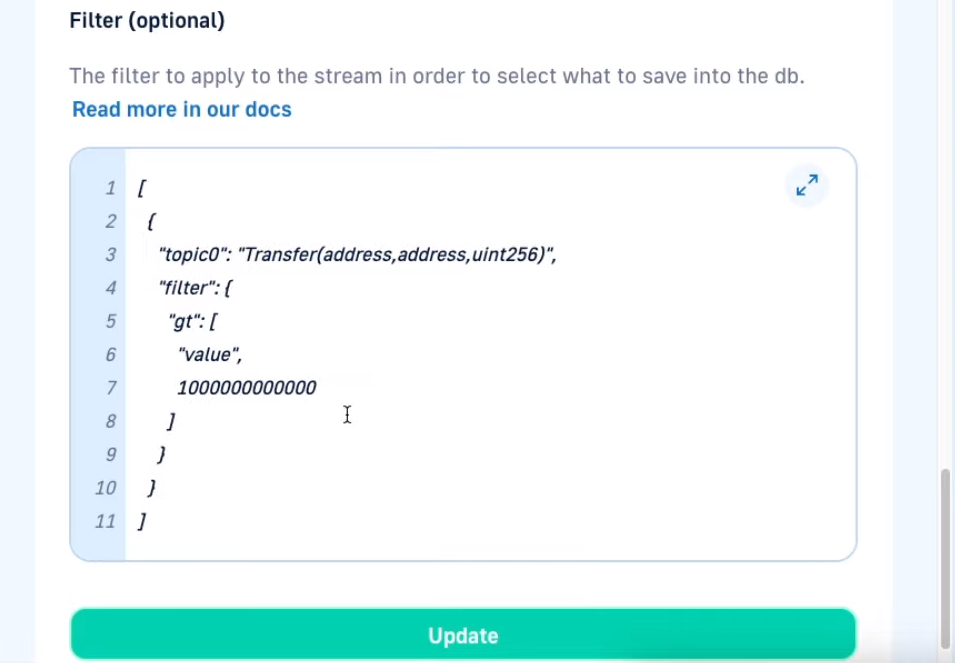
Since we want to focus on large (whale) transfers, we must also implement a suitable filter. This is where the second snippet of code provided at the top of the article comes into play. Paste those lines of code and click on “Update”:
Finally, switch your stream from demo to production:

Step 4 – Supply Your Twitter Bot for Crypto with the Information from Your Stream
At this point, you have your Twitter bot ready, and you are getting the information about all USDT transfers larger than one million. This means you only need to supply your bot with the information that the above-created stream fetches. To achieve this, you must tweak your “index.py” script accordingly.
For starters, you do not want to print the entire response but focus on specific information. A “try” statement will do the trick. You also want to define the pieces of information the stream returns. This is the updated “webhook” function:
def webhook():

    # Process the request data here

    webhook = request.data.decode("utf-8")

    json_object = json.loads(webhook)

    try:

        transfer = json_object["erc20Transfers"][0]

    except IndexError:

        return "OK"

    sender = transfer["from"]

    receiver = transfer["to"]

    value = transfer["value"]

    token_name = transfer["tokenName"]

    transaction_hash = transfer["transactionHash"]

    handle_response_and_tweet(sender, receiver, value,

                              token_name, transaction_hash)

    return "OK"
To use the above parameters in a tweet, we need to add another function – “handle_response_and_tweet” – into the “index.py” file:
def handle_response_and_tweet(sender, receiver, value, token_name, transaction_hash):
sender = sender[:6] + "..." + sender[-3:] + "..."
receiver = receiver[:6] + "..." + receiver[-3:] + "..."
value = "${:,.6f}".format(float(value)/1000000)
transaction_hash = 'https://etherscan.io/tx/' + transaction_hash
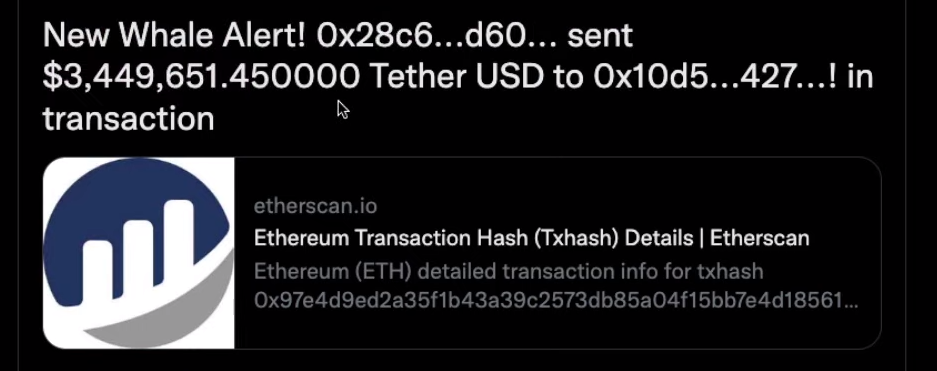
tweet = f"New Whale Alert! {sender} sent {value} {token_name} to {receiver}! in transaction {transaction_hash}"
send_tweet(tweet)
The above “sender” and “receiver” lines ensure we only tweet the first six and the last three characters of a sender’s and receiver’s addresses. After all, tweets have a limited amount of characters. When it comes to “value“, the above code adds the USD symbol and formats the number according to the fact that USDT uses six decimals. As far as “transaction_hash” goes, it simply follows Etherscan’s format. Moreover, “tweet” constructs the message that we want our Twitter bot for crypto to tweet:
Note: You can access the complete “index.py” script on GitHub.
What is a Twitter Bot?
A Twitter bot is a special kind of app that has the power to control a Twitter account. It does so through the Twitter API, which devs can access via their Twitter developer portal accounts (as demonstrated above). Furthermore, Twitter bots can perform various actions, including posting tweets, re-tweeting, following, unfollowing, liking, and even direct-messaging other accounts. Out of these, the above tutorial showed you how to use a Twitter bot for tweeting.

Best Crypto Tool for Developers
When it comes to Web3 development and creating dapps (decentralized applications), there are many useful tools. However, thanks to its simplicity, cross-chain functionalities, and cross-platform interoperability, Moralis stands out. It serves as a tool that bridges the development gap between Web2 and Web3. It enables devs to use legacy programming languages, frameworks, and platforms to join the Web3 revolution. Today’s tutorial is a great example of that – enabling Python-proficient devs to set up a Twitter bot for crypto alerts.
In the above tutorial, you had a chance to experience the power of Moralis’ Streams API. However, this is just one of the three core products this enterprise-grade Web3 API provider offers. Here is a neat layout of Moralis’ API fleet:
- Web3 Data API:
- NFT API
- Token API
- Balance API
- Transaction API
- Events API
- Block API
- DeFi API
- Resolve API
- IPFS API
- Streams API
- Web3 Auth API
You’ve already learned and even experienced how the Streams API enables you to listen to on-chain events. The Web3 Data API allows you to fetch any on-chain information and get it parsed. Among many other solutions, Moralis is also an ENS resolver. Also, Moralis enables you to add blockchain-based data storage. As for the Web3 Auth API, it lets you equip your dapps with the most popular Web3 log-in methods.
As Web3 technology evolves, so does Moralis. It is constantly improving and perfecting its products and services. Hence, Moralis’ resources also continuously add more and more value. For instance, you can now use Moralis’ Pure Faucets page to access user-friendly and hustle-free faucets, including the best Ethereum faucet and the Web3 market’s leading Polygon Mumbai faucet. So, make the most of what Moralis has to offer; sign up today!

How to Create a Twitter Bot for Crypto – Summary
The core of today’s article was our tutorial exploring how to create a Twitter bot for crypto. The tutorial took you through the following four steps:
- Twitter developer portal setup
- Create your Twitter bot with Python and Tweepy
- Obtain real-time, on-chain data with Moralis Streams
- Supply your Twitter bot for crypto with the information from your stream
As part of the third step, you also learned how to select a network or more of them and obtain a smart contract ABI as part of setting up a new stream. Aside from the tutorial, you also learned what a Twitter bot is and what makes Moralis the best crypto tool for developers.
If you enjoyed creating a Twitter bot for crypto, we encourage you to also explore our NodeJS Telegram bot tutorial. You may also want to cover our Web3.py vs Web3.js comparison. On the Moralis blog, you can also learn the gist of smart contract programming, what danksharding is, find out which the ultimate NFT standard is by diving into the ERC721 vs ERC1155 comparison, and much more.
Aside from our crypto blog, you also don’t want to miss out on practical video tutorials that await you on the Moralis YouTube channel. Lastly, if you wish to become blockchain-certified, Moralis Academy is the place to be. There, you’ll find countless blockchain development courses; however, we encourage you to first get your blockchain and Bitcoin fundamentals straight.