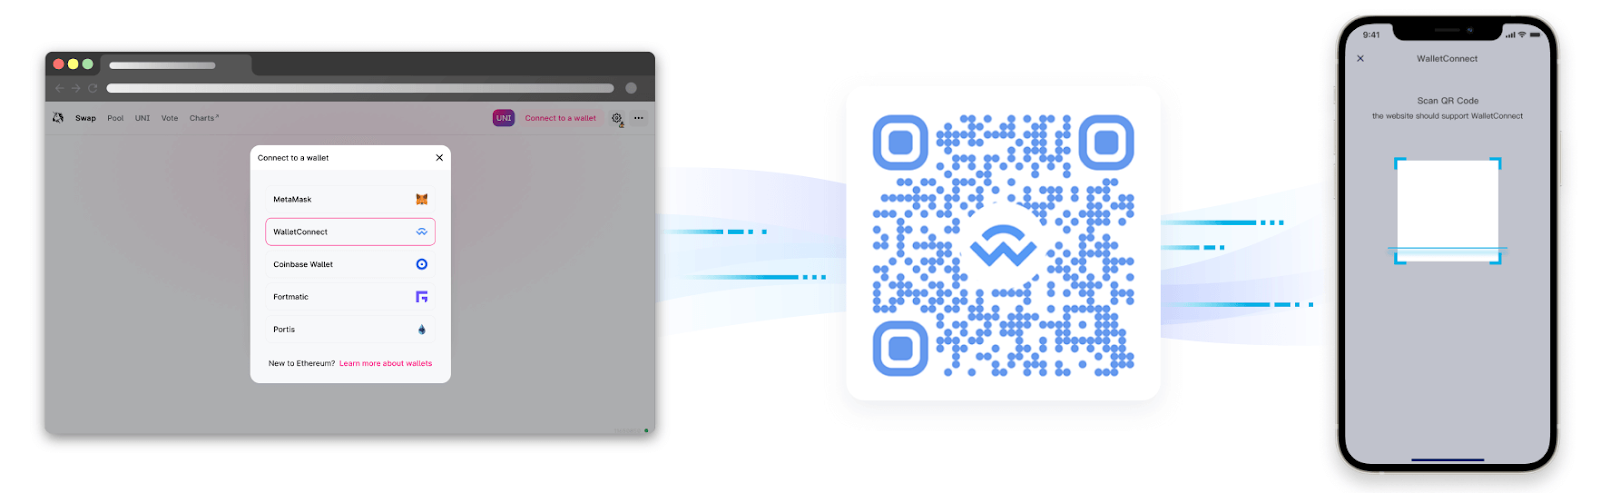
This tutorial looks at adding secure authentication via Moralis and how to integrate WalletConnect into your Web3 project. By following along in this tutorial, you can have an authentication solution up and running in record time, as seen in the following illustrative image showcasing WalletConnect integration:
If you’re an experienced developer, go ahead and access the complete file structure and code on our documentation page to get started immediately. However, if you want a step-by-step guide on how to integrate WalletConnect, we recommend reading this article from start to finish!
Overview
Web3 authentication is the gateway to dapps (decentralized applications), and with Moralis’ Web3 Auth API, you can add Web3 login to any dapp effortlessly. The API supports all major solutions, including WalletConnect integration. Since the latter tends to be the best alternative for mobile users, as a developer, you must learn how to integrate WalletConnect. After all, this open-source protocol supports more than 170 crypto wallets, making it one of the most user-friendly Web3 authentication methods. Furthermore, since Moralis is all about cross-chain interoperability, its Auth API enables you to implement WalletConnect to dapps across all leading blockchains. Also, Moralis empowers you to integrate it as a standalone Web3 login solution or combine it with other Web3 onboarding methods.
The core section of today’s article will be all about showing you how to add WalletConnect integration using Moralis. This is where you’ll have a chance to create a simple NextJS app and integrate WalletConnect as an authentication solution. However, before we invite you to roll up your sleeves, we need to cover some basics. As such, we’ll first ensure you all know what WalletConnect is and what wallets are compatible with this neat solution. However, if you are already familiar with these basics, feel free to create your free Moralis account and jump to the “Add WalletConnect Integration” section.
WalletConnect – What is it?
WalletConnect is an open-source protocol that can be used to establish a connection between a wide range of crypto wallets and dapps. This protocol ensures that the connection between wallets, applications, or devices is safe. After all, when you use WalletConnect to establish these connections, its protocol uses symmetric encryption via a shared key between two peers.
Essentially, WalletConnect is a decentralized Web3 messaging layer and a standard to connect blockchain wallets to dapps. Moreover, the WalletConnect team’s mission is to continuously expand the interoperability of the Web3 space. Hence, it’s rather safe to presume that WalletConnect will continue to provide the best tooling and infrastructure for Web3 wallets and dapps. Moreover, WalletConnect v2 is chain agnostic and compatible with any blockchain of your choice. Consequently, it’s easy to deliver an outstanding user experience when opting for this solution.
These are the three core WalletConnect features:
- Chain Agnostic – Like most Web3 projects, WalletConnect is aware that the future will most likely be multi-chain oriented. Accordingly, it already supports various chains, including Ethereum, Solana, and many others. Moreover, they are committed to continuing to add support for more chains.
- Multi-Chain – Thanks to WalletConnect’s multi-chain support, you can connect any of the supported wallets to multiple chains simultaneously.
- Platform Agnostic – WalletConnect supports different platforms. As such, you can use WalletConnect’s protocol on the web or desktop, mobile, and gaming apps.
Establishing Connections with WalletConnect – How Does It Work?
When it comes to using WalletConnect integration, users have two ways to establish the connection between wallets and dapps. They can do it by scanning a QR code, which is the preferred method and offered by default. However, users can also use a deep link. In both cases, one peer (or dapp) sends out the code or link, while the other must scan or approve it. As such, when you integrate WalletConnect into dapps, you enable users to easily establish safe and reliable Web3 connections.
What Wallets are Compatible with WalletConnect?
According to the official WalletConnect website, their solution works with more than 170 Web3 wallets. Since this number is extremely high, it wouldn’t make much sense to list all of the supported wallets herein. However, you can view all supported wallets by visiting WalletConnect’s official website. Once there, scroll down to the “Looking for a wallet?” section, and hit the “VIEW ALL WALLETS” button:
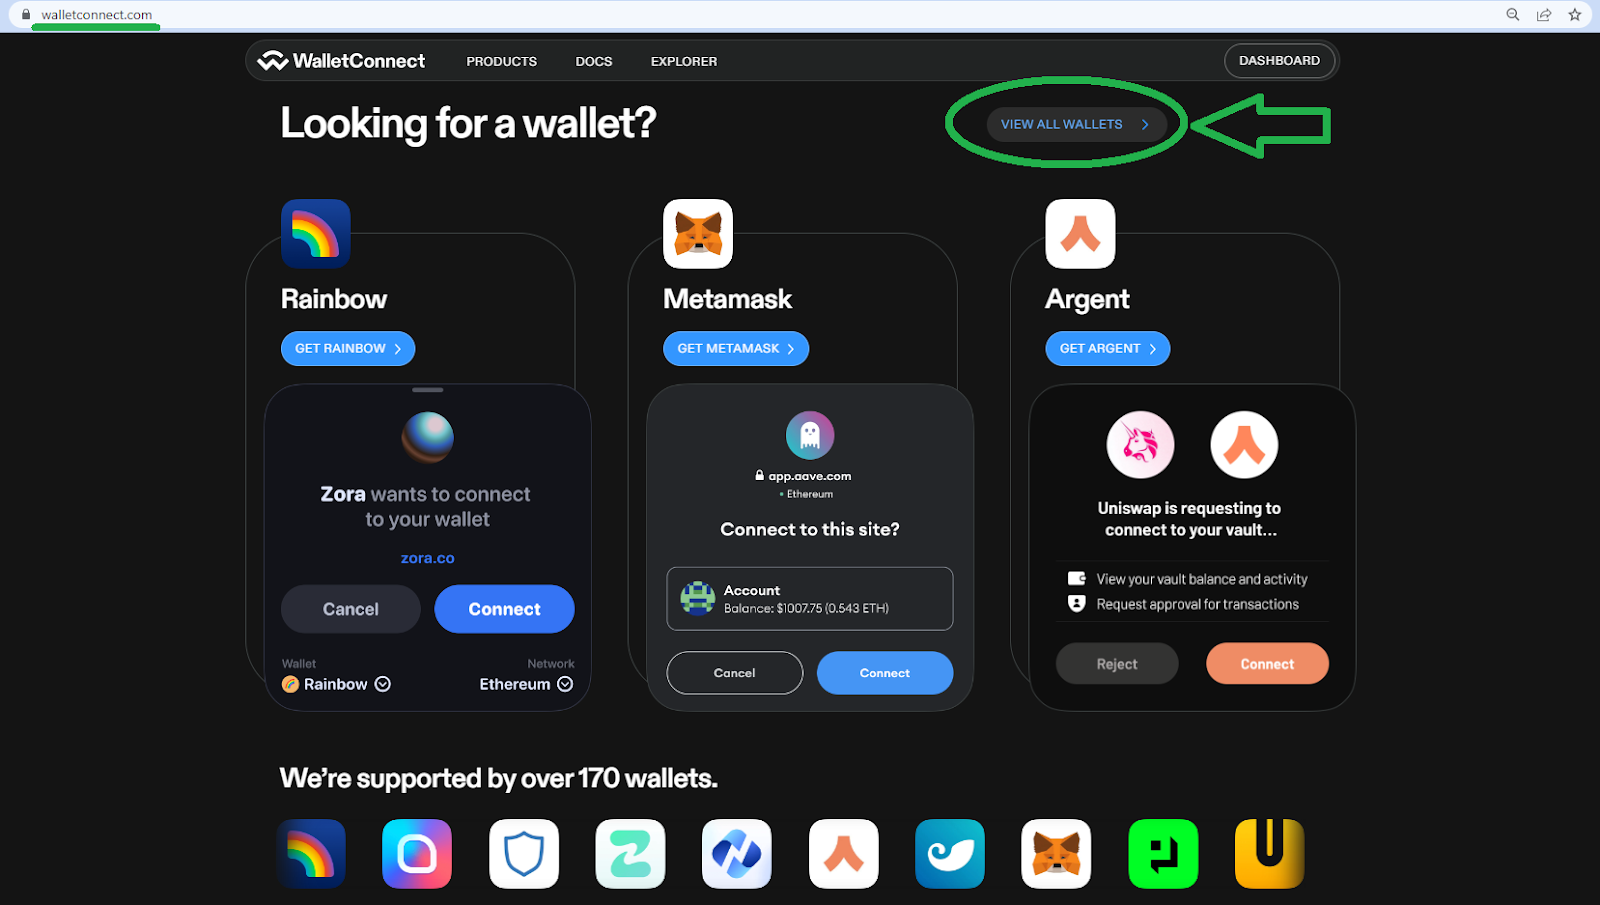
On the next page, you’ll actually be able to view all supported crypto wallets:
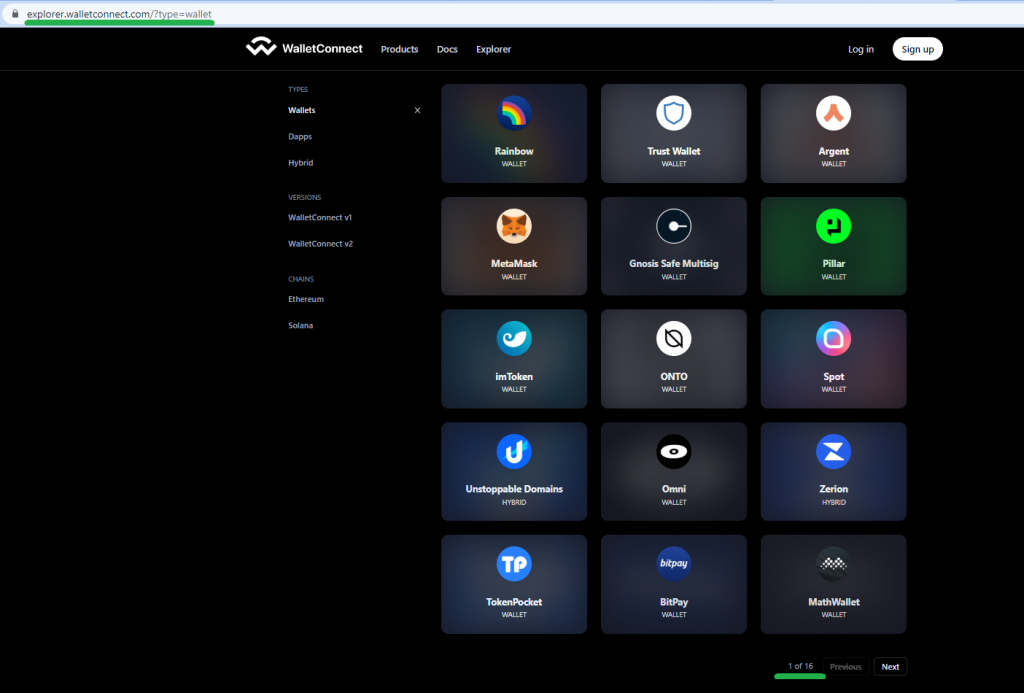
Moreover, as the above screenshot indicates, all supported Web3 wallets are listed across sixteen pages. Since there are fifteen wallets per page and there are fifteen total pages, it seems like WalletConnect already supports more than 225 crypto wallets.
Add WalletConnect Integration
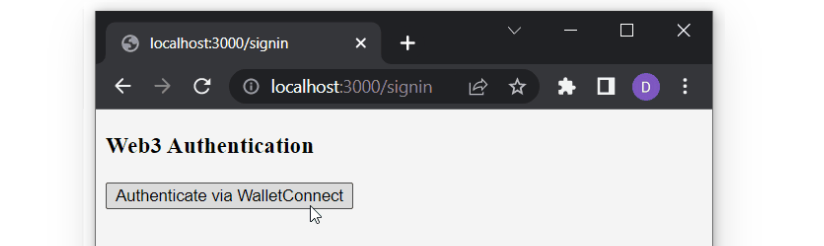
This is the section where you’ll learn how to add WalletConnect integration into your dapps. As mentioned above, we’ll focus on creating a NextJS application and equip it with this solution using the power of Moralis’ Web3 Auth API. So, if you decide to follow our lead, you’ll have your dapp with WalletConnect integration added in no time. In fact, here’s a quick preview of what you’ll be building:
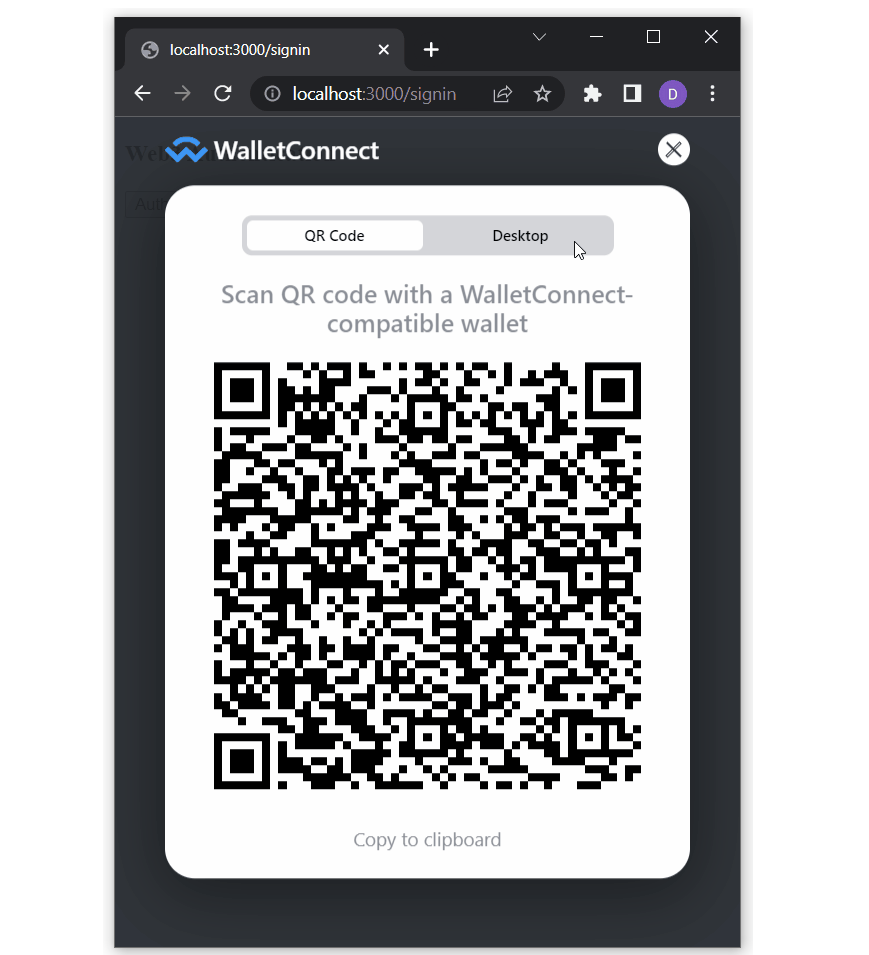
After clicking on the “Authenticate via WalletConnect” button, a QR code will pop up, enabling you (or your users) to connect your Web3 wallet by scanning the code:
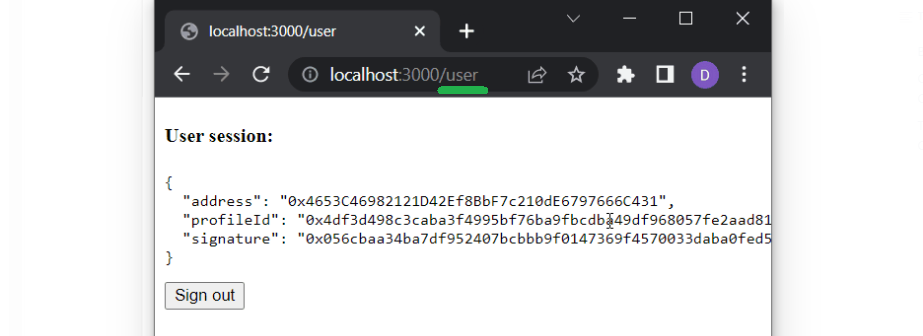
Finally, after successfully completing the Web3 authentication process, our dapp will also display some basic details about the connected wallet:
Prerequisites and the Initial Setup
If you want to build the above-demonstrated dapp following our lead, make sure you complete these prerequisites:
- Have your Moralis account ready.
- Install and set up Visual Studio Code (VSC).
- Create your NextJS dapp. If you need help with that, use the “Create Next App” page in the NextJS docs or complete our “Using NextJS” tutorial.
If you took care of the above prerequisites, proceed by installing the required dependencies. Essentially, you need to install Moralis, NextAuth, and Axios. To do this, use one of the following commands (depending on which package manager you are using:
npm install moralis next-auth axios
yarn add moralis next-auth axios
pnpm add moralis next-auth axios
Next, you need a Web3 library. Of course, there are several options at your disposal; however, we encourage you to follow our lead and use wagmi. Thus, install the “wagmi” dependency using one of the following commands:
npm install wagmi ethers
yarn add wagmi ethers
pnpm add wagmi ethers
Adding Environmental Variables
With the above dependencies in place, it’s time to add the required environment variables in a “.env.local” file. Also, make sure you have that file in your app’s root. Here are the variables you need to add:
- “APP_DOMAIN” – This is an “RFC 4501” DNS authority that is requesting the signing.
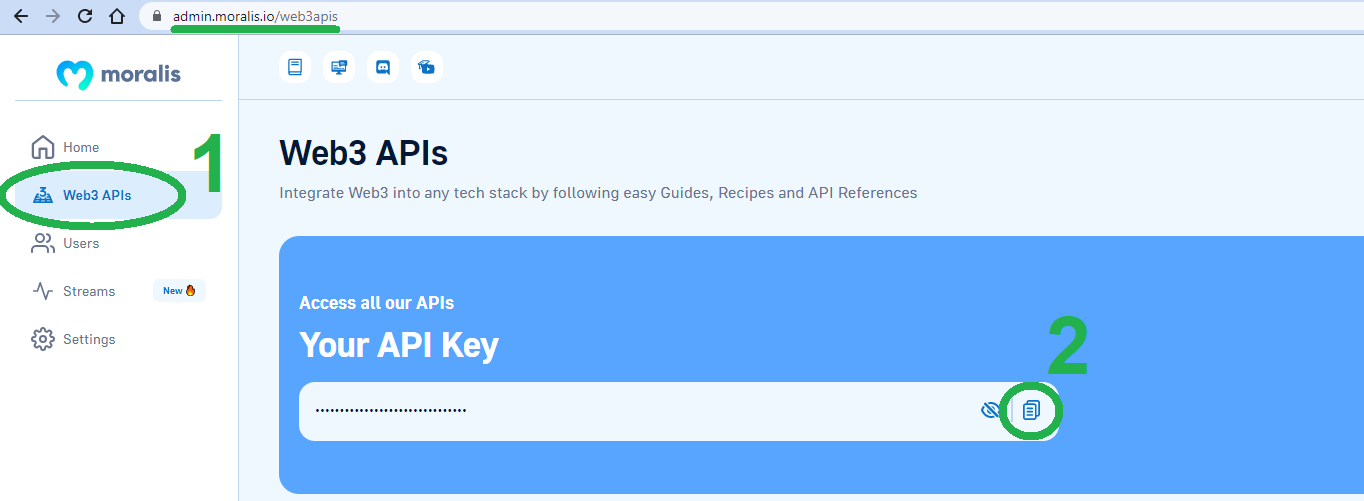
- “MORALIS_API_KEY” – You can obtain the key on the “Web3 APIs” page of your Moralis admin area:
- “NEXTAUTH_URL” – This is your dapp address, and in the development stage, you will use “http://localhost:3000” or another port.
- “NEXTAUTH_SECRET” – You use this variable to encrypt the JWT tokens of users. Moreover, you can put any value here or generate one at “https://generate-secret.now.sh/32”.
Furthermore, to help you better understand the above environment variables, make sure to have a look at this example:
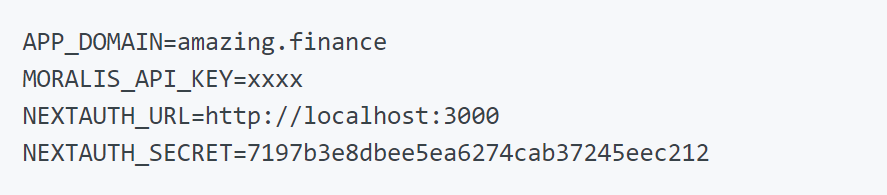
Note: Whenever you modify your “.env.local” file, you need to restart your dapp.
Wrapping Your App
As you may know, NextJS uses the “App” component to initialize pages. However, you can override that component and control the page initialization. To achieve that, you must wrap your pages with “WagmiConfig” and “SessionProvider“. So, create your “_app.jsx” file inside the “pages” folder and populate this file with the following lines of code:
import { createClient, configureChains, defaultChains, WagmiConfig } from 'wagmi';
import { publicProvider } from 'wagmi/providers/public';
import { SessionProvider } from 'next-auth/react';

const { provider, webSocketProvider } = configureChains(defaultChains, [publicProvider()]);

const client = createClient({
  provider,
  webSocketProvider,
  autoConnect: true,
});

function MyApp({ Component, pageProps }) {
  return (
    <WagmiConfig client={client}>
      <SessionProvider session={pageProps.session} refetchInterval={0}>
        <Component {...pageProps} />
      </SessionProvider>
    </WagmiConfig>
  );
}

export default MyApp;
Adding the “requestMessage” Endpoint
To add the “requestMessage” endpoint, you must create a new API file. Call that file’s “request-message.js” and make sure to have it in the “auth” folder, which should be inside “pages/api”. You will use this endpoint to make requests to “Moralis.Auth“, which will generate a unique message. Then, you’ll sign that message on the client side. Here are the lines of code that you should use in the “request-message.js” file:
import Moralis from 'moralis';

const config = {
    domain: process.env.APP_DOMAIN,
    statement: 'Please sign this message to confirm your identity.',
    uri: process.env.NEXTAUTH_URL,
    timeout: 60,
};

export default async function handler(req, res) {
    const { address, chain, network } = req.body;

    await Moralis.start({ apiKey: process.env.MORALIS_API_KEY });

    try {
        const message = await Moralis.Auth.requestMessage({
            address,
            chain,
            network,
            ...config,
        });

        res.status(200).json(message);
    } catch (error) {
        res.status(400).json({ error });
        console.error(error);
    }
}
Creating a Sign-In Page with WalletConnect Integration
By this point, you’ve successfully completed the initial setup. As such, it’s time you actually integrate WalletConnect. So, create a new page file (inside the “pages” folder) and call it “signin.jsx”. Moreover, start by populating this file with the following lines of code:
function SignIn() {
    return (
        <div>
            <h3>Web3 Authentication</h3>
        </div>
    );
}

export default SignIn;
Next, you want to use the same file to create a button that will enable Web3 authentication. In addition, you also want to “console.log” users’ details (as per the demo above). As such, you need to expand the content of the “signin.jsx” to match the following:
import { useConnect } from 'wagmi';
import { InjectedConnector } from 'wagmi/connectors/injected';
import axios from 'axios';

function SignIn() {
    const { connectAsync } = useConnect();

    const handleAuth = async () => {
        const { account, chain } = await connectAsync({ connector: new InjectedConnector() });

        const userData = { address: account, chain: chain.id, network: 'evm' };

        console.log(userData)
    };

    return (
        <div>
            <h3>Web3 Authentication</h3>
            <button onClick={() => handleAuth()}>Authenticate via WalletConnect</button>
        </div>
    );
}

export default SignIn;
Extending the “handleAuth” Functionality
The above lines of code already ensure that your Web3 authentication page looks as presented above. However, we still need to add the actual functionality. Hence, let’s first extend the “handleAuth” functionality to use it to call the above-created “requestMessage” endpoint. By doing so, your “signin.jsx” file should look as follows:
import { useAccount, useConnect, useSignMessage, useDisconnect } from 'wagmi';
import { InjectedConnector } from 'wagmi/connectors/injected';
import axios from 'axios';

function SignIn() {
    const { connectAsync } = useConnect();
    const { disconnectAsync } = useDisconnect();
    const { isConnected } = useAccount();
    const { signMessageAsync } = useSignMessage();

    const handleAuth = async () => {
        // Disconnects the Web3 provider if it's already active
        if (isConnected) {
            await disconnectAsync();
        }
        // Enabling WalletConnect
               const { account, chain } = await connectAsync({
            connector: new WalletConnectConnector({
                options: {
                    qrcode: true,
                },
            }),
        });


        const userData = { address: account, chain: chain.id, network: 'evm' };
        // Making a post request to our 'request-message' endpoint
        const { data } = await axios.post('/api/auth/request-message', userData, {
            headers: {
                'Content-Type': 'application/json',
            },
        });
        const message = data.message;
        const signature = await signMessageAsync({ message });

        console.log(signature)
    };

    return (
        <div>
            <h3>Web3 Authentication</h3>
            <button onClick={() => handleAuth()}>Authenticate via WalletConnect</button>
        </div>
    );
}

export default SignIn;
Configuring NextAuth
Inside the “auth” folder (path: “pages/api/auth/”), create a “[…nextauth].js” file and populate it with the following lines of code:
import CredentialsProvider from 'next-auth/providers/credentials';
import NextAuth from 'next-auth';
import Moralis from 'moralis';

export default NextAuth({
    providers: [
        CredentialsProvider({
            name: 'MoralisAuth',
            credentials: {
                message: {
                    label: 'Message',
                    type: 'text',
                    placeholder: '0x0',
                },
                signature: {
                    label: 'Signature',
                    type: 'text',
                    placeholder: '0x0',
                },
            },
              async authorize(credentials) {
                try {
                  // "message" and "signature" are needed for authorization
                  // We described them in "credentials" above
                  const { message, signature } = credentials;

                  await Moralis.start({ apiKey: process.env.MORALIS_API_KEY });

                  const { address, profileId } = (
                    await Moralis.Auth.verify({ message, signature, network: 'evm' })
                  ).raw;

                  const user = { address, profileId, signature };
                  // Returning the user object and creating  a session
                  return user;
                } catch (e) {
                  console.error(e);
                  return null;
                }
              },
        }),
    ],
    // Adding user info to the user session object
    callbacks: {
        async jwt({ token, user }) {
            user && (token.user = user);
            return token;
        },
        async session({ session, token }) {
            session.user = token.user;
            return session;
        },
    },
});
The above configures NextAuth so that you can add it to the “signin.jsx” script. Moreover, as you’ve probably noticed, the above configuration also utilizes the “MORALIS_API_KEY” variable created in the “.env.local” file above.
Securing Authentication
For this final tweak to the “signin.jsx” file, you’ll be adding NextAuth authentication. You also need to import “WalletConnectConnector” from wagmi, import “useRouter” from Next, and expand the “SignIn” function. Ultimately, this is what your “signin.jsx” script should look like in its final form:
import { signIn } from 'next-auth/react';
import { useAccount, useConnect, useSignMessage, useDisconnect } from 'wagmi';
import { useRouter } from 'next/router';
import axios from 'axios';
import { WalletConnectConnector } from 'wagmi/connectors/walletConnect';

function SignIn() {
    const { connectAsync } = useConnect();
    const { disconnectAsync } = useDisconnect();
    const { isConnected } = useAccount();
    const { signMessageAsync } = useSignMessage();
    const { push } = useRouter();

    const handleAuth = async () => {
        if (isConnected) {
            await disconnectAsync();
        }
        // Added WalletConnectConnector
        const { account, chain } = await connectAsync({
            connector: new WalletConnectConnector({
                options: {
                    qrcode: true,
                },
            }),
        });

        const userData = { address: account, chain: chain.id, network: 'evm' };

        const { data } = await axios.post('/api/auth/request-message', userData, {
            headers: {
                'Content-Type': 'application/json',
            },
        });

        const message = data.message;

        const signature = await signMessageAsync({ message });

        // Redirect user after success authentication to '/user' page
        const { url } = await signIn('credentials', { message, signature, redirect: false, callbackUrl: '/user' });
        /**
         * instead of using signIn(..., redirect: "/user")
         * we get the url from callback and push it to the router to avoid page refreshing
         */
        push(url);
    };

    return (
        <div>
            <h3>Web3 Authentication</h3>
            <button onClick={() => handleAuth()}>Authenticate via WalletConnect</button>
        </div>
    );
}

export default SignIn;
Adding User Page to Dapp with WalletConnect Integration
The final step to complete this simple NextJS dapp with WalletConnect integration revolves around the “user” page. As such, go to the “pages” folder and create the “user.jsx” file. These are the lines of code that you need to add to this file:
import { getSession, signOut } from 'next-auth/react';

// Gets a prop from getServerSideProps
function User({ user }) {
    return (
        <div>
            <h4>User session:</h4>
            <pre>{JSON.stringify(user, null, 2)}</pre>
            <button onClick={() => signOut({ redirect: '/signin' })}>Sign out</button>
        </div>
    );
}

export async function getServerSideProps(context) {
    const session = await getSession(context);

    // Redirect if not authenticated
    if (!session) {
        return {
            redirect: {
                destination: '/signin',
                permanent: false,
            },
        };
    }

    return {
        props: { user: session.user },
    };
}

export default User;
With all the scripts in place, it’s time you test your dapp.
Testing the WalletConnect Connector
If you used the “3000” port for your “NEXTAUTH_URL” variable, visit “http://localhost:3000/signin“. This is where you’ll be able to test your dapp’s authentication flow. Once on the “signin” page, click on “Authenticate via WalletConnect”:

When the QR code appears, use your favorite Web3 wallet on your phone to scan the code. For instance, this is what you should see on your phone if you decide to use Trust Wallet (the process is similar for other crypto wallets):

If the authentication is successful, you should land on the “user” page (“http://localhost:3000/user“). However, if the authentication is not successful, you’ll be redirected back to the “signing” page.
In case you are facing any issues, make sure to go through the scripts. As such, use the following overview of today’s progress. Ultimately, these are the files you created and populated by following today’s tutorial:
- “.env.local” – This is where you store all the local variables, including your Moralis Web3 API key.
- “_app.jsx” – You used this file to wrap your app with “WagmiConfig” and “SessionProvider“.
- “request-message.js” – This file serves as an endpoint for making requests to generate a unique message.
- “signin.jsx” – This is the file that covers the “signin” page and enables users to authenticate themselves using the WalletConnect integration.
- “[…nextauth].js” – This is where you configured NextAuth.
- “user.jsx” – You created this script to present successfully authenticated users with some basic user data.
WalletConnect Integration – How to Integrate WalletConnect – Summary
We covered quite a distance in today’s article. First, you learned what WalletConnect is and what wallets are compatible with this open-source protocol. Hence, you now know that there are somewhat close to 200 wallets you can use to authenticate with WalletConnect. With the basics under your belt, you were ready to follow our lead as we showed you how to integrate WalletConnect into a simple NextJS application. To do this, you completed some prerequisites, installed proper dependencies, and took care of the initial setup. Then, you just had to copy-paste the lines of code provided herein into the files we instructed you to create. Last but not least, you had an opportunity to test-run your dapp.
If you enjoyed this tutorial, we encourage you to explore other tutorials and how-to guides in the Moralis documentation. For instance, you can create dapps using Moralis with other frameworks and dev platforms. Or, you can explore other Web3 authentication options. In addition to Moralis’ docs, make sure to expand your blockchain development knowledge and skills using the Moralis YouTube channel and the Moralis blog. In fact, you may use these two outlets as your free ongoing blockchain development education. Some of the latest articles focus on Dogechain, Aptos, the Sui blockchain, the ultimate blockchain tech stack, the leading Web3 infrastructure solution, cross-chain bridging, and much more.
On the other hand, you might be interested in going full-time crypto sooner rather than later. In that case, you should become blockchain certified by enrolling in Moralis Academy. If you want to be a leader in a promising Web3 project, the “Blockchain Business Masterclass” course definitely deserves your attention.