This article will demonstrate how you can add MetaMask authentication with Django. Also, we’ll explore how to do so in only five steps. In doing so, we will create a full-stack Django app where users can sign in and authenticate themselves with their Web3 wallet. If you do not want to read the entire guide and instead jump right into the code, check out the following GitHub repo:
Full Add MetaMask Authentication with Django Documentation – https://github.com/MoralisWeb3/demo-apps/tree/main/django_moralis_auth/web3_auth
Web3 authentication is an essential mechanism of the decentralized web. Furthermore, allowing users to authenticate with their Web3 wallets makes enterprise services more accessible. Also, it provides a more compelling user experience. This suggests that a unified identification layer positively influences businesses and their consumers simultaneously. Moreover, it is possible to implement various authentication mechanisms, and a popular option is MetaMask. So, since Web3 authentication is a vital functionality of Web3 development and MetaMask is one of the most popular Web3 wallets, this article will focus on that subject. Specifically, we will show you how to add MetaMask authentication with Django!
Additionally, to enable a more seamless Web3 authentication flow, we will use the Moralis Auth API. In turn, we can create a full-stack Django app where users can authenticate with MetaMask in only five simple steps. However, if you are more comfortable working with NextJS, check out our guide on how to integrate backend Web3 authentication functionality! So, if you want to add authentication mechanisms to your future projects or simply want to become a blockchain developer, sign up with Moralis now. What’s more, creating an account is free of charge, and you can begin developing your first project immediately!
Although, before moving on, let’s go over some basics. Hence, we’ll start by looking at Django. After that, we’ll dive into the code!
What is Django?
Before we proceed with the tutorial on how to add MetaMask authentication with Django, it might be a good idea to explore the intricacies of Django. Hence, we will take this section to explain what Django is and how it helps developers build their projects markedly quicker. So, without further ado, let’s answer the question, “what is Django?”.

In short, Django is a high-level web framework for Python. Furthermore, the framework allows developers to build projects with clean and pragmatic design. Also, Django was built by developers for developers. As a result, the framework takes care of most of the heavy lifting associated with web development. Accordingly, if you use the framework, you can focus on writing applications. What’s more, you can avoid the need to reinvent the wheel.
Moreover, Django is entirely free and open source, and here are some prominent features of the framework:
- High Security – Django focuses on reliability by helping developers keep a high level of security when developing websites or applications. Accordingly, when working with Django, you can avoid some of the common security mistakes.
- Fast – As developers want projects to move quickly to market, Django designed its framework to prioritize speed.
- Scalability – Django provides the opportunity to scale quickly and flexibly.
With a better understanding of Django, we can move on to the main topic of this article. Accordingly, we will illustrate how to add MetaMask authentication with Django in only five steps!
Add MetaMask Authentication with Django in 5 Steps with Moralis
In this tutorial, we will look closer at the intricacies of Moralis Web3 authentication by creating a full-stack Django app. Moreover, app users will be able to log in with their Web3 wallets and verify their Web3 identity. Then, once the users have authenticated themselves, they can view information about themselves. For example, they can see an ID, address, chain ID, etc. So, to illustrate what we are working towards, here are two print screens of the login and user pages:
Login Page:

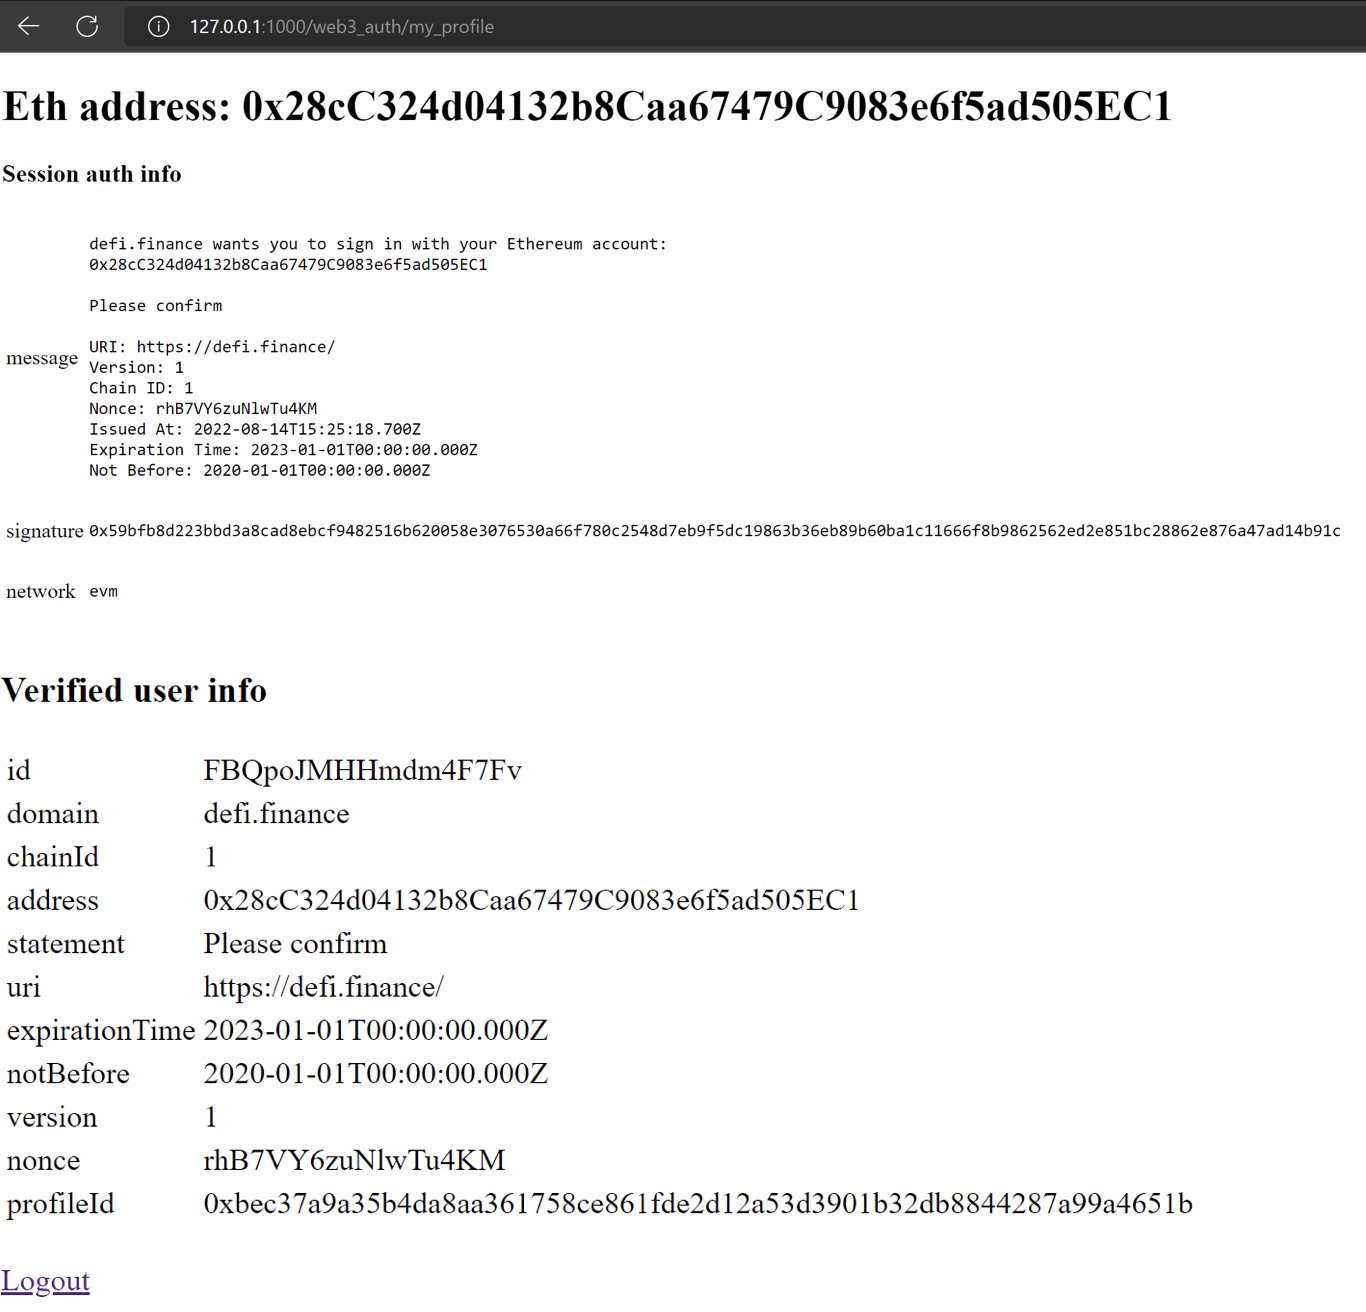
User Page:
As mentioned, since we are opting to work with Moralis, you will be able to add MetaMask authentication with Django in only five simple steps:
- Adding Prerequisites
- Installing Dependencies
- Creating a Django Project and Application
- Edit ”moralis_auth” Settings
- Creating the Main “web3_auth” Application and Templates
So, with no further ado, let’s jump straight into the first step and look at the required prerequisites we need to take care of before we start creating the application itself and add MetaMask authentication with Django!
Step 1 – Adding Prerequisites
As with any tutorial, there are specific prerequisites required. So, for this tutorial, a Moralis account is the first prerequisite you will need if you want to add MetaMask authentication with Django. Hence, if you haven’t already, we suggest you sign up with Moralis immediately! Moreover, creating an account is free and only takes a couple of seconds.

Furthermore, with a Moralis account at your disposal, the second prerequisite is Python 3. So, if you do not already have it, you need to install Python 3. In our case, we are using Python 3.10 to illustrate the process.
Lastly, we suggest you acquire basic knowledge about Django to make the tutorial more comprehensible. Although it isn’t required, in doing so, you’ll benefit from it if you want to follow along during this tutorial. Thus, you can check out the official documentation here to learn more about Django.
That is it for the prerequisites and the first step of this tutorial! So, with all the preparations complete, we can move on to the second step of the guide to show you how to install the necessary dependencies.
Step 2 – Installing Dependencies
If it is needed, the first thing you will need to do is create a virtual environment. However, why so? In short, virtual environments provide several benefits as they have their own site directories. Also, they can be isolated from other system site directories. Furthermore, this means they can have their own set of packages. What’s more, creating a virtual environment is relatively simple, and all you need is the following command:
python3 -m venv django_web3_auth_env
With a virtual environment at your disposal, we can move on. To do so, we will install various dependencies. Hence, you must install “django” and “requests” dependencies. For this tutorial, we used Django version 3.1, and you can use the following commands to install both dependencies:
django_web3_auth_env\Scripts>pip3.10.exe install django
django_web3_auth_env\Scripts>pip3.10.exe install requests
However, ensure these commands execute in the particular scripts folder for the local environment you previously created. Moreover, this is specified in the commands above since we set the path to our local environment.
So, with both dependencies installed, the second step in this tutorial is complete. Hence, let’s move on and take a look at how you can create a Django project and application!
Step 3 – Creating a Django Project and Application
To initiate the third step, you must create a Django project. So, to create a project, you can use the following command:
django_web3_auth_env\Scripts\django-admin startproject moralis_auth
Once you run this command and the project establishes, you will be able to find “django-admin” in the “Scripts” folder with the following path “django_web3_auth_env\Scripts\django-admin.exe“.
Next up, you must also create a Django application, and to make the app, use this command:
django_web3_auth_env\Scripts\python.exe manage.py startapp web3_auth
Moreover, make sure that “web3_auth” is located in the same folder where you find “manage.py”. However, this should not be a problem if the previous command was run in the folder where “manage.py” is found. In addition, you then need to run database migrations. This is relatively straightforward, and you can use the following command:
django_web3_auth_env\Scripts\python.exe manage.py migrate
Furthermore, during this stage, you must use the complete path pointing to Python executable in the virtual environment created in the second step. Additionally, for the final step, you can create a “superuser”; however, this is optional. So, to create the superuser, you can use the following code (once again, you must point to Python executable in your virtual environment):
django_web3_auth_env\Scripts\python.exe manage.py createsuperuser
Step 4 – Edit ”moralis_auth” Settings
We’ve now arrived at the fourth step of this guide. So, in this section, you will need to add the newly created app called “web3_auth” to the list of apps in “settings.py”. Furthermore, you must add the app at the end of the “INSTALLED_APPS” list. Moreover, it will look something like this in the code:
INSTALLED_APPS = [
    'django.contrib.admin',
    'django.contrib.auth',
    'django.contrib.contenttypes',
    'django.contrib.sessions',
    'django.contrib.messages',
    'django.contrib.staticfiles',
    'web3_auth'
]
Also, you need to include URLs in the “urls.py” file for the new app in the project. You should also include URLs from “django.contrib.auth.urls“, as this allows you to use log-out functionality. Moreover, it should look like this in the code:
from django.contrib import admin
from django.urls import path, include

urlpatterns = [
    path('admin/', admin.site.urls),
    path('web3_auth/', include('web3_auth.urls')),
    path('auth/', include('django.contrib.auth.urls')),
]
That’s it for the fourth step; however, we’ve got one more thing to do. So, in this brief guide’s fifth and final step, we will create the main “web3_auth” application. Furthermore, this includes” urls.py”, “views.py”, and two templates. But, with no further ado, let us take a closer look at the final step!
Step 5 – Creating the Main “web3_auth” Application and Templates
Next up, you will need to create a new file called ”urls.py” with the following content:
from django.urls import path

from . import views

urlpatterns = [
    path('moralis_auth', views.moralis_auth, name='moralis_auth'),
    path('request_message', views.request_message, name='request_message'),
    path('my_profile', views.my_profile, name='my_profile'),
    path('verify_message', views.verify_message, name='verify_message')
]
Moreover, once you are done adding the contents to “urls.py”, you need to create a new “views.py” file and add the following:
import json
import requests

from django.shortcuts import render, redirect
from django.http import HttpResponse, JsonResponse
from django.contrib.auth import authenticate, login
from django.contrib.auth.models import User

API_KEY = 'WEB3_API_KEY_HERE'
if API_KEY == 'WEB3_API_KEY_HERE':
    print("API key is not set")
    raise SystemExit


def moralis_auth(request):
    return render(request, 'login.html', {})

def my_profile(request):
    return render(request, 'profile.html', {})

def request_message(request):
    data = json.loads(request.body)
    print(data)

    REQUEST_URL = 'https://authapi.moralis.io/challenge/request/evm'
    request_object = {
      "domain": "defi.finance",
      "chainId": 1,
      "address": data['address'],
      "statement": "Please confirm",
      "uri": "https://defi.finance/",
      "expirationTime": "2023-01-01T00:00:00.000Z",
      "notBefore": "2020-01-01T00:00:00.000Z",
      "timeout": 15
    }
    x = requests.post(
        REQUEST_URL,
        json=request_object,
        headers={'X-API-KEY': API_KEY})

    return JsonResponse(json.loads(x.text))


def verify_message(request):
    data = json.loads(request.body)
    print(data)

    REQUEST_URL = 'https://authapi.moralis.io/challenge/verify/evm'
    x = requests.post(
        REQUEST_URL,
        json=data,
        headers={'X-API-KEY': API_KEY})
    print(json.loads(x.text))
    print(x.status_code)
    if x.status_code == 201:
        # user can authenticate
        eth_address=json.loads(x.text).get('address')
        print("eth address", eth_address)
        try:
            user = User.objects.get(username=eth_address)
        except User.DoesNotExist:
            user = User(username=eth_address)
            user.is_staff = False
            user.is_superuser = False
            user.save()
        if user is not None:
            if user.is_active:
                login(request, user)
                request.session['auth_info'] = data
                request.session['verified_data'] = json.loads(x.text)
                return JsonResponse({'user': user.username})
            else:
                return JsonResponse({'error': 'account disabled'})
    else:
        return JsonResponse(json.loads(x.text))
Web3 API Key and Moralis Auth
So, from looking at the above code, an essential thing you need to take care of is adding an API key on the ninth line. Furthermore, you must replace “WEB3_API_KEY_HERE” with a real API key. Moreover, this code provides a view for the primary authentication “moralis_auth“, a view to display profile info “my_profile“, and two views particulate to authentication “request_message” and “verify_message“.
Additionally, “verify_message” is responsible for requesting messages from the Moralis Auth API to be signed with MetaMask. Also, it will validate the returned signature and set up a user whenever the validation process succeeds. Hence, once the validation is successful, we create a session for that user and add additional info.
Adding the Templates
Lastly, to top everything off, we need to add two templates. However, before doing so, you need to create a new folder called “templates”. Next up, you can create a new “login.html” file with the following content:
<!DOCTYPE html>
<html lang="en">
<head>
    <meta charset="UTF-8">
    <meta http-equiv="X-UA-Compatible" content="IE=edge">
    <meta name="viewport" content="width=device-width, initial-scale=1.0">
    <title>Moralis Auth Django Demo</title>
</head>
<body>
    <div>

    {% if user.is_authenticated %}
        <h1>Welcome Moralis Web3 User, {{ user.username }} !</h1>
        <a href="{% url 'logout' %}?next={% url 'moralis_auth' %}">Logout</a>
        <br/>
        <a href="{% url 'my_profile' %}"> My profile </a>
    {% else %}
        <h1>Moralis Web3 Login Django demo</h1>
        <button class="btn" id="auth-metamask">Login with Moralis Web3 API</button>
    {% endif %}
    </div>

    <script src="https://cdn.jsdelivr.net/npm/axios/dist/axios.min.js"></script>
    <script src="https://cdn.ethers.io/lib/ethers-5.2.umd.min.js" type="application/javascript"></script>

    {% if user.is_authenticated %}
    {% else %}
    <script>
    const elBtnMetamask = document.getElementById('auth-metamask');

    const handleApiPost = async (endpoint, params) => {
      const result = await axios.post(`${endpoint}`, params, {
        headers: {
          'content-type': 'application/json',
          "X-CSRFToken": '{{ csrf_token }}'
        },
      });

      return result.data;
    };

    const requestMessage = (account, chain) =>
      handleApiPost('{% url 'request_message' %}', {
        address: account,
        chain: chain,
        network: 'evm',
      });

    const verifyMessage = (message, signature) =>
      handleApiPost('{% url 'verify_message' %}', {
        message,
        signature,
        network: 'evm',
      });

    const connectToMetamask = async () => {
      const provider = new ethers.providers.Web3Provider(window.ethereum, 'any');

      const [accounts, chainId] = await Promise.all([
        provider.send('eth_requestAccounts', []),
        provider.send('eth_chainId', []),
      ]);

      const signer = provider.getSigner();
      return { signer, chain: chainId, account: accounts[0] };
    };

    const handleAuth = async () => {
      // Connect to Metamask
      const { signer, chain, account } = await connectToMetamask();
      console.log("account", account, "chain", chain)

      if (!account) {
        throw new Error('No account found');
      }
      if (!chain) {
        throw new Error('No chain found');
      }

      const { message } = await requestMessage(account, chain);
      const signature = await signer.signMessage(message);
      const { user } = await verifyMessage(message, signature);
      console.log(user)
      if (user) {
        location.reload();
      }
      else{
        alert("authentication error")
      }
    };


    function init() {
      elBtnMetamask.addEventListener('click', async () => {
        handleAuth().catch((error) => console.log(error));
      });
    }

    window.addEventListener('load', () => {
      init();
    });

    </script>
    {% endif %}
</body>
</html>
This file also contains the JavaScript code required to sign messages with MetaMask. Moreover, you can then create a file called “profile.html”, which is the template that shows current info in regards to an authenticated user. Accordingly, you can add the following code to this file:
<!DOCTYPE html>
<html lang="en">
<head>
    <meta charset="UTF-8">
    <meta http-equiv="X-UA-Compatible" content="IE=edge">
    <meta name="viewport" content="width=device-width, initial-scale=1.0">
    <title>Moralis Auth Django Profile Page Demo</title>
</head>
<body>
    <div>

    {% if user.is_authenticated %}
        <h1>Eth address: {{ user.username }}</h1>
        <h3>Session auth info</h3>
        <table width="200px" border="0px" padding="5px">
        {% for key,value in request.session.auth_info.items %}
            <tr><td>{{key}}</td><td><pre>{{ value }}</pre></td></tr>
        {% endfor %}
        </table>
        <table width="200px" border="0px" padding="0px">
        <h3>Verified user info</h3>
        {% for key,value in request.session.verified_data.items %}
            <tr><td>{{key}}</td><td>{{ value }}</td></tr>
        {% endfor %}

        </table>
        <br/>
        <a href="{% url 'logout' %}?next={% url 'moralis_auth' %}">Logout</a>
    {% else %}
        <a href="{% url 'moralis_auth' %}"> Login page </a>
    {% endif %}
    </div>

</body>
</html>
So, that’s it; congratulations! At this point, you know how to add MetaMask authentication with Django to your future projects! Moreover, if you enjoyed this tutorial, you can learn more about other authentication alternatives with Moralis. For example, learn how to add sign-in with RainbowKit or add a sign-in with Magic.Link.
Add MetaMask Authentication with Django – Starting and Testing the Application
Now that the application is finalized, the last thing you need to do is test the application to make sure it works as intended. So, the first thing you need to do is start a local server on port “1000” with the following command:
django_web3_auth_env\Scripts\python.exe manage.py runserver 1000
Moreover, once you have started the application, you should be able to access the login page through the following link: http://127.0.0.1:1000/web3_auth/moralis_auth.
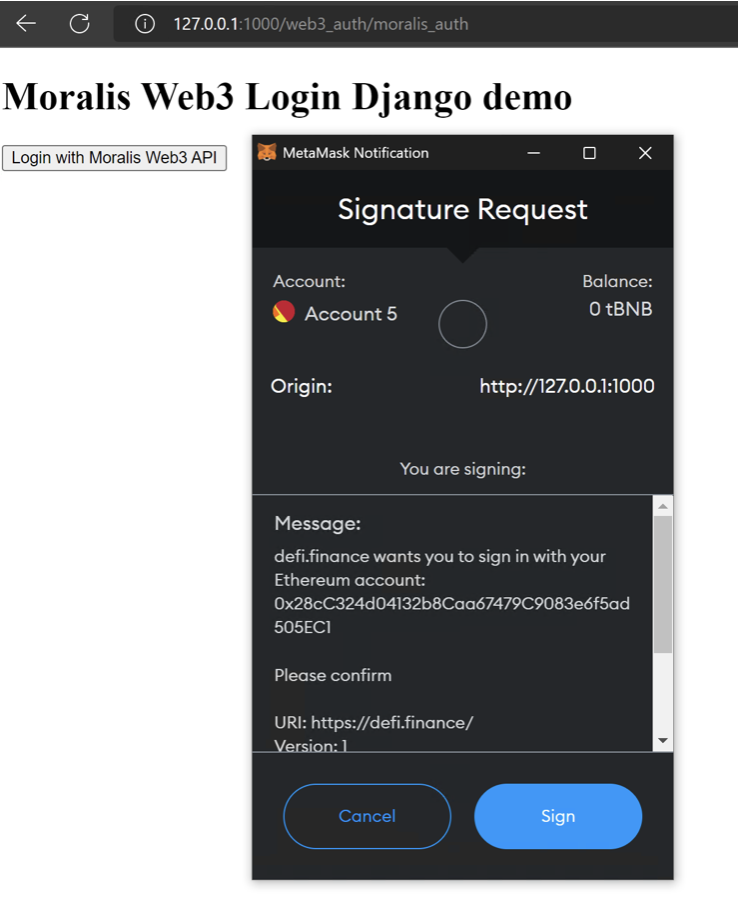
So, from there you can test the application by clicking on the “Login with Moralis Web3 API” button:

This should prompt your MetaMask wallet and allow you to sign a message:
As soon as you sign the message and the authentication is successful, you will be directed to the user page, which will look something like this:

If you have further questions regarding the process of adding MetaMask authentication with Django, check out the GitHub repository we initially linked to in the introduction. Also, you can check Moralis’ official documentation for further information on the process.
Add MetaMask Authentication with Django – Summary
If you followed along in this article, you now know how to add MetaMask authentication with Django. In doing so, you created a simple full-stack Django application where users could sign in with their MetaMask wallets. Also, once authenticated, the application would display information regarding the users. Moreover, thanks to Moralis’ authentication flow, you were able to create this application following the five steps below:
- Adding Prerequisites
- Installing Dependencies
- Creating a Django Project and Application
- Edit ”moralis_auth” Settings
- Creating the Main “web3_auth” Application and Templates

However, Web3 authentication is only one of the areas in which Moralis comes in handy. For example, the platform allows you to create Web3 webhooks easily or implement Web3 syncs in a heartbeat!
In addition, if you want to become more proficient in Web3 development, check out Moralis’ Web3 blog. In short, the blog offers premium content with daily updates. For example, learn more about the EIP-4361 standard, and blockchain syncs. Additionally, you can learn about different types of DAOs. Also, we highly recommend checking out Moralis Workshops where you can dive into hands-on challenges aimed toward Web3 development. For instance, you can learn how to clone popular Web2 apps and turn them into Web3 applications. What’s more, some of these examples include cloning Sim City and an Elden Ring Web3 game. Moreover, you can learn how to build a Web3 Twitter or a Web3 Angry Birds game! So, by participating in these challenges, you can become a more proficient Web3 developer in no time!
So, if you are planning on getting into blockchain development or want to add MetaMask authentication with Django, sign up with Moralis now! Furthermore, creating an account only takes seconds, which will provide you with a more accessible developer experience!
