One essential feature all decentralized applications (dapps) include is authentication. Accordingly, as a Web3 developer, knowing how to integrate backend Web3 authentication is key! Moreover, as Web2 users experience the drawbacks of traditional authentication methods, it’s not surprising that Web3 wallet providers such as MetaMask notice tremendous growth in active users. But, for many programmers, it has been quite challenging to implement a feature where users can connect their preferred Web3 wallets and prove their Web3 identity. However, thanks to Moralis, this is no longer the case! Aside from offering Web3 syncs and incredible Web3 APIs, Moralis enables developers to quickly integrate backend Web3 authentication. What’s more, Moralis lets you implement Web3 features with single lines of code!
Moving forward, we will take on an example project where we will use Next.js to create a simple dapp. Of course, we will use Moralis to implement backend Web3 authentication functionality. So, along the way, you will learn all you need to know about Next.js and Moralis to get going. However, before we get our hands dirty, we will cover some basics about the tools we will use herein. We will also take a look at a quick demo of our finished Next.js dapp. That way, you will know what to expect from this tutorial and whether or not you want to roll up your sleeves as we move forward. If so, you will also need to create your free Moralis account to access Moralis’ backend Web3 authentication functionality.

Moralis’ Backend Web3 Authentication
So, what makes backend Web3 authentication functionality from Moralis so unique? For one, it unifies Web3 wallets and Web2 accounts in your application. Furthermore, it enables you to own and control all user data instead of trusting a third party with those delicate pieces of information. Also, Moralis is compatible with any tech stack. Nonetheless, the Moralis Web3 Auth API is compatible with OpenID, OAuth, DIDs, and other standards. Moreover, all it takes to use this tool is to get your API key.
Which type of user is Moralis’ backend Web3 authentication functionality for? Well, it’s for everyone interested in building new Web3 apps the easy way. It’s also for devs that want to connect their existing Web2 user databases using Web3 authentication. Furthermore, Moralis’ backend Web3 authentication enables you to use aggregators such as Auth0 for your enterprise Web3 auth flows. In addition, this neat solution also solves most of the common Web3 auth problems. Thus, you do not need to:
- Understand Web3 authentication flows
- Master varying wallet standards
- Redirect users to third-party auth interfaces
- Learn how wallets sign or verify messages
- Constantly update and maintain the auth solution
- Discover how wallets work on different blockchains
- Assume responsibility for the auth solution’s security

Nonetheless, Moralis is also cross-chain interoperable. Hence, you get to target all leading programmable blockchains. As a result, this gives you more reach and future-proofs your sign-up flows. So, if you want to turn months of work into a task as simple as copying and pasting one line of code, give Moralis’ Web3 authentication a try. With this unified API, you will easily cover all Web3 authentication methods.

Why Use Next.js?
If you have worked with JavaScript before, you are probably familiar with React. Furthermore, Next.js is a lot like React; however, it enables you to create your backend within the same repository. As such, you can easily cover both the frontend and backend in one place. This means you can seamlessly integrate the Moralis backend functionality into your Next.js application. So, all we have to do is use our Next.js frontend to make a post request to our Next.js backend. Of course, it will be Moralis’ backend Web3 authentication that will handle Web3 logins.
How to Integrate Backend Web3 Authentication Functionality with Next.js and Moralis
Before we show you how to install a starter Next.js project, let’s take a closer look at a demo of our finished example dapp. Looking at the screenshot below, you can see that we kept things quite simple. After all, the point of this tutorial is to show you the backend Web3 authentication functionality. So, to authenticate themselves using their MetaMask wallets, users need to click on the “Authenticate via MetaMask” button:
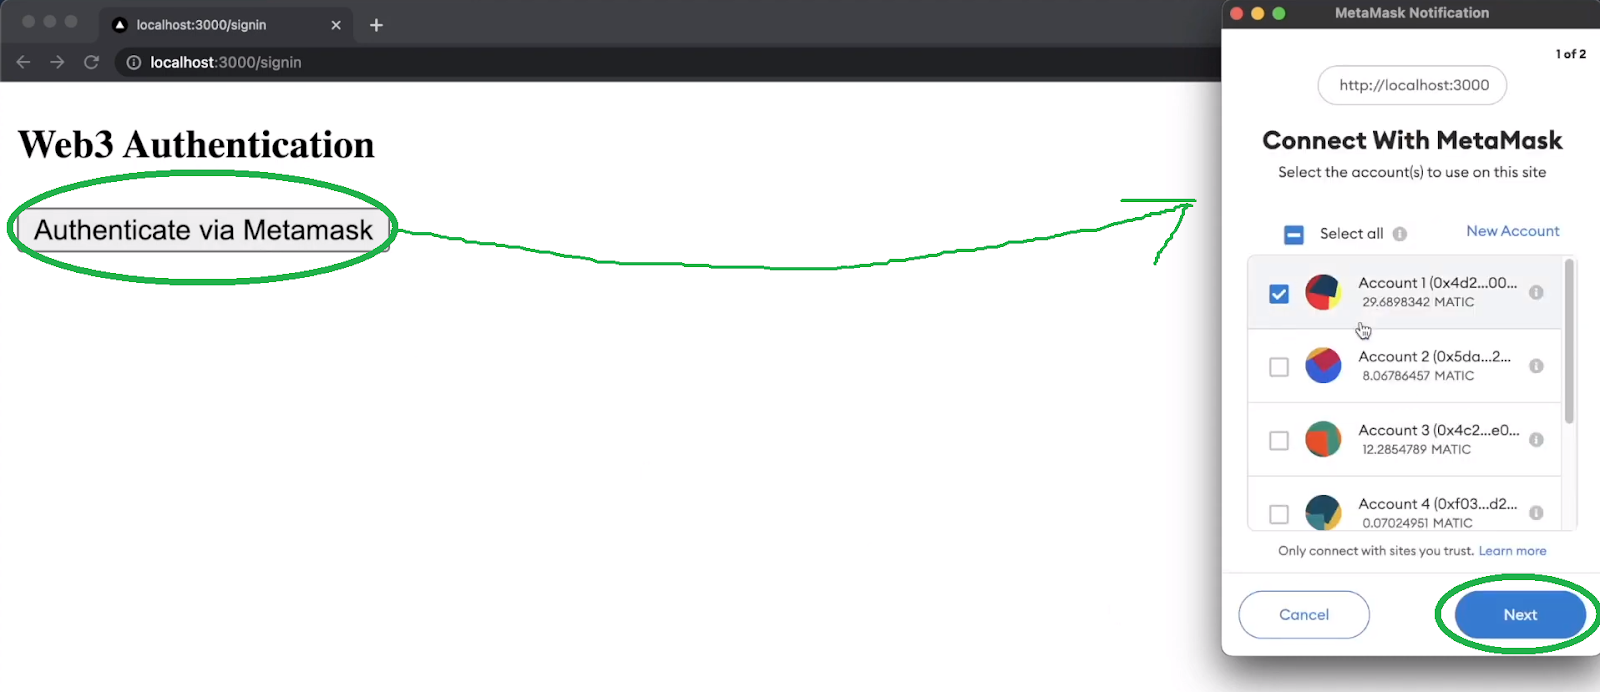
As you can see in the image above, the button prompts users’ MetaMask extensions. First, users need to click on the “Next” button. On the second step, they need to click on “Connect”:

After clicking on the “Connect” button, MetaMask pops up a signature request. Here, users need to click on the “Sign” button and finally complete their Web3 authentication process:

Last but not least, we also coded our example dapp to display certain details once users become authenticated:

Moreover, once signed in, users can see the “Sign out” button that enables them to disconnect their wallets from our dapp. The details that our dapp displays contain users’ addresses, profile IDs, and signature hashes. However, it’s important to note that using Moralis’ SDK lets you effortlessly include any on-chain data and evolve your dapp further.
Now that you know what we’ll be building let’s go through the steps that will take you from start to finish.
Create a New Next.js Project
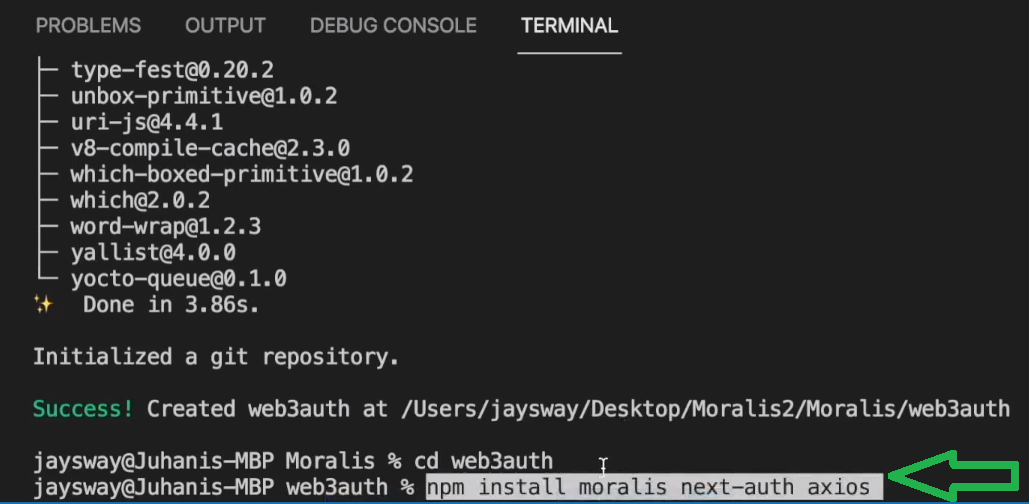
We recommend you follow our lead and open Visual Studio Code (VSC). There, create the “Moralis” folder and open a new terminal. Then, use the “npx create-next-app” command and name your app:

Next, navigate to the above-created project using the “cd web3auth” command. You also need to install some dependencies, so use the “npm install moralis next-auth axios” command:
By installing the above three dependencies, you will get access to:
- The Moralis SDK (“moralis”)
- An authentication package for Next.js (“next-auth”)
- Making requests from your Next.js frontend to your Next.js backend (“axios”)
Furthermore, you also need a Web3 library to access Web3 functionality, such as an integrated wallet in your browser. For this purpose, we can use the “wagmi” and “ethers” packages:

The above command also concludes our dependencies setup. So, now you can look at the files inside the above-created Next.js project:
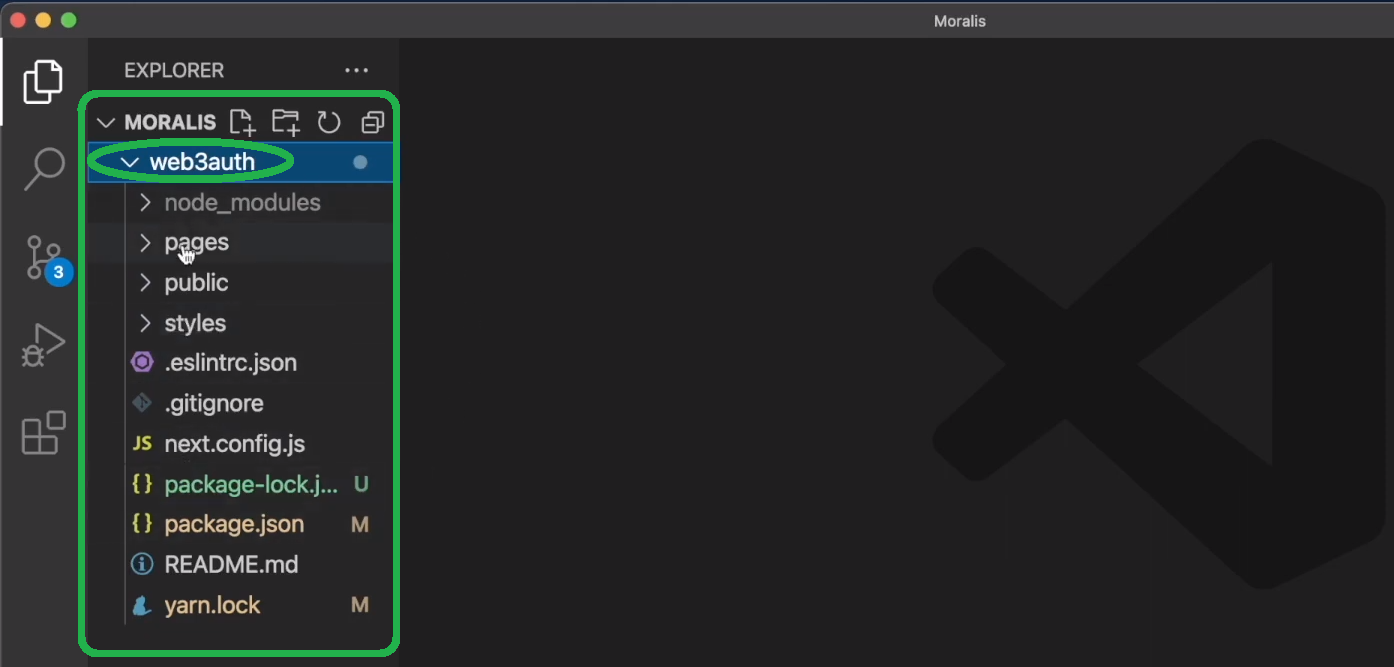
Looking at the screenshot above, you should see the “pages” folder. The latter contains all the essential files that we will focus on moving forward:
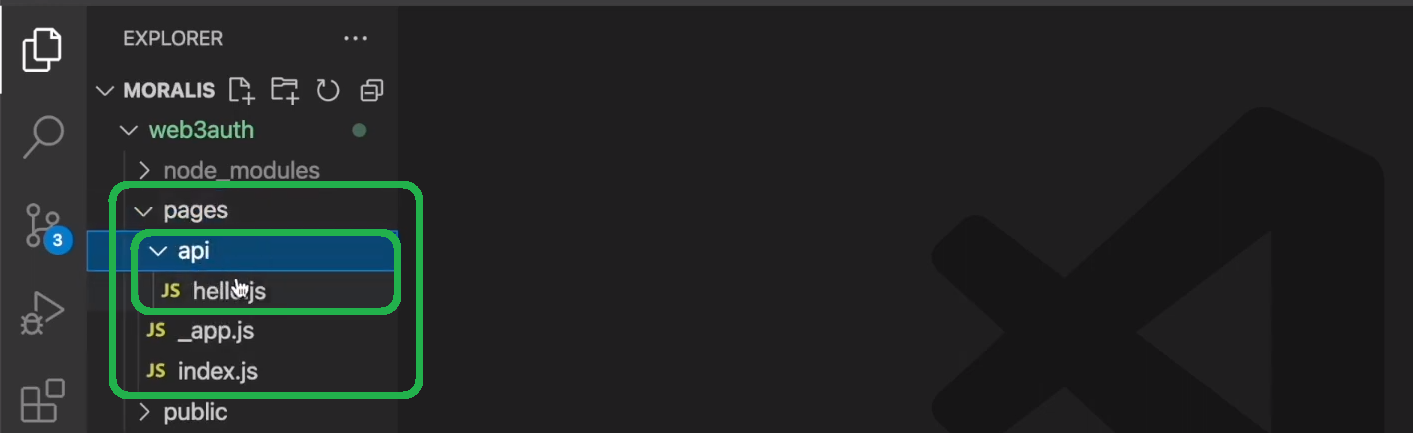
Moreover, the “api” folder contains all the backend-related info. On the other hand, the “_app.js” and the “index.js” files are your application’s frontend.
The Communication Between Next.js Frontend and Backend
To see how our Next.js frontend communicated with our Next.js backend, open the “index.js” file and delete everything except the outermost div. Then, add the “Get Name” button to that div:

In addition, also make sure to add the “getName” async function. The latter will call the “hello.js” file and console log the output:

Back in the “index.js” file, import “axios” by adding the ‘import axios from “axios”‘ line of code. Furthermore, also make sure to define the response and console log it:

To view the above code in your “localhost:3000“, use the “npm run dev” command. For more details, use the video below, starting at 4:49. Now that you know how to use Next.js, it’s time to create the above-presented example dapp. Hence, you will get to put Next.js and Moralis’ backend Web3 authentication functionality to use.
Simple Frontend to Backend Web3 Authentication Functionality
In this section, you will learn to create the simple frontend for our example dapp. For that purpose, you will use the “_app.js” file. Further, you will get to copy most of the code from the “Sign in With MetaMask” page from the Moralis documentation. So, start by replacing the existing content in the “_app.js” file with the code under step four. Just use the “copy” icon”:
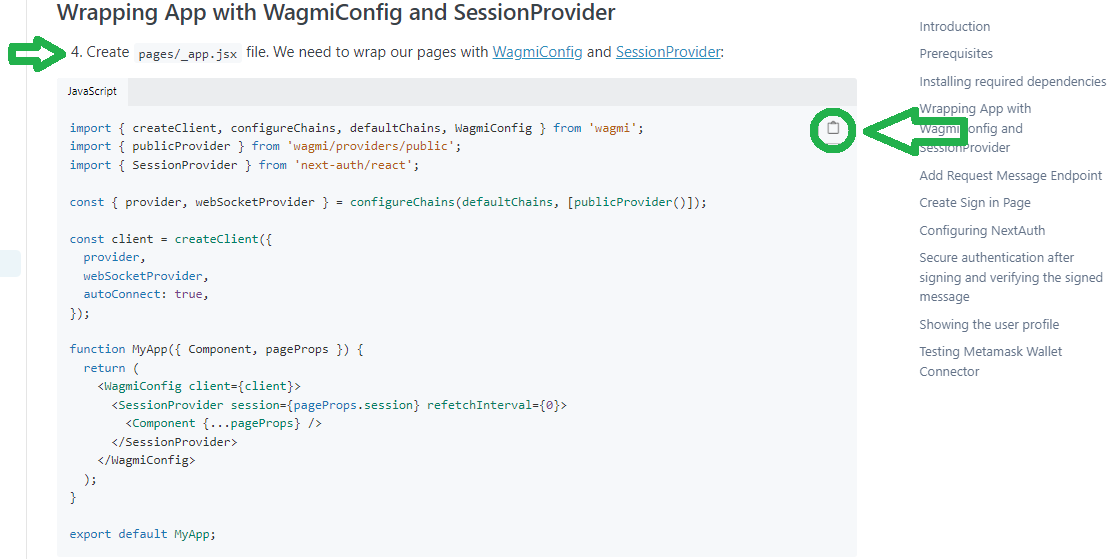
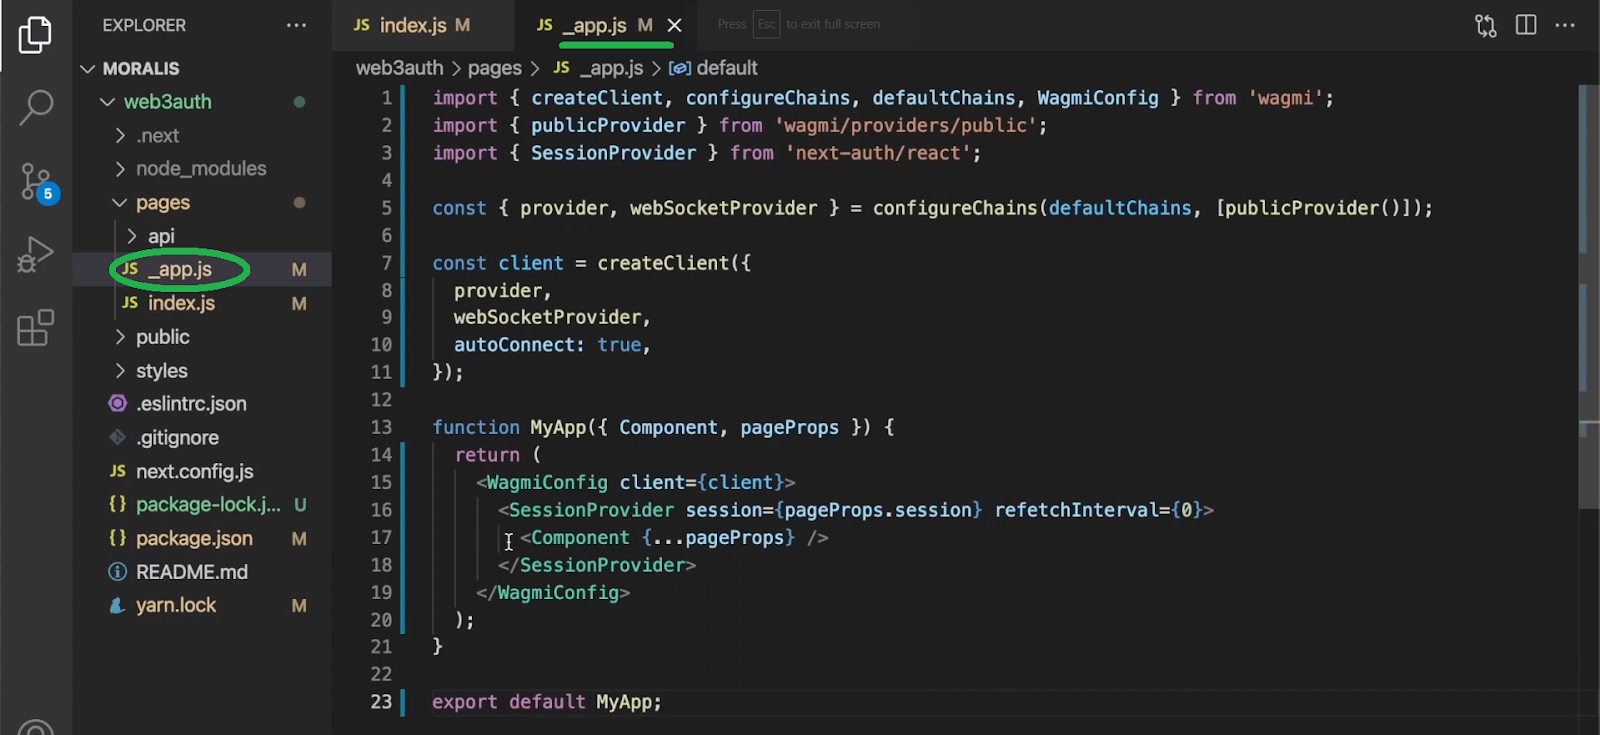
Then return to the “_app.js” file and paste the above-copied code:
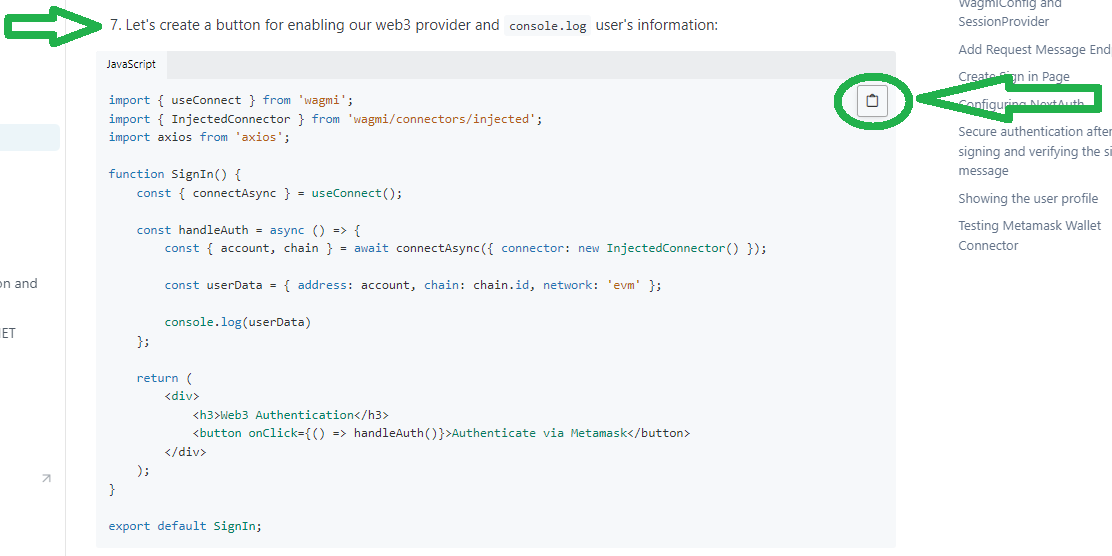
Next, you will create two additional pages. First, create the “sign in” page, which will be the page that will enable users to sign in. Paste in the code from the above documentation page, step seven:
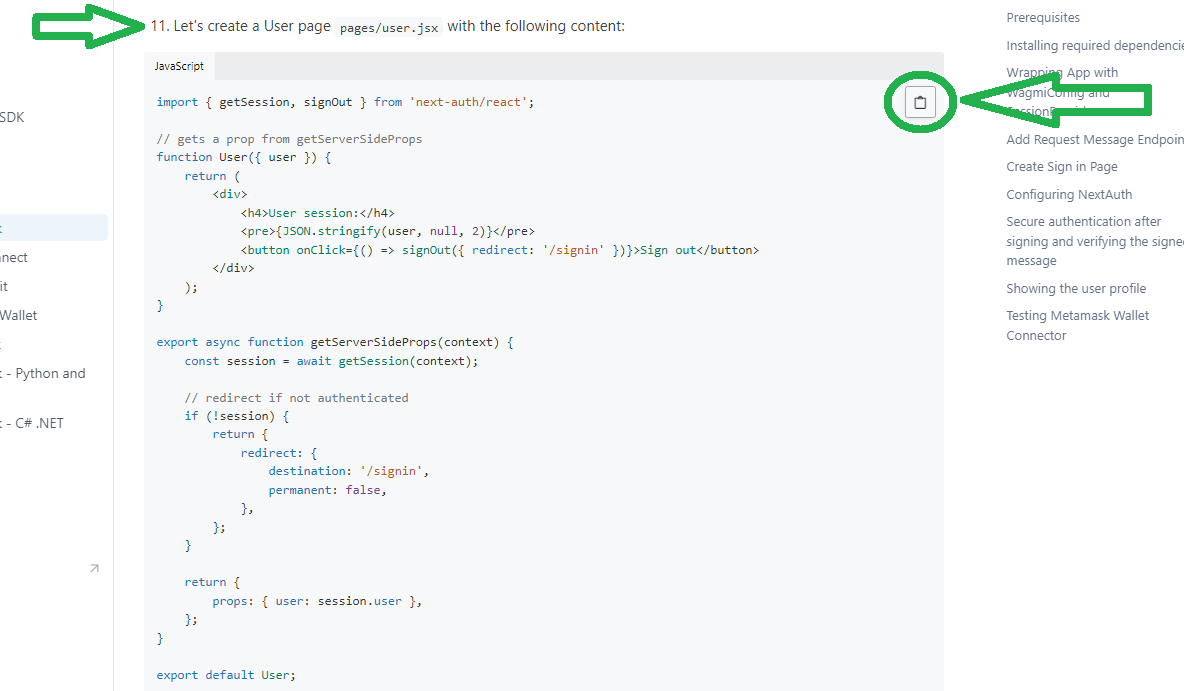
Another page for our frontend is the “user” page. This is the page on which users will be redirected once logged in. Again, use the above-linked Moralis documentation page and copy the code under step eleven:
Note: For a more detailed code walkthrough, use the video at the end of this article, starting at 5:50.
Implementing Backend Web3 Authentication Functionality
With our simple frontend pages in place, it is time to build a proper backend logic. Essentially, we need to request Moralis to send us a sign-in message. Then, after users sign the message, we also need to use Moralis to verify that sign-in message. Moreover, after successful verification, our backend needs to create an authenticated user, whose details will be displayed on the “user” page.
Start by heading to the “api” folder in Visual Studio Code and delete the “hello.js” file. Then, create a new folder called “auth” inside the “api” folder. Also, make sure to create the “.env.local” file inside the “web3auth” folder:

For more details about the environmental variables, use step three on the above documentation page. Looking at the variables above, you can see that this is where you need to paste your Moralis Web3 API key. To get it, you’ll need to create your free Moralis account. Then, click on the profile icon in the top-right corner (“1” in the image below) of your Moralis admin area. Next, click on “Account Settings”. Once on the “Account Settings” page, select the “Keys” tab, where you’ll be able to copy your Web3 API key:

Finally, don’t forget to paste your API key into the designated line of the “.evn.local” file.
Creating Our Backend Files
Now, navigate to the above-created “auth” file and create the “request-message.js” file. Again, no need to type the code; just use the above documentation page and copy the code on step five:

In order to match the message in our demo, change the “Please sign this message to confirm your identity.” statement to “web3 auth”:

Note: For a detailed code walkthrough, use the video below, starting at 11:00.
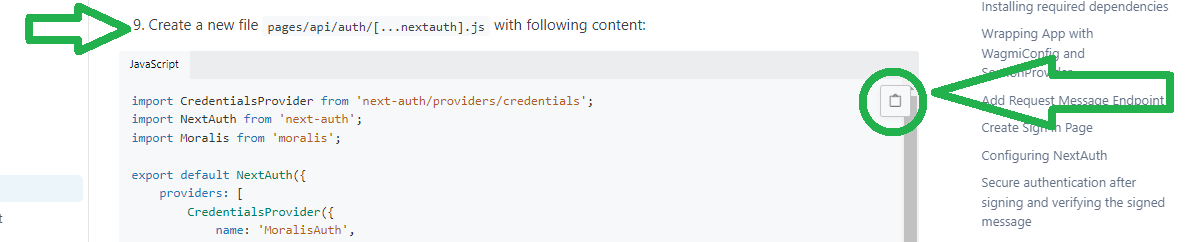
Nonetheless, we need to create another endpoint to authenticate users after they sign the initial message. For that purpose, create the “[…nextauth].js” file inside the “auth” folder and paste in the code from the same Moralis documentation page (step nine):
Finally, you need to return to the “signin.js” file and add the calls to the above-created endpoints, which are an essential part of our backend Web3 authentication functionality. To make this as straightforward as possible, select the entire content and replace it with the lines of code from the documentation page (step ten):

With this final piece in place, you can run your instance of our example dapp, which should work as presented above. Last but not least, here’s the video tutorial that we’ve been referencing throughout the article:
How to Integrate Backend Web3 Authentication Functionality – Summary
Today, you had a chance to learn how to use an open-source web development framework, Next.js, to create a simple dapp. Thanks to Next.js, you were able to use the same repository for the frontend and backend parts of your application. You also learned how to integrate backend Web3 authentication functionality effortlessly. The latter is possible thanks to the Moralis Web3 Auth API, which is at your disposal for free. All it takes is for you to create your free Moralis account and obtain your Web3 API key. Of course, you learned how to do that as well. Ultimately, you learned how to create a simple dapp that may serve as a gateway into the Web3 realm. Now, it’s up to you to add more advanced Web3 functionality.
However, if you don’t have your own ideas yet, we encourage you to build your skills and confidence by completing other example projects. You can find a ton of fantastic tutorials on the Moralis blog and the Moralis YouTube channel. Furthermore, these two outlets can serve as your free continuous blockchain development education. Though, if you are eager to take your backend Web3 authentication skills to another level in a professional way, enrolling in Moralis Academy might be the right path for you. Aside from a personalized study path and top-tier crypto courses, this is the place to join one of the most incredible crypto communities. Of course, this is also the place to become blockchain certified and go full-time crypto sooner rather than later.

