ChatGPT is a groundbreaking AI tool. However, can we use this tool in Web3 for, let’s say, NFT purposes? Absolutely! We can actually mint ChatGPT responses as NFTs, for example. If that sounds interesting and you’d like to know how to use ChatGPT to mint an NFT, read on! As we move forward, you’ll see how we built an example dapp that uses OpenAI’s API to incorporate the power of ChatGPT. Now, as far as implementing the ChatGPT functionality goes, the following code snippet does the trick:
app.get("/", async (req, res) => {
  const { query } = req;
  try {
    const response = await openai.createCompletion({
      model: "text-davinci-003",
      prompt: query.message,
      max_tokens: 30,
      temperature: 0,
    });
    return res.status(200).json(response.data);
  } catch (e) {
    console.log(`Something went wrong ${e}`);
    return res.status(400).json();
  }
});
To mint a ChatGPT NFT, you need to use a smart contract with a proper “mintNFT” function:
function mintNFT(address recipient, string memory tokenURI)
For the smart contract to handle the chat in question, we need to store the chat in a decentralized manner. Fortunately, we can do this easily when using the power of IPFS and the Moralis IPFS API. Essentially, the following lines of code get the job done:
app.get("/uploadtoipfs", async (req, res) => {
  const { query } = req;
  try {
    const response = await Moralis.EvmApi.ipfs.uploadFolder({
      abi: [
        {
          path: "conversation.json",
          content: { chat: query.pair },
        },
      ],
    });
    console.log(response.result);
    return res.status(200).json(response.result);
  } catch (e) {
    console.log(`Something went wrong ${e}`);
    return res.status(400).json();
  }
});
If you want to learn how to properly incorporate all of the above-outlined components to use ChatGPT to mint an NFT, create your free Moralis account and follow our lead!

Overview
In today’s article, we’ll show you how to use ChatGPT to mint an NFT by taking you through our Web3 ChatGPT tutorial. This means you’ll have a chance to follow our instructions and create your own instance of our ChatGPT NFT minter Web3 app. As such, we’ll show you how to implement the above-presented code snippets. Also, you don’t have to start from scratch; instead, you’ll be able to use our repo to clone our scripts. That way, you’ll be able to get to the finish line in a matter of minutes.
Below the tutorial, you can find the section where we demonstrate our dapp in its final form. Plus, this is where we answer the “what is a ChatGPT NFT?” question. Last but not least, we also discuss ChatGPT’s place in evolving Web3.

ChatGPT NFT Tutorial – How to Use ChatGPT to Mint an NFT
Building a dapp that enables you to mint ChatGPT NFTs from scratch is a multi-step process. When you decide to use JavaScript and the Moralis JS SDK, the following steps outline this process:
- Create and deploy a smart contract that will mint a ChatGPT NFT.
- Build your backend with NodeJS and Express.
- Install all required backend dependencies: Express, Moralis, CORS, dotenv, and OpenAI.
- Write a proper backend (“index.js”) to incorporate ChatGPT and the Moralis IPFS API.
- Build your frontend with NextJS.
- Install all required frontend dependencies: NextAuth, Moralis, wagmi, etc.
- Write multiple frontend scrips, including “.jsx” and “.js”.
Instead of diving into the above steps, you can take a shortcut by accessing our “moralis-chatgpt” GitHub repo. The latter contains all the frontend and backend scripts, as well as the smart contract template. Hence, make sure to clone our code. Then, you’ll be able to see the “backend”, “hardhat”, and “nextjs_moralis_auth” folders in Visual Studio Code (VSC):

With the above three folders and their contents in place, it’s time you deploy your own instance of our ChatGPT NFT minting smart contract.

Smart Contract that Mints ChatGPT NFTs
As the “hardhat” folder suggests, we used Hardhat to create and deploy our smart contract. However, there are other Ethereum development tools you can use. If you are familiar with Remix IDE, simply copy the content of the “MessageNFT.sol” script and paste it into Remix. You can find our contract template in the “hardhat/contracts” directory:
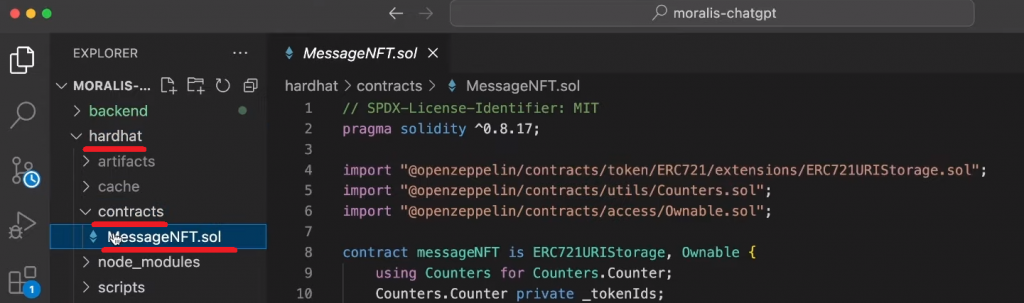
In case this is your first rodeo with Solidity smart contracts, let’s quickly go through the lines of “MessageNFT.sol”. The latter starts with an MIT license and a pragma line:
// SPDX-License-Identifier: MIT
pragma solidity ^0.8.17;
Below the pragma line, we have three OpenZeppelin imports that enable our smart contract to inherit features from existing verified contracts. So, our Web3 contract inherits the ERC-721 standard, the ability to count NFTs and assign NFT IDs, and the “owner-minting” restriction:
import "@openzeppelin/contracts/token/ERC721/extensions/ERC721URIStorage.sol";
import "@openzeppelin/contracts/utils/Counters.sol";
import "@openzeppelin/contracts/access/Ownable.sol";
Next, we defined the contract name and type (ERC-721), the “constructor” and the “mintNFT” function. The latter will mint ChatGPT NFTs whenever you (the owner of the contract) call it. So, to do this, the “mintNFT” function needs to take in an NFT recipient’s address and token URI:
contract messageNFT is ERC721URIStorage, Ownable {
    using Counters for Counters.Counter;
    Counters.Counter private _tokenIds;

    constructor() ERC721("Chapt GPT Conversation", "CGPTC") {}

    function mintNFT(address recipient, string memory tokenURI)
        public
        onlyOwner
        returns (uint256)
    {
        _tokenIds.increment();

        uint256 newItemId = _tokenIds.current();
        _mint(recipient, newItemId);
        _setTokenURI(newItemId, tokenURI);

        return newItemId;
    }
}
As far as the “address recipient” parameter goes, the contract will get it from the connected wallet’s address. To be able to mint, the recipient’s address needs to match the contract owner’s address. On the other hand, the token URI will come from your backend once the IPFS API uploads a particular ChatGPT conversation.
Note: You can deploy the above smart contract to Ethereum or any other EVM-compatible chain. However, to avoid any confusion, we urge you to focus on the Goerli testnet. This is the network this tutorial use.

NodeJS Backend of Our ChatGPT NFT Minter Web3 App
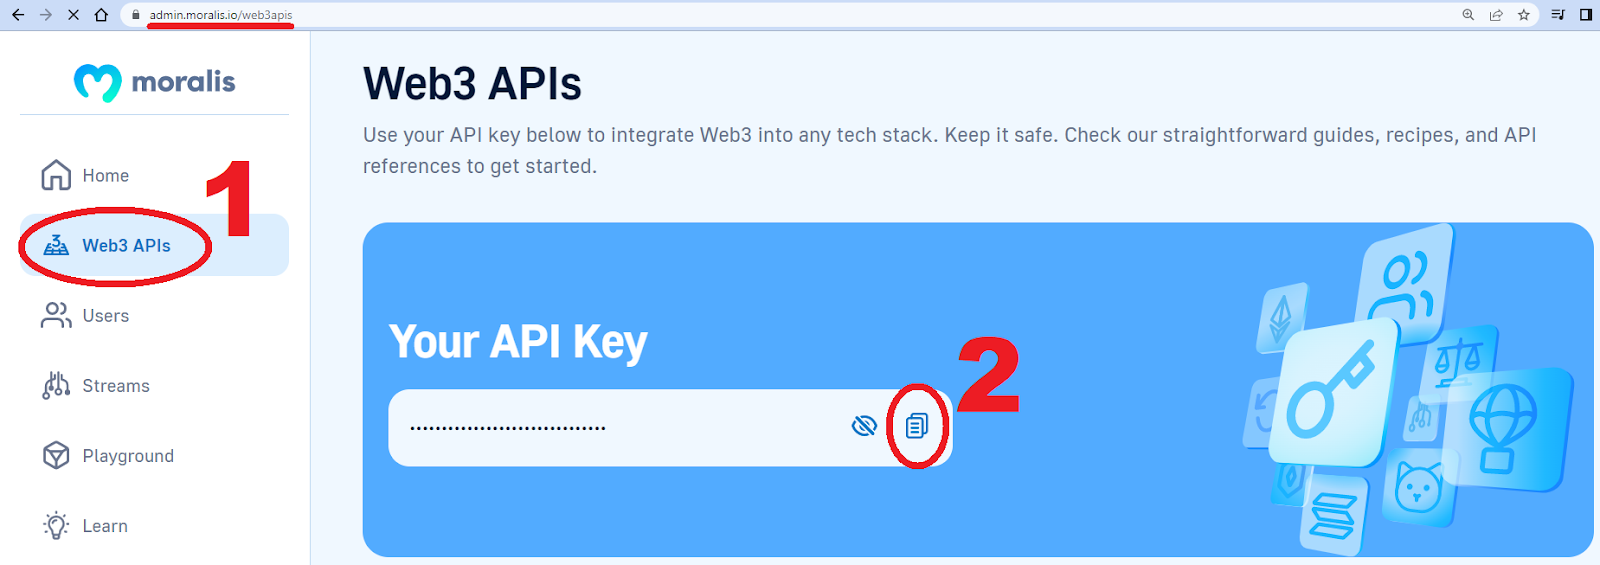
After successfully deploying your instance of our “MessageNFT.sol” smart contract, focus on the “backend” folder. There, you’ll find the “index.js”, “package-lock.json”, and “package.json” files. The latter tells you which dependencies this project utilizes. Moreover, you can install them with the “npm i” command. To make your backend function properly, create a “.env” file and store your Moralis Web3 API key in the “MORALIS_API_KEY” variable.
In case you haven’t created your Moralis account yet, do so now. Then, log in to your account to access your admin area. From there, you’ll be able to copy your Web3 API key with the following two clicks:
Now that you’ve successfully installed all the required dependencies and set your API key in place, you can run the backend’s “index.js” script. However, since this is the script that does all the heavy backend lifting, let’s walk you through its code.
The top lines of the script import all dependencies and define the local port to run on:
const express = require("express");
const app = express();
const port = 5001;
const Moralis = require("moralis").default;
const cors = require("cors");
require("dotenv").config();
Then it uses CORS and Express and imports the API key from your “.env” file:
app.use(cors());
app.use(express.json());

const MORALIS_API_KEY = process.env.MORALIS_API_KEY;
At the bottom, the script initializes the above key via the “Moralis.start” method:
Moralis.start({
  apiKey: MORALIS_API_KEY,
}).then(() => {
  app.listen(port, () => {
    console.log(`Listening for API Calls`);
  });
});
In addition, this also imports the OpenAI API configuration lines, which we obtained from the OpenAI docs:
const { Configuration, OpenAIApi } = require("openai");
const configuration = new Configuration({
  apiKey: process.env.OPENAI_API_KEY,
});
const openai = new OpenAIApi(configuration);
The above-covered lines of code surround the implementation of the root and “uploadtoipfs” endpoints that you saw in the introduction. Moving on, we’ll go over those two Express server endpoints.

Root Endpoint
As you probably remember, the main goal of today’s tutorial is to build a dapp that allows you to use ChatGPT to mint an NFT. You’ve already deployed the smart contract that will do the minting, but you haven’t incorporated ChatGPT into your backend. For that purpose, let’s create a root endpoint incorporating the OpenAI API to fetch the entry message from the frontend, pass that message to ChatGPT, and return ChatGPT’s reply. Here are the lines of code that take care of that:
app.get("/", async (req, res) => {
  const { query } = req;
  try {
    const response = await openai.createCompletion({
      model: "text-davinci-003",
      prompt: query.message,
      max_tokens: 30,
      temperature: 0,
    });
    return res.status(200).json(response.data);
  } catch (e) {
    console.log(`Something went wrong ${e}`);
    return res.status(400).json();
  }
});
The “uploadtoipfs” Endpoint
The last piece of the backend puzzle revolves around uploading a ChatGPT conversation to IPFS. By doing so, you get your token URI that your smart contract uses to mint a ChatGPT NFT. To do this with minimum effort, we used the Moralis IPFS API and created the “uploadtoipfs” endpoint:
app.get("/uploadtoipfs", async (req, res) => {
  const { query } = req;
  try {
    const response = await Moralis.EvmApi.ipfs.uploadFolder({
      abi: [
        {
          path: "conversation.json",
          content: { chat: query.pair },
        },
      ],
    });
    console.log(response.result);
    return res.status(200).json(response.result);
  } catch (e) {
    console.log(`Something went wrong ${e}`);
    return res.status(400).json();
  }
});
Looking at the lines of code above, you can see the “Moralis.EvmApi.ipfs.uploadFolder“ method. The latter uses “conversation.json” as an IPFS path and the current ChatGPT conversation as the corresponding content.

NextJS Frontend of Our ChatGPT NFT Minter Web3 App
You can explore all frontend-related scripts inside the “nextjs_moralis_auth” folder. Presuming that you are JavaScript proficient and have some frontend mileage under the hood, we won’t spend much time on the frontend. After all, you just need to install all the required frontend dependencies. However, let’s look at some mention-worthy aspects. For instance, we wrap our app with “WagmiConfig” and “SessionProvider” to use authentication across the entire app:
function MyApp({ Component, pageProps }) {
    return (
        <WagmiConfig client={client}>
            <SessionProvider session={pageProps.session} refetchInterval={0}>
                <Component {...pageProps} />
            </SessionProvider>
        </WagmiConfig>
    );
}
Another important aspect is the code that renders the header of our frontend, including the “Connect” button. For that purpose, the “signin.jsx” script uses “handleAuth“, which allows you to connect or disconnect MetaMask. Once you successfully connect MetaMask, the “user.jsx” page takes over. The latter has a different header than “signin.jsx”. The “user.js” script also utilizes the “loggedIn.js” component for frontend and backend communication. So, it is the “loggedIn.js” script that renders your frontend:
  return (
    <section>
      <section className={styles.chat_box}>
        <section className={styles.chat_history} id="chatHistory"></section>
        <section className={styles.message_input}>
          <input
            type="text"
            id="inputField"
            placeholder="Type your message..."
            onChange={getMessage}
          />
          <button onClick={sendMessage}>Send</button>
        </section>
      </section>
      {showMintBtn && (
        <button className={styles.mint_btn} onClick={mint}>
          MINT NFT
        </button>
      )}
    </section>
  );
}
Note: If you want a more detailed code walkthrough of the “loggedIn.js” script, use the video at the top (5:53).
ChatGPT Minter Web3 App Demo
If you’ve used our code and ran both the backend and frontend dapps, you can now use your local host to take your instance of our ChatGPT NFT minter for a spin:

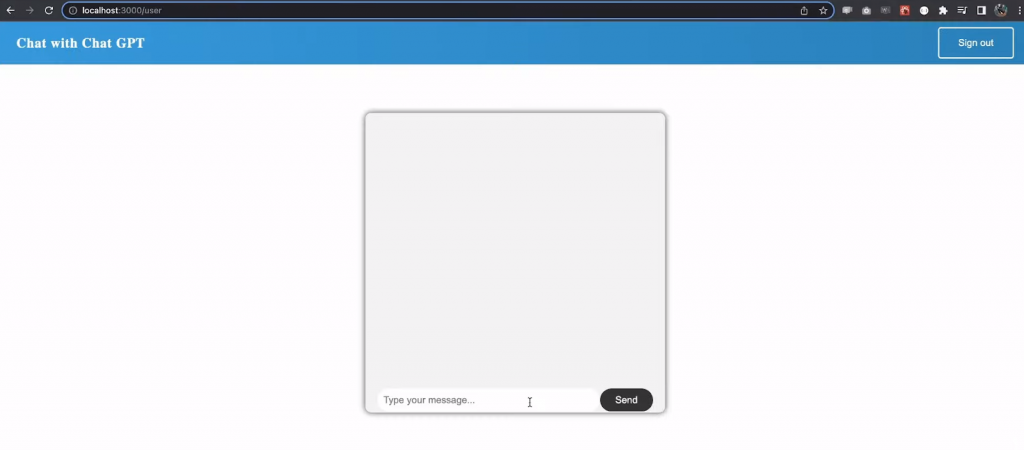
To access the app functionality, you need to hit the “Authenticate via MetaMask” button. The latter will prompt your MetaMask extension, asking you to sign the signature request:
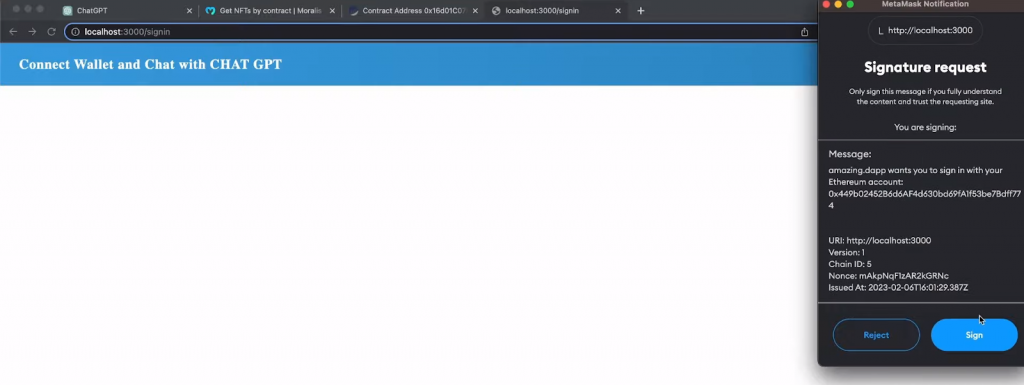
Once you click on “Sign”, the Web3 app (dapp) utilizes the “user.jsx” script that displays a ChatGPT box and a different header:
You can use the entry field to type your question/command and hit “Send” to get ChatGPT’s reply. As soon as ChatGPT replies, our dapp presents you with the “Mint NFT” button:
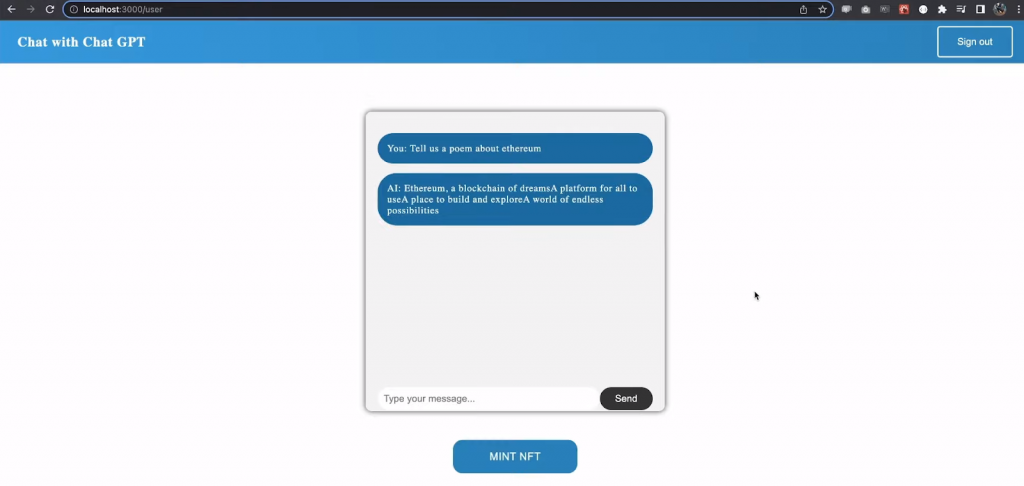
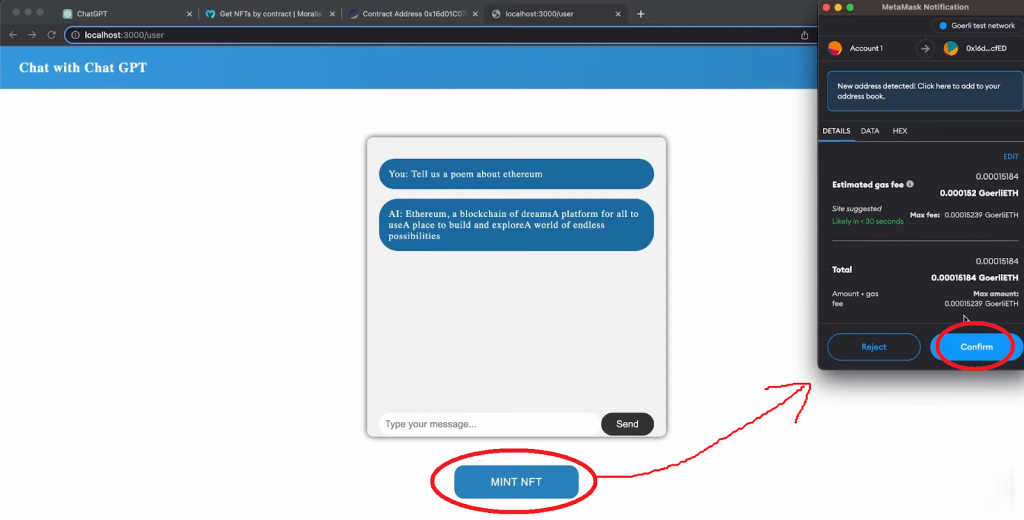
So, if you decide to convert your ChatGPT conversation into an NFT, you need to use that button. Also, make sure to use the same wallet address as you have to deploy your smart contract. If you click on “Mint NFT”, MetaMask will pop up asking you to confirm an NFT-minting transaction:
Once the Goerli chain confirms the transaction, you can view your new ChatGPT NFT on Etherscan. However, if you were to upgrade your Web3 app with the ability to fetch the NFT’s details, you’d want to use the “Get NFTs by contract” API endpoint. You can use that endpoint’s API reference page to test its power:
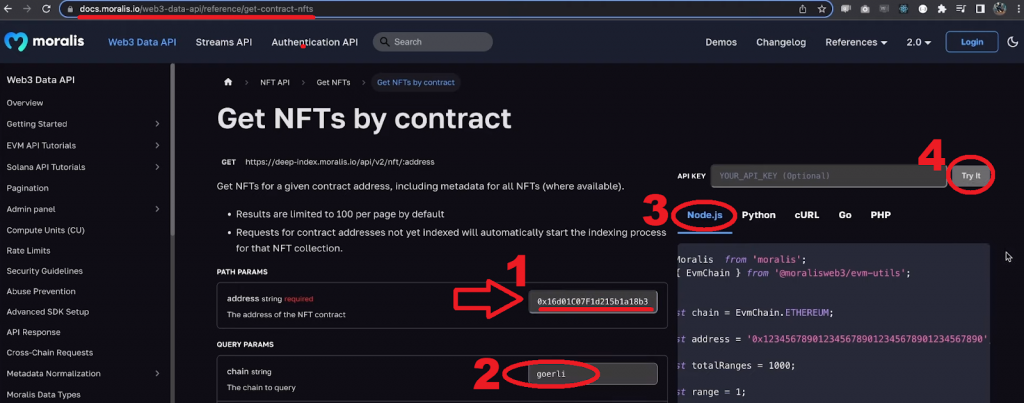
To see the response after hitting the above “Try it” button, you’ll need to scroll down the “Get NFTs by contract” API reference page:

What is a ChatGPT NFT?
A ChatGPT NFT is a non-fungible token (NFT) that is in some way associated with ChatGPT – an advanced chatbot developed by OpenAI. For instance, it could be an NFT that uses the ChatGPT logo as its NFT-representing file or an NFT that was minted by a smart contract generated using ChatGPT.

ChatGPT and Web3
Users around the globe are already using ChatGPT for many different purposes. Some of the most common ChatGPT use cases include generating programming code or code templates and finding/fixing code errors, creating content, generating marketing and sales pitches, performing accounting and data analysis, and more.
ChatGPT can be used via its web dashboard or via OpenAI’s API (as in the above tutorial). The latter enables devs to implement the power of AI into all sorts of dapps. Now, keep in mind that to make the most out of ChatGPT, you may need to train it on specific datasets that are relevant to your application.
Web3 devs and communities are already using ChatGPT to generate text (creating chatbots or virtual assistants), translate text, perform sentiment analysis, generate smart contracts and scripts for dapps, etc.
All in all, ChatGPT is an extremely powerful tool. With the right input and properly utilized output, it can be a great addition to various dapps and can enrich the Web3 experience.
How to Use ChatGPT to Mint an NFT – Summary
In today’s article, we showed you how to create a ChatGPT NFT minter Web3 app (dapp). You now know that by deploying a proper smart contract and creating a suitable backend and frontend, you can use ChatGPT to mint an NFT. Also, by using our code, you were able to cover all those aspects with minimum effort. You can now play around with your instance of our dapp and create as many ChatGPT NFTs as you wish.
In the above tutorial, you also encountered the Moralis IPFS API, which is just one of many Web3 APIs from Moralis. Furthermore, with your Moralis API key, you can use the full scope of the Moralis Web3 Data API, Authentication API, and Moralis Streams API. The latter is a superior Notify API alternative poised to make Web3 libraries obsolete. So, with these enterprise blockchain solutions from Moralis, you can build killer Web3 wallets, portfolio trackers, and other kinds of dapps. Additionally, thanks to Moralis’ cross-chain interoperability, you can BUIDL on Ethereum, leading EVM-compatible chains, Solana, and Aptos! If you choose to build on Aptos, make sure to use the Aptos testnet faucet before going live.
Learn more about building dapps the easy way from the Moralis documentation, our YouTube channel, and our blog. These free resources can help you become a Web3 developer in no time. If you wish to take a more professional approach to your blockchain development education, enroll in Moralis Academy.
