When it comes to crypto communities, Discord is an extremely popular platform. Hence, we want to show you how to build a Discord bot for on-chain events, and thanks to the Moralis Streams API, you can build a crypto monitor Discord bot effortlessly. All it takes is a free Moralis account, a Discord server, and some simple JavaScript programming. Moreover, building a Discord bot is a lot simpler than you might think, and in this article, we’re going to accomplish this in five simple steps:
- Setting Up a Simple NodeJS Express Backend
- Adding a New Moralis Stream
- Verifying the Webhook Sender
- Setting Up a Discord Bot
- Implementing an Example Blockchain Discord Bot
Furthermore, it shouldn’t take more than twenty minutes to set things up. Also, thanks to Moralis’ cross-chain interoperability, the best thing about our Discord bot is that you can listen to any on-chain event on Ethereum and other EVM-compatible chains. But, for the sake of this tutorial, we’ll focus on the Polygon testnet (Mumbai).
Moving forward, we’ll first ensure that you all know what a Discord bot is. Then, we’ll dive into today’s tutorial. However, before we show you how to build a Discord bot, we’ll take a look at a demo, which will help you better understand what a crypto monitor Discord bot is. In addition, by seeing our demonstration, you’ll also be able to decide whether or not you want to focus on building a Discord bot for your own purposes. With that said, if you already know what a Discord bot is, feel free to dive right into our blockchain Discord bot tutorial.

What is a Discord Bot?
If you’ve done any online shopping, you’ve probably encountered chatbots. These bots are programs that help automate certain processes. Moreover, when these sorts of AI-driven tools are used to automate tasks on Discord servers, they are called Discord bots. As you may know, Discord servers offer many features, many of which can be automated.
So, what exactly is a blockchain Discord bot? It is a Discord bot that triggers a specific action on a specific Discord server when a particular on-chain event (the one that the bot listens to) occurs. Hence, a crypto monitor Discord bot is a very practical tool for all sorts of crypto Discord communities. After all, it can add a lot of value to private and public Discord channels.
It’s also worth mentioning that the Discord bot feature is available on Discord’s developer portal. As such, you don’t have to do any serious coding to create Discord bots. Instead, you can simply select among the given options and use Discord’s pre-built solutions. You’ll get to see this, as we show you how to build a Discord bot in the section below.
How to Build a Discord Bot for Blockchain Events
Building a Discord bot for crypto is effortless, thanks to Moralis’ Streams API. This powerful tool enables you to stream blockchain data into your backend (in this case, Discord’s backend) via webhooks. To access this powerful tool, you only need a free Moralis account. Of course, you also need to decide what on-chain events interest you. This will determine whether you can listen to an existing smart contract or if you’ll need to create and deploy your smart contract first. However, for the sake of this tutorial, we’ll use an existing smart contract. In fact, to avoid any confusion, start by focusing on our example Web3 contract.
Also, to build your own crypto monitor Discord bot following our lead, you will need the following tools:
- A Moralis account, which you can create for free!
- Some type of code editor or IDE. We’ll be using Visual Studio Code (VSC).
- A Discord server and access to Discord’s developer portal.
- A blockchain explorer. Our example Web3 contract is on the Mumbai network, so we’ll be using PolygonScan.
- The Postman platform (optional). This is a tool to help you make API calls to different posts, get endpoints, etc.
Moreover, we’ll take you through the following steps:
- Setting Up a Simple NodeJS Express Backend
- Adding a New Moralis Stream
- Verifying the Webhook Sender
- You need to ensure that only Moralis can make a webhook post.
- Setting Up a Discord Bot
- Implementing an Example Blockchain Discord Bot
- Sending messages with Discord.js
Now, as mentioned above, before we show you how to build a Discord bot, let’s take a look at a demonstration.
Our Crypto Monitor Discord Bot – Demo
So, this is our example Discord server, which we created for the sake of this tutorial:
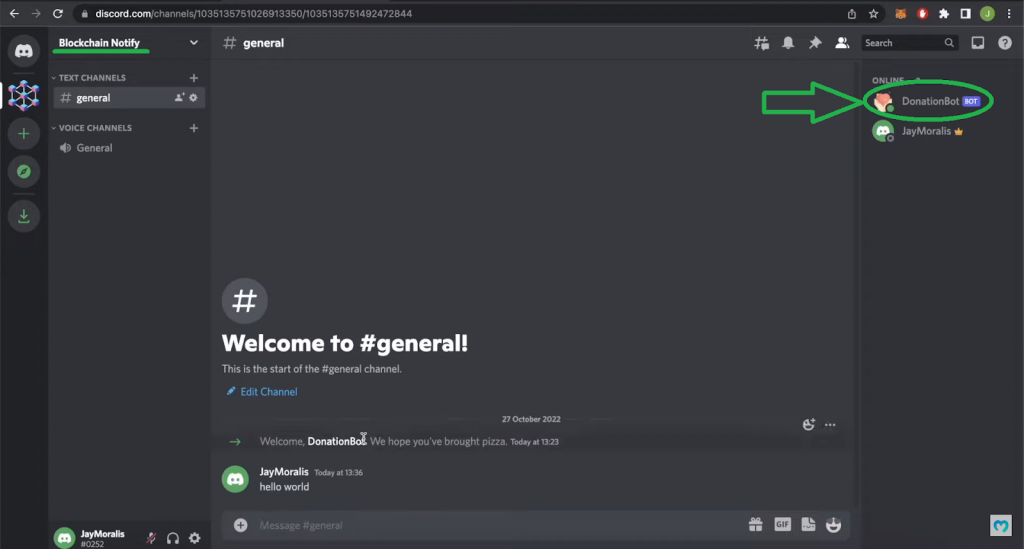
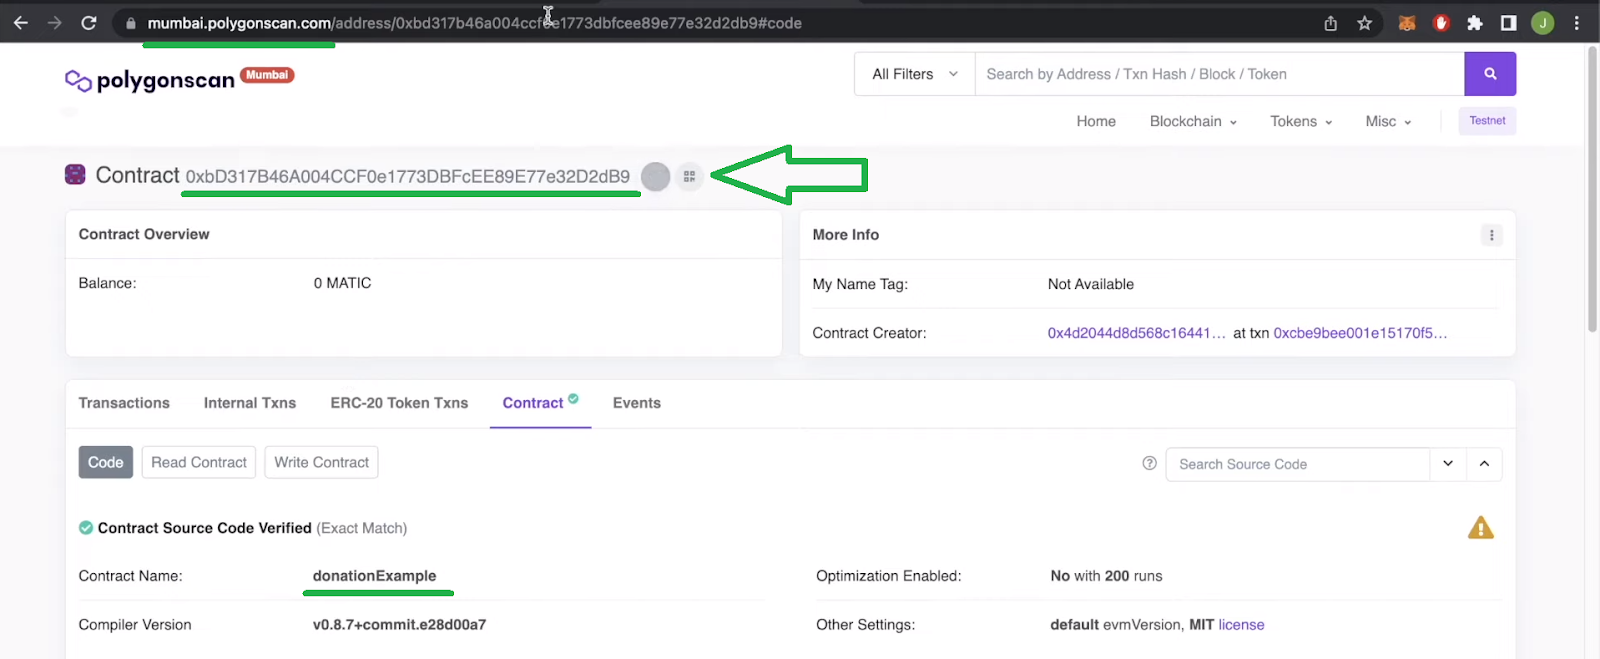
Looking at the above screenshot, you can see our crypto monitor Discord bot (“DonationBot”) in the right sidebar. Next, we use PolygonScan to interact with our example “donationExample” smart contract. Obviously, this is the smart contract that our example blockchain Discord bot listens to.
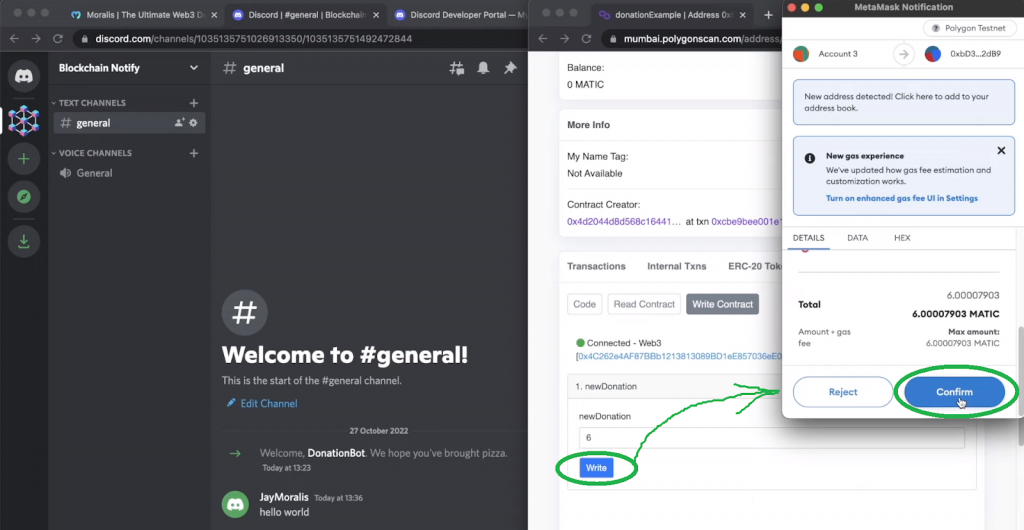
The above image shows you that by clicking on the “Write” button on PolygonScan’s page for our example Web3 contract, we actually execute an on-chain transaction using MetaMask. Also, as you can see above, we donated six MATIC tokens. Finally, as soon as our transaction goes through, our Discord bot posts a message informing our Discord members about this donation:
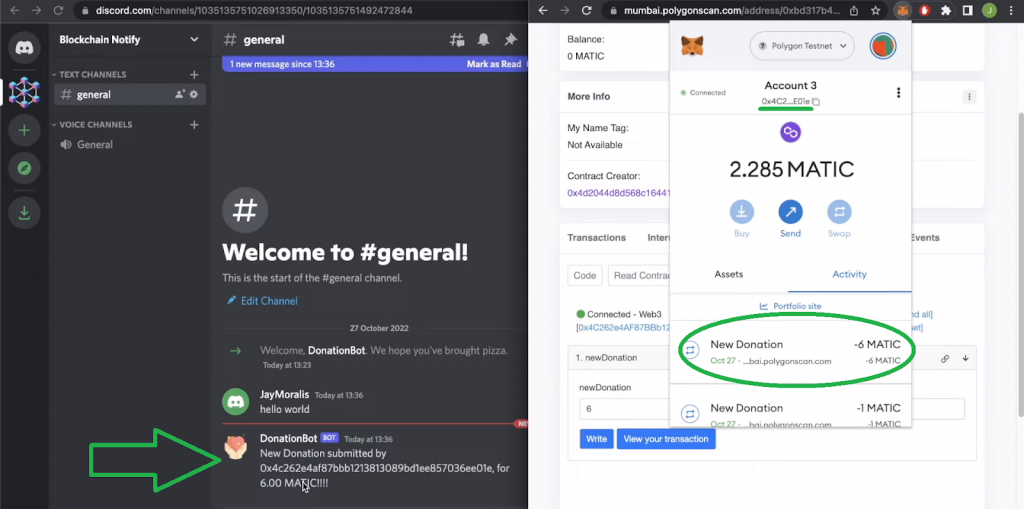
As you can see, the message includes the donor’s address and the donated amount. However, the key point is that the on-chain event (a donation transaction) triggered our Discord bot.
If you find this feature useful, make sure to follow our lead in the upcoming sections, where we’ll cover building a Discord bot that listens to on-chain events (like the one presented in this demo).
Setting Up a Simple NodeJS Express Backend
If you want to learn how to build a Discord bot for on-chain events the easy way, start with a simple NodeJS Express dapp. You can find the starter code in our GitHub repo for this tutorial. Also, make sure you have “ngrok” installed to create a “ngrok” tunnel to your Express dapp. To do this, open a new terminal and enter the following command:
ngrok http 3000
Note: In case you are using a different port, make sure to replace “3000” accordingly.
As a result of running the above command, you will get an address where your Express dapp will be running:

Next, you want to install all the dependencies with this command:
npm i express moralis discord.js dotenv
Moreover, we recommend that you also install “nodemon” so that you’ll be able to view changes without needing to stop and restart your server. Hence, also use the command below:
npm i nodemon
With the dependencies in place, open your “package.json” file and add the “start” script for “nodemon“:

Finally, you are ready to run your dapp using the command below:
npm run start
Adding a New Moralis Stream
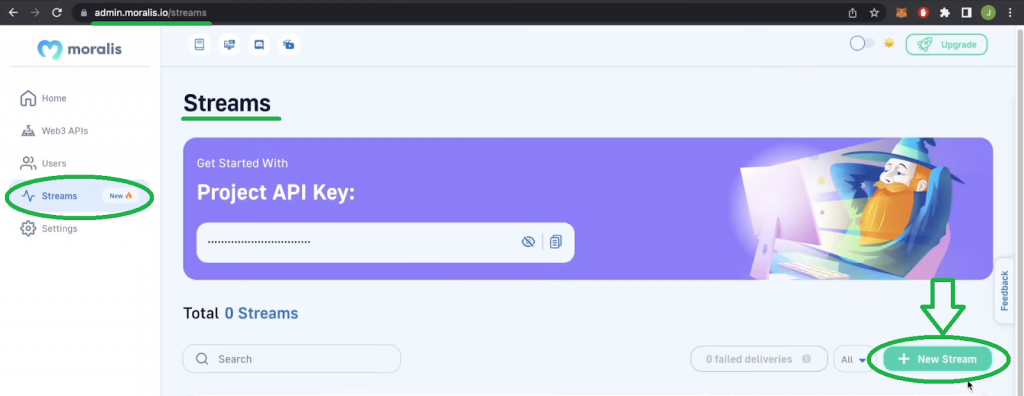
With your dapp running, it’s time to create a new Moralis Stream. To do this, you need your Moralis account. So, in case you haven’t created your account yet, do so now. Using your credentials, you’ll access your admin area. From there, you’ll be able to go to the “Streams” page, where you need to click on the “New Stream” button:
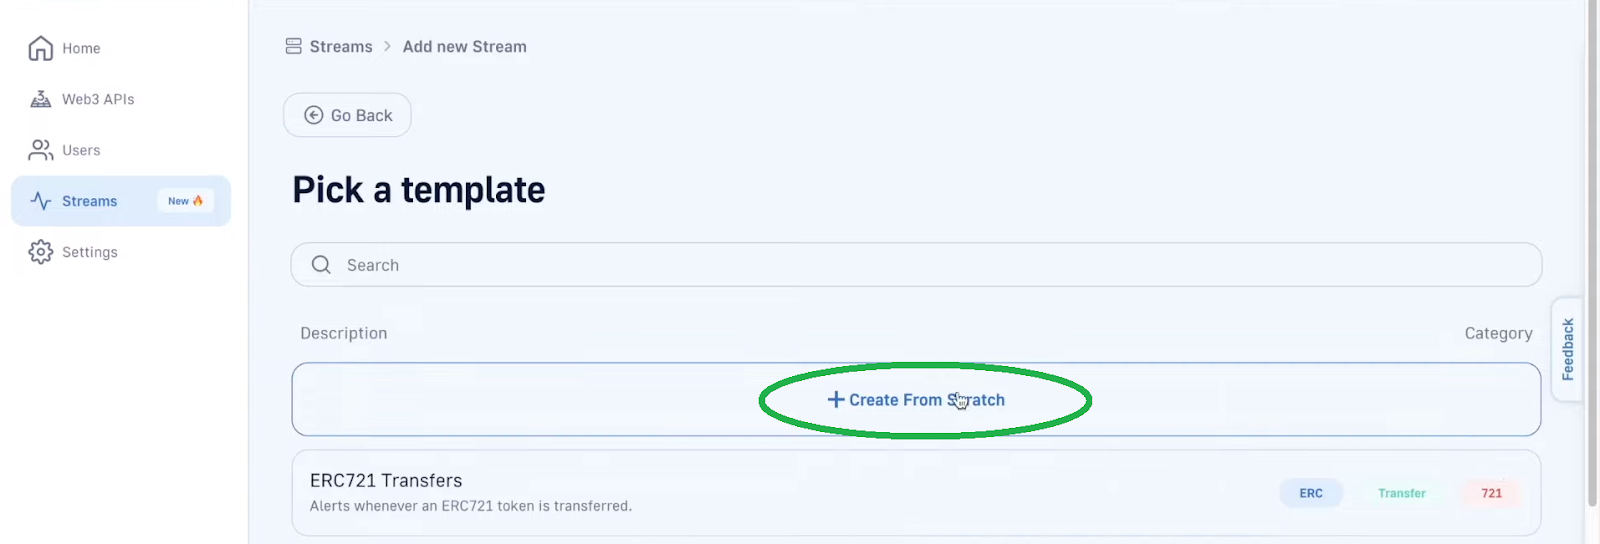
Then, select the “Create From Scratch” option:
Next, you need to enter several details related to the smart contract you want to listen to. This is an essential step of the “how to build a Discord bot” process. Moreover, in the future, you’ll want to use your own smart contract or other already deployed contracts. However, for the sake of this tutorial, we recommend you use our example smart contract (the “exampleDonation” contract).
Obtaining and Entering Smart Contract Details
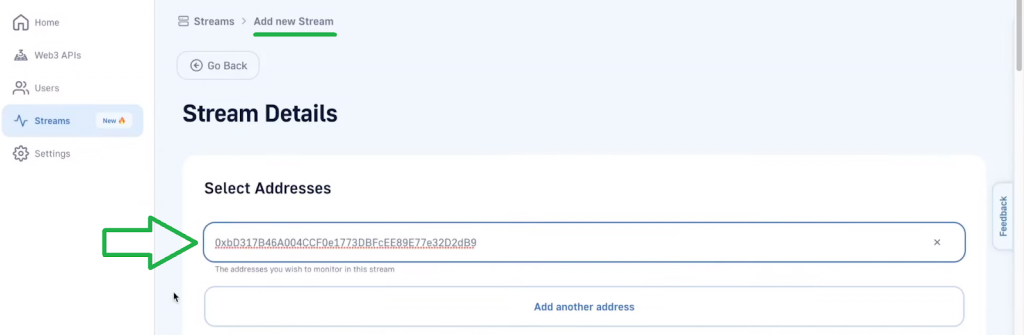
By focusing on the “exampleDonation” contract, go to PolygonScan and copy this smart contract’s address:
Then, return to your “Add new Stream” window and paste the above-copied address into the designated spot:
Moving on, scroll down to add your new Moralis Stream’s description. This can be whatever you want; however, to avoid any unnecessary confusion, you can use “New Donation”:

Next, paste your “ngrok“ address in the “Webhook URL” entry field and add “/webhook” at the end:

As far as the tag goes, you can go with “NewDonation”:

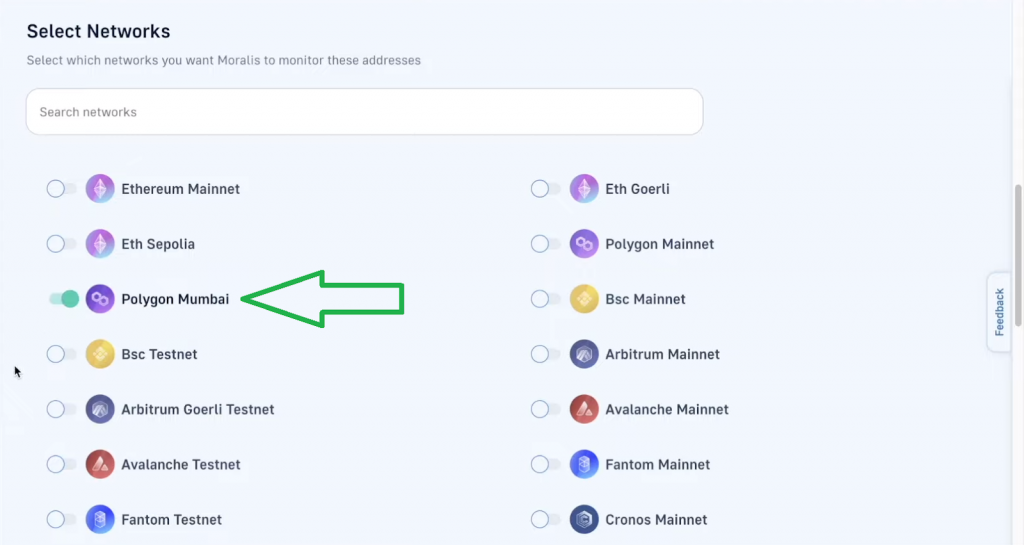
When it comes to selecting networks, you need to make sure you select the network on which the smart contract you want to listen to is. If you remember, the “exampleDonation” contract is on Polygon’s testnet. Thus, make sure to select the “Polygon Mumbai” option:
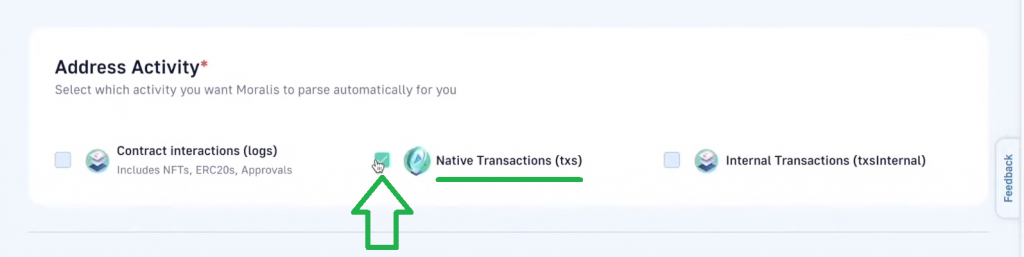
Then, you want to select the “Native Transactions” option (donations are made in MATIC):
Furthermore, make sure to turn on “Event Emittance”:

Next, return to PolygonScan to copy the smart contract’s ABI:

By pasting the copied ABI in the designated area, you’ll get to select the event of this smart contract:

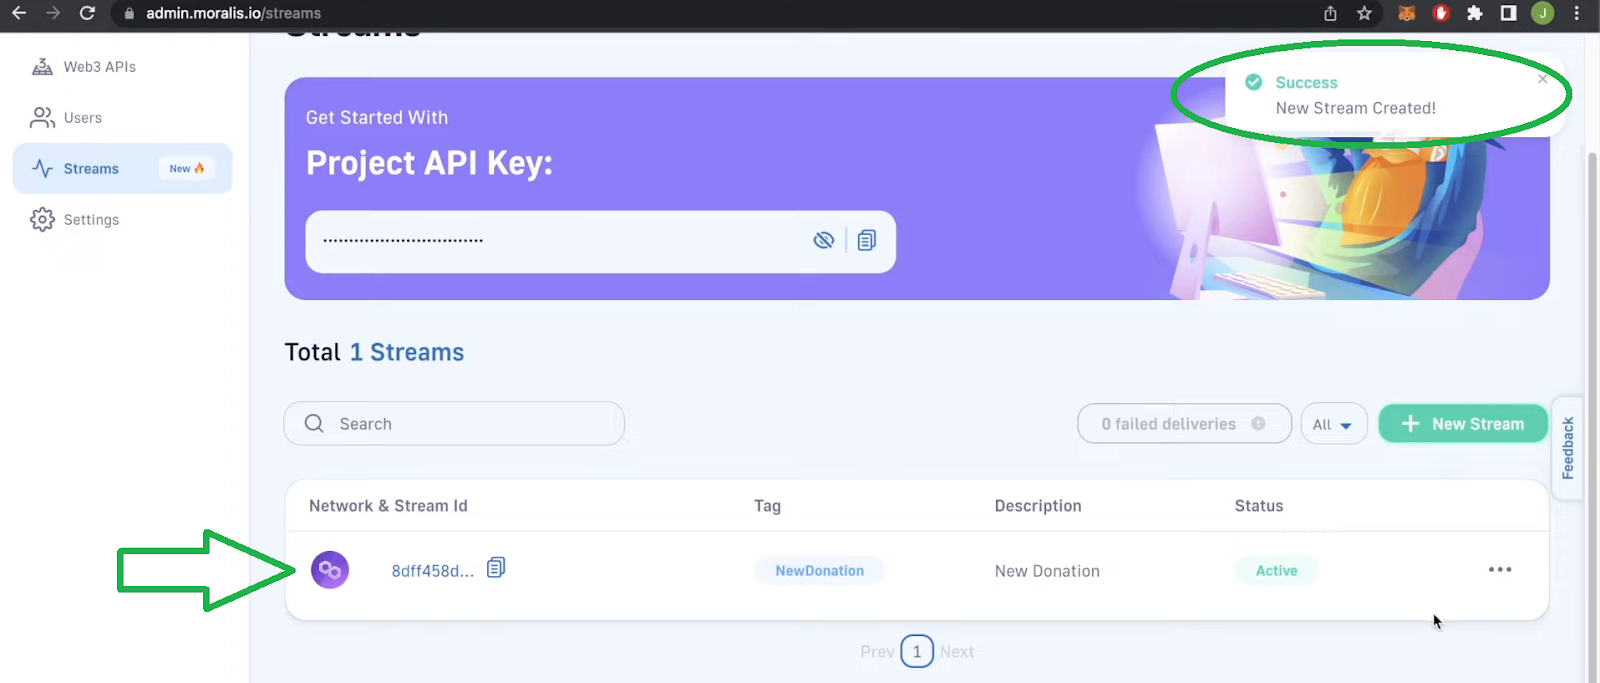
Finally, create your new Moralis Stream by clicking on the “Create Stream” button in the bottom-right corner. As a result, you should get the “New Stream Created” success message. You should also be able to see your Moralis Stream at the bottom of the “Stream” page:
You can now test your Moralis Stream. To see exactly how to do that, use the video at the bottom of the article, starting at 5:36.
Verifying Webhook Sender
With the current “index.js” code (as provided in the “starter.js” file”), anyone with your webhook address can make a post request. As such, you must implement the necessary tweaks to verify the webhook sender. First, import Moralis at the top of your “index.js” file:
const Moralis = require("moralis").default;
Then, initialize an instance of Moralis by adding the following lines of code:
Moralis.start({
  apiKey: process.env.APIKEY,
})
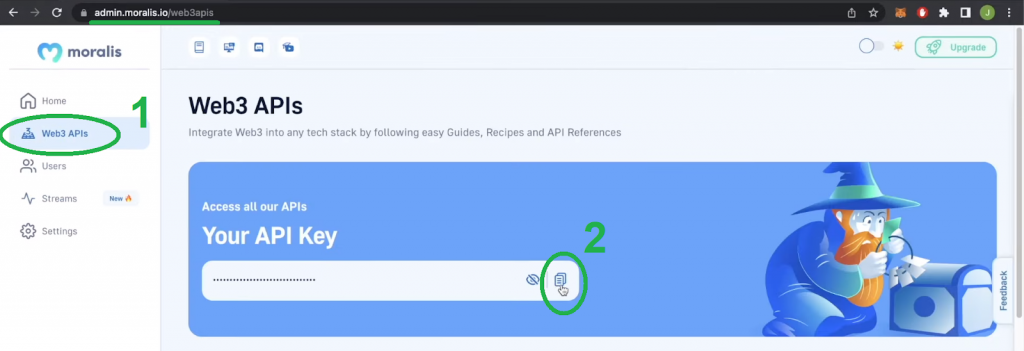
Looking at the lines of code above, you see that you need your Moralis Web3 API key. You need to copy it from your Moralis admin area:
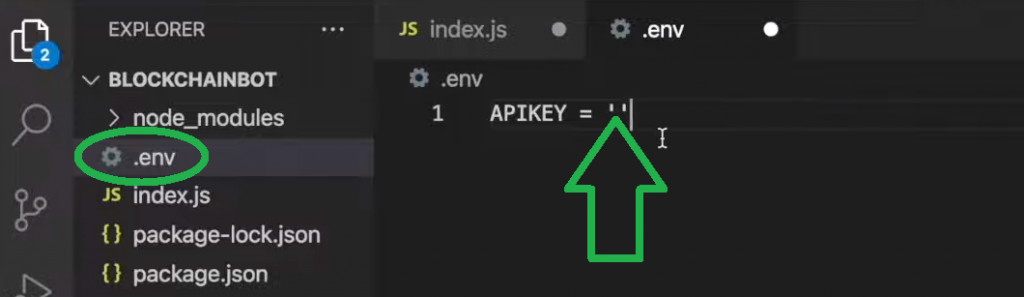
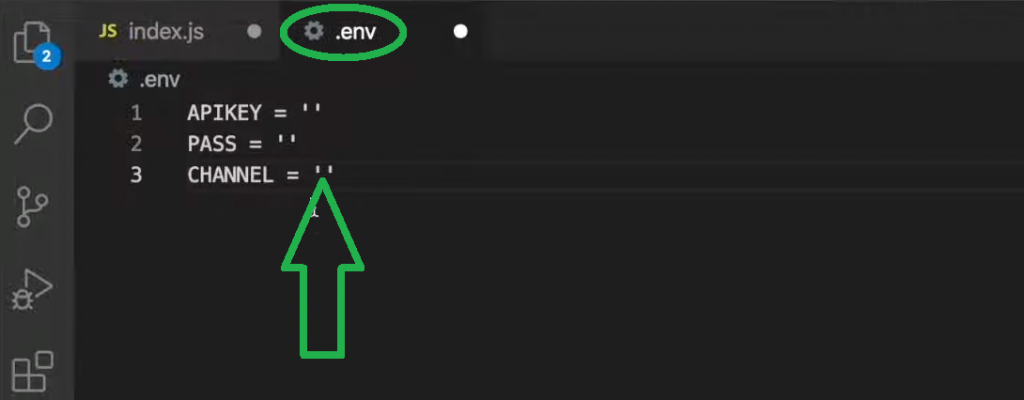
Next, return to VSC, create a new file (“.env”), and paste your Web3 key next to “APIKEY”:
With your Web3 API key in place, return to the “index.js” file and require “dotenv” at the top:
require("dotenv").config();
Now, you want to make sure that your dapp starts only after starting Moralis by putting “app.listen” inside “then”:
Moralis.start({
  apiKey: process.env.APIKEY,
}).then(() => {
  app.listen(port, () => {
    console.log(`Listening to streams`);
  });
});
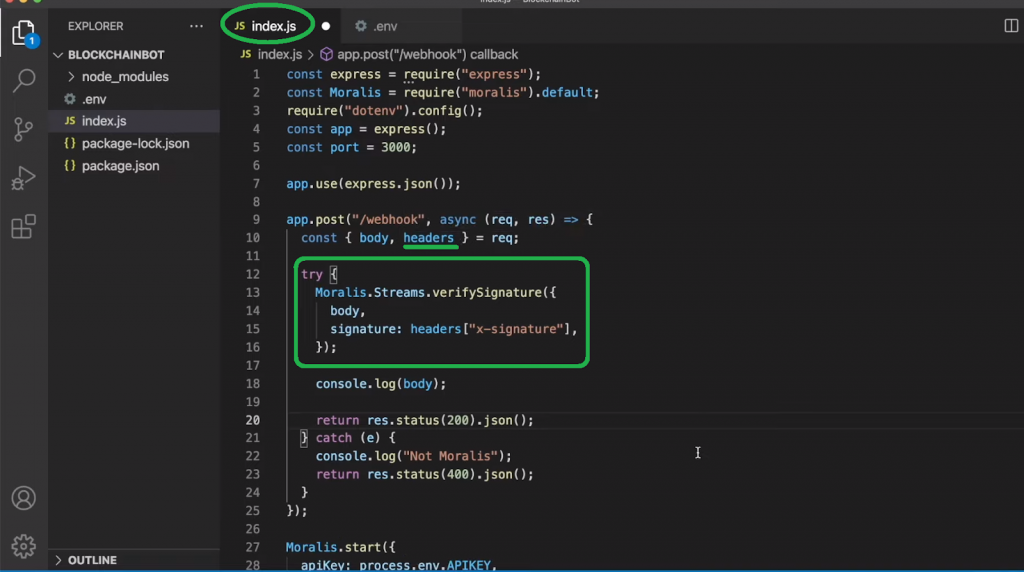
Then, you also want to look at “headers” and add Moralis’ “verifySignature”:
Note: We encourage you to test your current progress by following our in-house expert’s lead (video below at 10:20). This is where you’ll use Postman.
Setting Up a Discord Bot
Demonstrating how to build a Discord bot wouldn’t be complete without us showing you how to set up a Discord bot. So, start by going to your Discord account. There, create a new server (“Blockchain Notify”). If you’ve never created a Discord server before, make sure to use the video below (11:30).
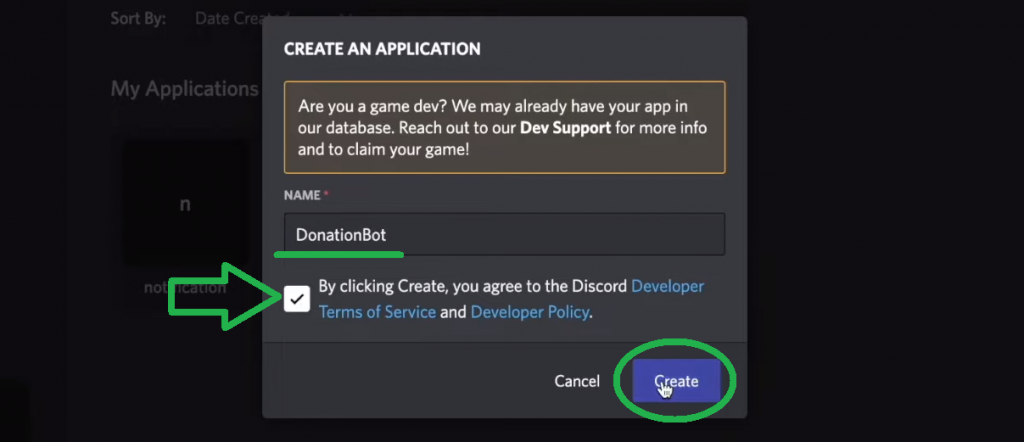
Once you have your server ready, it’s time to add a new Discord bot to that server. To do that, visit Discord’s developer portal and sign in. Then go to the “Applications” page and click on the “New Application” button:

Next, name your application, check the box, and hit the “Create” button:
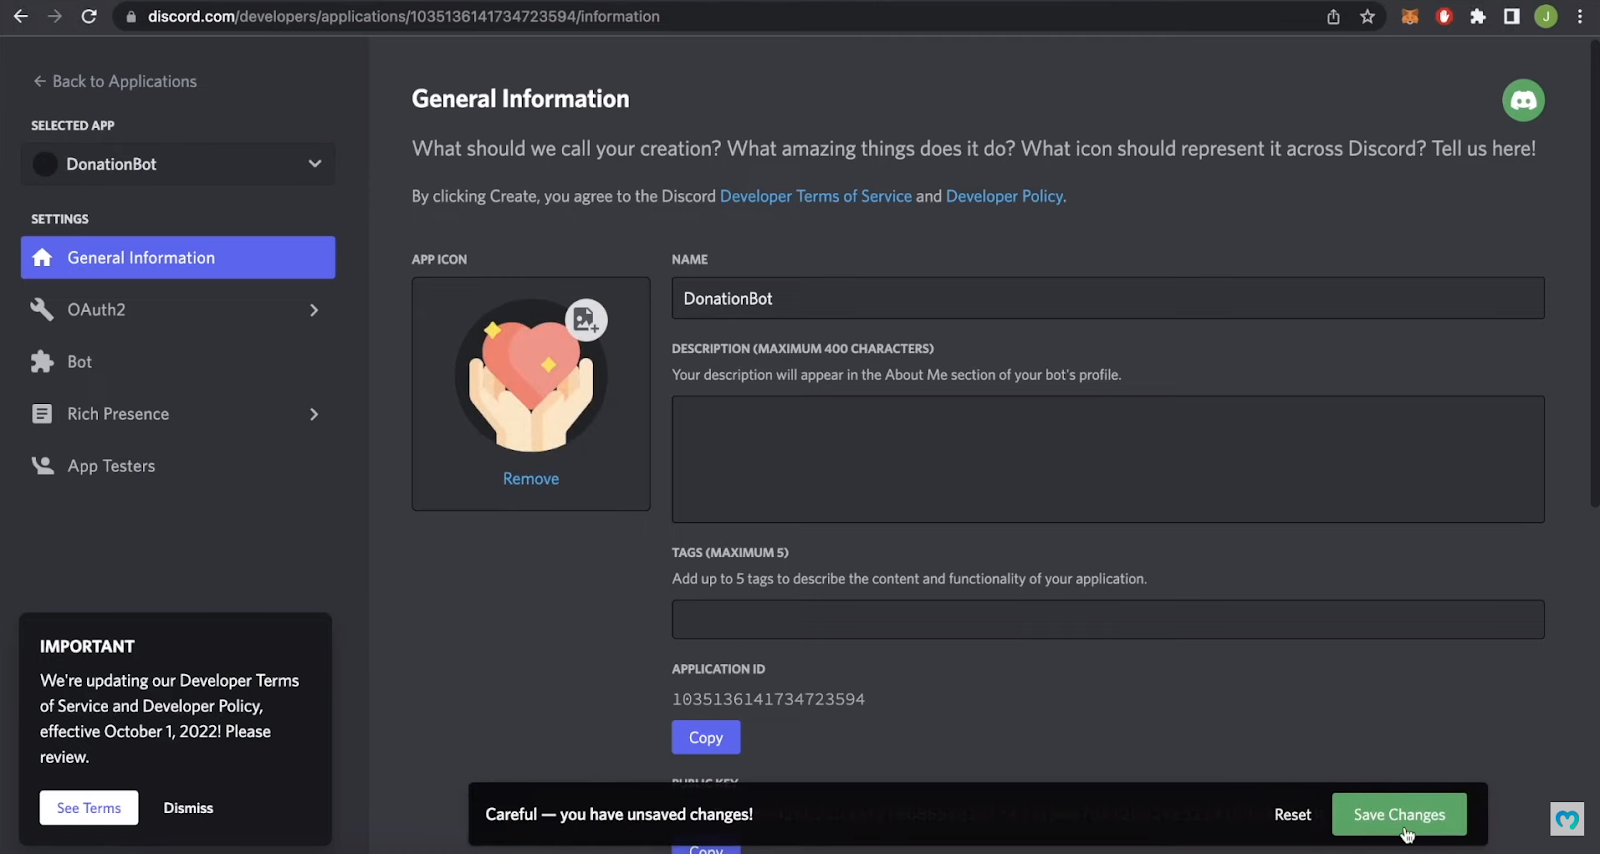
You can also add an icon to your application:
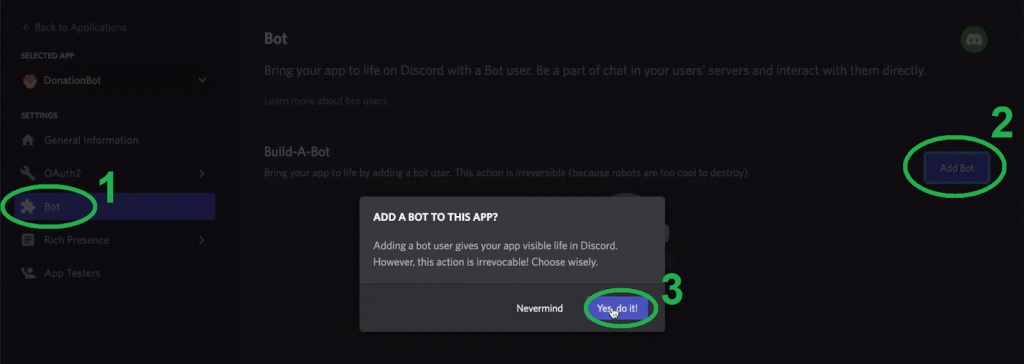
Then, you want to select the “Bot” option, click on the “Add Bot” button, and confirm with a click on “Yes, do it!”:
Moving forward, you want to expand “OAuth2” and click on the “URL Generator” option:
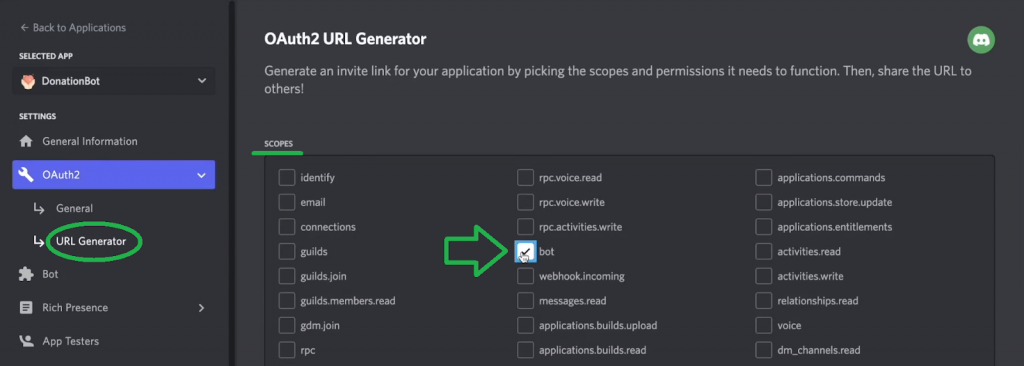
Next, as indicated in the image above, check the “bot” scope. Then, scroll down and check the “Send Message” permission:

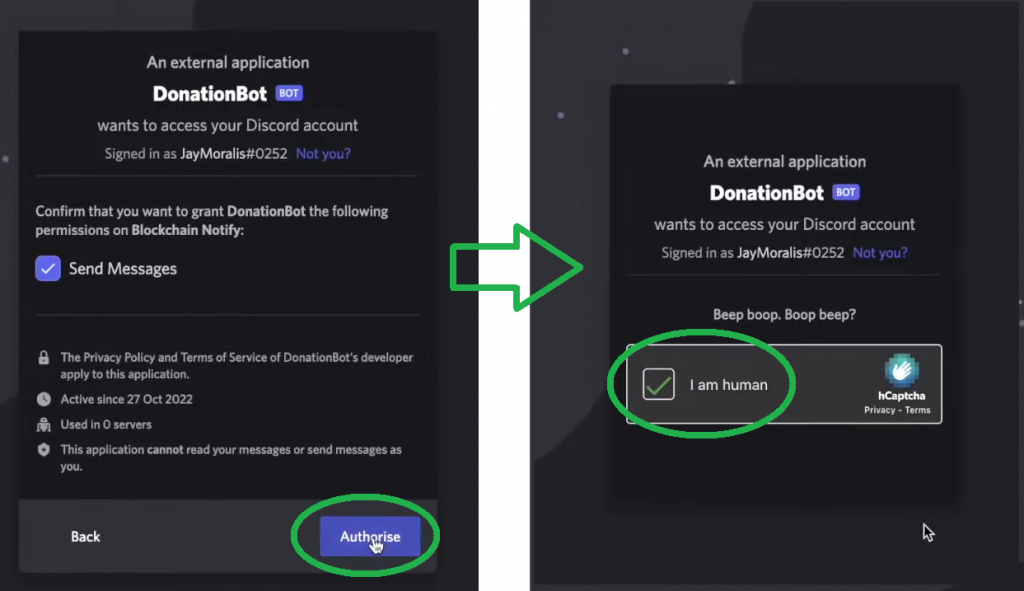
As shown in the above screenshot, copy the generated URL. By pasting that URL into your browser, you’ll be able to select a server to which you want to add that bot:

To finalize this step of building a Discord bot for crypto, you’ll also need to click on the “Authorize” button and confirm that you are human:
Now, you can close that tab and visit your Discord. If you’ve followed our instructions, you should now have the “DonationBot” bot in your “Blockchain Notify” Discord server:

Implementing an Example Blockchain Discord Bot – Sending Messages with Discord.js
In this final step of our “how to build a Discord bot” quest, you need to add the necessary lines of code to ensure that the above-created bot becomes a crypto monitor Discord bot. Hence, return to your “index.js” script and import “discord.js” at the top:
const discord = require("discord.js");

Next, create a Discord client just below the imports:

const client = new discord.Client({
    intents: [],
  });

client.login(process.env.PASS);
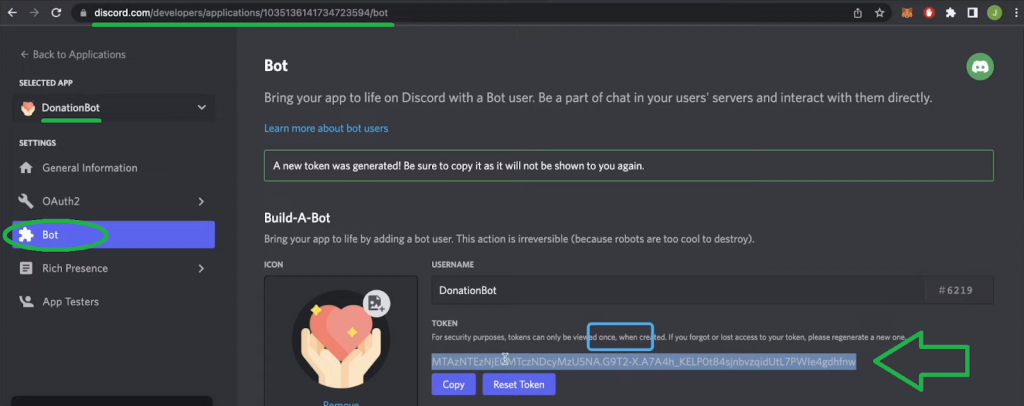
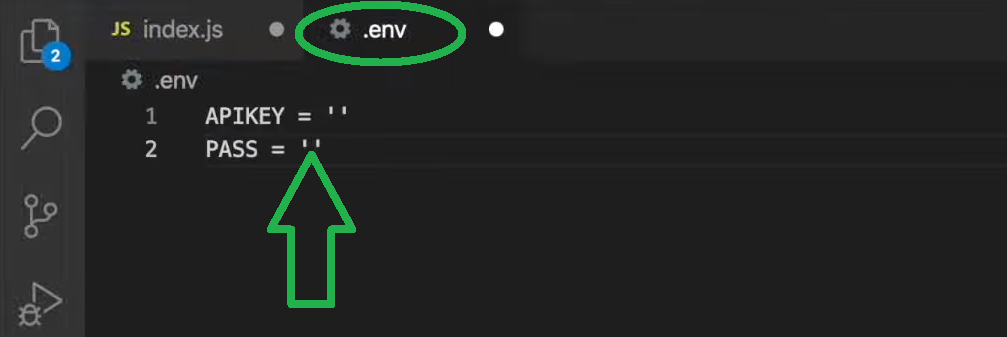
Looking at the bottom line of the code above, you can see that you need to add the “PASS” variable to your “.env” file. To get this variable, return to your “DonationBot” application (the “Bot” option) and click on the “Reset Token” button. Then copy the token:
Moving on, go to your “.env” file, create the “PASS” variable, and paste in the above-copied token:
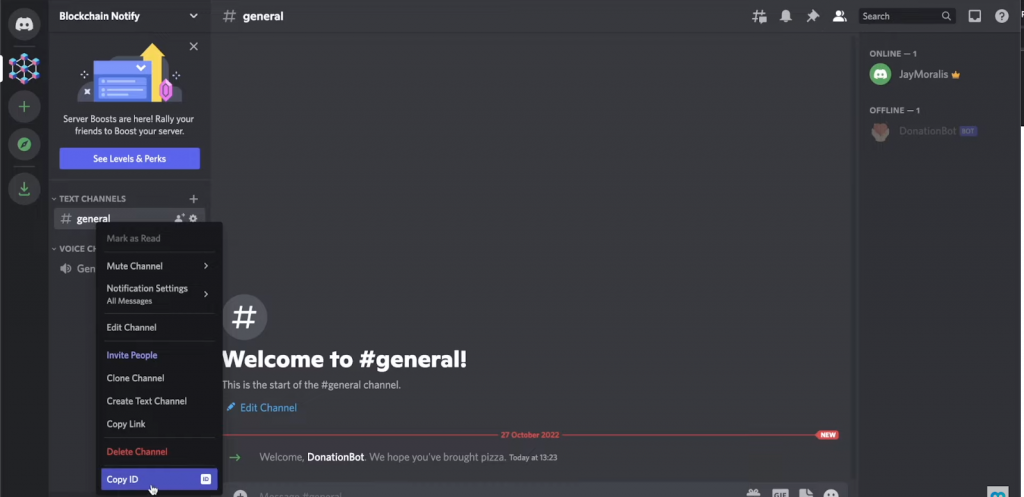
Next, go to your Discord server, and copy your channel ID (right-click on the channel in which you want your bot to post messages):
Return to the “.env” file and create a new variable that will store the above-copied ID:
With your variables in place, you can add the necessary lines of code inside “try”:
    let from = body.txs[0].fromAddress;
    let amount = Number(body.txs[0].value / 1E18);

    const channel = await client.channels.fetch(process.env.CHANNEL);
    channel.send(`New Donation submitted by ${from}, for ${amount.toFixed(2)} MATIC!!!!`);
Note: You can access the final code on GitHub.
With the above lines of code in place, you have successfully completed all five steps involved in the “how to build a Discord bot” implementation. Now, make sure to take your bot for a spin. For guidance, use the video below (17:34).
Last but not least, here’s the video version of our “how to build a Discord bot” tutorial we’ve been referencing throughout the article:
Blockchain Discord Bot – Build a Discord Bot for On-Chain Events – Summary
We covered quite a distance in today’s article. First, you had a chance to learn what a Discord bot is. We also made sure you know what a crypto monitor Discord bot is. With the basics under your belt, you had an opportunity to follow our lead. Moreover, by taking you through the five primary steps, we provided you with all the details related to building a Discord bot. These five steps included:
- Setting Up a Simple NodeJS Express Backend
- Adding a New Moralis Stream
- Verifying the Webhook Sender
- Setting Up a Discord Bot
- Implementing an Example Blockchain Discord Bot
Nonetheless, we also shared a video tutorial containing additional details about building a Discord bot for on-chain events.
We suggest you use the “how to build a Discord bot” knowledge obtained above to build your own crypto monitor Discord bot for another smart contract. That way, you’ll properly solidify your knowledge. On the other hand, you may want to explore other blockchain development topics and create all sorts of dapps. If that’s the case, you should use the Moralis docs, the Moralis YouTube channel, and the Moralis blog. After all, these outlets have the power to help you become a Web3 developer for free. For example, some of our latest topics show you how to program smart contracts on Solana, upload files to IPFS, mint a coin on Solana, how to create an NFT project, and much more.
Of course, you can also take a more professional approach to your crypto education. By enrolling in Moralis Academy, you can become blockchain certified and significantly improve your chances of landing a crypto job. To create a proper foundation, we encourage you to start with the course focusing on blockchain and Bitcoin fundamentals.
