Did you know that you can seamlessly mint an NFT directly from a contract using Etherscan in seconds? Thanks to the accessibility of Etherscan, you can actually do so in three easy steps:
- Get an NFT smart contract address.
- Go to Etherscan, navigate to the contract’s page, click on the ”Contract” tab, followed by ”Write Contract”, and connect your wallet:
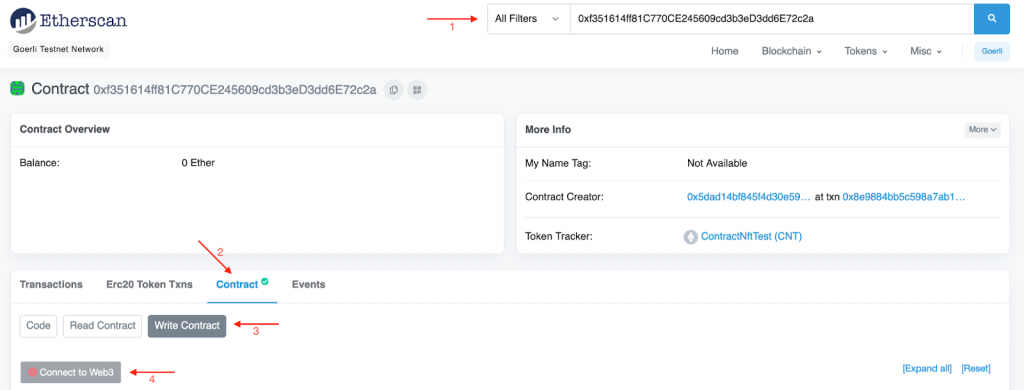
- Find the function for minting a new NFT and click on ”Write”:

It is as easy as that! But if you want a more detailed breakdown of the steps above, join us in this tutorial as we cover the complete process from start to finish. In combination with demonstrating how to mint an NFT directly from a contract, the article also shows you how to verify the transaction using Moralis!
Overview
Today’s article demonstrates how to mint an NFT from a contract and confirm the transaction using Moralis in three steps:
- Prerequisites
- Mint an NFT from a Contract Using Etherscan
- Confirm the Transaction Using Moralis
By covering the steps above, you will be minting NFTs from smart contracts using Etherscan in no time! If you are eager to get going, jump straight into the ”NFT Mint from Contract…” tutorial by clicking here!
With the non-fungible token (NFT) boom in 2021, you’ve most likely heard of these tokens before. NFTs are some of the blockchain industry’s most prominent features, and even with last year’s decline in trading volume, they remain an interesting prospect. That said, now might be a better time than ever to get into NFT development. If this sounds exciting, join us as we teach you how to mint and NFT from a contract using Etherscan!
In combination with teaching you to mint an NFT using a contract, the tutorial demonstrates how to validate the transaction using Moralis. In doing so, you will learn how the best Ethereum API works and experience the accessibility of Moralis firsthand.
Suppose you already know how to mint tokens and are looking for additional NFT-related content. If so, you can, for instance, learn how to get token metadata or get all NFT transfers here at Moralis.
Now, remember to sign up with Moralis immediately, as you need an account to follow long. Registering gives you access to the various Web3 APIs from Moralis, along with other prominent development tools. This enables you to seamlessly leverage the power of blockchain technology in all future development projects to build more efficiently!
Nevertheless, let us kickstart this tutorial on how to mint an NFT using a contract straightaway in the following section!
Mint NFT from Contract – How to Mint NFT Directly from Etherscan Contract
The following sections will illustrate how to mint an NFT from a contract on the Goerli testnet using Etherscan. Once you are done minting the NFT from Etherscan, we will also show you how to check if the transaction was successful using Moralis!

By the end of the article, you will have learned the ins and outs of minting an NFT from Etherscan on Goerli. From there, you can, with a few tweaks, follow the same steps to mint an NFT from a contract on any network, including the Ethereum mainnet.
If you would rather watch videos to educate yourself, check out the clip below from Moralis’ YouTube channel (the same one attached at the outset of this article). In this video, one of our engineers shows how to mint an NFT using a contract from start to finish:
Consider that you need a recap on NFTs, smart contracts, or Etherscan before moving forward. If so, you can find three sections below the tutorial explaining each in further detail. Otherwise, get stuck in as we jump straight into the prerequisites!
Step 1: Prerequisites
Before showing you how to mint an NFT from a contract, make sure you have the following ready:
- A Moralis Account – If you have not already, sign up with Moralis immediately.
- MetaMask – Visit MetaMask to create a wallet and download the browser extension.
- Goerli Tokens – Use Moralis’ testnet faucets page to acquire tokens for Goerli.
Step 2: Mint an NFT from a Contract Using Etherscan
To mint an NFT using Etherscan, you need a smart contract address. If you do not have one in mind and want to follow along, use the one we created especially for this tutorial:
Smart contract address: 0xf351614ff81C770CE245609cd3b3eD3dd6E72c2a
Next, visit “goerli.etherscan.io” and input the address into the search bar to navigate to the contract’s page:

From there, click on the ”Contract” tab, followed by ”Write Contract”:
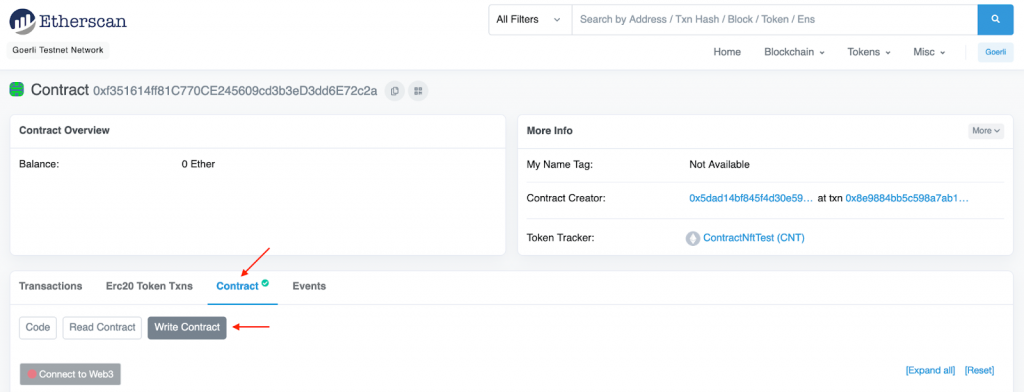
Next, connect your Web3 wallet by clicking on the ”Connect to Web3” button and selecting ”MetaMask”:

Once connected, you can interact directly with the contract’s functions through Etherscan. Since you are looking to mint an NFT from this contract, select the ”createToken” function and hit ”Write” (note that if you are using another contract, the function might have a different name):

Clicking on ”Write” will prompt your MetaMask wallet, enabling you to sign the NFT minting transaction:
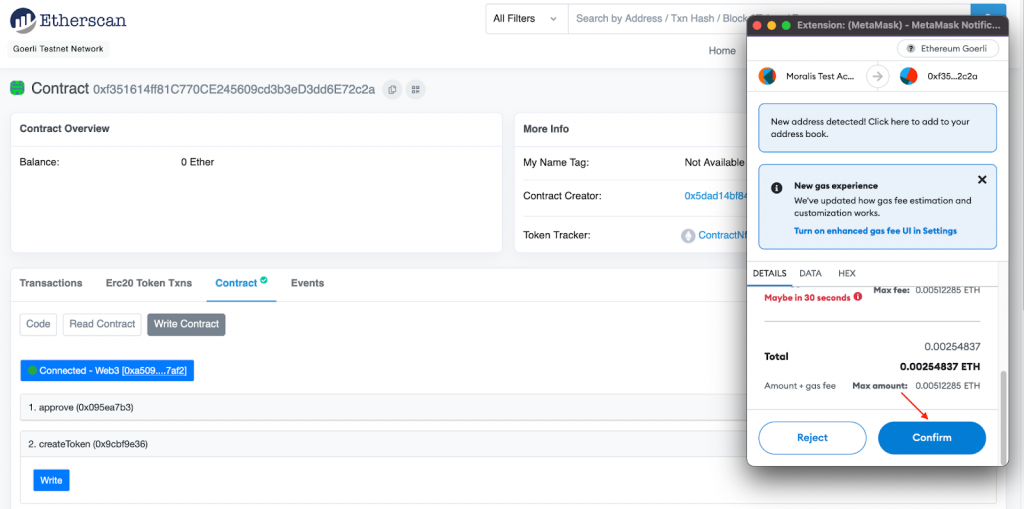
Congratulations! You just minted your first NFT using a contract on Etherscan! If everything worked correctly, you should now be able to view your transaction on the ”Transactions” tab:

Step 3: Confirm the Transaction Using Moralis
For the final step of this ”Mint an NFT From a Contract” tutorial, let us confirm the transaction using Moralis!
First, open your integrated development environment (IDE) and create a NodeJS project. You can then add two files to the project’s root folder: ”.env” and ”index.js”:

Proceed by opening ”.env” and creating a new ”MORALIS_KEY” environment variable, which needs to equal your Moralis API key. You can find your key by logging in to the Moralis admin panel and clicking on the ”Web3 APIs” tab:

Copy this value and input it into the code. Your ”.env” file should now have an environment variable looking similar to this:
MORALIS_KEY = “JnJn0M…”
Next, open ”index.js” and input the following contents:
const Moralis = require("moralis").default
const { EvmChain } = require('@moralisweb3/common-evm-utils')
require('dotenv').config()

Moralis.start({
    apiKey: process.env.MORALIS_KEY
}).then(async()=>{

const response = await Moralis.EvmApi.nft.getContractNFTs({
    address:"REPLACE_ME",
    chain:EvmChain.GOERLI
})

    consloe.log(response.raw.result)
})
From there, add the contract address to the ”address” parameter when calling Moralis’ ”getContractNFTs” endpoint by replacing ”REPLACE_ME”:
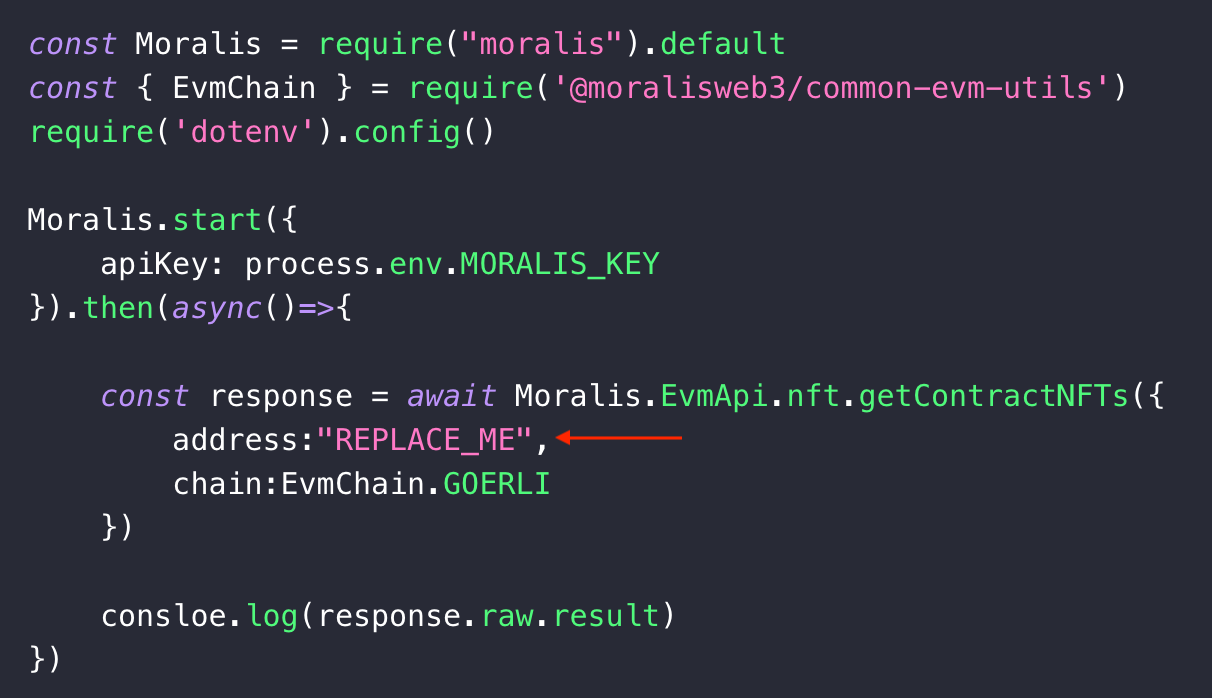
Next, launch a new terminal, ”cd” into the root folder of the project, and run the command below to install the required dependencies:
npm i moralis @moralisweb3/common-evm-utils dotenv
Lastly, run ”node index.js” in the terminal, which should produce a JSON response similar to this:

If the response in your terminal contains details regarding your transaction, you have successfully verified it using Moralis!
NFTs and Contracts – What They Entail
NFTs and smart contracts are two concepts frequently mentioned throughout this Etherscan NFT minting article. If you are new to Web3 programming, you might not be familiar with what they entail. For this reason, we will take the following two sections to explore them if further detail, starting with NFTs. So, what are NFTs?
NFTs
NFTs is an abbreviation for ”non-fungible tokens”. Now, to understand what they actually entail, an excellent starting point is to analyze the terminology. The term ”non-fungible” derives from conventional economics and describes items, goods, and other assets with unique properties. For example, paintings are non-fungible, as they generally are one-of-a-kind. Similarly, NFTs are one-of-a-kind, entirely unique crypto tokens!

To make the description above more understandable, let us also explore the concept of ”fungibility”. The term ”fungible” describes interchangeable assets that do not have unique properties. For example, in traditional economics, a common fungible asset is a currency. A one-dollar bill generally has the same properties and value as another, meaning it is possible to swap one for the other without monetary compensation.
In combination with NFTs, there are also fungible tokens within the crypto space, and a great example is Bitcoin. One Bitcoin token has the same value and properties as another, meaning they are interchangeable. The same cannot be said for NFTs (non-fungible tokens), as they are unique, and only a unique copy exists of each token.
The uniqueness of NFTs makes them ideal for representing other non-fungible assets, such as digital or physical art. However, note that NFTs generally do not ”hold” or ”contain” any other assets. Instead, these tokens point to something particular in the metadata, acting as proof of ownership. Furthermore, NFTs are minted using smart contracts that also assign ownership and reassign it whenever these tokens are transferred. As such, to understand NFTs further, let us also explore smart contracts in the next section.
Contracts
Smart contracts – or Web3 contracts – are programs stored on a blockchain. These contracts are designed to execute predefined actions dependent on predefined conditions. Often, these contracts are used for automating the execution of agreements between actors so that involved participants can be certain of particular outcomes.
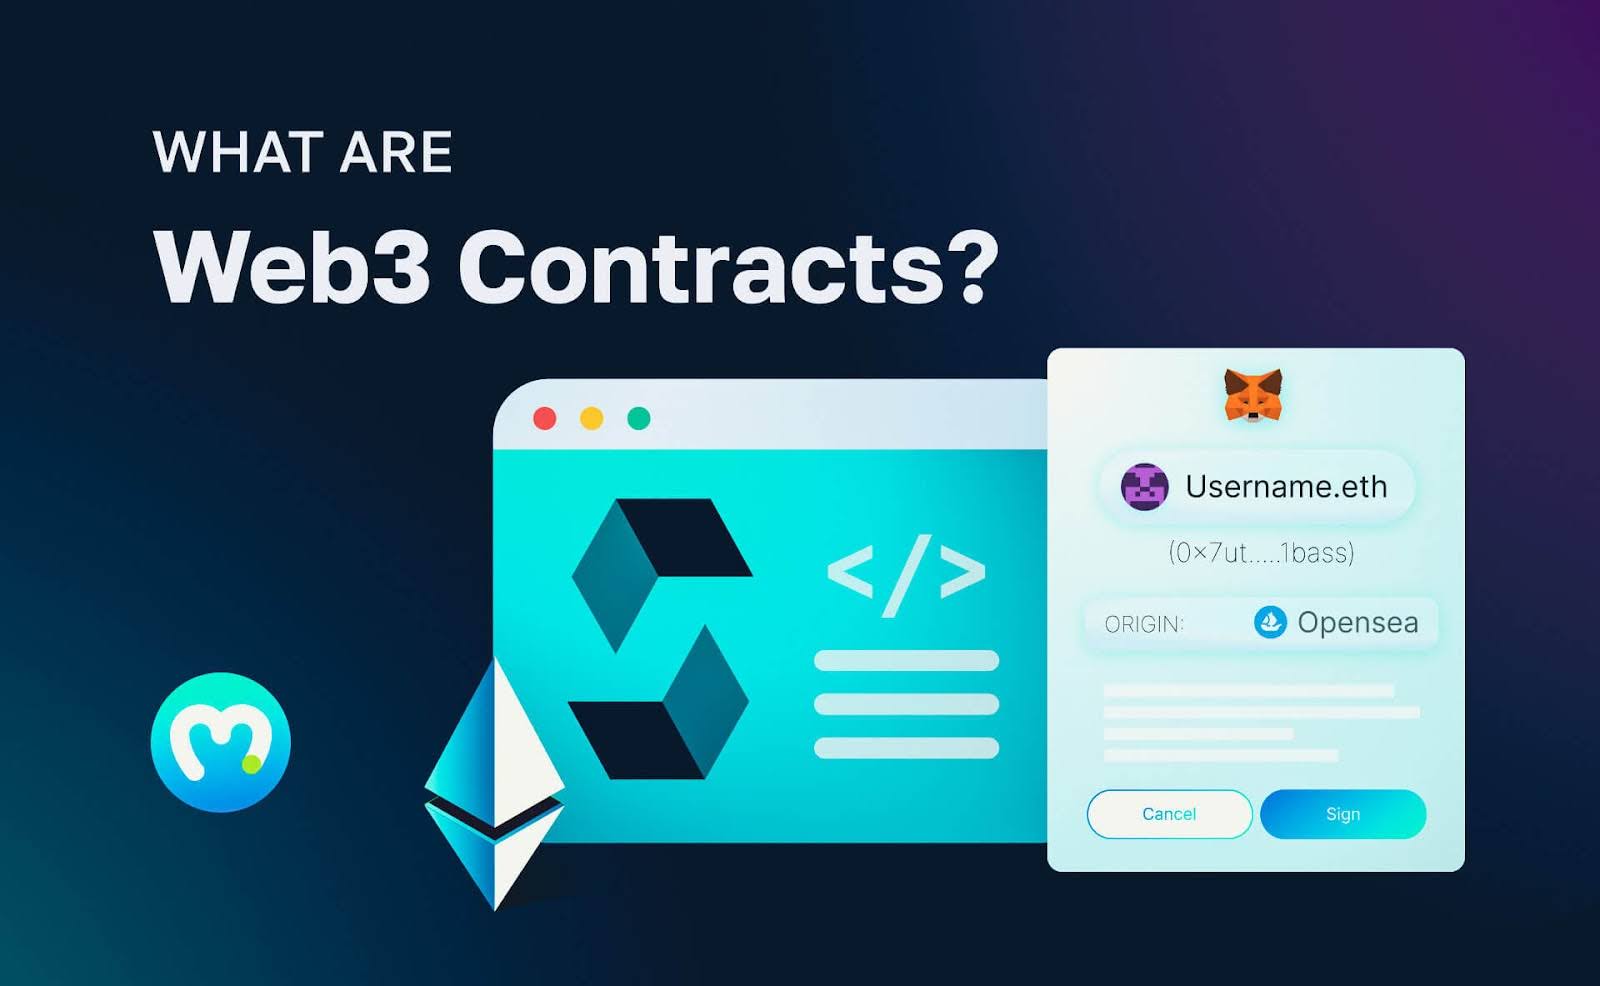
In the context of Ethereum, contracts consist of two parts:
- A collection of code (functions)
- Data (their state)
Smart contracts are a particular Ethereum account. But what does this mean? It means they have a balance and can be the target of on-chain transactions. However, unlike other accounts, they are not controlled by a user but run as programmed based on their code.
The most common smart contract standard for Ethereum NFTs is called ERC-721. This standard ensures that tokens from such a contract implement a minimum interface. This, for instance, includes that tokens are transferable, that it is possible to query token balances, etc.
If you have further interest in Web3 contracts, learn how to create them by checking out our guide on smart contract programming!
That briefly covers smart contracts, and the next section will look closer at Etherscan and how/why you can use this block explorer to mint an NFT from a smart contract!
NFT Mint from Contract – Minting NFT from Etherscan
In short, Etherscan is a block explorer and analytical platform for the Ethereum network. Block explorers feature intuitive user interfaces (UIs), providing easy access to on-chain data regarding assets, transactions, balances, gas fees, and much more!

Along with seamless access to the mainnet’s on-chain data, Etherscan also provides block explorers for the various Ethereum testnets, including Goerli and Sepolia. This means you can use Etherscan in all stages of your development journey.
As you know, this article is in relation to the Goerli testnet. If you want to explore the Sepolia testnet, check out our guide answering the question, ”what is the Sepolia testnet?”.
It is also possible to interact with smart contracts directly through Etherscan, providing an accessible way to call a contract’s function. This is how you can effortlessly mint an NFT from a contract with Etherscan in just a couple of minutes!
Why Use an NFT from Etherscan?
As you now know, you can mint an NFT from a contract using Etherscan. This is possible since Etherscan allows you to interact directly with smart contracts through the platform’s UI. Consequently, you can, for instance, call a contract’s mint function. But you might be asking yourself, ”why should I use Etherscan to mint a token?” and “why use an NFT from Etherscan?”. The answer to this question is accessibility!
The intuitive interface of Etherscan enables anyone to interact with smart contracts, even users without any prior Web3 programming background. You can also mint NFTs with only a few clicks!
Summary – How to Mint an NFT from Etherscan Using a Contract
In this article, we taught you how to mint from Etherscan using a contract. Along with the Etherscan NFT minting process, you also learned how to confirm the transaction using Moralis. In doing so, the article covered the following three steps:
- Prerequisites
- Mint an NFT from a Contract Using Etherscan
- Confirm the Transaction Using Moralis
By completing the steps above, you now know how to mint an NFT directly from a contract on Goerli. From here, you can now use the same principles for minting an NFT using Etherscan on any network, including the Ethereum mainnet!
If you found this tutorial helpful, consider checking out more content here at Moralis’ Web3 blog. For instance, learn how to use a Web3 JS call contract function, get transaction details by hash, or get contract logs. You can also improve your Web3 programming skills by enrolling in Moralis Academy. The academy offers great blockchain development content for new and more experienced developers. For example, check out the academy’s course on Ethereum fundamentals!
Lastly, remember to sign up with Moralis! You can register an account for free and leverage the power of blockchain technology in no time. In doing so, you will be able to build faster and more efficiently!
