With Moralis‘ industry-leading events API (a.k.a. EVM API), you can get any ETH contract logs in a matter of seconds! With this application programming interface, all you need is a single API call to the “getContractLogs” endpoint while passing a smart contract address as an argument:
const response = await Moralis.EvmApi.events.getContractLogs({
  address: query.address,
  chain: query.chain,
});
By familiarizing yourself with the Web3 development space and the events API, you can seamlessly get ETH event logs and integrate them into any of your future blockchain projects in no time. For more information about the ”getContractLogs” endpoint, check out Moralis’ official get logs by contract documentation page! Moreover, if you already have an active Moralis account, go ahead and jump straight into the documentation page to utilize the code snippet above. However, if you’re new to Moralis, sign up and follow our lead as we explore how to utilize the code snippet in this article!
Overview
When building conventional Web2 projects, applications and websites commonly use logs to capture and describe events occurring at certain moments. Developers can, in turn, use these logs to detect events, debug code, notify log viewers of occurrences, etc. Furthermore, logs play an equally important role within the Web3 development space when writing or interacting with smart contracts. If you’d like to explore logs and events further for Web3, this article will show you how to easily get contract logs using Moralis!
In combination with a tutorial on how to get contract logs, the article initially starts by exploring the intricacies of Ethereum logs. From there, we will dive into ETH get logs methods and discover where the event logs are stored before jumping into the tutorial!
Now, if you’d like to explore topics beyond contract logs, you should check out additional exciting content here at Moralis. For instance, check out our guide to ethers.js events or learn how to listen to smart contract events using ethers.js! Moreover, in order to follow along during the “Web3 get event logs tutorial” part of this article, make sure to sign up with Moralis. Creating an account is entirely free, and it only takes a couple of seconds, so you have nothing to lose!
What are Ethereum Contract Logs?
Before showing you how to get contract logs using Moralis, we need to initially cover what Ethereum contract logs are and how they can be helpful. As such, without further ado, let’s kickstart this tutorial by answering the question, ”what are Ethereum contract logs?”.
Ethereum smart contracts can generally emit events whenever they execute and perform certain on-chain actions. When this occurs, the contracts also create Ethereum contract logs, providing insight into particular events. As such, whenever transactions are mined, you can view event logs related to these transactions by querying the Ethereum blockchain.
Moreover, Ethereum event logs consist of two central components: topics and data. As such, let us quickly break down the two below, starting with topics:
- Topics – The initial part of Ethereum event logs is an array of topics, which are 32-byte ”words” describing the details of an event. Further, each log can have a maximum amount of four topics.
- Data – The other component of Ethereum event logs is additional data. A log’s topics and data work best together as these components have their own benefits and drawbacks. For example, the topics are searchable, but the data is not. However, including data in Ethereum event logs is much more economically friendly than topics.
Nevertheless, if you want a more comprehensive breakdown, check out our article exploring Ethereum logs in further detail!
What are ETH Get Logs, and Where are They Stored?
With a more profound understanding of Ethereum event logs, this section will explore ETH get logs methods and then take a closer look at where the logs are stored. As such, let us start by taking a closer look at ETH get logs methods in the following sub-section.
ETH Get Logs
So what are ETH get logs? ETH get logs are methods for querying event logs from the Ethereum blockchain. There are various Web3 get event logs methods supplied by a multitude of blockchain infrastructure companies and node providers. However, this article will focus on your best option, Moralis’ ”getContractLogs” endpoint!
The ”getContractLogs” endpoint is the best and most accessible ETH get logs method, enabling you to query Ethereum event logs through a single API call. All you need to do is supply a contract address and call this endpoint.
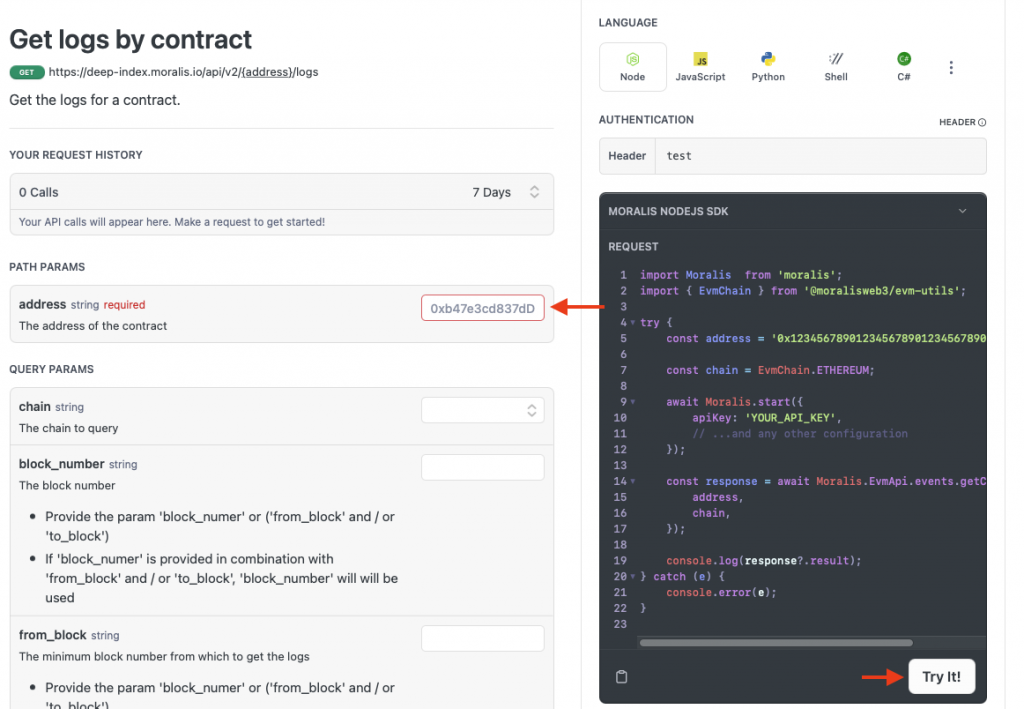
What’s more, you can try out this ETH get logs method by visiting Moralis’ official get logs by contract documentation page, and it will look something like this:

From there, to test this Web3 get event logs method, supply an address in the ”address” input field and hit the ”Try It!” button:
Nevertheless, now that you have familiarized yourself with Moralis’ ETH get logs method, let us briefly take a closer look at where Ethereum event logs are stored before showing you how to get contract logs in the main part of the tutorial!
Where are They Stored?
When Ethereum smart contracts emit events, logs are written and stored in a transaction receipt. All receipts contain transaction outcomes comprising two core elements: Ethereum event logs and status. As such, in combination with the event logs, transaction receipts also contain information such as log blooms, gas used for the transaction, etc.
In conclusion, transaction receipts store Ethereum event logs along with other transaction data. Nevertheless, now that you know where they are stored, let us dive into the central part of this Web3 get event logs tutorial and show you how to get contract logs with Moralis!
Web3 Get Event Logs Tutorial – How to Get Contract Logs with Moralis’ ETH Get Logs Method
Now that you know what Ethereum event logs are and what they can be used for, let us jump straight into a practical Web3 get event logs example. The following sections will show you how to create a NodeJS and NextJS application for querying the event logs of any Ethereum smart contract. More specifically, the information returned to the app’s user interface (UI) will contain data, such as a transaction time stamp, block number, contract address, and transaction hash.
To make this tutorial as straightforward as possible, we’ll use Moralis’ events API and the ”getContractLogs” endpoint. What’s more, thanks to the overall accessibility of Moralis, you will be able to create this application in three steps:
- Cloning and Setting Up the Project
- Code Breakdown: Backend
- Code Breakdown: Frontend
If you prefer watching videos to learn, check out the clip below from the Moralis YouTube channel. In this video, one of our software engineers walks you through the aforementioned steps, providing an even more in-depth breakdown of the code:
Nevertheless, before jumping into the first step of this get contract logs tutorial, let us take a closer look at the end product with a quick application demo!
Get Contract Logs: Application Demo – What are You Working Toward?
To begin with, let us briefly take a closer look at the end result. Doing so gives you a more profound understanding of what you are working toward. Nevertheless, you can find a print screen of the app’s landing page down below:

As the image illustrates, the UI consists of four core elements: a heading, two input fields, and a ”Submit” button. To use the application, you need to supply an Ethereum smart contract address, select a chain using the ”Select Chain” drop-down menu, and hit the button. Once you click on the button, the application calls the ”getContractLogs” Moralis endpoint to fetch and display the contract’s event logs:
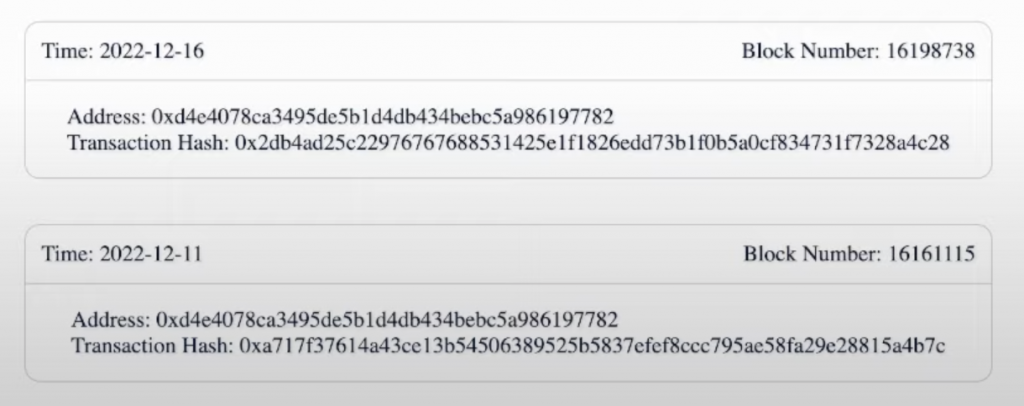
As you can see from the responses above, the app displays each event’s timestamp, block number, contract address, and transaction hash.
If this sounds exciting and you want to learn how to create this application, read on as we will cover the process from start to finish. Without further ado, let us jump into the first step, where we will show you how to clone and set up the project!
Step 1: Web3 Get Event Logs – Cloning and Setting Up the Project
Since this is a tutorial made primarily to show you how to get the Ethereum event logs of a contract, we will use an already prepared application template, allowing us to do precisely that. As such, we can skip redundancies associated with creating the app and focus on the core functionality of querying Ethereum event logs.
To begin with, launch your IDE. Then, create a NodeJS project folder and clone the application to your local directory. You can find the GitHub repository for the complete project down below:
Complete Get Contract Logs App Documentation – https://github.com/MoralisWeb3/youtube-tutorials/tree/main/get-contract-logs
From there, launch a new terminal and install the required dependencies by running the following command:
npm i moralis @moralisweb3/common-evm-utils dotenv express
With the dependencies installed, you must add your Moralis API key to the ”backend” folder. To do so, start by creating a ”.env” file in the ”backend” root folder and create the following environment variable:
MORALIS_API_KEY = “replace_me”
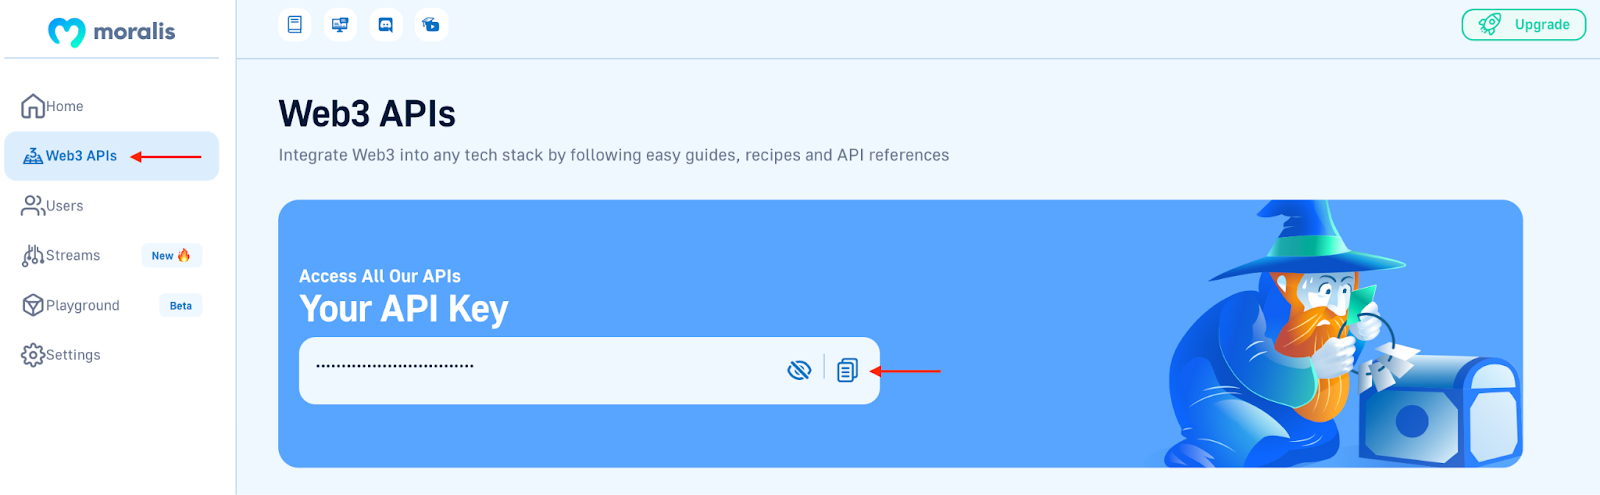
However, as you might have figured, you must replace ”replace_me” with your actual key. Now, in order to get a key, you need a Moralis account. So, if you do not have an account already, sign up with Moralis right away and log in. From there, you will find your key under the ”Web3 APIs” tab:
Once you have added your key to the code, you have completed the setup and the tutorial’s initial step. As a result, you should now be able to launch the application. However, to provide insight into the application’s inner workings, the following two steps will break down the essential parts of the code, starting with the backend!
Step 2: Web3 Get Event Logs – Code breakdown: Backend
This section will break down the code for the ”index.js” file, as this is where we find most of the backend logic. To begin with, on the initial lines of ”index.js”, we require the necessary dependencies:
const express = require("express");
const app = express();
const port = 5001;
const Moralis = require("moralis").default;
const cors = require("cors");

require("dotenv").config({ path: ".env" });

app.use(cors());
app.use(express.json());
From there, we create a new ”MORALIS_API_KEY” variable by importing the key you just recently added to the ”.env” file:
const MORALIS_API_KEY = process.env.MORALIS_API_KEY;
Next, we add the ”/getlogs” endpoint, where we find the logic for querying the Ethereum event logs. As you can see in the snippet below, we call the ”getContractLogs” endpoint by passing the address and chain from the frontend as arguments:
app.get("/getlogs", async (req, res) => {
  try {
    const { query } = req;

    const response = await Moralis.EvmApi.events.getContractLogs({
      address: query.address,
      chain: query.chain,
    });

    return res.status(200).json(response);
  } catch (e) {
    console.log(`Something went wrong ${e}`);
    return res.status(400).json();
  }
});
This clearly illustrates the power of Moralis! All you need is a single API call to get the Ethereum event logs of any smart contract!
Lastly, to top things off, we initialize Moralis using the API key by running the ”Moralis.start()” function:
Moralis.start({
  apiKey: MORALIS_API_KEY,
}).then(() => {
  app.listen(port, () => {
    console.log(`Listening for API Calls`);
  });
});
That covers the backend logic. Let us dive into the frontend code to see how it all ties together!
Step 3: Web3 Get Event Logs – Code breakdown: Frontend
You will be able to find all of the frontend logic in the ”main.js” file of the ”frontend” folder. In this case, we will mainly focus on ”handleSubmit()” since this is where we find the frontend functionality for getting the Ethereum event logs. Before launching the app, make sure to install “axios” in the “frontend” root folder. To do so, use this terminal input: “npm i axios”. All in all, the function looks like this:
const handleSubmit = async () => {
  address = document.querySelector("#inputField").value;
  const chain = chainValue.value;

  const response = await axios.get(`http://localhost:5001/getlogs`, {
    params: { address, chain },
  });

  console.log(response.data);
  setResult(response.data.result);
  setShowResult(true);
  document.querySelector("#inputField").value = "";
  setChainValue("");
};
The function above is called whenever someone clicks on the ”Submit” button on the app’s UI. Once called, the function extracts the values from the two input fields, saving them in the ”address” and ”chain” variables.
From there, the function makes an “axios” request to the ”/getlogs” endpoint of your backend server, passing the ”address” and ”chain” variables as arguments. As you remember from the backend code, this endpoint, in turn, calls the ”getContractLogs” Moralis endpoint, returning the Ethereum event logs, which are finally stored in the ”response” object.
That covers the ”handleSubmit()” function! The remainder of the code handles the required imports, renders the UI elements, maps the results using the data from the ”response” object, etc.
Moreover, note that the information on the UI is only a selection of the data provided by the ”getContractLogs” endpoint. For more details, check out the get logs by contract documentation page.
That covers this get contract logs tutorial and the practical example. If you have followed along this far, you can now apply the same fundamental principles in future development endeavors to get contract logs and use the data directly in your Web3 projects!
Summary – How to Get Contract Logs with Moralis’ ETH Get Logs Method
This article taught you how to get contract logs using Moralis’ events API and the ”getContractLogs” endpoint. More specifically, we showed you how to create an application from which you could continuously get the logs of any smart contracts by supplying its address. Thanks to the accessibility of Moralis, you were able to create the app in only three steps:
- Cloning and Setting Up the Project
- Code Breakdown: Backend
- Code Breakdown: Frontend
If you have joined us until this point, you now know how to get contract logs using Moralis. From here, you can apply your new skills to any future blockchain projects to implement similar functionality!
If you found this Web3 programming tutorial instructive, consider checking out more guides here on the Moralis Web3 blog. For instance, check out our article answering the question, ”what is danksharding?”, learn how to build an ethers.js dapp, or discover how to use a Web3 JS call contract function!
Moreover, if you are serious about becoming a Web3 developer, sign up with Moralis now. With Moralis’ Web3 APIs, you can fully leverage the power of blockchain technology to build dapps more seamlessly!
