A vital part of blockchain development revolves around interacting with and listening to decentralized networks. One of the most efficient ways to do so is through blockchain listeners that receive alerts regarding smart contract events in real time. But how do you set up blockchain listeners? One alternative is ethers.js, which is a prominent JavaScript library making it more accessible to interact with the Ethereum network. If you want to learn more about how this library works, join us in this tutorial as we illustrate how to listen to smart contract events using ethers.js!
In combination with showing you how to listen to smart contract events using ethers.js, the article initially covers the intricacies of both smart contract events and this library. However, if you are already familiar with these concepts, feel free to skip straight into the ”Listen to Smart Contract Events Using Ethers.js” section. From there, we examine the differences between working with ethers.js and the Moralis Web3 Streams API to set up blockchain listeners. Furthermore, the Streams API is one of several Web3 APIs featured by Moralis that can aid your development endeavors. Moreover, if you want to become a blockchain developer, we recommend taking a closer look at other Moralis Web3 development tools. For instance, check out the NFT API allowing you to, for example, get all transfers of an NFT with a few lines of code!
Nevertheless, it does not matter if you want to set up streams or have a general interest in Web3 development; sign up with Moralis now to fully leverage the power of the blockchain industry!
Smart Contract Events and Ethers.js
Before showing you how to listen to smart contract events using ethers.js, we will dedicate the following two sections to exploring the intricacies of smart contract events and ethers.js. As such, if you already know what they entail, feel free to skip right into the ”Listen to Smart Contract Events Using Ethers.js” section. Otherwise, join us as we start by answering the question, ”what are smart contract events?”.
What are Smart Contract Events?
All Web3 contracts emit so-called ”smart contract events” when something relevant happens within them based on their code. In short, these events are a type of signal emitted by smart contracts to notify developers and software systems that something meaningful has happened. Moreover, applications and other platforms use these signals to communicate.

Let us use the ERC-20 token standard as an example to clarify this further. All smart contracts implementing this standard automatically emit a ”transfer” event whenever someone trades a token. Moreover, in addition to a notification, these events generally contain more details regarding the transactions.
As you might have already concluded, it is essential to be able to listen to events like these in real time when building Web3 projects. With that said, you require a seamless workflow for setting up blockchain listeners that can alert you and your projects whenever something relevant occurs on-chain, and this is where ethers.js enters the equation!
Exploring Ethers.js
Ethers.js is a blockchain JavaScript (JS) library launched in 2016. It is one of the most popular open-source Ethereum JS libraries to date, featuring millions and millions of downloads. Like conventional programming libraries, ethers.js is a collection of prewritten snippets of code that developers can use and reuse to perform common functions. However, compared to traditional libraries, ethers.js is Web3-based. As such, developers use this library to communicate and interact with the Ethereum network more seamlessly.
Ethers.js features four core modules: ”ethers.contract“, “ethers.utils“, “ethers.wallets“, and “ethers.provider“. These four modules are at the very center of the library’s application programming interface (API). However, for more detailed information about them and the library in general, check out our article answering the question, ”what is ethers.js?”.
Now, with this brief overview of the intricacies of ethers.js, let us explore some of the library’s most prominent benefits in the following sub-section!
Benefits of Ethers.js
In order to better understand the utility of ethers.js and why you might want to use the library, let us explore some of its most prominent benefits:
- Security – When working with ethers.js, you can keep private keys safe and secure.
- Size – Ethers.js is a small library, solely 88 KB compressed and 284 KB uncompressed.
- MIT Licence – Ethers.js is completely open-source, including all dependencies.
- ENS – The library features Ethereum Name Service (ENS) support. As such, ENS names are handled as first-class citizens.
- Test Cases – Ethers.js provides a significant collection of test cases actively maintained and updated.
The bullet points above are only five examples; there is much more for you to discover! Nevertheless, with a more profound understanding of ethers.js, the library’s benefits, and smart contract events, we’ll take a look at the central part of this tutorial, how to listen to smart contract events using ethers.js!
Listen to Smart Contract Events Using Ethers.js
In this section, we’ll show you how to listen to smart contract events using ethers.js. More specifically, we will quickly show you how to set up a blockchain listener for monitoring transfer events of the USD coin (USDC) smart contract. However, before dividing deeper into the central script, you need to deal with a few prerequisites!
First of all, you need to set up a new NodeJS project and create two files: ”abi.json” and ”.env”. To the ”abi.json” file, add the USDC smart contract application binary interface (ABI). From there, you need to add the key of a valid node provider to the ”.env” file. In this instance, we will show you how to listen to smart contract events using ethers.js and Alchemy. So, add a new environment variable called ”ALCHEMY_KEY” to the file and include your key.
Since the core focus of this article is on how to listen to smart contract events using ethers.js, we will not dive into any more detail on setting up the ”abi.json” and ”.env” files but rather direct our attention toward the script itself. However, before doing so, you must install a couple of dependencies. To do so, open a new terminal and run the command below:
npm i ethers dotenv
The “index.js” File
When you are done setting up the ”abi.json” and ”.env” files, the next step is to create an ”index.js” file, to which we will add the code for the blockchain listener. As such, with a new file at your disposal, the first thing you want to add is the following snippet at the top of ”index.js”:
const ethers = require("ethers");
const ABI = require("./abi.json");
require("dotenv").config();
The code above specifies that ”index.js” uses ethers.js, imports the contract ABI, and provides access to the key from the ”.env” file. From there, you are going to want to create a new asynchronous function called ”getTransfers()”:
async function getTransfer(){
    const usdcAddress = "0xA0b86991c6218b36c1d19D4a2e9Eb0cE3606eB48"; ///USDC Contract
    const provider = new ethers.providers.WebSocketProvider(
        `wss://eth-mainnet.g.alchemy.com/v2/${process.env.ALCHEMY_KEY}`
    );

    const contract = new ethers.Contract(usdcAddress, ABI, provider);

    contract.on("Transfer", (from, to, value, event)=>{

        let transferEvent ={
            from: from,
            to: to,
            value: value,
            eventData: event,
        }

        console.log(JSON.stringify(transferEvent, null, 4))

    })
}
The function above is relatively straightforward; however, let us break it down from top to bottom. To begin with, the initial two lines within the function’s curly brackets create two variables: ”usdcAddress” and ”provider”.
To the former, specify the contract address that you wish to monitor. For the latter, add the node provider using one of ethers.js’ modules and the key from the ”.env” file.
From there, you create a new ”contract” object by passing the ”usdcAddress”, ”ABI”, and ”provider” variables as arguments when calling the ”ethers.Contract()” function. You then use the ”contract” object to set the listener, specifying that it is transfer events that you are interested in.
Lastly, you make sure that the results are returned to the console. All in all, your ”index.js” file should now look like this:
const ethers = require("ethers");
const ABI = require("./abi.json");
require("dotenv").config();

async function getTransfer(){
    const usdcAddress = "0xA0b86991c6218b36c1d19D4a2e9Eb0cE3606eB48"; ///USDC Contract
    const provider = new ethers.providers.WebSocketProvider(
        `wss://eth-mainnet.g.alchemy.com/v2/${process.env.ALCHEMY_KEY}`
    );

    const contract = new ethers.Contract(usdcAddress, ABI, provider);

    contract.on("Transfer", (from, to, value, event)=>{

        let transferEvent ={
            from: from,
            to: to,
            value: value,
            eventData: event,
        }

        console.log(JSON.stringify(transferEvent, null, 4))

    })
}

getTransfer()
Running the Script
Now that you have completed the entire script used to listen to smart contract events using ethers.js, the last thing remaining is running the code. As such, open a new terminal, input the command below, and hit enter:
node index.js
Running this command will return new transactions associated with the USDC smart contract. To give you an idea of what it can look like, you will find a print screen of an example down below:
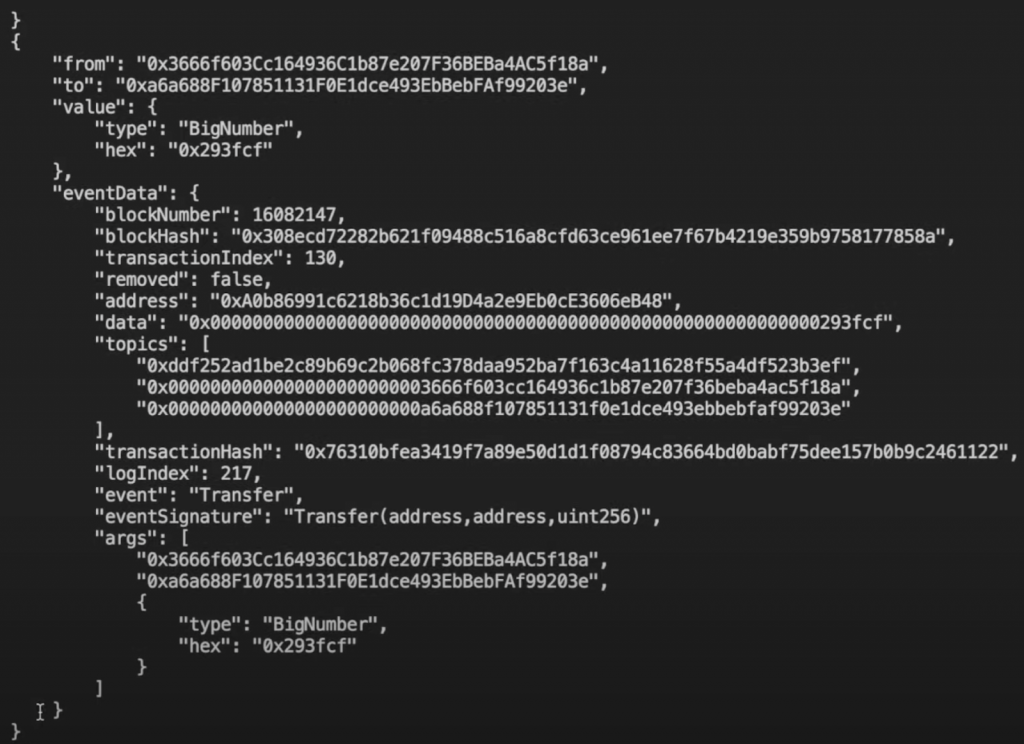
As you can see, the ”getTransfers()” function returns a bunch of information, such as the “to” and “from” addresses, event data like the block number, block hash, transaction index, and much more.
That’s it! You now know how to listen to smart contract events using ethers.js! Now, while ethers.js is an excellent development tool, there is an alternative many developers have found to be much more beneficial. Thus, in the next section, we will present an ethers.js alternative!
An Ethers.js Alternative
Even though ethers.js is a great library and tool for setting up blockchain listeners, it is always worth looking over other prominent alternatives, and an amazing example is Moralis’ Streams API! With this application programming interface, you can easily stream on-chain data into the backend of your blockchain projects using Moralis webhooks!
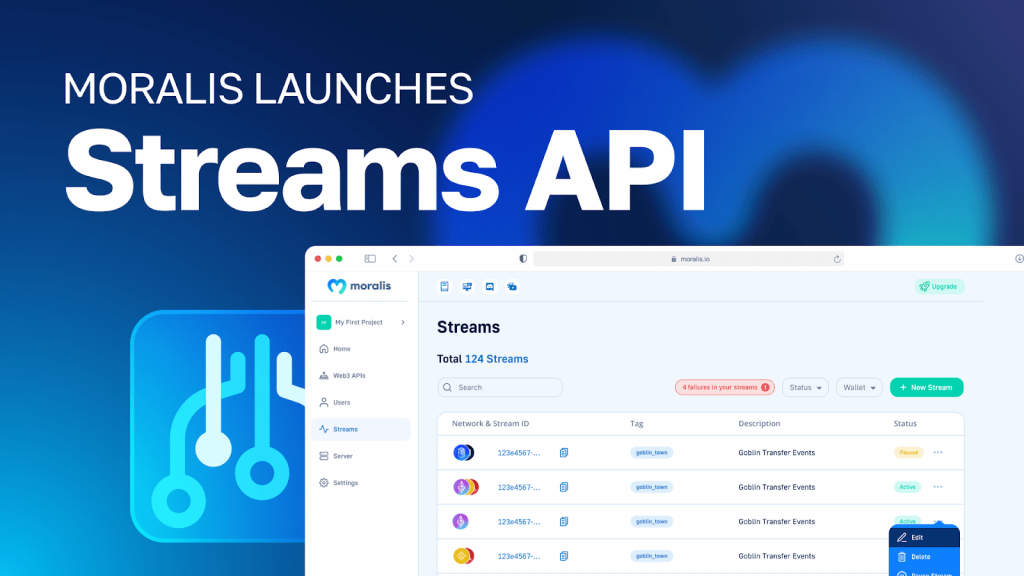
What’s more, with the accessibility of Moralis, you can set up streams or blockchain listeners in only five simple steps:
- Supply an address
- Apply filters to specify when you want to receive webhooks
- Select the chain(s) you are interested in monitoring
- Add a webhook URL
- Receive webhooks
It does not have to be more complicated than that! Nevertheless, let us also closely examine some of the main advantages of using Moralis’ Web3 Streams API!
Advantages of Moralis’ Streams API
Moralis’ Streams API features many prominent advantages, and you can find five examples down below:
- 100% Reliability – When working with Moralis’ Streams API, you do not need to bother with unreliable node providers. Instead, by using Moralis, you get 100% reliability.
- Multiple Contracts – With Moralis’ Streams API, you can create one blockchain listener for multiple different smart contract addresses.
- Filters – Moralis’ Streams API is flexible, allowing you to set up streams to receive Web3 webhooks only when certain conditions are met.
- No Unnecessary Abstractions – Moralis eliminates redundant processes such as building abstractions.
- Save Time – You do not have to waste time building complicated data pipelines, which allows you to save time when it comes to listening to blockchain networks.

That covers some examples of the advantages that come from working with Moralis. With a more profound understanding of smart contract events, ethers.js, and Moralis, it is time to jump into an action-packed section. As we do so, we get to sit ringside and watch ethers.js vs Moralis Streams!
Ethers.js vs Moralis Streams When Listening to Smart Contract Events
The option to listen to smart contract events using ethers.js is a good start. However, as you learned in the ”Advantages of Moralis’ Streams API” section, Moralis’ Streams API provides numerous benefits. So, how do ethers.js and Moralis Streams compare? Let’s have a closer look at the following image:
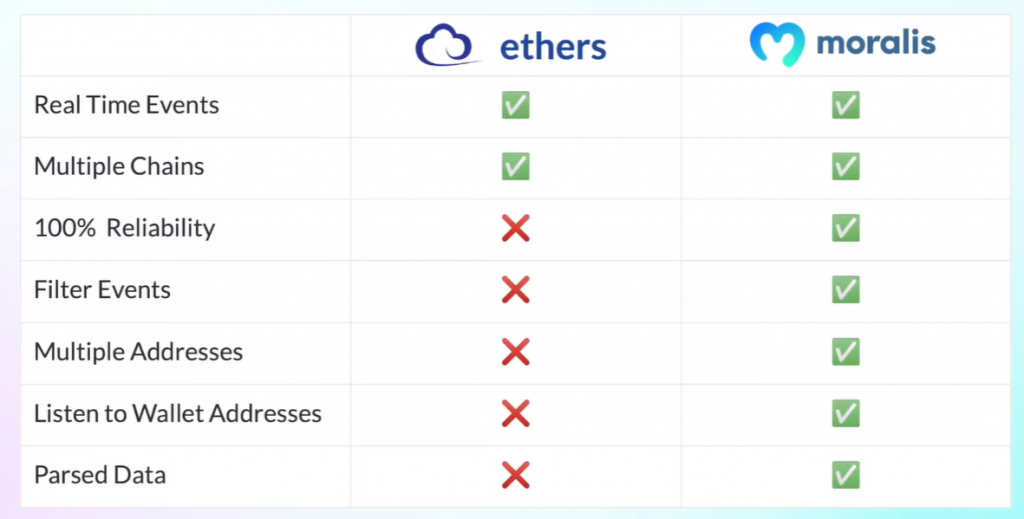
In the table above, you can see a brief summary of the similarities and differences between them. With a quick glance, you immediately notice that Moralis provides everything that ethers.js has to offer and more. This includes 100% reliability, the option to filter events, use multiple addresses, get parsed data, etc. Consequently, you might want to consider Moralis as an alternative for listening to smart contract events.
However, you do not have to take our word for it! In the following sub-section, we will quickly show you how to set up the same blockchain listener. But instead of utilizing ethers.js, we’ll now use Moralis. Doing so highlights the advantages of working with Moralis compared to ethers.js!
Listen to Smart Contact Events with Moralis
You can find the entire code for setting up the blockchain listener with Moralis down below:
const Moralis = require("moralis").default;
const Chains = require("@moralisweb3/common-evm-utils");
const EvmChain = Chains.EvmChain;
const ABI = require("./abi.json");
require("dotenv").config();

const options = {
  chains: [EvmChain.ETHEREUM],
  description: "USDC Transfers 100k",
  tag: "usdcTransfers100k",
  includeContractLogs: true,
  abi: ABI,
  topic0: ["Transfer(address,address,uint256)"],
  webhookUrl: "https://22be-2001-2003-f58b-b400-f167-f427-d7a8-f84e.ngrok.io/webhook",
  advancedOptions: [
    {
        topic0: "Transfer(address,address,uint256)",
        filter: {
            gt : ["value", "100000"+"".padEnd(6,"0")]
        }
    }
]

};

Moralis.start({
  apiKey: process.env.MORALIS_KEY ,
}).then(async () => {
  const stream = await Moralis.Streams.add(options);
  const { id } = stream.toJSON();

  await Moralis.Streams.addAddress({
      id: id,
      address: ["0xA0b86991c6218b36c1d19D4a2e9Eb0cE3606eB48"]
  })
});
To briefly summarize, in the code above, we create an ”options” object with a few parameters. Moreover, it is passed as an argument when calling the ”Moralis.Streams.add()” function. So, what are the main differences between the two options?

A significant difference between ethers.js and the Moralis Streams options is the ”Moralis.Streams.AddAddress()” function. As you can see from the code above, we pass an ”address” array as a parameter. In this example, we only include the USDC contract address. However, you can include as many addresses as you would like. Consequently, you can use the same blockchain listener for multiple contracts with Moralis. This is, unfortunately, not possible when working with ethers.js, as it would require you to set up new listeners for different addresses. Another prominent example is that you can add the ”advancedOptions” parameter in the ”options” object to create filters!
Lastly, let us take a look at the response from running the streams-based script (before executing the code, install the required Moralis dependencies, in addition to “ethers” and “dotenv” installed before, by running ”npm i moralis @moralisweb3/common-evm-utils” in a new terminal):

In the image above, we have included one of the responses sent to our webhooks server. This is one of many transactions that are part of a more extensive array. Nevertheless, as the screenshot indicates, the stream’s response contains parsed data, including a transaction hash, contract address, log index, etc.
Would you like a more detailed breakdown of the differences between the two options we’ve compared? If so, check out our article on ethers.js vs Web3 streams. What’s more, you can also learn more about creating streams through the following video from the Moralis YouTube channel:
Listen to Smart Contract Events Using Ethers.js – Summary
In this article, we taught you how to listen to the blockchain with ether.js. In doing so, you discovered and learned how to create a blockchain listener for monitoring transfer events. Furthermore, we did so with the ones associated with the USDC contract. You can now apply the same principles to any other contracts to receive real-time alerts for future projects!
Moreover, if you found this article helpful, check out more Moralis content on the Web3 blog. For instance, learn the difference between Web3.js vs ethers.js, or check out our tutorial that further examines an ethers.js example.
What’s more, if you are serious about getting into blockchain development, sign up with Moralis right away! You can create an account for free; it only takes a few seconds, so you have nothing to lose!
