Web3 developers can now get all transfers for non-fungible tokens (NFTs) in a quick and easy manner, thanks to Moralis. In fact, with the following code snippet, developers can get all NFT transfers for any wallet:
result = evm_api.nft.get_wallet_nft_transfers(
    api_key=api_key,
    params=params,
)
If you know Python and have used Moralis before, you know exactly how to implement the above code to get all NFT transfers. As such, you can roll up your sleeves and start building dapps (decentralized applications) with the transfer functionality right away. However, if this is your first encounter with Moralis, stick around and learn how to build a neat dapp that gets all NFT transfers, which is a hugely beneficial feature any dapp should utilize. That said, create your free Moralis account and follow our lead as we go through the sections below.
Overview
If you walked around a random city asking people what NFTs are, about 95% or more wouldn’t have a clue what these tokens are. Even those who have heard of non-fungible tokens mainly associate them with meaningless JPEGs. This should tell you that we are still in the early stages of Web3 and that countless use cases of these unique crypto assets have not yet been discovered.
That said, now is the best time to learn how to build NFT-related dapps (decentralized applications) and try to take NFTs to the next level. Although creating “the next big thing” in Web3 is a great goal, mastering the basics is a great place to start. That’s what we’ll focus on herein.
Aside from learning how to get all NFT transfers, you should also learn how to get NFT collection data, get all NFTs from a contract, or even learn how to work with metadata for NFT storage. These lessons can be found on our blog, and they will help you understand how to fetch on-chain data without breaking a sweat. While most of the aforementioned tutorials focus on using NodeJS, today’s article will utilize Python/Django. However, before we move on and take on this article’s “get all NFT transfers” tutorial, we need to cover some basics. Thus, let’s first ensure you know the ins and outs of NFT transfers.
Exploring the Ins and Outs of NFT Transfers
As pointed out previously, NFTs are unique crypto assets. Unlike fungible tokens, each non-fungible token has a unique identifier – immutable on-chain encryption. Further, each identifier is assigned to a blockchain address. So, if we focus on NFTs on Ethereum, there’s a particular Ethereum address (public key) assigned to every NFT. Essentially, these addresses are the owners. Moreover, the ownership is automatically transferred when NFTs are transferred. As such, when you get all NFT transfers, you also discover who the senders and the recipients are.

NFT transfers require the same tools as fungible token transfers – Web3 wallets. The wallet you need depends on the blockchain you want to use when transferring your NFTs. For example, for Ethereum NFTs and tokens on other EVM-compatible chains, MetaMask does the trick. That said, you must make sure to add the network (if it’s a different chain than Ethereum) to your MetaMask. In addition, as a sender, you also need to have a sufficient amount of native cryptocurrency (ETH for Ethereum, BNB for BNB Chain, MATIC for Polygon, etc.) to cover transaction fees.
One noteworthy aspect to consider is that wallets usually don’t support direct NFT transfers. Also, in many cases, you can’t even see your NFT directly in a wallet. Consequently, in many cases, you must use NFT marketplaces. The latter typically displays NFT-representing files and NFT metadata neatly. However, it’s important to keep in mind that whether you transfer NFTs using marketplaces or your wallets directly (if supported), the transaction itself takes the same route. Moreover, in some cases, the only difference is that certain NFT marketplaces may charge additional fees for NFT transfers.
How Do Non-Fungible Token Transfers Work?
Now, let’s dig a little deeper and explore how NFT transfers work from a regular user standpoint and a development perspective. Above, you learned that while the user experience can vary slightly depending on the exact tools/platforms involved in an NFT transfer, the principles are the same. So, whether you are using a Web3 wallet that supports NFTs or an NFT marketplace (centralized or decentralized), there are always the same core components involved in the transfer. These are the sender’s and recipient’s key addresses. Based on these details, the smart contract – which was used to mint (store it on-chain) the respective NFT – ensures that the transfer executes correctly. It does so through the unique NFT ID and metadata that no other token can replicate.
Also, note that smart contracts are the on-chain programs that make NFTs possible. Developers or NFT creators deploy those on-chain pieces of software when they mint NFTs. Then, these smart contracts assign ownership and manage the transferability of the NFTs. Moreover, smart contracts conform to different standards, such as ERC-721 and ERC-1155. So, the information related to every NFT transfer is properly added to the blockchain.
Now that you know the basics of NFT transfers, you are ready to focus on today’s tutorial, which will show you how to get all NFT transfers effortlessly.
How to Get All NFT Transfers for Any Wallet
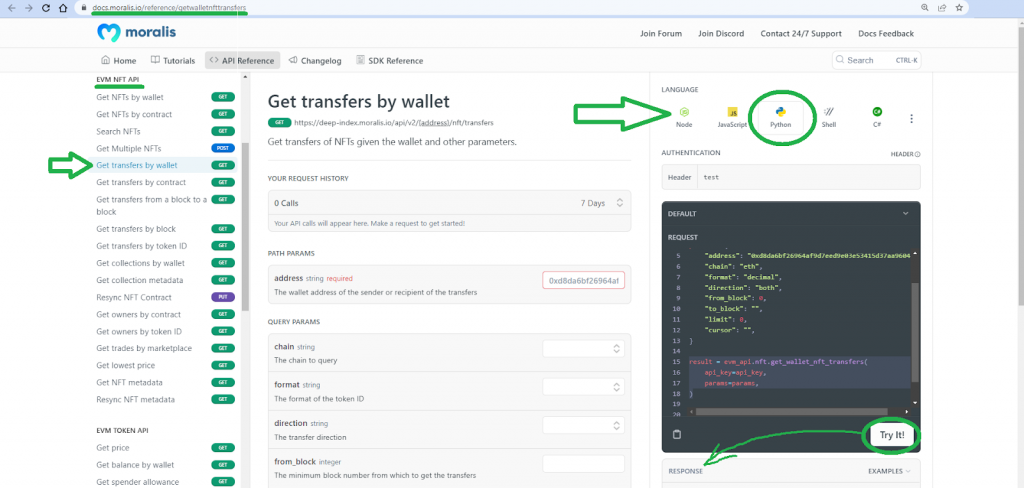
As the above screenshot indicates, the “get transfers by wallet” endpoint using the EVM API is the go-to tool when you want to get all NFT transfers for any wallet. In the above image, you can also see that we choose Python as the programming language. That’s because we will use Django for the backend portion of today’s tutorial. However, as the above image indicates, you can utilize many other languages/frameworks for this endpoint.
Furthermore, the “get transfers by wallet” endpoint takes in many parameters. However, the wallet address of the sender or recipient of the transfers is the only required parameter. Nonetheless, we encourage you to visit the above endpoint’s documentation page yourself to explore the details of this incredible tool. That said, before we take on the central part of this tutorial, let’s show you the results by doing a quick demo of our example dapp (decentralized application) we’re about to build.
Get All NFT Transfers with Our Example Dapp – Demo
Using React, we created the following frontend, which is relatively simple and clean:
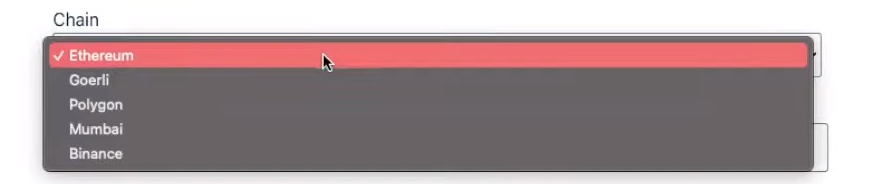
Looking at the above screenshot, you can see that we are running our example NFT dapp on a local host. In addition, you can see that our dapp has two entry fields – one to enter a wallet address and the other to set the limit of the transfers we want to display. Between the two entry fields, you can also see a chain-selection bar. The latter is, by default, set to “Ethereum”. However, since Moralis is cross-chain interoperable, our dapp easily supports other EVM-compatible chains. Among all supported EVM chains, we included the following ones:
Now, let’s see how to dapp works. With a wallet address (we’ve already picked one out), chain selected, and limit set, we can hit the “Get Transfers” button. As a response, our example dapp displays the last ten transfers below the top panel:
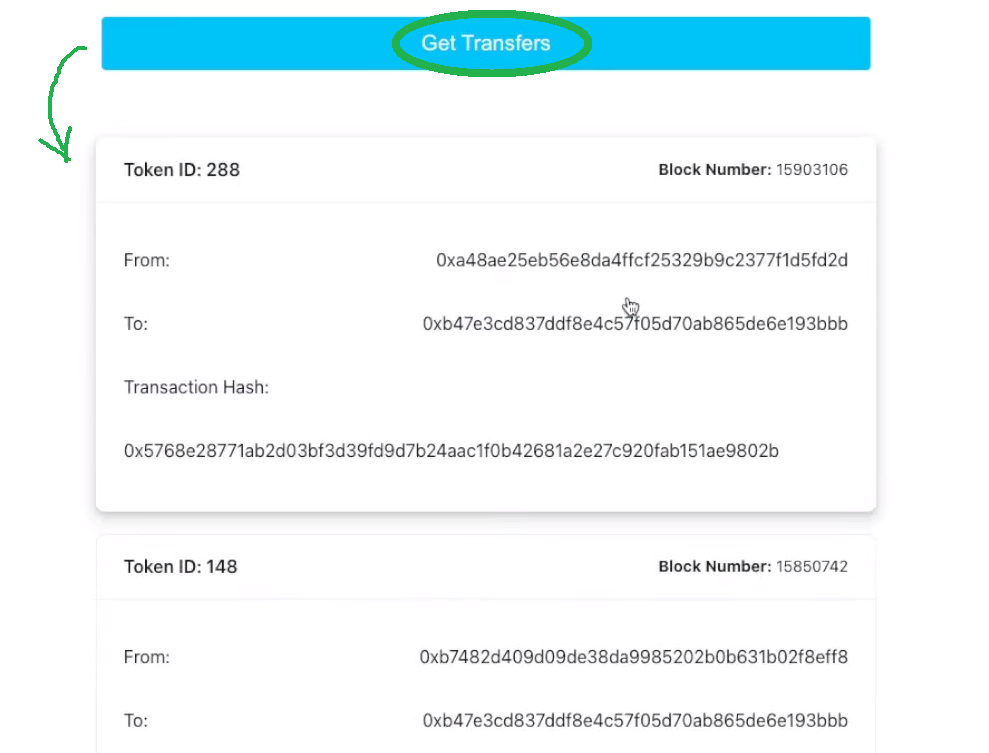
Furthermore, in the above screenshot, you can view two of the displayed transfers. You can also see all the transfer details that our dapp returns. These details include a token ID, block number, “from” address (sender), “to” address (receiver), and transaction hash.
Note: You can see the above demo more closely in the video below, starting at 0:19.
Nonetheless, if you’d like to build your own instance of our example dapp, make sure to follow the instructions in the following section.
Build Your Instance of Our Example Dapp
You can access the complete code on GitHub for this project. Furthermore, you will find the “frontend” and “backend” folders on GitHub that contain all the scripts associated with our example dapp.
When it comes to the above-presented dapp’s backend, we focused on using Django. If you want to use this Python framework, make sure to complete the following steps:
- Install Django and the “rest” framework using the following two command lines in their respective order:
pip install django
pip install djangorestframework django-cors-headers
- You also need to install Moralis’ SDK. To do so, we use the following command:
pip install moralis
- With the frontend folder selected, you also need to install the npm dependencies:
npm install
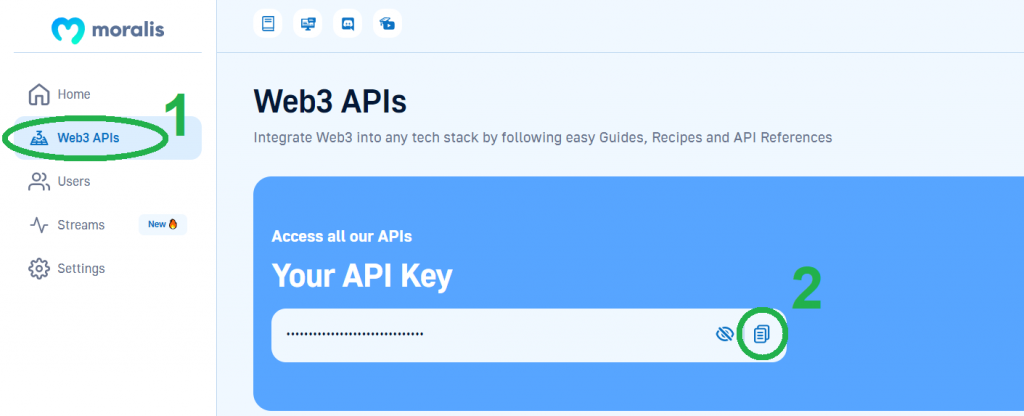
With the above prerequisites under your belt, you can now enter your Moralis Web3 API key. To access your Web3 API key, make sure you have a Moralis account ready. If not, make sure to create one for free now! Then, once you have your account, you’ll be able to visit your admin area and copy your Web3 API key:
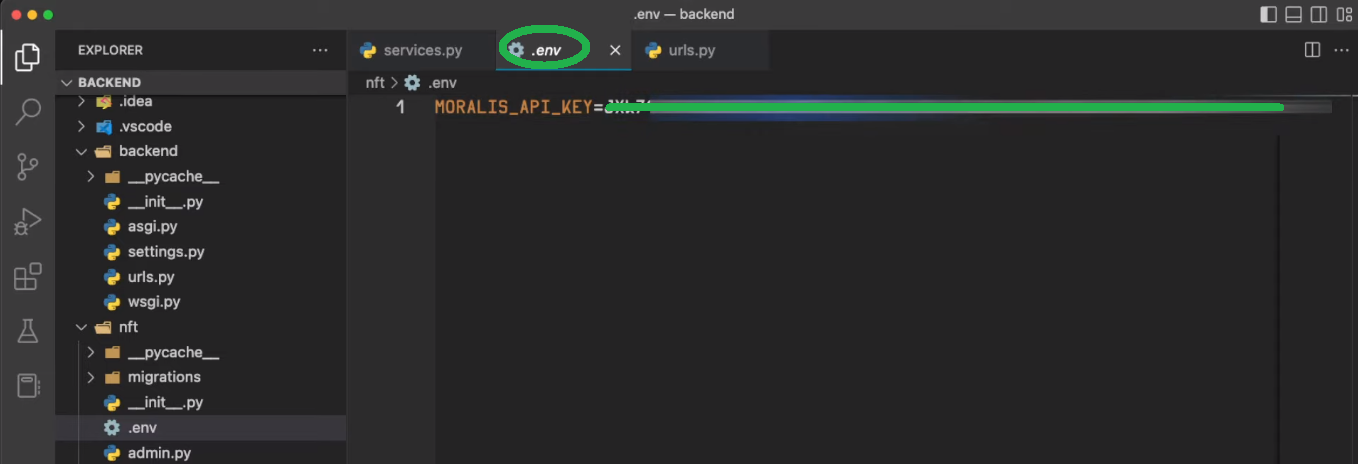
In case you need more assistance with obtaining your API key, use the video below, starting at 1:40. With your key copied, create your “.env” file inside the “backend” folder and paste your key next to the “MORALIS_API_KEY” variable. It will look something like this:
With your key in place, you can run your backend and frontend. To run the Django server on the backend, use the following command:
python manage.py runserver
To run the frontend React server, navigate to your “frontend” folder and use the command below:
npm start
Video Walkthrough of the Code to Get All NFT Transfers
The above commands, in combination with the properly inserted Web3 API key, are all you need to do to start using our dapp to get all NFT transfers with a click of a button. Nonetheless, if you are interested in a more detailed code walkthrough, make sure to use the video below.
Starting at 1:10, our in-house expert will copy the Python code from the above-presented “get transfers by wallet” documentation page. Then, he will discuss the parameters of the particular API endpoint. The interesting part starts at 3:26. This is where you’ll learn more about the core backend and frontend scripts that power our example dapp (decentralized application).
If you have additional interest in Python development, we recommend checking out our ultimate Web3 py tutorial for blockchain developers. After completing it, you’ll have a firm understanding of what Web3 py is and how developers can use it. In addition, make sure to check out our complete Web3 Python SDK documentation!
How to Get All NFT Transfers for Any Wallet – Summary
Today’s journey started with some basics, and you had an opportunity to explore the ins and outs of NFT (non-fungible token) transfers. This is where we also explained how non-fungible token transfers work. With a fundamental understanding, you had a chance to learn how to get all NFT transfers for any wallet. You discovered that this feat is pretty straightforward when you use Moralis’ EVM API – the “get transfers by wallet” endpoint in particular. Then we demonstrated our example dapp that utilizes the feature of getting all NFT transfers. Moreover, you even had a chance to clone our code and build your own instance of our example dapp. Last but not least, our in-house expert took you through the code of the core scripts.
If you completed the above tutorial – both the steps outlined herein and from the video – you now know the concept of using Moralis’ EVM API. In addition, you also obtained your Web3 API key and have all you need to start building all sorts of dapps. However, to gain some initial confidence, we recommend completing some of the tutorials that await you inside the Moralis docs. Don’t forget to explore other blockchain development topics on the Moralis YouTube channel and the Moralis blog. Some of the latest articles there focus on the Ethereum Web3 API, getting token balances of an address, an excellent Web3.js vs ethers.js comparison, and much more.
In addition to these free Moralis resources, you may want to consider enrolling in Moralis Academy. After all, that is the best way to become blockchain certified and significantly improve your chances of landing your dream job in the blockchain industry. Once enrolled, you’ll be able to start your journey by mastering blockchain and Bitcoin fundamentals.
