As the title suggests, this article illustrates how you, as a developer, can connect MetaMask to website using the NextJS framework. What the title does not mention, however, is the other tool we’ll utilize herein – Moralis. As things currently stand, MetaMask acts as the initial gateway to interacting with Web3 apps, and Moralis – the leading enterprise-grade Web3 API provider – lets developers seamlessly integrate MetaMask into their websites. Moreover, Moralis’ Web3 authentication solution makes this article’s mission possible. So, if you want an answer to the “how to connect MetaMask to website?” question, this article is for you!
However, before we show you how to connect MetaMask to website with NextJS and Moralis, we need to get you all up to speed. Hence, we’ll first ensure that you all know what MetaMask is. Then, we’ll point out the main reasons why you ought to learn how to connect MetaMask to website. Next, you’ll get a chance to follow our lead and get your hands dirty via our tutorial. We’ll take you through the entire process, starting with the initial setup. You only need to make sure that you have the necessary tools ready. As such, make sure to create your free Moralis account and set up Visual Studio Code (VSC). Of course, also download the MetaMask browser extension and create your wallet, in case you don’t have it yet. That way, you’ll be able to take your dapp for a spin once you complete all the steps.
Want the latest in blockchain development? Make sure to subscribe to Moralis Magazine for weekly updates on what’s happening within Web3 development!
What is MetaMask
If you’ve been dabbling in crypto, the chances are that you’ve already used this awesome tool known as MetaMask. Of course, that doesn’t mean you really know what it is. MetaMask is the most popular Web3 wallet, primarily focusing on the Ethereum chain. However, it also supports all other EVM-compatible chains. However, you must add those networks yourself.
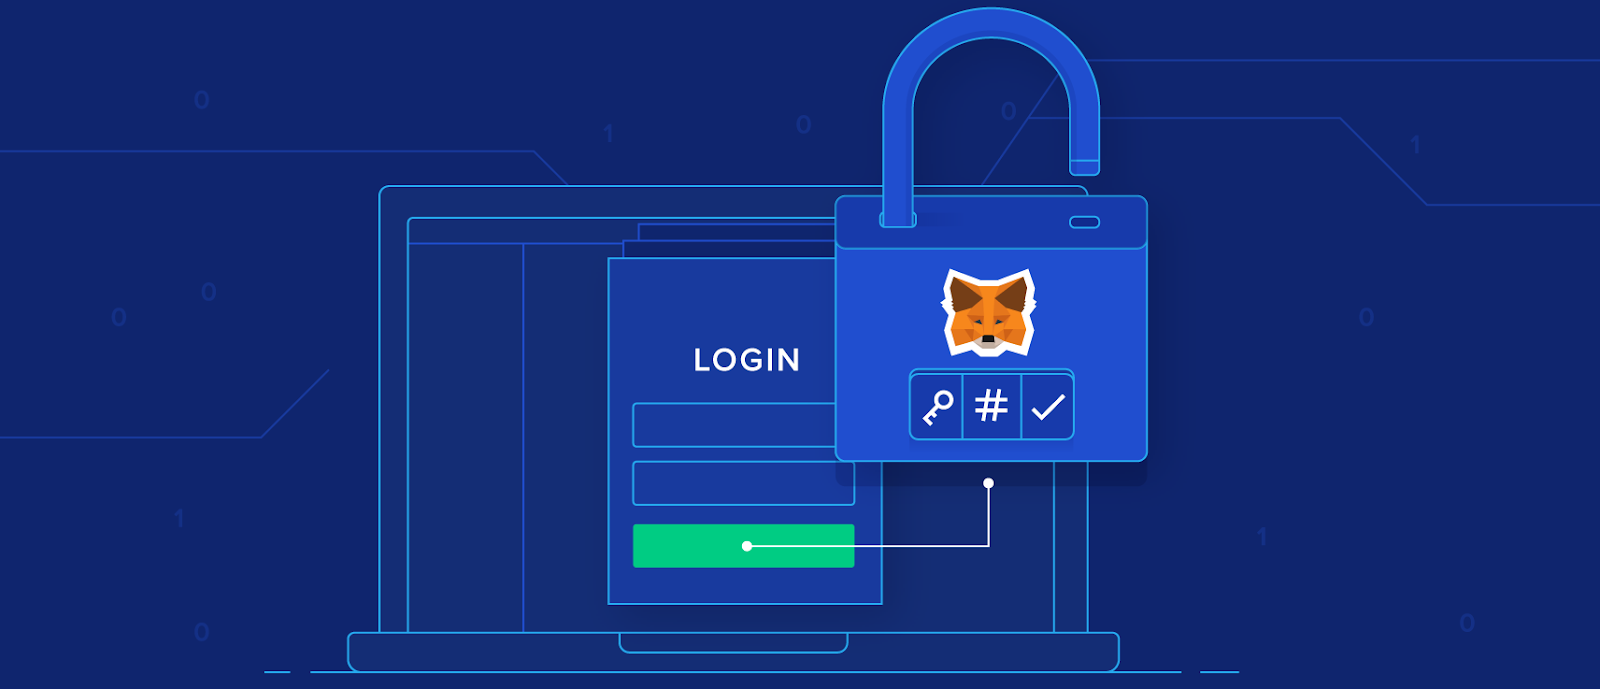
Furthermore, MetaMask is also a gateway to countless dapps (decentralized applications) available on its supported networks. Essentially, this hot crypto wallet is the most popular tool that everyone with an internet connection can use for Web3 authentication. Hence, with a click of a button or two, users can connect their wallets to dapps. Once they establish the connection, users can interact with all on-chain features of the dapp in question. Ultimately, MetaMask provides one of the simplest and, at the same time, securest ways to connect to blockchain-based applications. With MetaMask, you are always in control when interacting on Web3.
In addition, let’s point out that MetaMask enables you to buy, store, send, and swap cryptocurrencies. Whether you are using the MetaMask browser extension or mobile app, it equips you with a key vault, secure login, token wallet, and token exchange. As such, it enables you to manage your digital assets properly.
Nonetheless, MetaMask lets you own your data. It generates passwords and keys on your device so only you can access your accounts and data. Hence, it’s up to you to choose what to share and what to keep private.
Note: We recommend visiting “metamask.io”, where you can watch a cool video explaining what MetaMask is:
Why Connect MetaMask to Website?
Just by reading the introduction and the above “What is MetaMask” section, odds are you already understand why you should connect MetaMask to website. However, let’s now clarify the purpose behind using MetaMask.
First, it’s important to divide MetaMask users into visitors and developers. Of course, they both use MetaMask, but their purpose and their specific use cases vary greatly. The purpose for visitors is quite clear – connecting to dapps and managing their crypto assets.
On the other hand, developers primarily use MetaMask to test their dapps and deploy smart contracts. While doing so, devs will also use MetaMask to handle the same actions as the visitors but mainly on testnets/devnets. Furthermore, developers are the ones that incorporate Web3 authentication options. It is up to them to add that option to their dapps. Only if devs connect MetaMask to website on the backend will visitors be able to authenticate themselves using MetaMask on the frontend. Accordingly, it is important that Web3 devs are well aware of all the benefits Web3 offers. These benefits include decentralization, censorship resistance, non-stop accessibility, data ownership, transparency, etc.
So, why should you learn how to connect MetaMask to website as a developer? To contribute to the adoption of the new, improved internet – Web3. Moreover, this is where Moralis enterprise-grade Web3 solutions, available to all, empower you to take care of Web3 authentication without breaking a sweat!

Why Use Moralis?
Moralis’ mission, to make enterprise development for Web3 accessible to all, is the answer to why you should use Moralis. If you are interested in utilizing your Web2 dev skill to join the Web3 revolution, then Moralis is what you need. Its enterprise-grade APIs enable you to cover your Web3-related backend needs with short snippets of code. Moreover, it all starts with Web3 authentication.
So, what makes Moralis’ backend Web3 authentication functionality so unique? For starters, it unifies Web3 wallets and Web2 accounts in your application. Moreover, it lets you own and control all user data instead of trusting a third party to handle delicate pieces of information. Also, the Moralis Web3 Auth API is compatible with OpenID, OAuth, DIDs, and other standards.
In addition, you need to know that Web3 authentication is just a small part of what Moralis has to offer. With Moralis’ Web3 API, NFT API, and Streams API, you can create all sorts of dapps. Ultimately, if you are interested in building dapps the easy way, Moralis is the tool to use. It is a powerhouse that can save you a ton of time and resources, and learning how to connect MetaMask to website with NextJS and Moralis is a great place to start.

Connect MetaMask to Website with NextJS and Moralis
Finally, you are ready to roll up your sleeves and create a simple dapp that offers MetaMask authentication. As such, just follow our lead as we show you how to connect MetaMask to website using NextJS and Moralis. Start by opening VSC. Then create your “Moralis” folder and open a new terminal. Next, use the “npx create-next-app” command. First, you’ll need to name your application (feel free to go with our name):

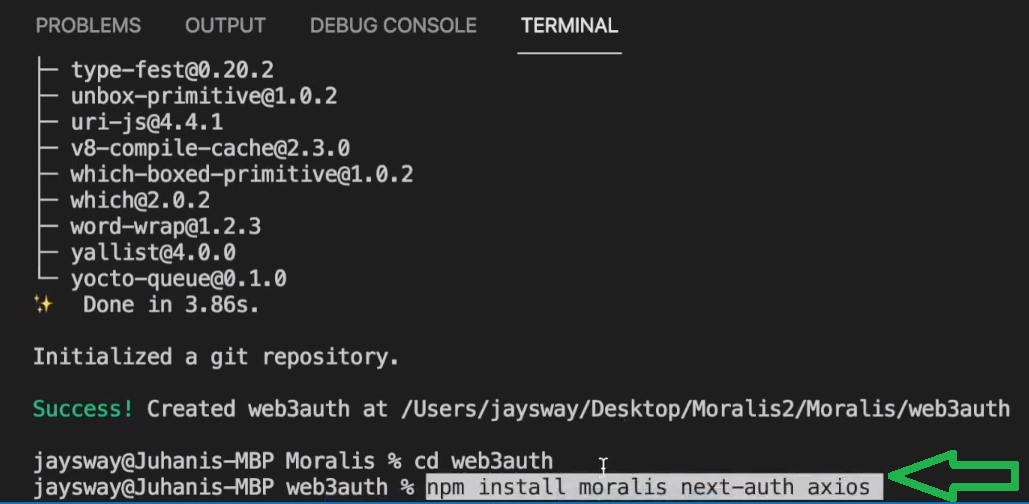
Then, use the “cd web3auth” command to navigate to the above-created project. In addition, enter the “npm install moralis next-auth axios” command to install the required dependencies:
Moving forward, install the “wagmi” and “ethers” packages using the “npm install wagmi ethers” command:

With all dependencies in place, we encourage you to look at the default files inside your NextJS project:

Make sure to focus on the “pages” folder, which contains the files that we’ll work with moving forward:
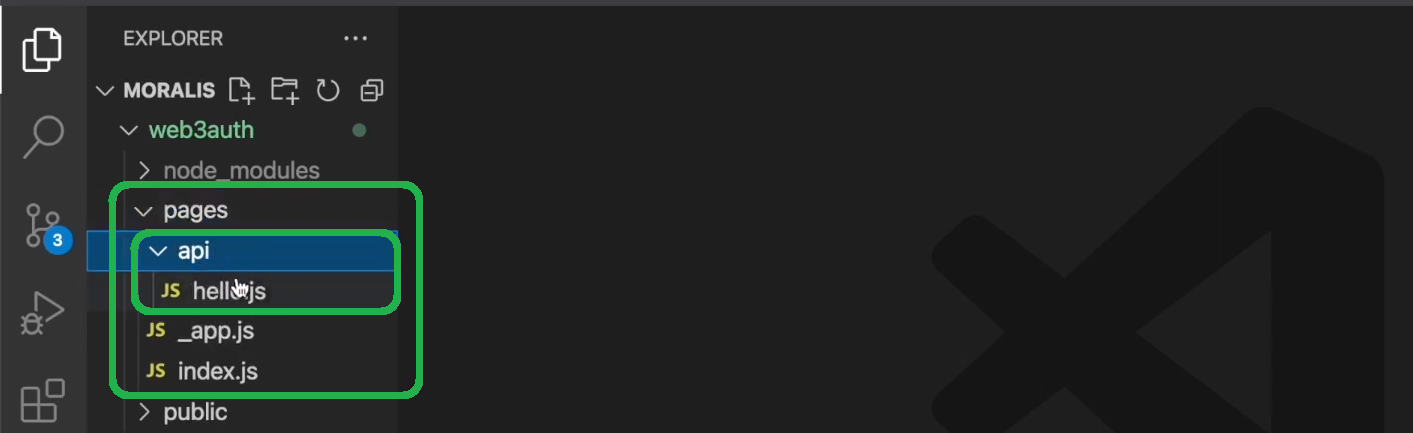
The “api” folder contains all the backend-related info, while the “_app.js” and “index.js” files cover your app’s frontend.
NextJS Frontend-Backend Communication
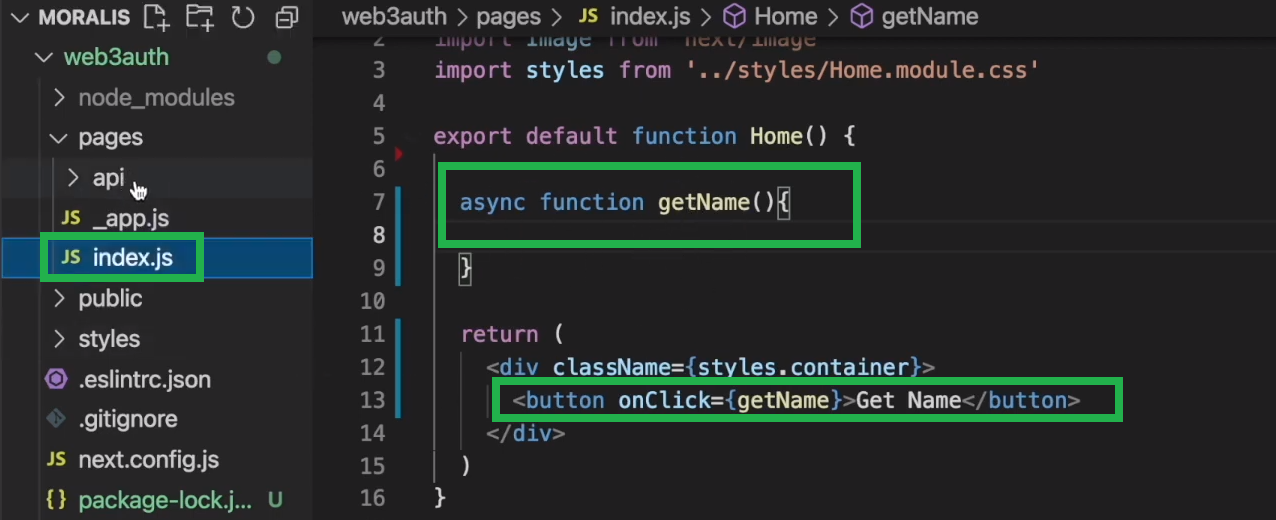
You’ll use the “index.js” file to take care of your NextJS app’s frontend-backend communication. Start by deleting the default content except for the outermost div. Next, populate that div with the “Get Name” button and add the “getName” async function:
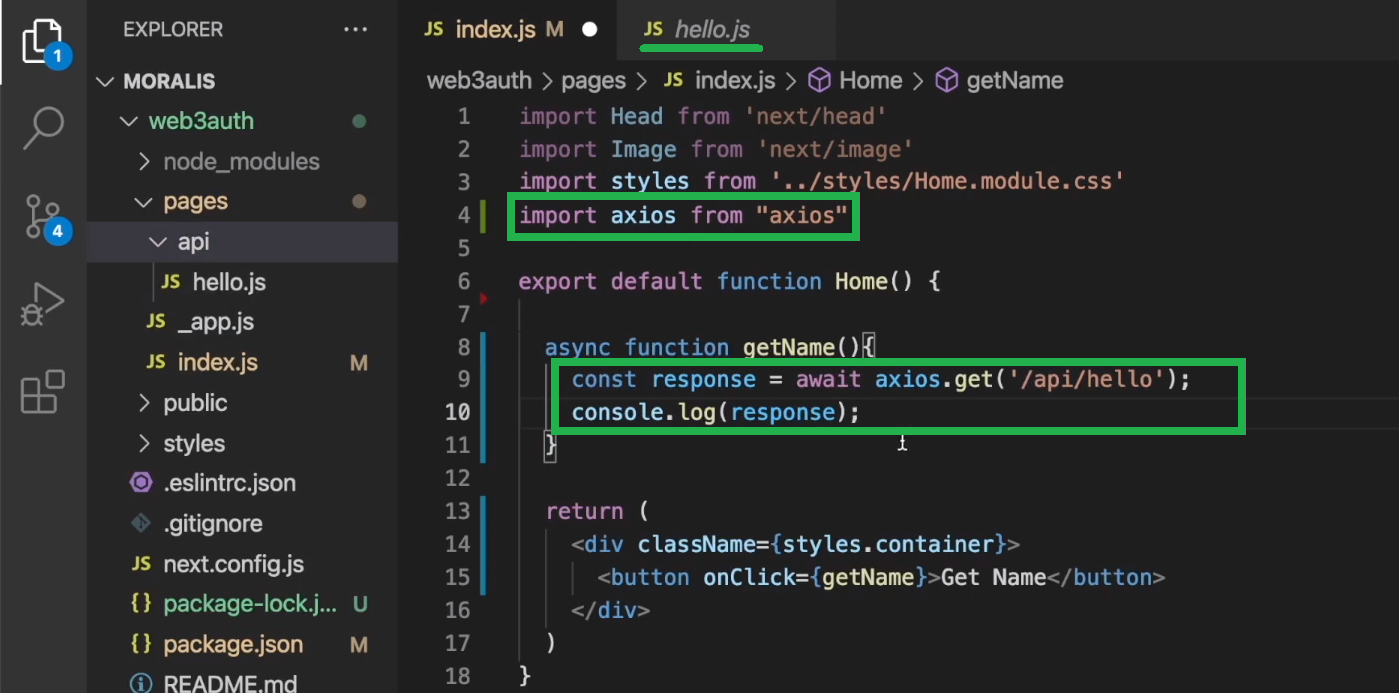
Then, import “axios”. You do this by adding ‘import axios from “axios” ‘ at the top. Moreover, also define the “getName” function’s response and “console.log” it:
We encourage you to check out your progress in your “localhost:3000“. To do this, enter the “npm run dev” command. Use the video below (4:49) for more details.
Preparing Your Frontend to Connect MetaMask to Website
It’s time to create a simple frontend for your example dapp. As such, you’ll be focusing on the “_app.js” file. Moreover, the process will be straightforward as you’ll get to copy most of the code from the “Sign In with MetaMask” page from the Moralis documentation. Start by copying the code under step four:
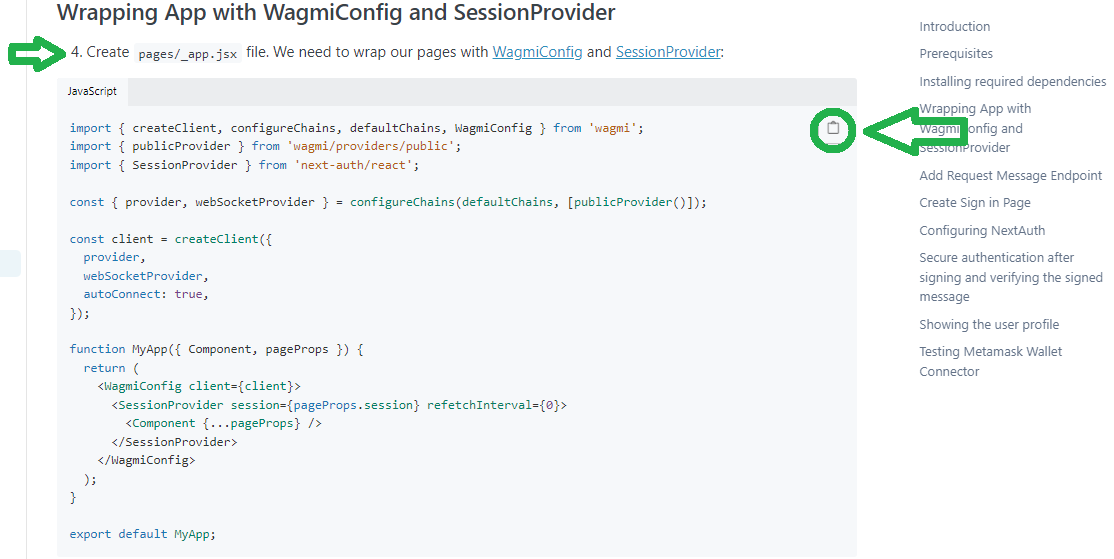
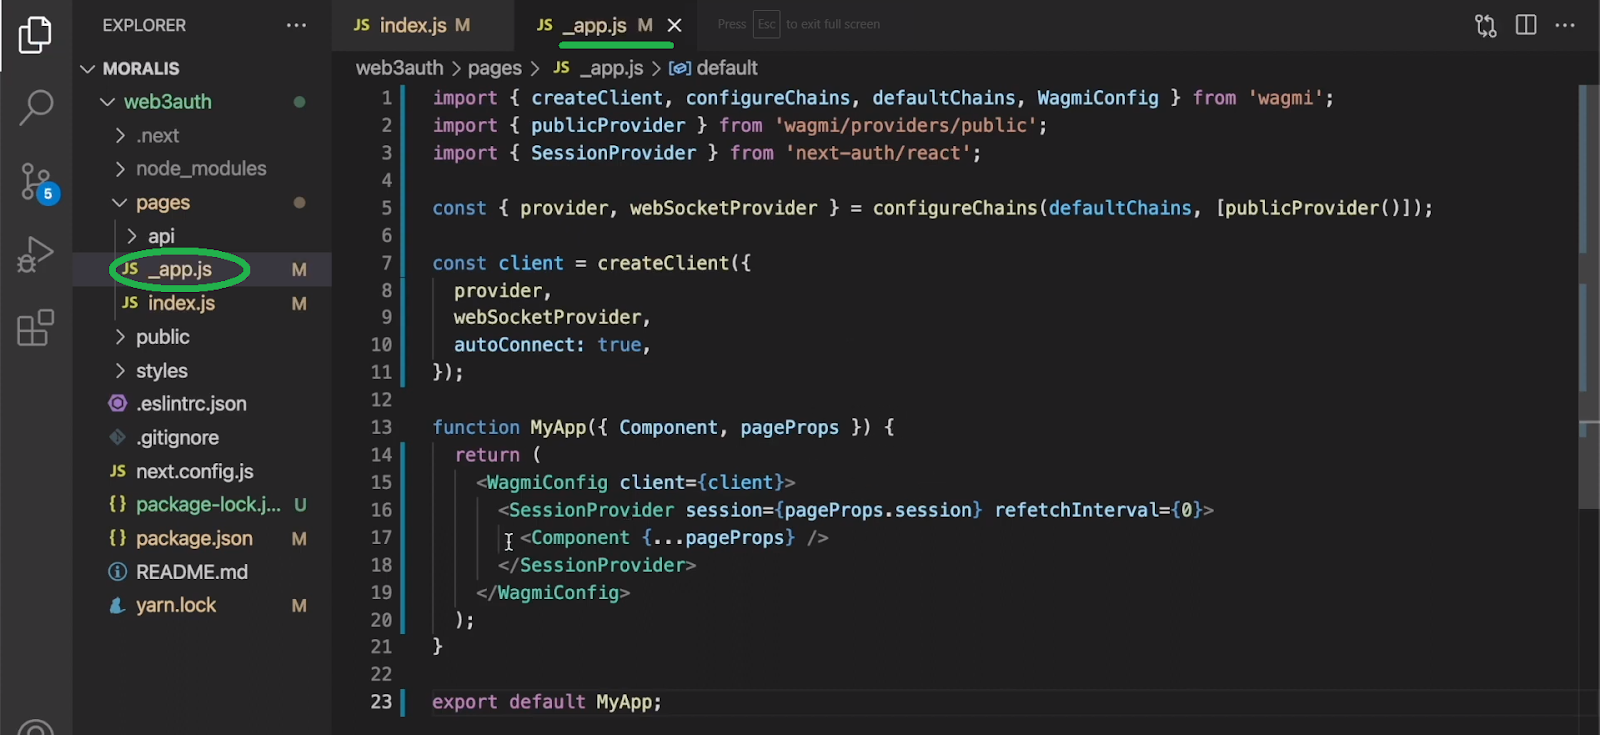
Then, open “_app.js” and replace this file’s default content with the above-copied lines of code:
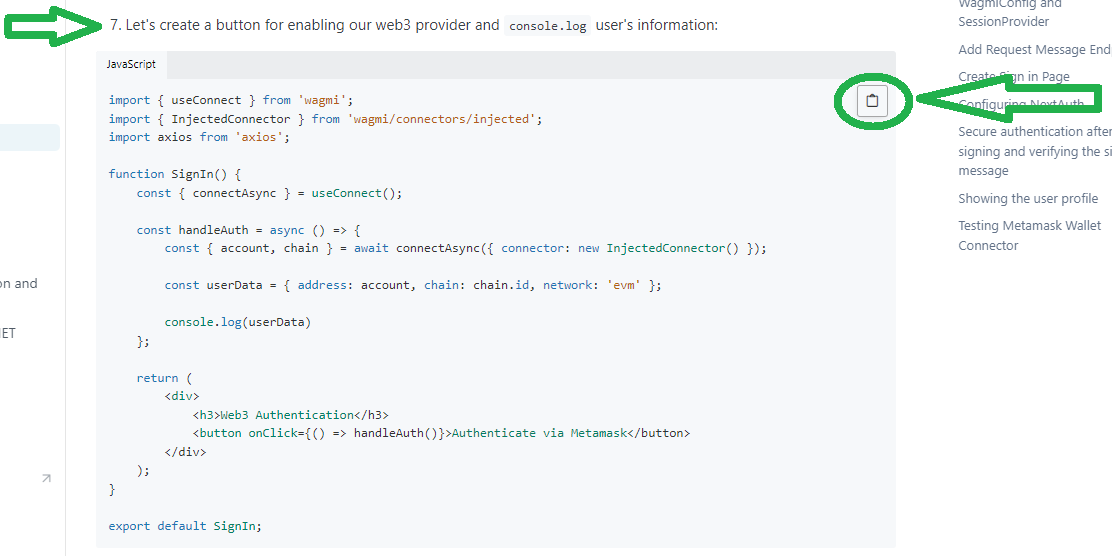
Moving forward, you need to create two additional pages. Start with the “sign in” page. The latter will enable users to connect MetaMask to website. So, copy the code from the docs (step seven) and paste it into the “sign in” file that you created inside the “pages” folder:
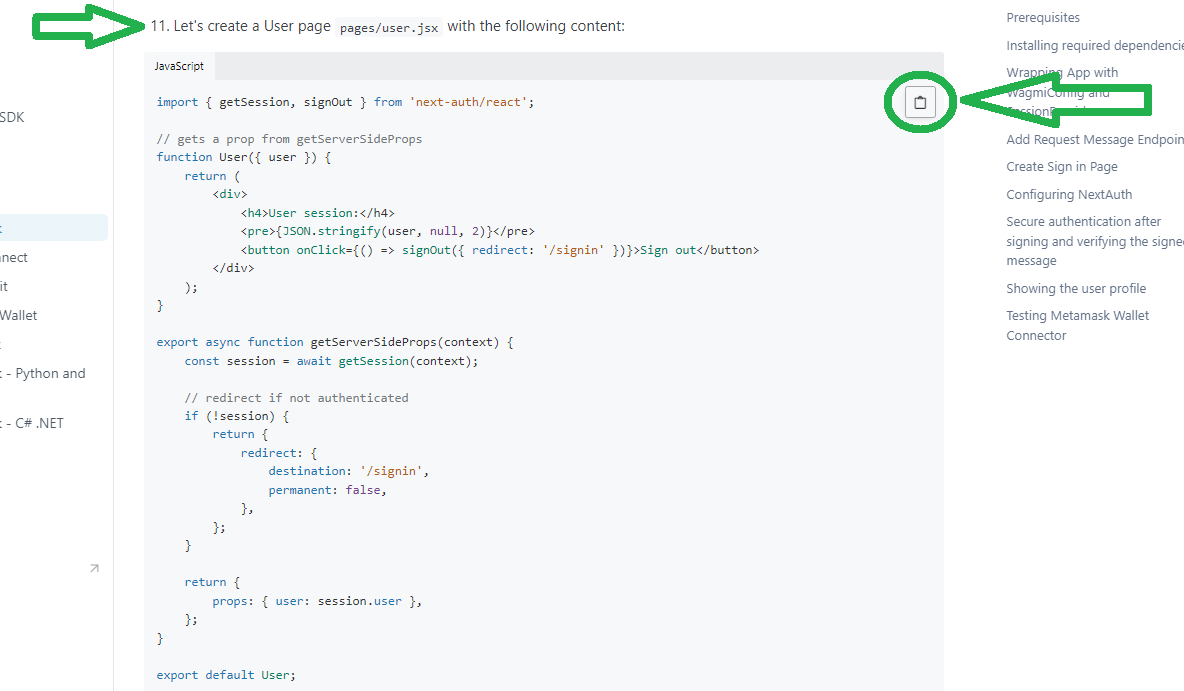
Next, you need to create the “user” page. This is the page on which users will land after connecting their MetaMask wallets to your dapp. To get the code for this file, again use the Moralis docs (step eleven):
Note: You can get a more detailed code walkthrough in the video below (5:50).
Adding Backend Web3 Authentication Functionality to Your NextJS App
At this point, you have your simple frontend pages ready. As such, it’s time to add proper backend logic to your NextJS app. Since this logic will cover Web3 functionality, it will also convert your app into a dapp. Your goal is to request Moralis to send you a sign-in message that users need to sign. In addition, you’ll also use Moralis to verify that sign-in message. Finally, after successful verification, your backend needs to create an authenticated user and display their details on the “user” page.
First, go to the “api” folder and delete the “hello.js” file. Next, create a new folder inside the “api” folder and name it “auth”. Moreover, also create your “.env.local” file inside the main folder (“web3auth”):
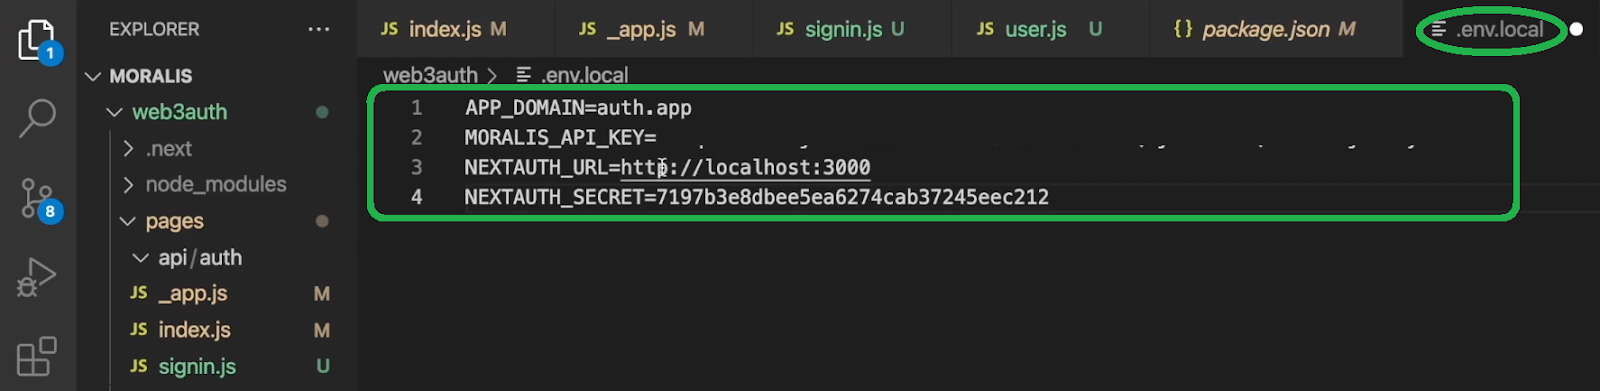
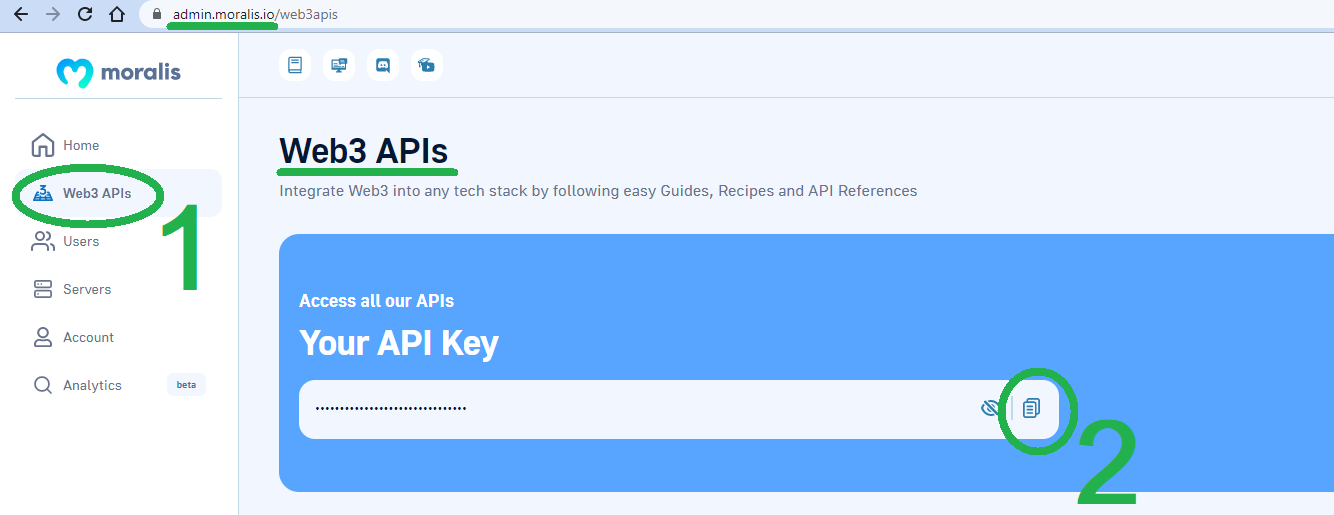
To learn more about the environmental variables, use step three on the “Sign In with MetaMask” documentation page. Also, as you can see in the image above, one of the variables is your Moralis Web3 API key. Fortunately, getting this key is a simple two-step process. However, you must have your Moralis account ready. So, make sure to use the “create your free Moralis account” link from the outset of this article. Once inside your Moralis admin area, go to the “Web3 APIs” page and copy your API key:
Creating Your Backend Files
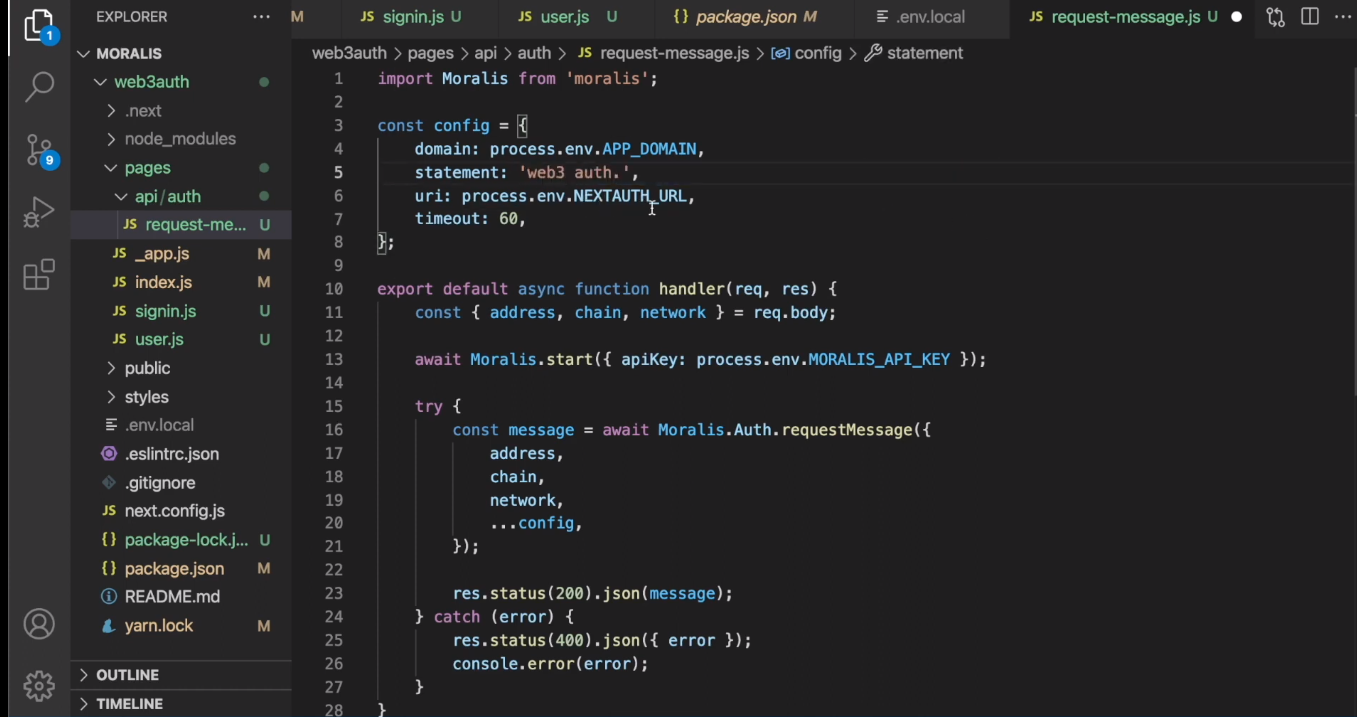
Now, create the “request-message.js” file inside the above-created “auth” folder. Then, populate this file with the code from the Moralis docs (step five):
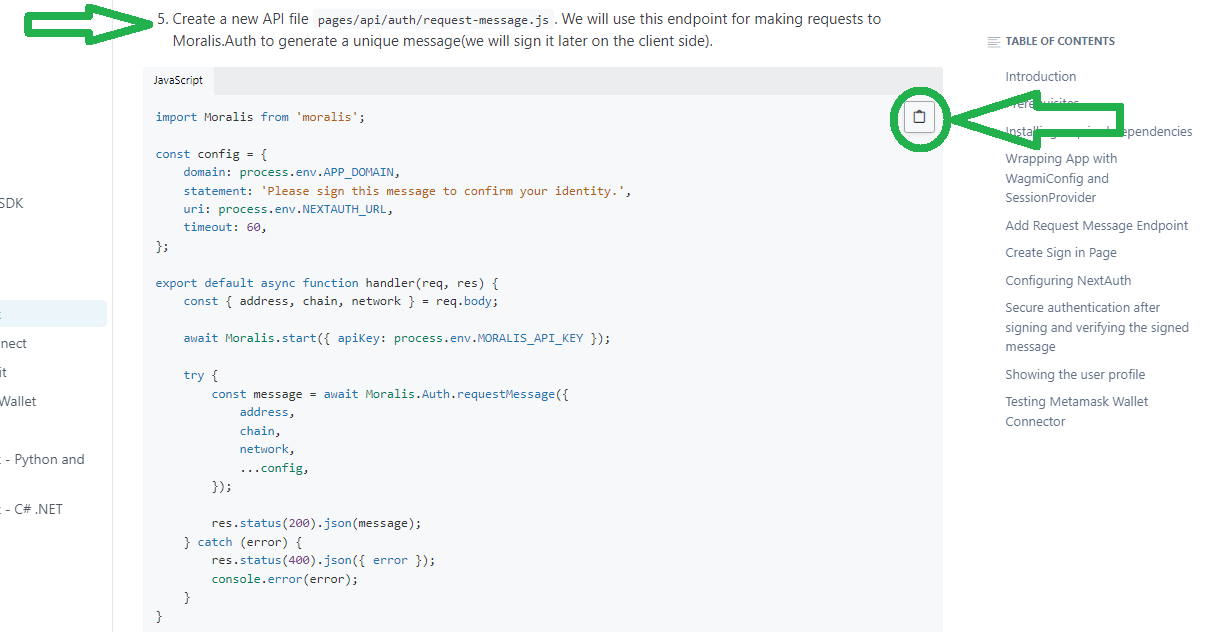
If you want to match our example dapp, change the “Please sign this message to confirm your identity.” “statement” to “web3 auth“:
Note: Use the video below (11:00) for more details.
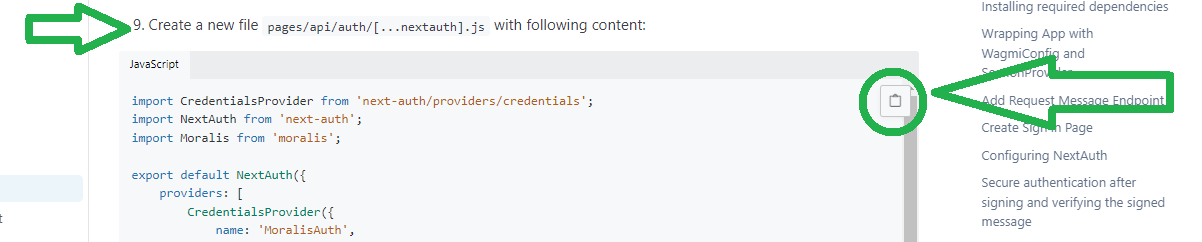
Next, in order to authenticate users after they sign the initial message, you need to create another endpoint. Hence, create another file inside the “auth” folder and name it “[…nextauth].js”. Populate this file with the code from the documentation (step nine):
Last but not least, return to the “signin.js” file. There, you need to add the calls to the above-created endpoints. These calls are an essential part of the “how to connect MetaMask to website” feat. Of course, you can again copy the required lines of code from the documentation. Simply select the entire “signin.js” content and replace it with the code under step ten:

With that, you’ve successfully implemented Web3 authentication with MetaMask, NextJS, and Moralis. So, you can now run your example dapp. If you followed our instructions to the point, your dapp should work as presented in the following section.
Authenticate Website Users with MetaMask
The screenshot below shows the gist of our example dapp. At this point, you should know how to connect MetaMask to website. Moreover, as you can see, users need to click on the “Authenticate via MetaMask” button:
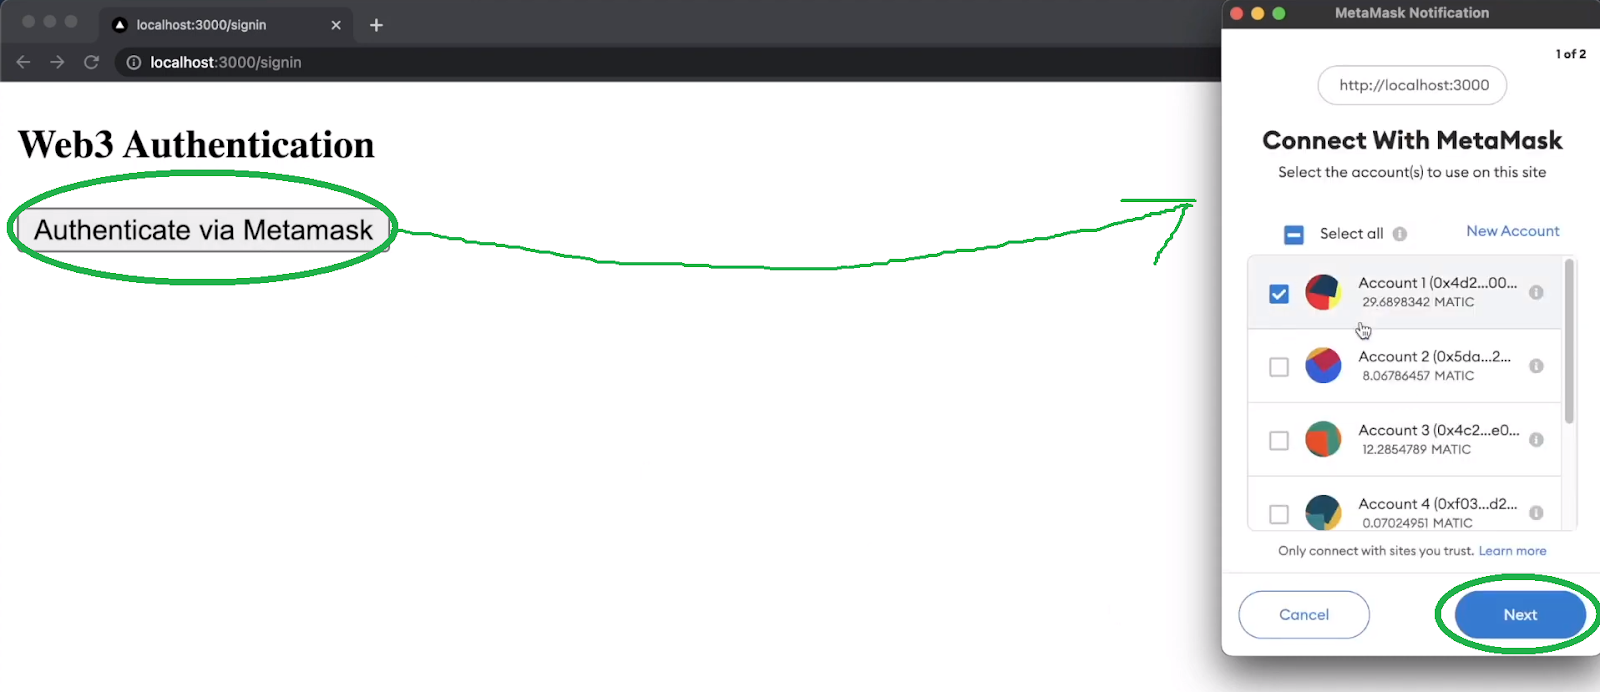
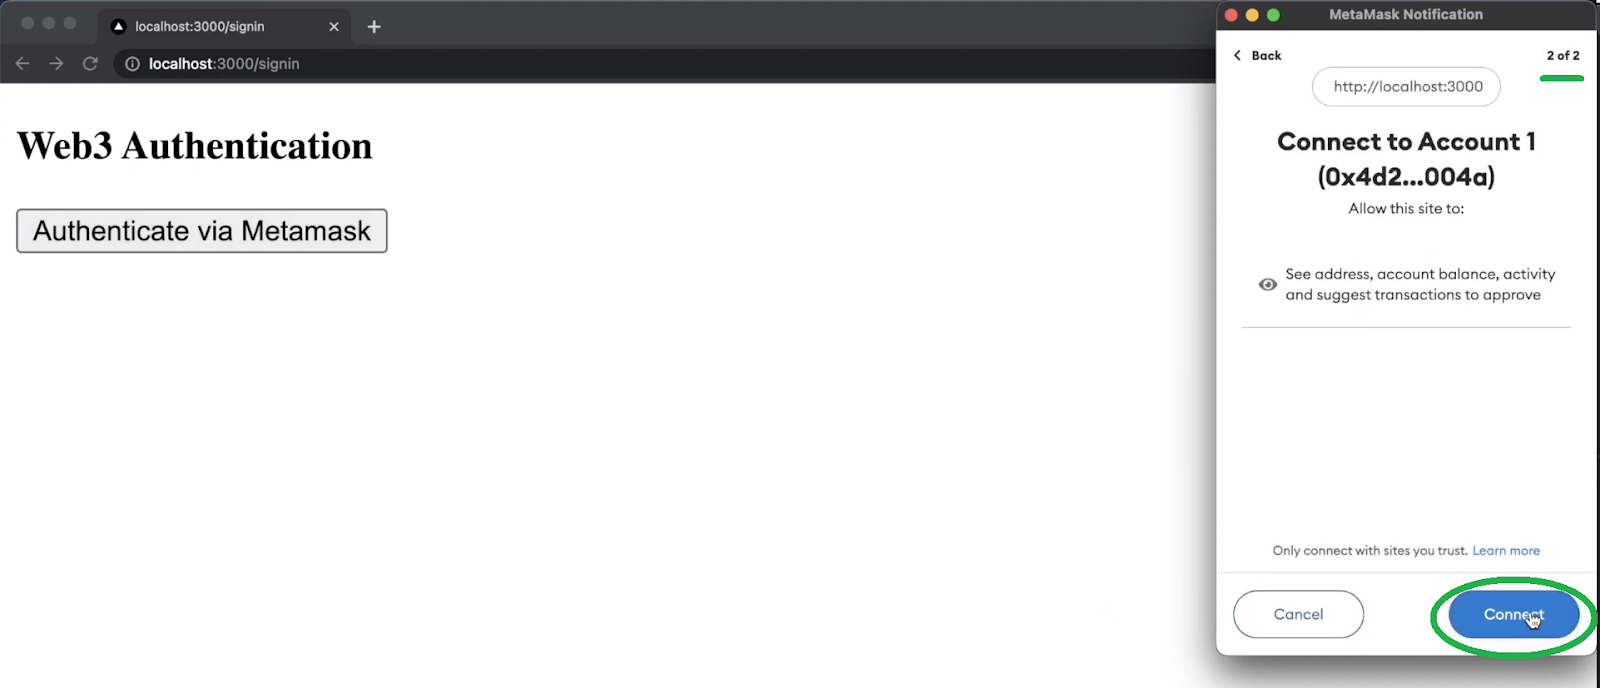
Once users click on the authentication button, the MetaMask extension pops up. Hence, users need to click on the “Next” button, followed by a click on “Connect”:
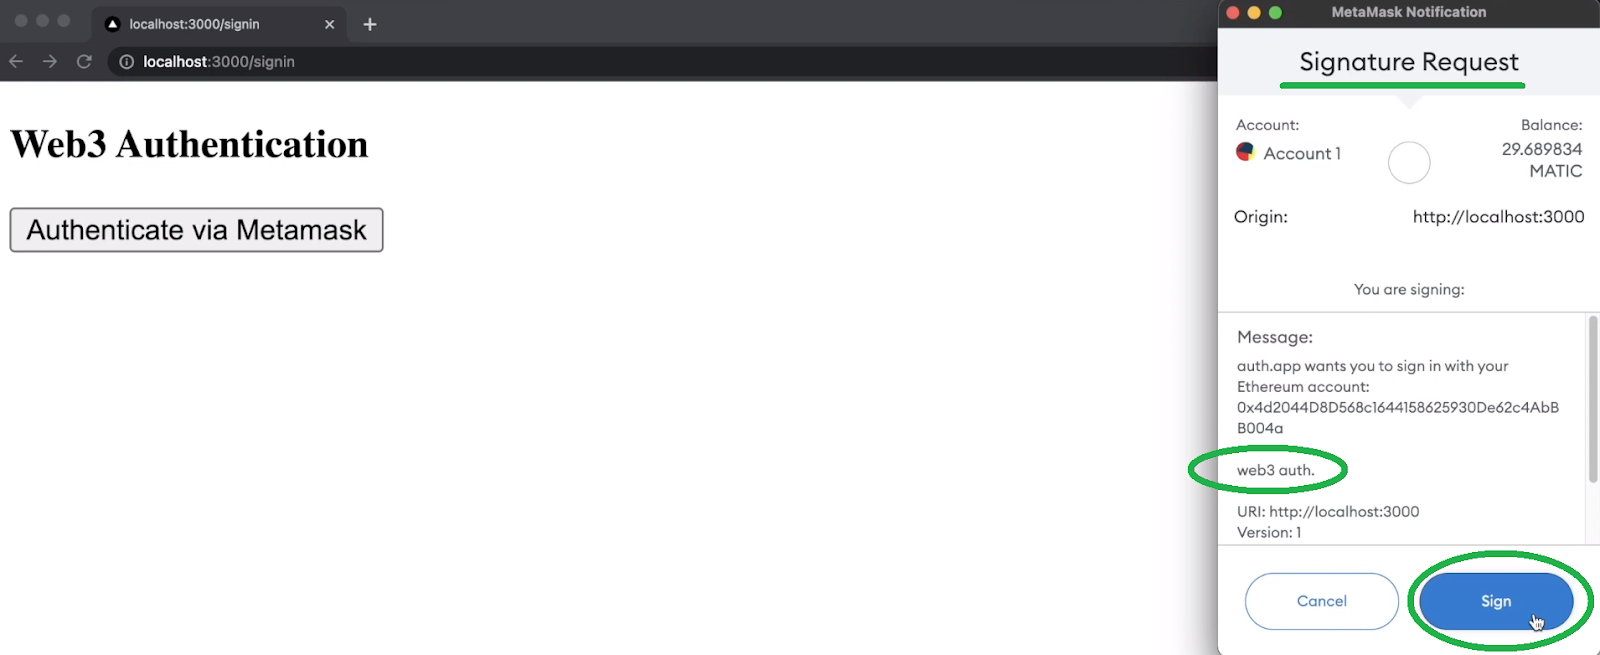
To finalize the process, users also need to sign our dapp’s signature request:
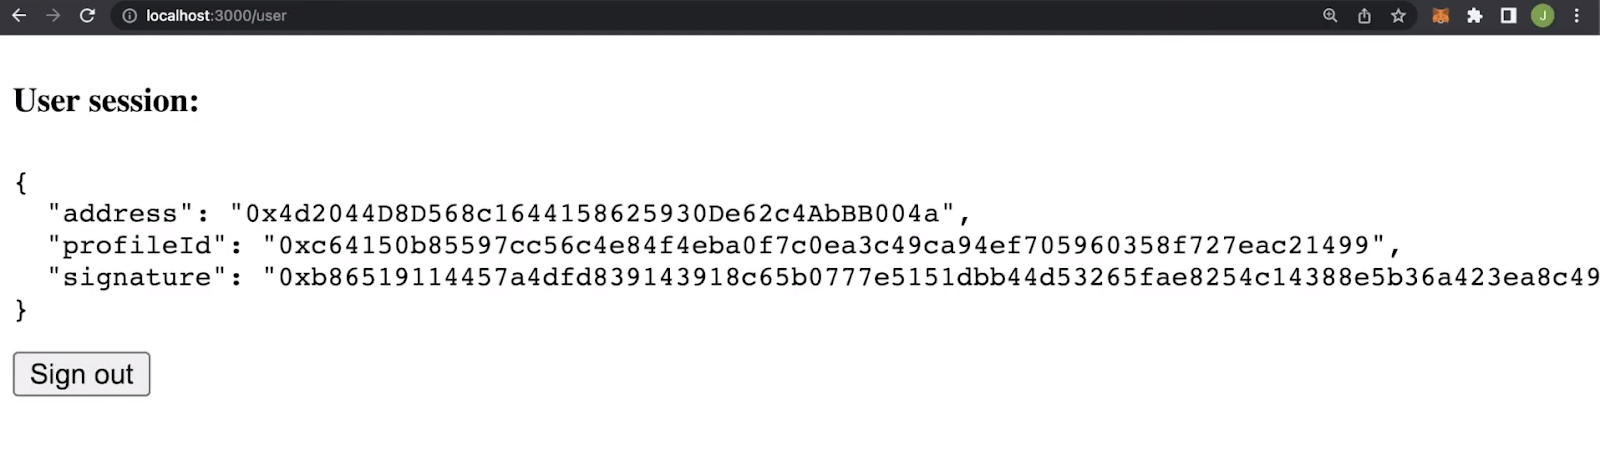
As per the code presented in the previous section, successfully authenticated users land on the “user” page:
Last but not least, here’s the video tutorial that we’ve been referencing throughout the article. Not only does it contain all the details, but our in-house Moralis experts demonstrate the exact steps on how to connect MetaMask to website:
Note: You can also access our final code for this example dapp on GitHub.
How to Connect MetaMask to Website with NextJS – Summary
If this was your first rodeo with Web3 programming, you learned a lot from today’s article. You now know what MetaMask is and how it can be used with NextJS applications to create dapps. Moreover, you also learned that Moralis is the tool that ties it all together. Thanks to Moralis, you get to create dapps with legacy programming languages and frameworks. Nonetheless, we took you through all the steps related to the “how to connect MetaMask to website” challenge. Last but not least, you also had a chance to explore a demo of our example dapp.
Furthermore, since Web3 authentication is the starting point of all dapps, you are now ready to take your dapp development to the next level. Of course, you can continue building with NextJS or use other frameworks and dev platforms. For instance, you can use Unity, Firebase, or Supabase. As such, you can also focus on developing awesome Web3 games with these tools combined with the power of Moralis. Moreover, don’t forget that Moralis supports multiple blockchains. As a result, you are never stuck to any particular chain, which future-proofs your dapps.
So, if you want to gain more confidence or learn to become a proper Web3 developer for free, make sure to visit the Moralis YouTube channel and the Moralis blog. There, you can find countless example projects. On the other hand, you may be interested in going full-time crypto. In that case, becoming blockchain certified can significantly improve your chances of landing your dream job. If that’s something you are interested in, make sure to consider enrolling in Moralis Academy. This is also the place to become a member of one of the most advancing communities in the industry.