NFTs revolutionize ownership, ticketing, certification, etc. Furthermore, an originator can grant access to content on a website only to those holding specific NFTs (non-fungible tokens). This type of “gated” website or specific page utilizing NFTs as validation is one of the unique verification methods developers implement in websites seeking to adopt blockchain technology. Moreover, if you are a developer who wants to learn how to create an NFT gated website in Django, then this article will be highly beneficial. In fact, with the Moralis SDK, creating an NFT gated website in Django becomes a straightforward process.
If you are familiar with the best Web3 tech stack, you know that Moralis is the ultimate Web3 API provider. It provides you with enterprise-grade Web3 APIs, including the Moralis NFT API. Furthermore, Moralis is all about cross-platform interoperability. Hence, you can use various Web2 development platforms and programming languages to join the Web3 revolution. In addition, when creating an NFT gated website in Django with Moralis, you can focus on multiple programmable chains. After all, Moralis is also cross-chain interoperable. As a result, you are never stuck to any particular chain, which future-proofs your dapps.
So, if you are eager to learn how to create an NFT gated website in Django, create your free Moralis account and follow our lead. However, before we roll up our sleeves and take on today’s challenge, let’s make sure you all know what Django is.

What is Django?
Django is a free, open-source, and high-level Python-based web framework. It follows the “model–template–views” (MTV) architectural pattern, and this web framework encourages rapid development and clean, pragmatic design. Furthermore, Django was designed to help devs take apps from concept to completion as quickly as possible. In addition, Django is extremely secure. As such, it allows developers to avoid many common security mistakes. Also, this framework can scale quickly and flexibly. Nonetheless, Django Software Foundation maintains Django, and this foundation is a US-based independent 501 non-profit organization.
Furthermore, to learn more about Django, make sure to visit the official Django website (“djangoproject.com”). This is where you can browse the Django documentation and explore instructions on how to get started with this Python-based web framework.
Create an NFT Gated Website in Django with Moralis
Today’s tutorial will teach you how to show content for a restricted page only to authenticated users that own specific NFTs. As such, you will need a website that includes Web3 authentication. In case you haven’t accomplished that part already in the past, feel free to skip to the “Adding NFT Gated Functionality to Your Website in Django” section. On the other hand, make sure to visit the Moralis documentation. There, you’ll learn how to add secure Web3 authentication to your Django application. Essentially, you’ll learn to create a full-stack Web3 authentication flow. Moreover, covering that part is a prerequisite to creating an NFT gated Website in Django.
Of course, you can save a lot of time using our final code template, which awaits you on GitHub. In order to implement Web3 authentication to your Django app the easy way, you’ll need your Moralis account. So, in case you haven’t done so yet, click on the “create your free Moralis account” link in the intro or visit Moralis’ homepage. You’ll also need to install Python v3. Nonetheless, make sure to use the Django documentation to obtain the Django basics.
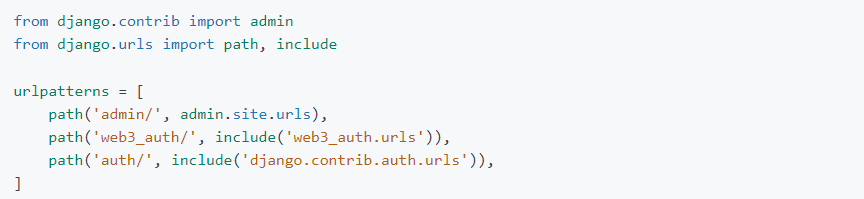
The above-linked page from the Moralis documentation will guide you through all the steps you need to complete this project. First, you’ll install all required dependencies. Then, you’ll create a new Django project (“moralis_auth“) and a new Django app (“web3_auth“). You’ll also learn how to run database migrations and how to create a “super user”. Next, you’ll need to edit the “moralis_auth” project settings. You’ll do this by adding “web3_auth” to the list of installed apps in “settings.py“:

In addition, you’ll need to include URLs from the newly created app in the new project:
Finally, you’ll focus on creating your main “web3_auth” application by using “urls.py“, “views.py“, and templates.
Obtain Your Moralis Web3 API Key
The essential part of the “views.py” script is the “API_KEY” line of code. This is where you need to paste in your Moralis Web3 API key, enabling you to use the power of Moralis. Fortunately, it is quite simple to obtain that key once you are inside your Moralis admin area. You’ll get to access the latter with your Moralis account credentials. Then, obtaining your Moralis Web3 API key is a matter of two clicks:

Running Your Django Dapp
By setting your API key in place and creating the “login.html” and “profile.html” templates, you’ll be ready to start your dapp. If you’ve followed the Moralis documentation to the point, you should be able to view your dapp on a local server. It should look like this:

As you can see in the image above, we are focusing on functionality and not design. However, we encourage you to create a more eye-catching UI. Moreover, after you click on the “Login with Moralis Web3 API” button, your MetaMask will pop up asking you to sign a signature request:
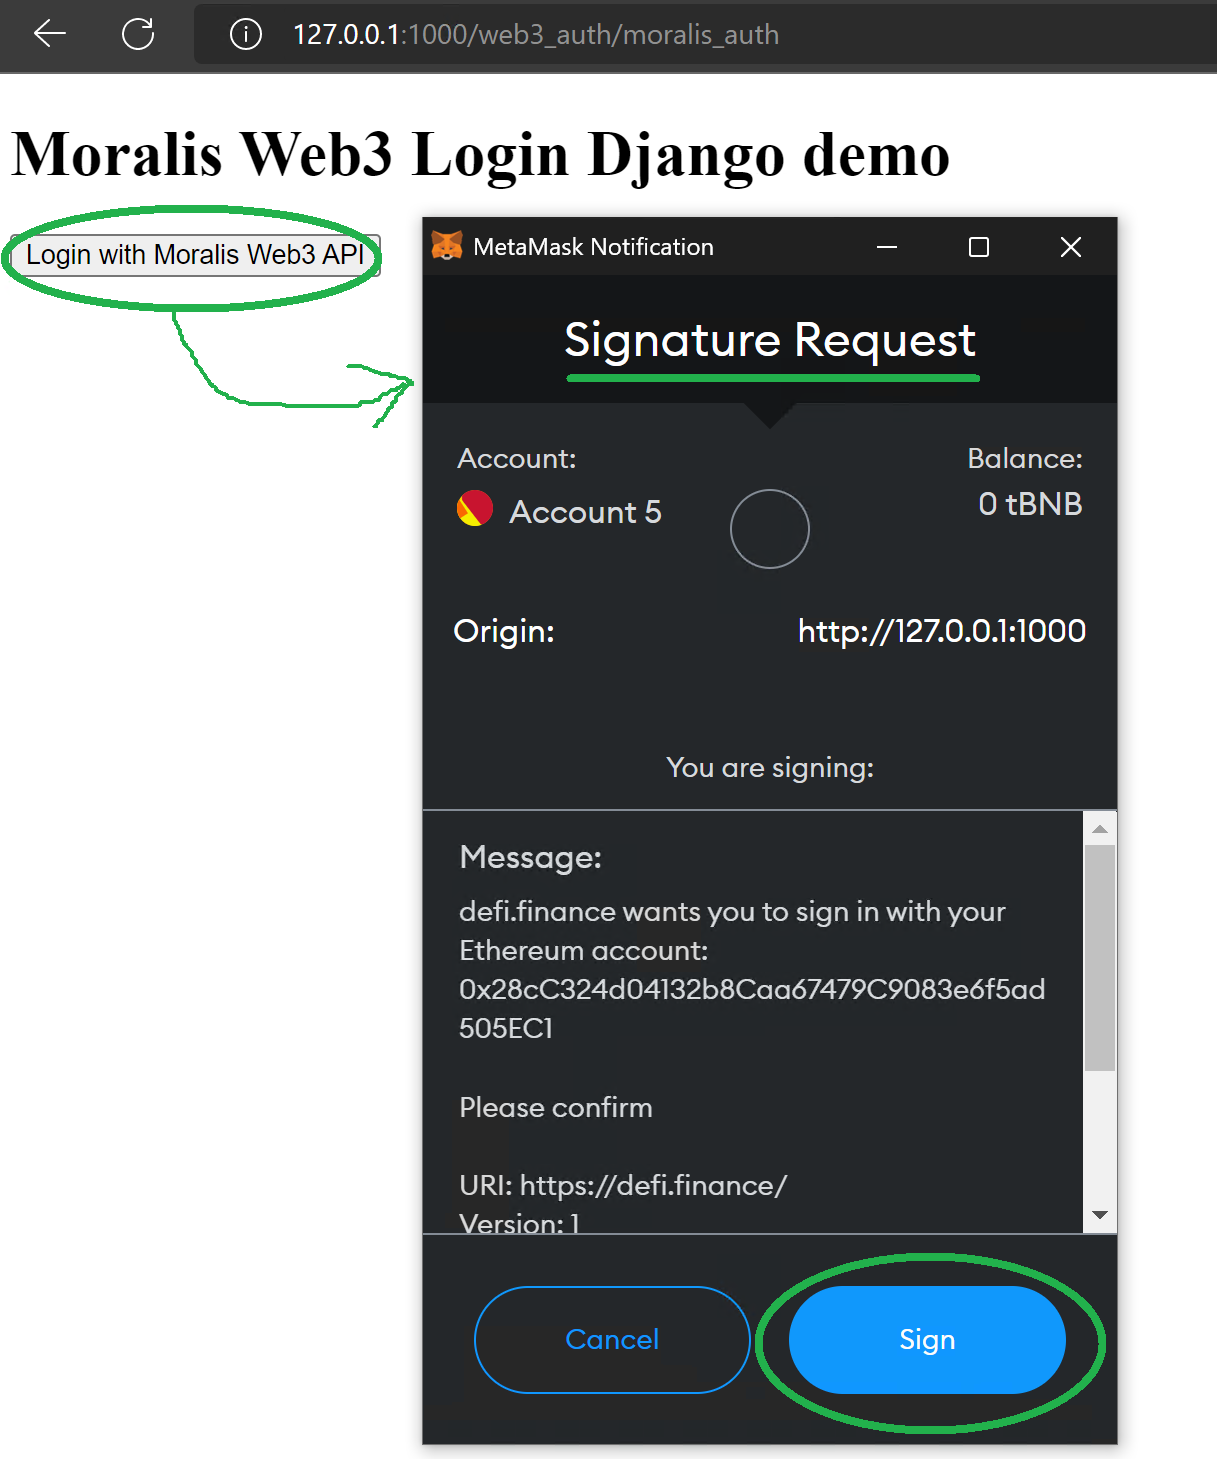
After signing the above signature request, you will see the complete profile page:

Of course, all of the above details should match your Web3 wallet’s details.
Now that you know how to use the Moralis Auth API in Django, it’s time we focus on converting the above dapp into an NFT gated website.

Adding NFT Gated Functionality to Your Website in Django
We will show you how to create an NFT gated website in Django based on the above-presented dapp. As such, make sure you’ve covered that part. Then, you need to open the “views.py” file and add a new view. Follow our lead and name the new view “protected“. Here are the lines of code that you need to add to “views.py“:
def protected(request):
    eth_address = request.session.get(
        'verified_data', {}).get('address', None)
    nfts = []
    # this is the opensea contract address on polygon
    CONTRACT_ADDRESS = "0x2953399124f0cbb46d2cbacd8a89cf0599974963"
    WEB3_API_URL = 'https://deep-index.moralis.io/api/v2'
    REQUEST_URL = '%s/%s/nft?chain=polygon&token_addresses=%s' % (
        WEB3_API_URL,
        eth_address,
        CONTRACT_ADDRESS
        )

    x = requests.get(
        REQUEST_URL,
        headers={'X-API-KEY': API_KEY})
    print(json.loads(x.text))
    nfts = json.loads(x.text)['result']
    # show only 1 nft
    if nfts:
        nfts = json.dumps([nfts[0]], indent=4)
    print(eth_address)
    print(nfts)
    return render(
        request, 'protected.html',
        {'nfts': nfts})
As mentioned previously, Moralis supports multiple blockchains. However, as you can see in the code above, we decided to focus on the Polygon chain. Moreover, looking at the lines of code above, you can see that the “protected” view extracts the address from the current session’s user. After doing so, it makes a Web3 API request to get the NFTs associated with a specific contract address for that wallet address.
Creating the “protected.html” Template
To create an NFT gated website in Django, you must add a new template. Hence, follow our lead and add a template called “protected.html“. Then populate this template with the following lines of code:
<!DOCTYPE html>
<html lang="en">
<head>
    <meta charset="UTF-8">
    <meta http-equiv="X-UA-Compatible" content="IE=edge">
    <meta name="viewport" content="width=device-width, initial-scale=1.0">
    <title>Moralis Django NFT Gated Demo Page</title>
</head>
<body>
    <div>

    {% if user.is_authenticated %}
        <h1>Eth address: {{ user.username }}</h1>
        <h2>Protected content</h2>
        {% if nfts %}
          <h3>Nice! You have our NFT!</h3>
          <pre>
{{ nfts }}
          </pre>
        {% else %}
          <h3>Sorry, you don't have our NFT!</h3>
        {% endif %}
        <br/>
        <a href="{% url 'logout' %}?next={% url 'moralis_auth' %}">Logout</a>
    {% else %}
        <a href="{% url 'moralis_auth' %}"> Login page </a>
    {% endif %}
    </div>

</body>
</html>
Looking at the lines of code above, you can see that this template uses the “if” function to offer two different headings. If users have a proper NFT, our dapp displays the “Nice! You have our NFT!” heading. However, in case the users don’t have the required NFT, our dapp displays the “Sorry, you don’t have our NFT!” title. In addition, when users have a required NFT, our dapp also shows the NFT’s details. You’ll see this as we look at the demo of our example NFT gated website created with Django and Moralis.
However, before you can run your instance of our example dapp, you also need to add the following line of code to the “urls.py” script:
path('protected', views.protected, name='protected'),
As you can see, the above line of code is just a path to the “protected” view.
Our Example NFT Gated Website in Django – Demo
With the above-presented lines of code added to “views.py” and “urls.py” and the new template in place, you can run your instance of our example dapp. Of course, the actual display of your dapp will depend on the fact whether or not you own an NFT that you set as required (the NFT contract address). So, if you don’t own the required NFT, you’ll see the above-mentioned “Sorry, you don’t have our NFT!” title:

On the other hand, if you own the required NFT, you’ll get to see the gated content:

Taking Your NFT Gated Website Knowledge Further
As you can imagine, there are countless use cases for utilizing an NFT gated website. The most basic examples would involve offering specific content to the owners of the required NFTs. However, you could take things further and grant access to Web3 games or dapps that are off limits to regular visitors. Moreover, NFT gated websites can also be used for online events, collecting rewards, attending secret online meetups, and much more. As such, you can offer to create an NFT gated website in Django for various NFT projects.
On the other hand, you can also create your own NFT project. In that case, you’d need to decide what kind of NFTs you want to focus on. In case you decide to have artistic images representing NFTs, you can easily outsource that part. Or, you can partner with a digital artist or a skilled designer. However, as far as the technical part of creating NFTs goes, your dev skills will come in handy. You might be surprised that creating NFTs is not all that difficult. Of course, it involves working with smart contracts, but you don’t have to be a Solidity expert to mint NFTs. Thanks to some excellent tools, such as Remix, Hardhat, and OpenZeppelin, you can deploy smart contracts quite effortlessly. Nonetheless, you can also focus on the Solana blockchain, in which case you can use Metaplex’s NFT Candy Machine.
To learn more about creating NFTs on EVM-compatible chains or Solana, make sure to visit the Moralis blog. There, you can find articles explaining all you need to know about NFTs and NFT minting. Of course, this is also the place to find detailed step-by-step tutorials on how to create NFTs of different standards.
How to Create an NFT Gated Website in Django – Summary
In today’s article, you had a chance to learn how to create an NFT gated website in Django. We started by making sure that you all knew what Django is. Then we focused on creating a simple Django application with Web3 authentication. Furthermore, this is where we did a proper overview of the required steps. However, for more details, you need to use the Moralis documentation. Once you have your own instance of our Django dapp ready, you just need to tweak the “views.py” and “urls.py” scripts. In addition, you also needed to create the “protected.html” template. Once you created your NFT gated website in Django, you hopefully took it for a spin. Last but not least, we also discussed how to take the NFT gated websites to the next level. Among other useful tips, this is where you found out how to mint NFTs.
As mentioned above, the Moralis blog is a great place to learn more about NFT utility and NTF development. Furthermore, this is also the place where you can explore other aspects of Web3 development. In combination with the Moralis YouTube channel and the Moralis documentation, these outlets can help you become a Web3 developer for free. However, there’s much more to Web3 development than creating an NFT gated website in Django. Moreover, thanks to Moralis, you can use any popular legacy dev platform and create a killer dapp without breaking a sweat.
It’s also worth pointing out that the crypto realm offers countless job opportunities. As such, there’s a high demand for folks interested in going full-time crypto. However, before seeking a crypto career, you need to know a thing or two about Web3 and blockchain tech. This is where becoming blockchain certified with Moralis Academy can help you take things to the next level.
