Thanks to enterprise-grade APIs from the market’s leading Web3 infrastructure provider, developers can get a Web3 wallet balance and add a native balance feature to their dapps. By using Moralis’ “getNativeBalance” endpoint, you can get wallets native crypto balance instantly:
const response = await Moralis.EvmApi.balance.getNativeBalance({
    address,
    chain,
});
If you’re familiar with Moralis and the NodeJS framework, you’ll be able to properly incorporate the above lines of code into your script and get Web3 wallet balance. Also, you can get started with the above endpoint immediately by visiting the link below. On the other hand, this may be your first rodeo with this ultimate Web3 API provider. In that case, make sure to take on a simple dapp tutorial that awaits you below. To learn how to get wallet balances for crypto following our lead, you’ll only need your free Moralis account and about eight minutes of your time.
Overview
Fungible and non-fungible tokens (NFTs) are all important crypto assets; however, they can’t compare to the importance of native coins. The latter are cryptocurrencies native to programmable chains. The most popular ones include ETH for Ethereum, BNB for BNB Smart Chain (BSC), and MATIC for Polygon. That said, learning how to get wallet balances for crypto native coins makes sense, which is exactly what you’ll learn to do in this tutorial. In this article, you’ll have a chance to create a simple multi-chain dapp that will enable you to get Web3 wallet balances without breaking a sweat.
However, before we show you how to build such a dapp, you must get better acquainted with the ultimate wallet balance tool – Moralis’ Web3 API and the “Web3 get wallet balance” endpoint (a.k.a. “getNativeBalance“). Hence, we’ll make sure you know the details of this endpoint and how to explore it even further on your own.
After covering these basics, we’ll do a quick demonstration of how to get wallet balances for crypto with our example dapp. This will give you a chance to determine whether or not you’ll want to roll up your sleeves and follow our lead moving forward. Finally, you’ll be able to create your own instance of this neat Web3 wallet explorer dapp in three simple steps.

Exploring the Ultimate Wallet Balance Tool
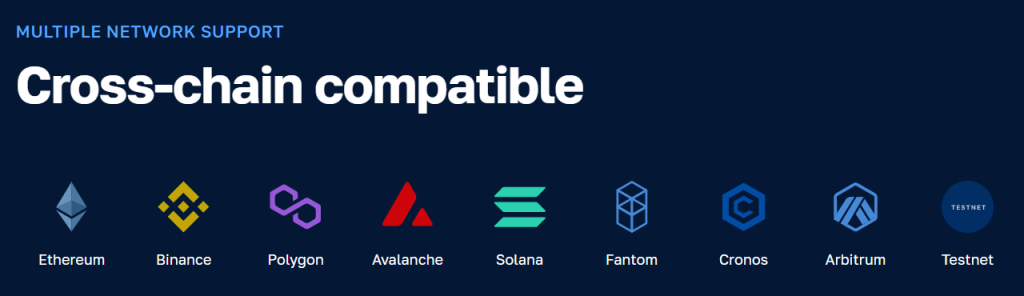
Before we focus on the details of the “Web3 get wallet balance” endpoint, it’s important to point out that there are many other valuable API endpoints that Moralis offers. In fact, it is the entire Moralis toolbox that makes it the ultimate wallet balance tool. After all, you also get to explore fungible tokens, their prices, NFTs, transfers, and transactions of crypto tokens and coins and stream blockchain data via Web3 streams. Furthermore, since Moralis is all about cross-chain interoperability, you get to do all that on most leading development blockchains.
Moreover, Moralis is also cross-platform interoperable, which means you can use its power with your favorite legacy dev tools. This is how Moralis helps you bridge the development gap between Web2 and Web3. As such, the ability to get Web3 wallet balance effortlessly is just one of many superpowers of Moralis. For instance, you can also implement Web3 authentication using Moralis’ Web3 Auth API, interact with and listen to smart contracts using Moralis’ Streams API, and incorporate NFT functionality with Moralis’ NFT API. However, herein, we’ll focus on teaching you how to get wallet balances for crypto that are native.
The “Web3 Get Wallet Balance” Endpoint
First of all, we must point out that “Web3 get wallet balance” refers to the “getNativeBalance” endpoint. That said, we invite you to visit this endpoint’s documentation page:
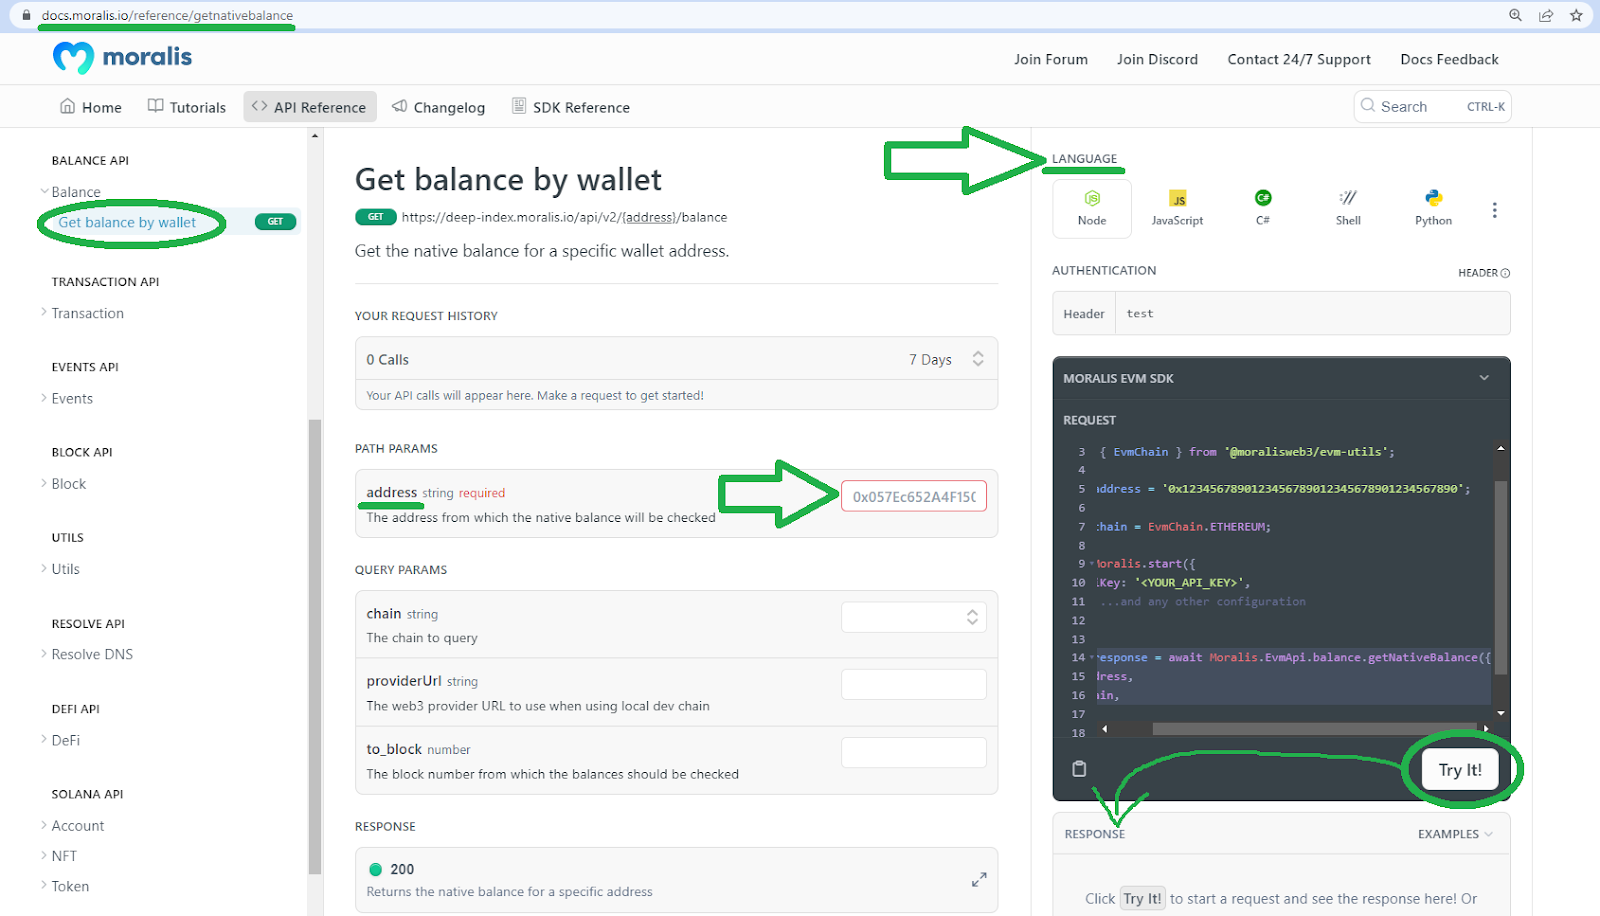
Once on the above page, you’ll notice that you can fetch any wallet’s native balance by entering a wallet address. Furthermore, the “address” parameter is the only required parameter that this endpoint accepts. However, there are other optional parameters:
- “chain” – This parameter enables you to choose the chain you want to focus on. Moreover, you can see the list of supported chains you want to query by clicking on the entry field.
- “providerUrl” – You can use this parameter to determine the Web3 provider URL when using local dev chains.
- “to_block” – This parameter enables you to enter the block number from which the balances should be checked. That way, you are able to explore the full history of various wallet balances.
Furthermore, looking at the screenshot from the documentation page, you can see that you get to select the programming language in the top-right section of the page. Then, you can simply copy the required code snippet from the “request” field. Of course, you can also use the “Try It!” button to check out the response.

How to Get Wallet Balance Using Moralis
Now that you know the ins and outs of the “Web3 get wallet balance” endpoint, it’s time for today’s tutorial. By following the details laid out in the upcoming sections, you’ll be able to build an example wallet explorer dapp. Ultimately, these are the three steps you need to complete to get Web3 wallet balances in such a way:
- Creating a NodeJS Backend Dapp
- Initializing Moralis
- Creating a ReactJS Frontend Dapp
However, let’s do a quick demo of our example dapp before showing you how to get wallet balances for crypto.
Get Web3 Wallet Balance with Our Example Dapp – Demo
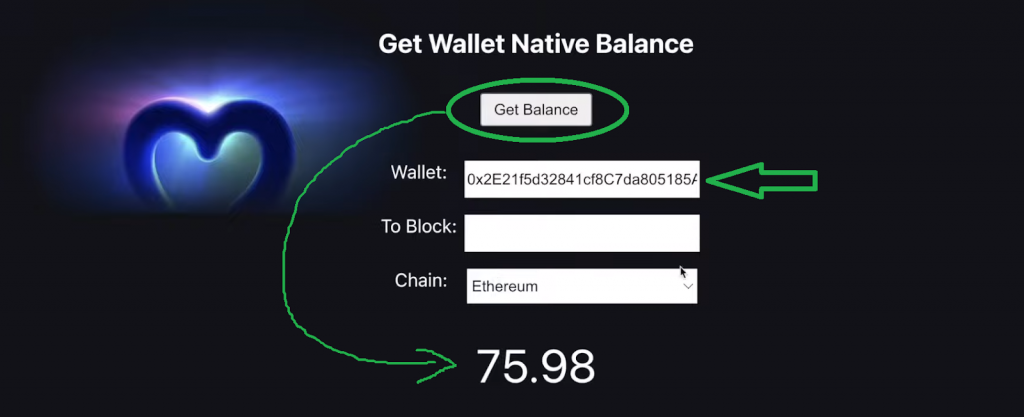
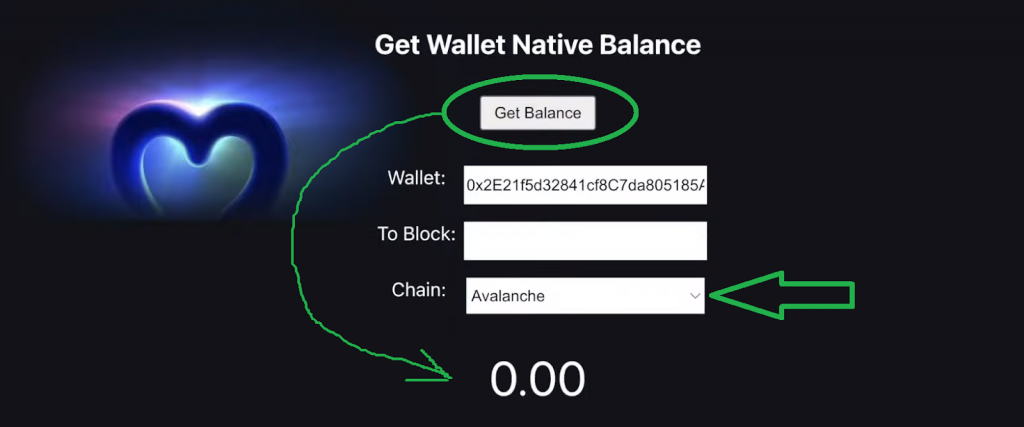
The following screenshot demonstrates what our “Get Wallet Native Balance” dapp looks like:

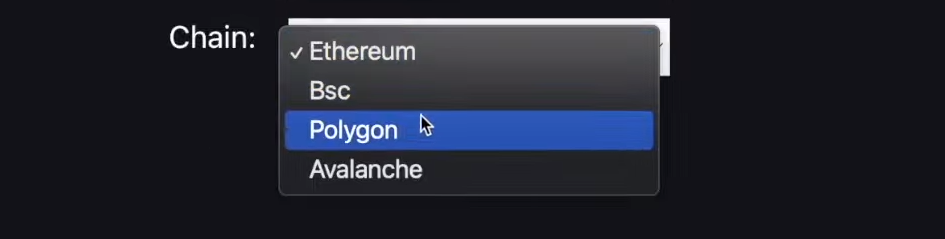
As you can see, it comes with its title at the top, followed by the “Get Balance” button. However, before we can use that button to get Web3 wallet balance, we need to enter the required parameter – a wallet address. Furthermore, our example dapp also offers the option to focus on any past blocks via the “To Block” entry field. Last but not least, the “Chain” option enables us to select the network we want to focus on:
When we paste in a wallet address and keep the “Ethereum” option selected, we can get that wallet’s current native balance (ETH):
Furthermore, if we also enter a block number, we get the past balance of that wallet on the day when that block was added:
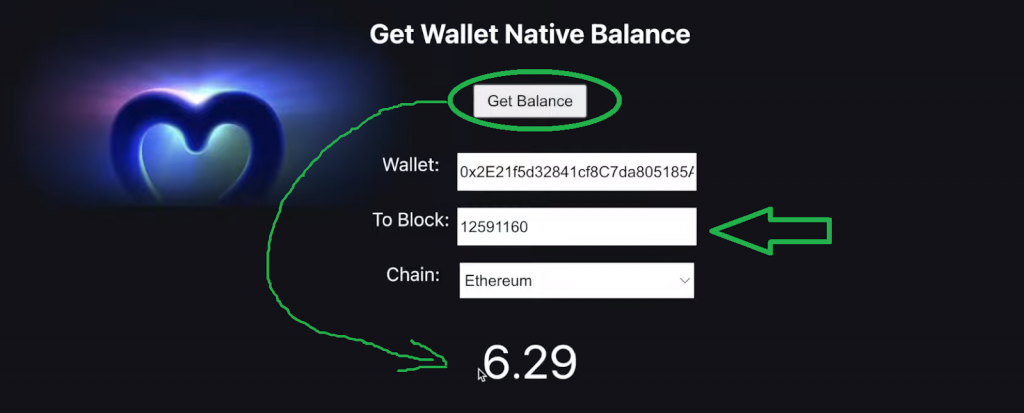
Looking at the above screenshot, you can see that the same wallet had a much lower ETH balance on June 8th, 2021 (when the “12591160” block was added).
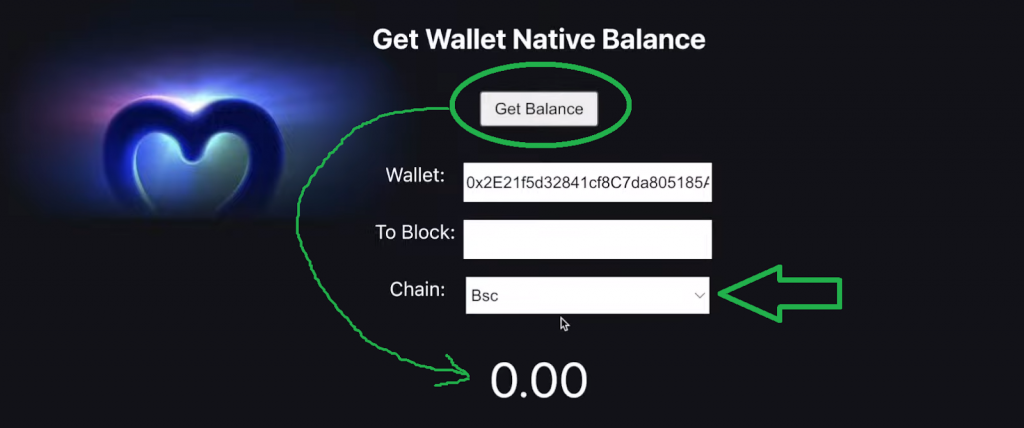
We can also adjust the chain to get other native wallet balances:
- This wallet has zero BNB coins:
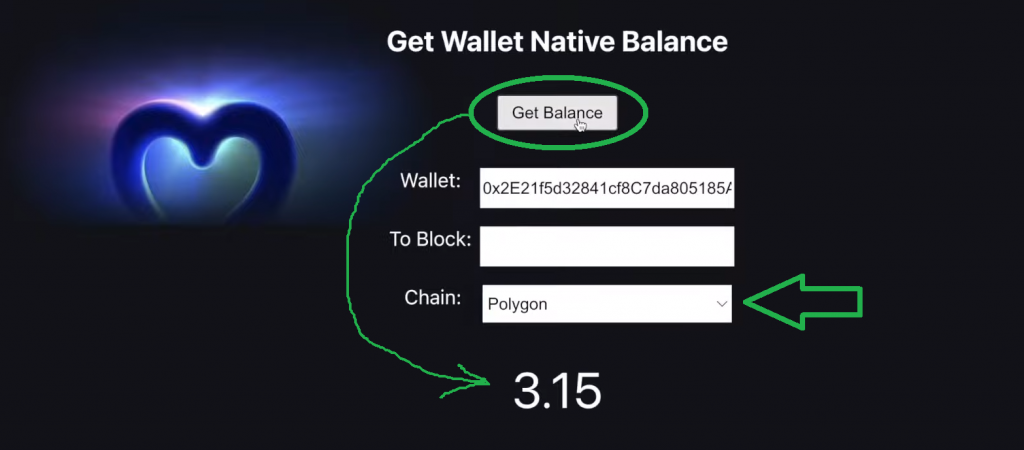
- The example wallet has 3.15 MATIC coins:
- The balance of the Avalanche native coin (AVAX) is also zero for that wallet address:
If you’d like to learn how to get wallet balances for crypto coins using our example dapp yourself, complete the upcoming three steps.
Step 1: Creating a NodeJS Backend Dapp
Note: In case you’ve never created a NodeJS application before, start by completing the steps on the “NodeJS” page in Moralis’ docs. That way, you’ll get to properly install the required dependencies and set up and run an Express server.
When youm have a basic NodeJS application ready and running on an Express server, you can create your “index.js” script. The latter will get wallet balance on the backend using the “getNativeBalance” endpoint. However, you must first define the required constants at the top of the file:
const express = require("express");
const Moralis = require("moralis").default;
const app = express();
const cors = require("cors");
const port = 3000;
With the above lines of code in place, ensure that your dapp uses “cors” and “express”:
app.use(cors());
app.use(express.json());
Using the “Web3 Get Wallet Balance” Endpoint
You can now create the “get” endpoint to the “balance” route. Using a simple “if-else” statement, you get to ensure that the “getNativeBalance” endpoint accepts the provided parameters (as demonstrated above). As such, here are the lines of code that you need to add to your “index.js” file:
app.get("/balance", async (req, res) => {
  try {
    const { query } = req;
    let balance;

    if (query.toBlock) {
      balance = await Moralis.EvmApi.balance.getNativeBalance({
        address: query.address,
        chain: query.chain,
        toBlock: query.toBlock
      });
    }else{
      balance = await Moralis.EvmApi.balance.getNativeBalance({
        address: query.address,
        chain: query.chain,
      });
    }

    const result = balance.raw;

    return res.status(200).json({ result });
  } catch (e) {
    console.log(e);
    console.log("something went wrong");
    return res.status(400).json();
  }
});
Looking at the lines of code above, you can see that this NodeJS dapp queries the details from the entry fields. As such, we will link to them on the frontend, creating the “Get Balance” button. Furthermore, you can see that the backend only queries the “address” and “chain” parameters if a “toBlock” is not provided. Moreover, the code above returns results in a raw format and console-logs results and potential errors.
Step 2: Initializing Moralis
The last piece of the “index.js” script revolves around initializing Moralis. Hence, make sure to add the following lines of code to that script:
Moralis.start({
  apiKey: "MORALIS_API_KEY",
}).then(() => {
  app.listen(port, () => {
    console.log(`Listening for API Calls`);
  });
});
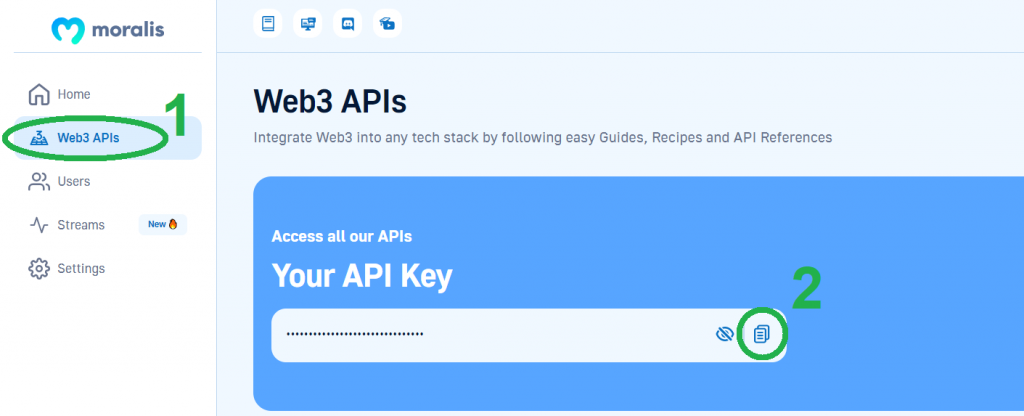
Nonetheless, to make the above lines of code work, you must replace the “MORALIS_API_KEY” placeholder with your actual Web3 API key. To do this, you need to access your Moralis admin area. To access the latter, you need to have your Moralis account ready. So, in case you haven’t done so yet, use the “free Moralis account” link stated at the outset of this article to create your account. Once inside your Moralis admin area, select the “Web3 APIs” page and copy your API key:
Finally, complete your NodeJS dapp by pasting your Web3 API key in place:

Note: You can access the complete “index.js” script covered in this article on GitHub.
Step 3: Creating a ReactJS Frontend Dapp
Odds are you have some experience with creating JavaScript applications. As such, you probably know how to create the above-demonstrated frontend app yourself from scratch. However, we want to make sure that there’s no confusion; hence, you can find the required ReactJS script on GitHub. With those files at your disposal, you just need to clone our code. By doing so, you can have your own instance of our “Get Wallet Native Balance” dapp ready in a couple of minutes.
Moreover, the core file of our dapp’s frontend functionality is “App.js“. The latter uses the “fetchBalance” function to get the wallet balance for the entered address. Here are the details of that function:
 async function fetchBalance() {

    let res;

    if(toBlock){
      res = await axios.get(`http://localhost:3000/balance`, {
        params: { address: address, chain: chain, toBlock: toBlock },
      });
    }else{
      res = await axios.get(`http://localhost:3000/balance`, {
        params: { address: address, chain: chain },
      });
    }

    console.log(res);

    setBalance((res.data.result.balance / 1E18).toFixed(2))
  }
Looking at the last line of code above, you can see that we take the raw balance, which includes eighteen decimals, and round it to two decimal places. If you return to the above demo section, you’ll see that all balances use two decimals.
Video Version of Today’s Tutorial
If you want further guidance and a more thorough code walkthrough, make sure to check out the video below. In it, you’ll have a chance to watch our in-house expert present the above steps. Starting at 3:54, you can see the details of the core backend script (“index.js”). Then, starting at 5:24, you can reexamine the “App.js” script and refresh your frontend dev skills.
Nonetheless, make sure to use your localhost address to take your instance of our example dapp for a spin. Try using different wallet addresses and different chains. We also encourage you to explore past balances by using different block numbers.
Get Wallet Balance – How to Get Wallets Native Crypto Balance – Summary
Today’s article taught you how to get wallet balances for crypto native coins. As such, you now know that Moralis’ “getNativeBalance” is the backend tool that makes fetching this on-chain data as straightforward as it gets. Furthermore, you also learned that in order to use this excellent tool, you need your Moralis Web3 API key. If you completed the above three-step tutorial, you now know how to get it. Moreover, this tutorial also showed you how to create a proper NodeJS backend dapp and a matching ReactJS for the client side. Hence, you had an opportunity to create your own instance of our “Get Wallet Native Balance” dapp. With this dapp at your disposal, you are able to get wallet balance for any address on all leading EVM-compatible chains effortlessly.
If you enjoyed today’s tutorial, we encourage you to dive deeper into the Moralis docs. Now that you are familiar with the concept, you’ll find it even easier to work with other Moralis’ Web3 API endpoints. Aside from the Moralis documentation, we recommend expanding your blockchain development horizons with the content available on the Moralis YouTube channel and the Moralis blog. These two outlets can serve as your free ongoing crypto education. Some of the latest topics focus on creating a Minecraft Web3 game, using Firebase as NFT metadata storage, building a blockchain Discord bot, Solana smart contract examples, Ethereum webhooks, and much more.
Last but not least, you may be interested in taking a more professional approach to your crypto education. In that case, you ought to enroll in Moralis Academy. Additionally, if you agree that centralized financial infrastructure needs to be replaced with decentralized solutions, you may want to master DeFi in 2022.
