Microsoft Azure PlayFab is a powerful gaming backend platform. Combined with Unity, it can help you easily create advanced games. However, the real opportunities lie in Web3 gaming. Thus, we decided to illustrate herein how you can create a dapp (decentralized application) with PlayFab. The key to using this great legacy tool for Web3 development is Moralis. This enterprise-grade Web3 API provider equips you with three core functionalities that enable you to create decentralized applications. With Moralis’ Web3 authentication feature, you can onboard users effortlessly. With Web3 syncs from Moralis, you can establish communication paths between smart contracts and your dapps. Also, Moralis’ Web3 API lets you easily fetch all sorts of on-chain data using single lines of code.
While our main focus herein will be on PlayFab, we will also utilize Unity. So, if you want to create a dapp with PlayFab and Unity, you can do so by completing these five steps:
- Complete the initial Microsoft Azure PlayFab setup
- Set up Azure functions
- Create Azure functions with Visual Studio Code (VSC)
- Deploy Azure functions using VSC
- Set up Unity and connect it with Microsoft Azure PlayFab
However, before we tackle the above five steps, we need to show you how to create your free Moralis account. The latter will be your ticket to obtaining your Moralis Web3 API key, which you’ll need when setting up Azure functions. Hence, creating a Moralis account is a prerequisite if you want to create a dapp with PlayFab. Furthermore, before we roll up our sleeves, you should note that Moralis is cross-chain interoperable. As such, it enables you to easily target all leading programmable blockchains, including Ethereum, Solana, Avalanche, Polygon, BNB Chain, Cronos, and others. In turn, you can expand your reach quickly and future-proof your dapps!
Create a Dapp with PlayFab and Unity – The Main Prerequisite
As mentioned, you need to get your Moralis account ready in order to obtain your Moralis Web3 API key. The latter will be an essential piece of the puzzle when setting up Azure functions. So, if you haven’t done that yet, use the “create your free Moralis account” link. On the other hand, you may also visit the Moralis homepage and click one of the “Start for Free” buttons:

In the next step, enter your email address and create your password:

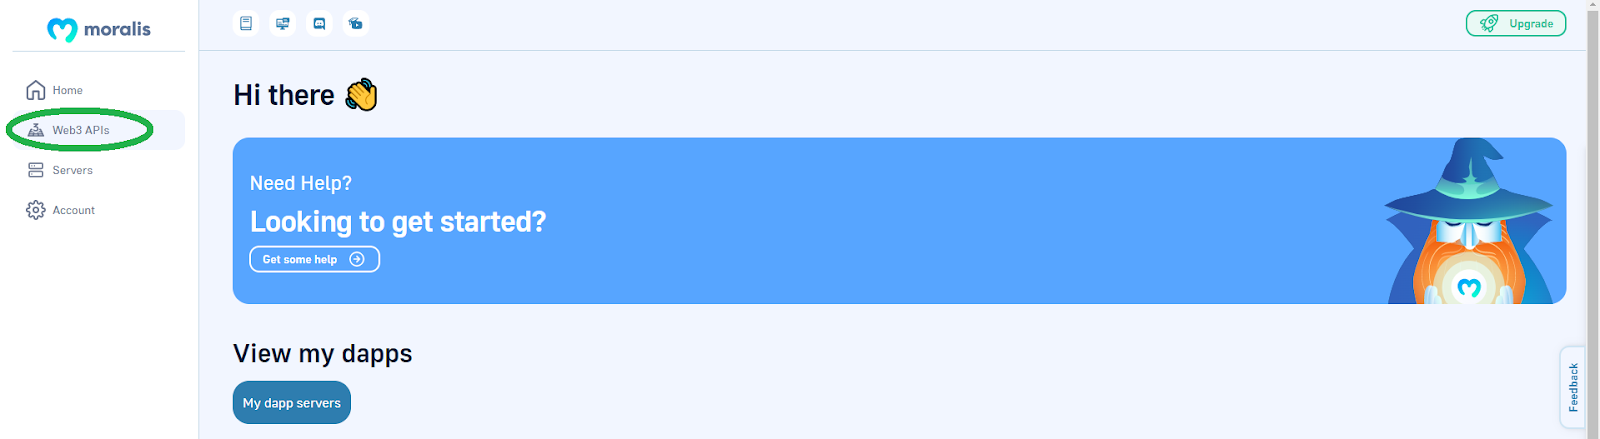
Also, don’t forget to confirm your account by clicking on the confirmation link that will come to your email inbox. After doing so, you’ll be able to access your Moralis dashboard. There, you’ll need to click on the “Web3 APIs” option in the side menu:
If you are planning on focusing on Ethereum or other EVM-compatible chains, the EVM API will be your focus. However, in case you want to create your dapps on Solana, select “Solana API”. Then, click on “Copy API Key”, followed by a click on “Web3 Api Key”:
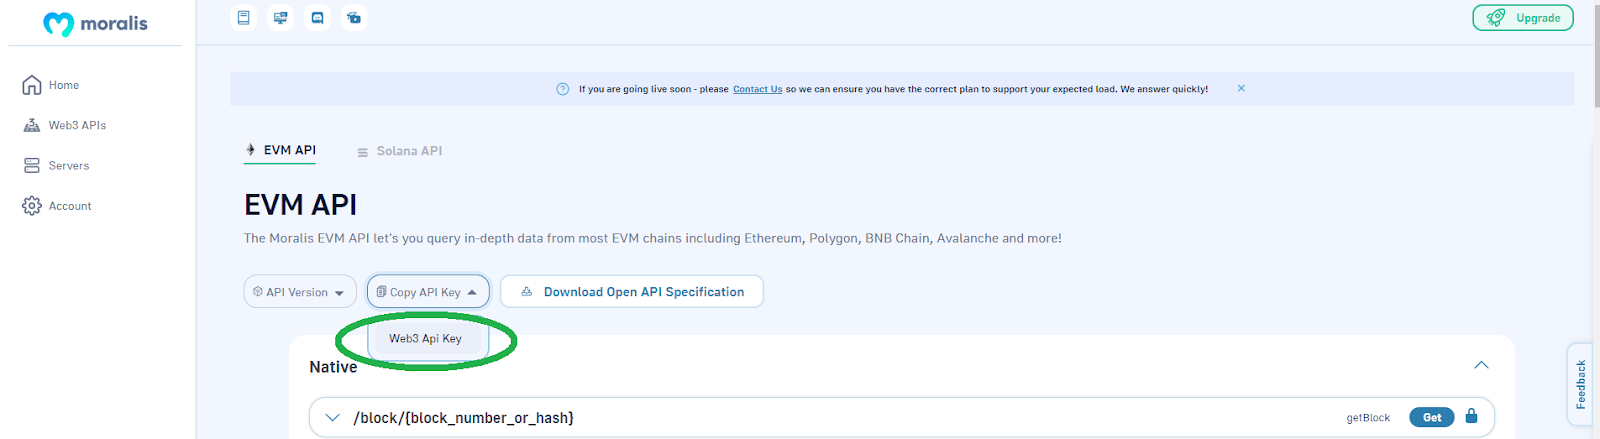
By doing so, you will see a notification stating that you’ve successfully copied your Moralis Web3 API key:

Nonetheless, there’s another way to copy your Moralis Web3 API key. You can obtain it via the “Account” option. Once on the “Account Setting” page, click on the “Keys” tab and then copy your Web3 API key:

Create a Dapp with Playfab and Unity in 5 Steps
If you remember, we need to go through these five steps to create a dapp with PlayFab and Unity:
- Complete the initial Microsoft Azure PlayFab setup
- Set up Azure functions
- Create Azure functions with Visual Studio Code (VSC)
- Deploy Azure functions using VSC
- Set up Unity and connect it with Microsoft Azure PlayFab
Moving forward, we will break each of the five main steps into smaller steps. As a result, you will be able to easily follow our lead and create a dapp with PlayFab and Unity in no time.
Create a Dapp with PlayFab – Step 1: The Initial Microsoft Azure PlayFab Setup
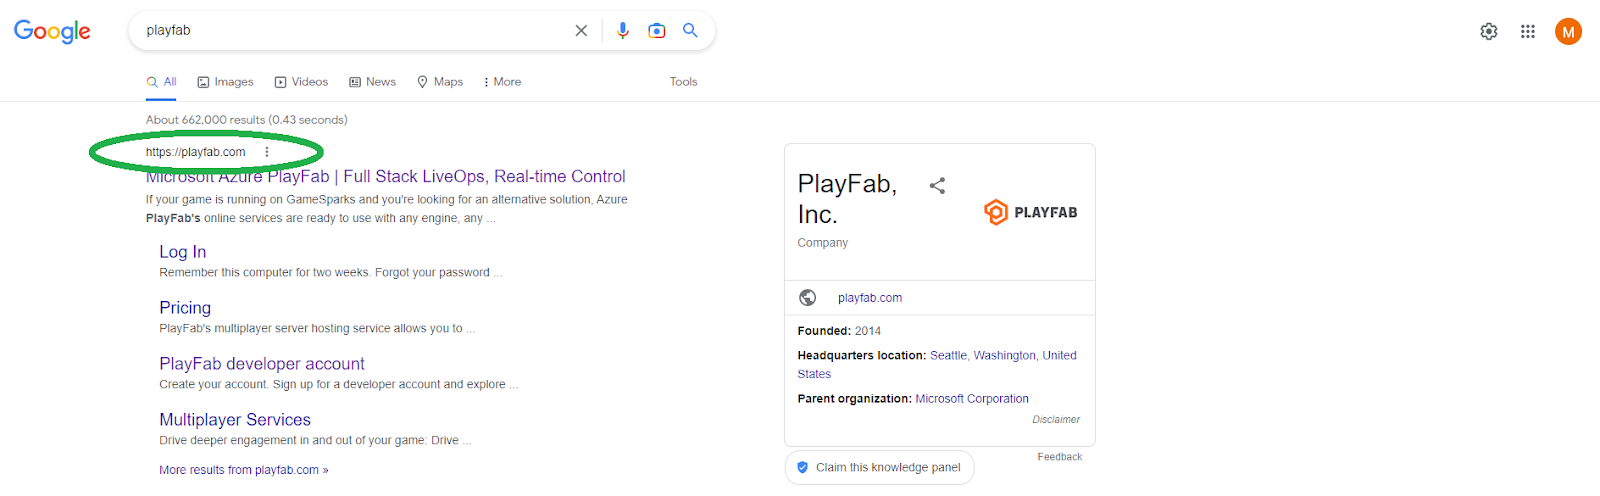
As you probably already understand, you need an active PlayFab account to use this Microsoft tool for game development. Fortunately, you can choose a free plan to get started without any additional cost. With that said, you must first visit the official PlayFab website. Use your favorite browser and a reliable search engine:
Once on the PlayFab homepage, click the “sign up” button:

The above button will take you to the PlayFab signup page, where you need to enter your credentials:

With your PlayFab account ready, you will need to create a new title. As you can see in the image below, we named ours “Moralis”:

Then, you will need to go to your settings:
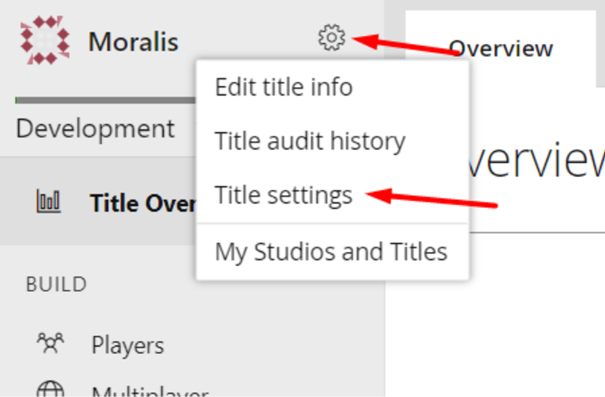
Next, navigate to the “API Features” tab and write down the “Title ID”. You will need this ID as we move on when setting up the Azure functions. With your title ID noted, go to the “Secret Keys” tab and write down your “Secret key”. As with the “Title ID”, you will need that value in the second major step of this tutorial.
Create a Dapp with PlayFab – Step 2: Set Up Azure Functions
In step one, you obtained your PlayFab “Title ID” and “Secret key”. As such, you are now ready to set up your Azure functions. We do this by using Azure Function App, which enables you to build web APIs. Hence, we will use that Azure feature to run Moralis in the backend. However, Azure Function App is a separate product, so you need another account to use it. Thus, make sure to create your free Azure account:

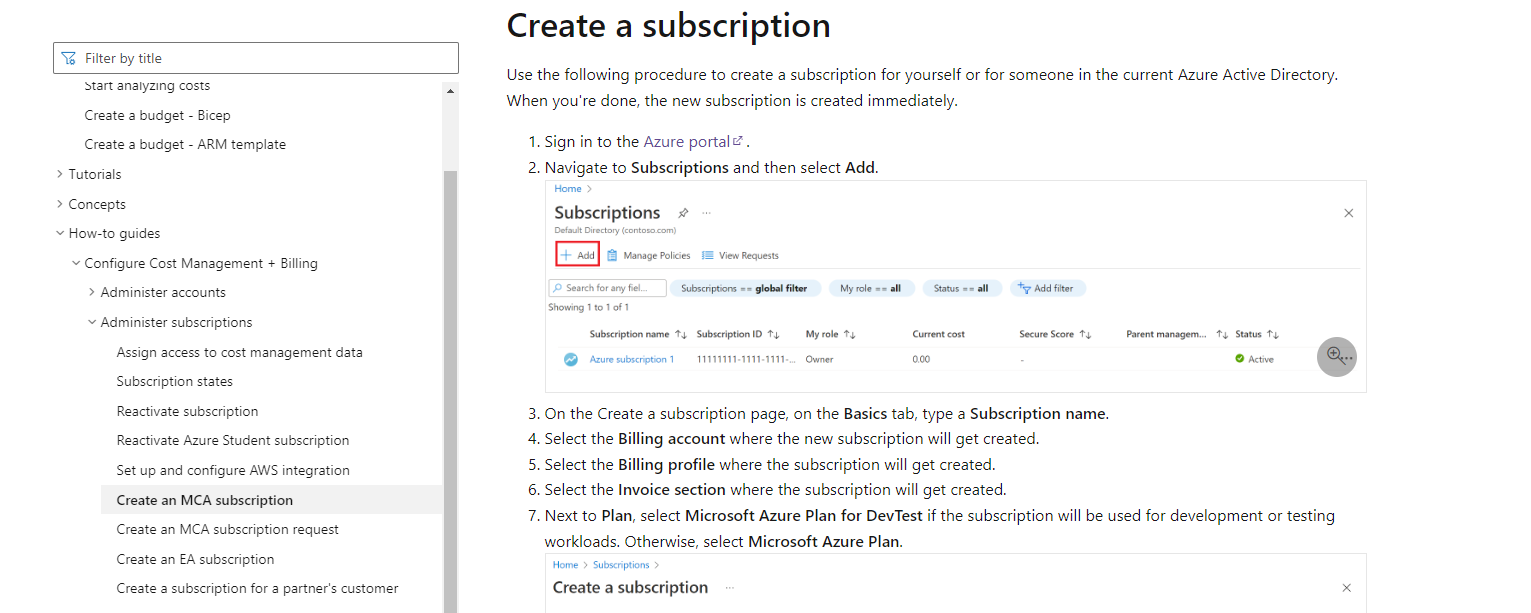
Next, you must create your Microsoft Customer Agreement (MCA) subscription. Essentially, you will need to complete fifteen simple steps. For detailed instructions, use Microsoft’s documentation.
With your MCA ready, use your Azure search bar and type in “Function App”:

After selecting “Function App” (as shown above), you’ll get to create a new function app. Use the screenshot below to match your settings:
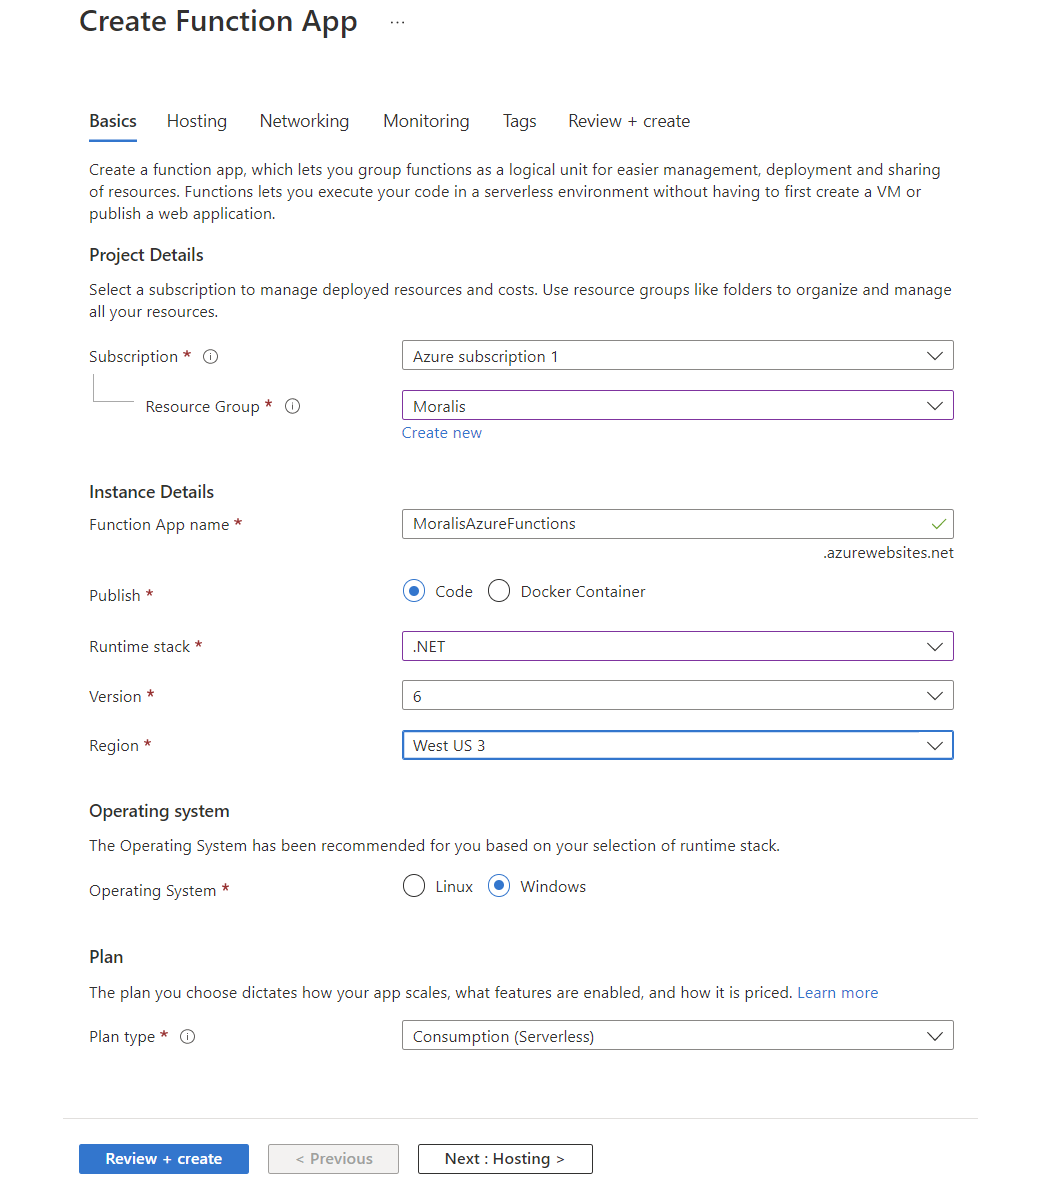
With the above details in place, click on the “Review + create” button, followed by a click on “Create”. Then, you’ll need to open the above-created function app that you’ve named “MoralisAzureFunctions”:

Next, go to “Configuration” and click on the “New application setting” option:

Name your new application setting “MORALIS_API_KEY“. Paste the Moralis Web3 API key you obtained previously in the value entry field. Moreover, leave the “Deployment slot setting” option unchecked and hit “Ok”.
Use the “New application setting” button four more times to create the following four application settings. So, repeat the above actions; however, use these details:
- Second Application Setting:
- Name: “MORALIS_AUTHENTICATION_API_URL”
- Value: “https://authapi.moralis.io/”
- Third Application Setting:
- Name: “MORALIS_WEB3_API_URL”
- Value: “https://deep-index.moralis.io/api/v2”
- Fourth Application Setting:
- Name: “PLAYFAB_TITLE_ID”
- Value: Your PlayFab title ID (obtained above)
- Fifth Application Setting:
- Name: “PLAYFAB_DEV_SECRET_KEY”
- Value: Your PlayFab secret key (obtained above)
With all of the above application settings in place, click on “Save”:

Finally, click on “Continue”:

Create a Dapp with PlayFab – Step 3: Creating Azure Functions with Visual Studio Code (VSC)
Before you go about creating Azure functions with VSC, you need to get the following prerequisites in place:
- The .Net 6.0 SDK
- Azure functions core tools version 4.x
- Download and install Visual Studio Code
- C# extension for VSC
- Azure functions extension for VSC
Moreover, this step of creating dapps with PlayFab is all about coding Azure functions that integrate the Moralis SDK. To simplify things, we made the complete code available on GitHub.
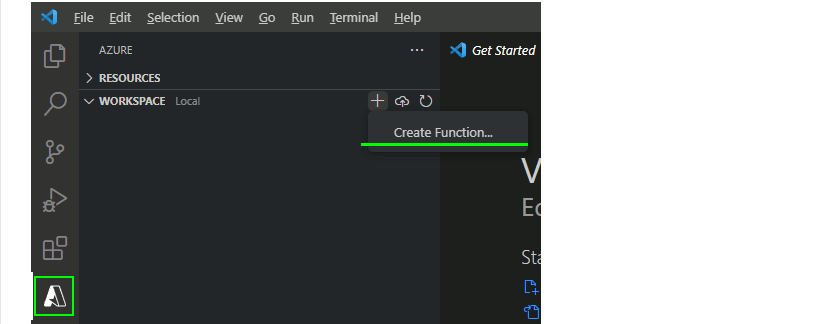
Start by opening VSC. Then, select “Azure”, followed by “Resources”, where you get to add a function:
Next, click “Create a new project” and select an existing folder or create a new one. Feel free to follow our lead and create the “example-auth-azure-functions” folder. Also, make sure to select C# as a programming language:

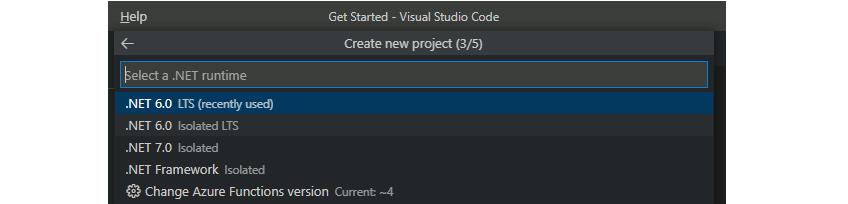
Then, select the “.NET 6.0 LTS” runtime:
Next, select “HTTP trigger” as your template:

Then, provide the “PlayFab.AzureFunctions” as a root namespace for your project:

As far as “AccessRights” go, select “Function”:

Next, select the “Open in current window” option. Then, you will see a pop-up window indicating missing dependencies. Click on the “Restore” button:

Finally, open the “.csproj” file. In it, you should see the “ItemGroup” element with one or more “PackageReferrence” elements. You need to select that section and replace it with the following lines of code:
<ItemGroup>
    <PackageReference Include="Microsoft.NET.Sdk.Functions" Version="4.1.1"/>
    <PackageReference Include="PlayFabAllSDK" Version="1.127.220718"/>
    <PackageReference Include="PlayFabCloudScriptPlugin" Version="1.53.190627-alpha"/>
    <PackageReference Include="Moralis" Version="2.0.4-beta"/>
</ItemGroup>
Don’t forget to save the updated file.
Main Functions Code Walkthrough
When you created your function, it generated the “ChallengeRequest.cs” file. However, we want you to rename it to “MoralisPlayFab.cs” and the class to “MoralisPlayFab“. Next, you need to replace the existing “using” statement with these:
using System;
using System.IO;
using System.Threading.Tasks;
using System.Collections.Generic;
using Microsoft.AspNetCore.Mvc;
using Microsoft.AspNetCore.Http;
using Microsoft.Azure.WebJobs;
using Microsoft.Azure.WebJobs.Extensions.Http;
using Microsoft.Extensions.Logging;
using PlayFab.ServerModels;
using Moralis.Network;
using Moralis.AuthApi.Models;
using Moralis.AuthApi.Interfaces;
using Newtonsoft.Json;
Then, create the following variables inside the “MoralisPlayFab” class:
private static string AuthenticationApiUrl = Environment.GetEnvironmentVariable("MORALIS_AUTHENTICATION_API_URL", EnvironmentVariableTarget.Process);

private static string Web3ApiUrl = Environment.GetEnvironmentVariable("MORALIS_WEB3_API_URL", EnvironmentVariableTarget.Process);

private static string ApiKey = Environment.GetEnvironmentVariable("MORALIS_API_KEY", EnvironmentVariableTarget.Process);
You also need to change the name of the “run” method to “ChallengeRequest“. Furthermore, remove the “get” parameter of the “HttpTrigger“. Nonetheless, copy the “ChalengeRequest” method and rename it “ChallengeVerify“. In addition, also add the following lines of code to each of the two methods:
// Create the function execution's context through the request
string requestBody = await new StreamReader(req.Body).ReadToEndAsync();
// Deserialize Playfab context
dynamic context = JsonConvert.DeserializeObject(requestBody);
var args = context.FunctionArgument;
For a detailed code walkthrough regarding the two methods, use Moralis’ documentation. The “ChallengeRequest Method” section will walk you through the details of the “ChallengeRequest” method. Moreover, the “ChallengeVerify Method” section will walk you through the “ChallengeVerify” method.
Also, in the documentation, you will learn how to add methods that retrieve wallet balances, including fungible and non-fungible tokens (NFTs). This is where the power of Moralis makes things feel like a breeze.
Note: Use the previous “GitHub” link or visit the “Complete MoralisPlayFab.cs” section to see the entire code.
Create a Dapp with PlayFab – Step 4: Deploy Azure Functions Using VSC
With the above lines of code in place, it’s time to deploy your Azure functions, and you will do this with VSC. So, start by signing in to Azure:

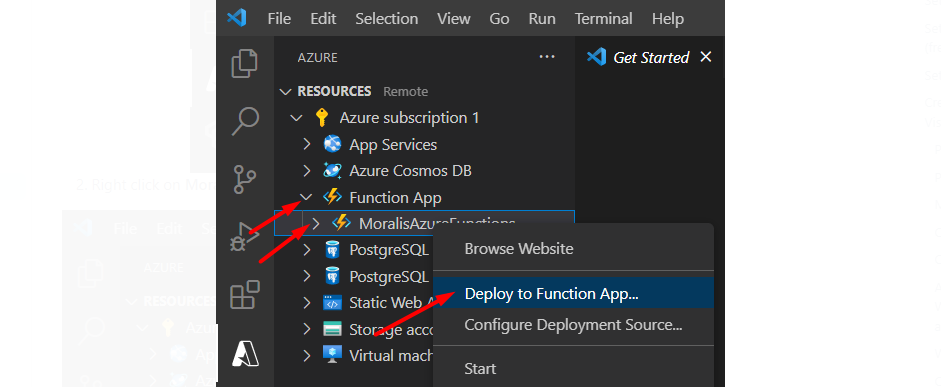
Once signed in to Azure, you’ll be able to right-click on “MoralisAzureFunctions”. Then, select the “Deploy to Function App” option:
To proceed, you’ll need to click on “Deploy” from the pop-up window that appears:

After deploying your Azure functions, you need to go to “Automation” inside your PlayFab dashboard:

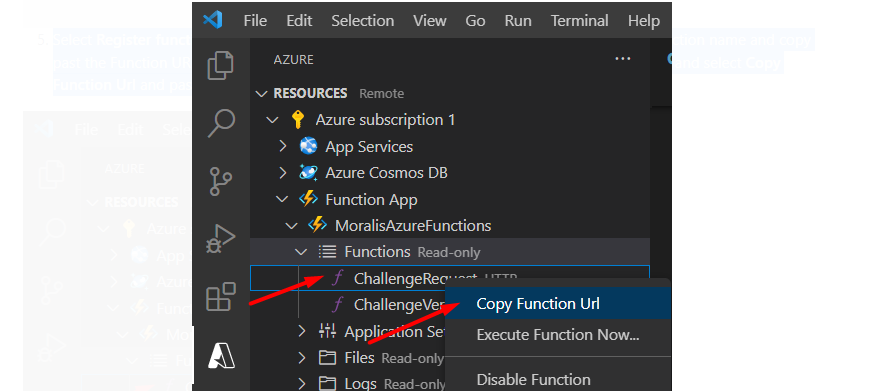
Then, select the “Register function” option and set the “Trigger” type to HTTP. Next, enter “ChallengeRequest” under the function name and copy-paste the function URL from VSC. To get the function URL in VSC, right-click on “ChallengeRequest” under “Functions” and click on “Copy Function Url”:
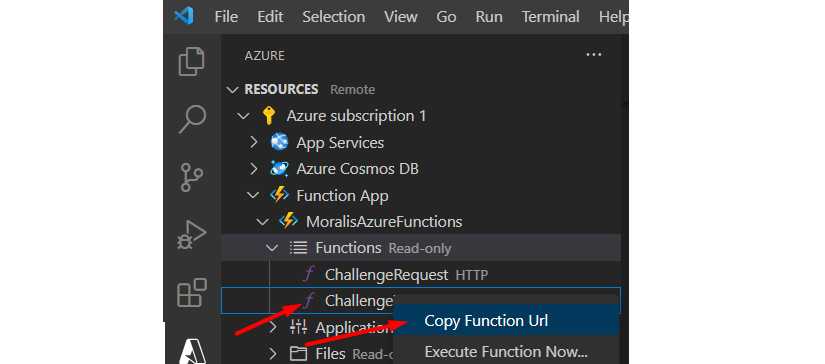
Select the “Register function” option for the second time and set the “Trigger” type to HTTP again. This time repeat the above process for “ChallengeVerify” (function name):
If you remember, you also have the “GetNativeBalance“, “GetTokenBalances“, and “GetNfts” operations. Accordingly, repeat the “Register function” process for these endpoints and copy their URLs from your Moralis dashboard.
Create a Dapp with PlayFab – Step 5: Set Up Unity and Connect it with PlayFab
Now that you’ve successfully deployed and registered your Azure functions, you need to connect PlayFab with Unity. By using our Unity demo project, you can easily enable secure Web3 authentication. So, use the above “GitHub” link and download the ZIP file:

After extracting the file, you will see the “Complete” and “Starter” folders. If you want to run the application, you should open the “Complete” project. However, if you want to work your way through the tutorial, go with the “Starter” project.
Next, click on “PlayFab” > “Editor Extensions”:
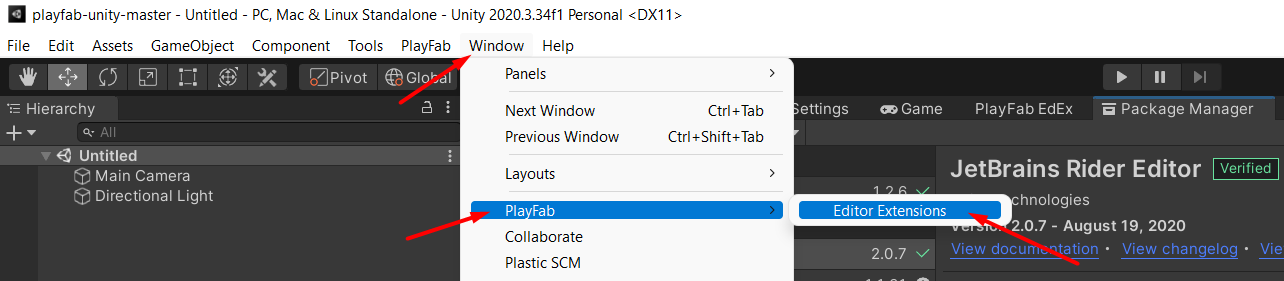
Note: In case Unity doesn’t show the above menu, restart it.
Then, click on “LOG IN” and enter your PlayFab credentials:

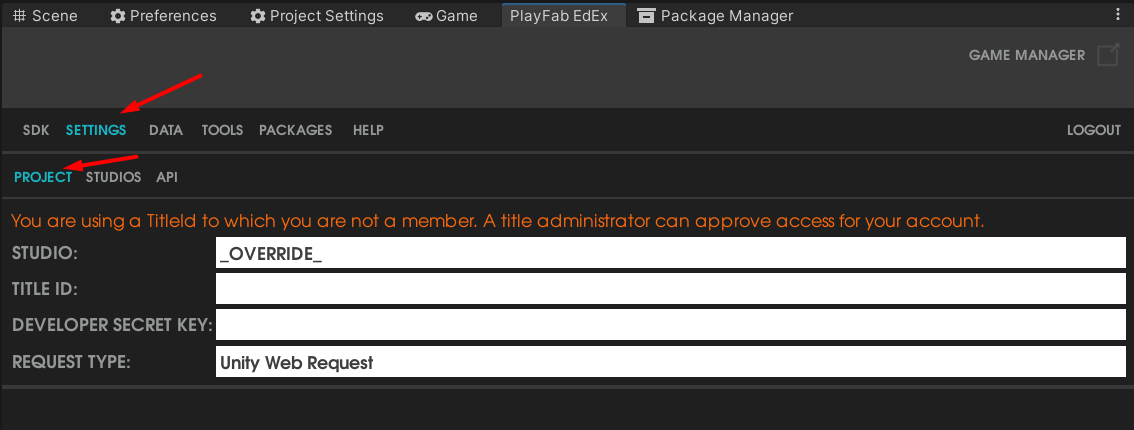
Once logged in, go to “Settings” > “Project”, where you need to select your studio and title ID:
Finally, go to the “Scenes” folder and open “SampleScene”:

Exploring Our Demo Unity Web3 Game
With PlayFab connected to Unity, you’ve successfully completed all five steps of the “create a dapp with PlayFab” journey. However, we encourage you also to explore our Unity demo game. As far as that goes, your next steps depend on the type of project you choose above. In case you went with the “Complete” project, you can directly run the “SampleScene” and select the “PLAY AS GUEST” option:

On the other hand, if you choose the “Starter” project, you must complete specific action steps to implement the necessary functionality. In that case, we encourage you to use the “Programmatically Interact with Moralis via PlayFab” section of the previously-linked Moralis documentation page. That section will walk you through the core scripts. Moreover, you will learn how to integrate your instance of this Unity dapp with Moralis via PlayFab by completing 24 simple steps.
You will also follow some straightforward steps that wire up the Moralis Web3 Auth service. With that in place, you will be able to play this example game as if you selected the “Complete” project.
How to Create a Dapp with PlayFab and Unity in 5 Steps – Summary
In this article, you learned how to create a dapp with PlayFab and Unity. Further, you saw that thanks to the ultimate Web3 API provider, Moralis, you can add Web3 functionality quite easily. Also, by using Visual Studio Code, you discovered how to create and deploy Azure functions. Then, using the “Automation” option in your PlayFab dashboard, we showed you how to register those functions. Ultimately, by exploiting the power of Moralis, you were able to create a demo dapp using legacy dev tools. Last but not least, you also had a chance to explore our example Web3 game and even take it for a spin. Moralis offers amazing authentication features – such as MetaMask authentication with Django and how to add sign in with Magic.Link.
Moreover, now that you know how to create a dapp with PlayFab and Unity, you can dive deeper into Web3 game design. However, if you need some additional practice first, make sure to explore the Moralis YouTube channel and the Moralis blog. Both of these outlets host a ton of excellent tutorials that can help you become a dapp developer for free.
On the other hand, you might be eager to go full-time crypto sooner rather than later. In that case, becoming blockchain certified usually makes all the difference. If that’s something you find interesting, you should consider enrolling in Moralis Academy!
