This tutorial will demonstrate how you can add a sign in with RainbowKit. To illustrate the process, we will create a simple application where users can sign in with RainbowKit. Once they have authenticated themselves, the app will display an address, profile ID, and signature. However, if you would like to inspect the code for the app immediately, check out the following GitHub repo:
Full RainbowKit Authentication App Documentation – https://github.com/MoralisWeb3/demo-apps/tree/main/nextjs_moralis_auth
Before moving forward, please note that the code concerns MetaMask authentication. For this reason, you will need to make a few tweaks to make it suitable for RainbowKit. If you have questions regarding this process, follow along as we show you how to add a sign in with RainbowKit instead.
Web3 authentication is an essential part of building dapps (decentralized applications) and Web3 development in general. Furthermore, it allows users to authenticate themselves through their Web3 wallets on several platforms. Also, individuals do not have to keep track of several login credentials suggesting that the decentralized web offers a unified identification layer. Some examples of prominent wallets and solutions are MetaMask, Coinbase Wallet, RainbowKit, etc. This article will focus on the latter as we show you how to add a sign in with RainbowKit in five steps using Moralis!
Before showing you how to add a sign in with RainbowKit, we begin by exploring RainbowKit. Once we grasp the concept, we will dive deeper into the process and demonstrate the accessibility of Moralis by creating a simple authentication application in only five steps. Thus, if you follow along, you will be capable of adding RainbowKit authentication to all future blockchain projects with ease!
So, if you want to create sophisticated dapps, sign up with Moralis immediately!
What is RainbowKit?
The team behind the popular Web3 wallet, Rainbow Wallet, is behind RainbowKit. Furthermore, RainbowKit is a React library that supplies components for building a connect wallet UI (user interface) with just a few code snippets. In addition, the kit supports many wallets, including Coinbase Wallet, WalletConnect, MetaMask, and Rainbow.

If you would like to learn more about adding sign in mechanisms for other alternatives, make sure to check out our additional guide on how to add Coinbase Wallet login functionality to your apps. Otherwise, read on and learn how to add a sign in with RainbowKit!
Nonetheless, the kit provides an easy, fast, and highly customizable way for developers to add great wallet authentication experiences to all their Web3 projects. Also, RainbowKit takes care of the complicated stuff behind the scenes. As a result, developers and their teams can focus on creating great communities and unique products for their customers.
Furthermore, RainbowKit offers a selection of features, and here are three key benefits:
- Wallet Management – RainbowKit supplies wallet management out of the box for all your applications. Moreover, in addition to handling the connection and disconnection of wallets, the kit also supports several swap connection chains, wallets, displays wallet balances, etc.
- Customization – RainbowKit is highly customizable and lets you tweak the UI in unison with your branding. Also, the kit allows selecting a few pre-defined colors and radius configurations. However, creating fully customized themes for more advanced situations is also possible, which includes adding your own buttons and removing specific features.
- Industry Standards – To increase interoperability with most products, RainbowKit is based on “ethers” and “wagmi”. Moreover, these are two of the most common libraries within the space.
Now, with a deeper understanding of RainbowKit, we can move forward. So, let’s explore how to add a sign in with RainbowKit!
How to Add a Sign In with RainbowKit in 5 Steps
As mentioned previously, this brief guide will show you how to add a sign in with RainbowKit. To demonstrate the process, we will create a simple Next.js application where users can authenticate themselves with RainbowKit. Furthermore, following the sign in and authentication process, the application will display the user’s address, profile ID, and signature. Moreover, since we are using Moralis’ Web3 authentication API, we will be able to add this functionality using the following five steps:
- Installing Dependencies, Libraries, and RainbowKit
- Wrapping the Application with “WagmiConfig” and “SessionProvider”
- Creating a Request Message Endpoint
- Configuring “NextAuth” and Creating a Sign In Page
- Setting Up a User Page
Following these steps will demonstrate the capabilities of Moralis’ Web3 authentication and how to add secure authentication mechanisms to your Next.js apps. Also, once users authenticate themselves using Web3 wallets and their Web3 identity, the next-auth library is responsible for creating a session cookie. This session cookie will have an encrypted JWT inside containing various information in the users’ browsers.
Login Page:

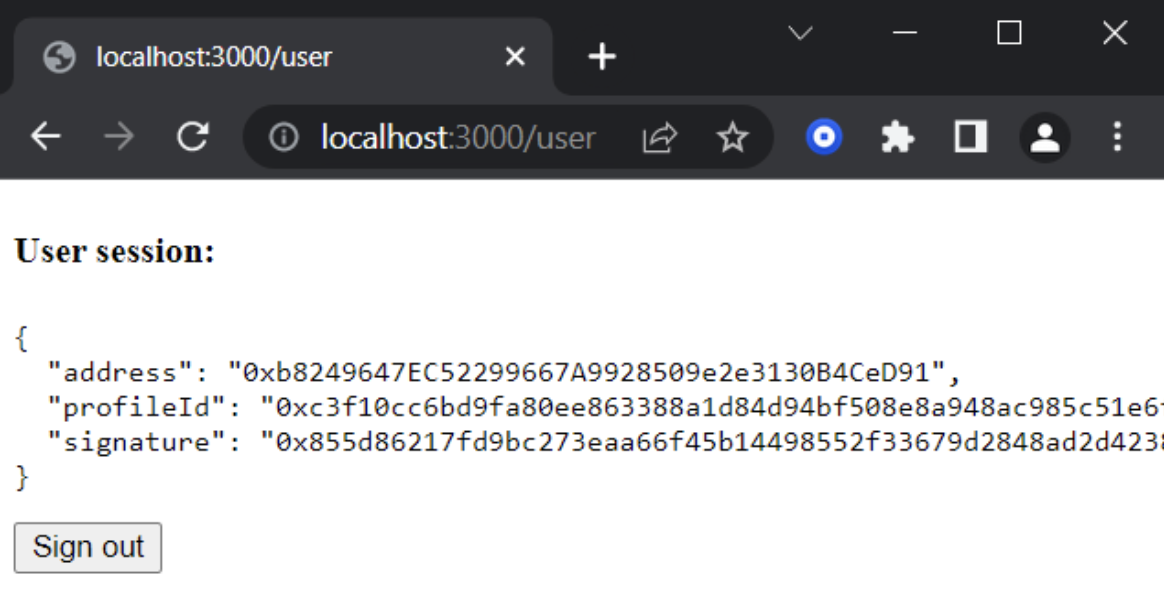
User Page:

However, before we move on to the first step of this brief guide, there are a few prerequisites you need to deal with. First of all, you will need a Moralis account. Thus, if you have not already, make sure to sign up with Moralis straight away. In addition, you need an IDE (integrated development environment). In our case, we are using Visual Studio Code; however, you are free to use any IDE you are familiar with. Finally, you need to create a Next.js application. If you have trouble with this, check out the “create-next-app” documentation or follow Moralis’ NextJS dapp guide.
With all prerequisites finalized, we will look closer at installing the dependencies, libraries, and RainbowKit!
Step 1 – Installing Dependencies, Libraries, and RainbowKit
We hope you’re as excited as we are for the initial step! Furthermore, the first step in this tutorial revolves around installing dependencies, libraries, and RainbowKit. Initially, we will install Moralis, next-auth, and axios dependencies. Moreover, to install these three components, all you need is the following npm command:
npm install moralis next-auth axios
Next up, we need to install a library, which is required to add a sign in with RainbowKit. Hence, we will install the popular wagmi library. Moreover, you might remember this from before, as RainbowKit was based on this to ensure interoperability across large parts of the Web3 ecosystem. Anyway, to install the wagmi dependency, you can use the following command:
npm install wagmi ethers
In addition to wagmi, you will also need to install RainbowKit. This can be accomplished through the following code snippet:
npm install @rainbow-me/rainbowkit
Lastly, in the final part of the first step, you need to add some environment variables to your “.env.local” file in the app root. Accordingly, this is what you need to add:
APP_DOMAIN=amazing.finance
MORALIS_API_KEY=xxxx
NEXTAUTH_URL=http://localhost:3000
NEXTAUTH_SECRET=7197b3e8dbee5ea6274cab37245eec212
We will briefly cover the last three variables as they require extra attention. First, you will need an API key, which you can get by signing up with Moralis. Second, “NEXTAUTH_URL” is currently set to “http://localhost:3000“. This is fine during the development process; however, once you are done with your app, this variable should be set to your app’s address.
Lastly, the “NEXTAUTH_SECRET” variable is used for encrypting JWT tokens of your app’s users. It is possible to put any value here; however, you can use the following website to generate a fitting value:
https://generate-secret.now.sh/32
Now, that is it for the first step; let’s progress to the second stage, where we wrap the application with “WagmiConfig” and “SessionProvider“!
Step 2 – Wrapping the Application with WagmiConfig and SessionProvider
To initiate the second step, you need to create a new “pages/_app.jsx” file. Following this, you can wrap your pages with “WagmiConfig” and “SessionProvider“. To do so, you can simply add the following content to the file you just created:
import { createClient, configureChains, defaultChains, WagmiConfig } from 'wagmi';
import { publicProvider } from 'wagmi/providers/public';
import { SessionProvider } from 'next-auth/react';
import { getDefaultWallets, RainbowKitProvider } from '@rainbow-me/rainbowkit';
import '@rainbow-me/rainbowkit/styles.css';

const { provider, webSocketProvider, chains } = configureChains(defaultChains, [publicProvider()]);

const { connectors } = getDefaultWallets({
    appName: 'My RainbowKit App',
    chains,
});

const client = createClient({
    provider,
    webSocketProvider,
    autoConnect: true,
    // added connectors from rainbowkit
    connectors,
});

// added RainbowKitProvider wrapper
function MyApp({ Component, pageProps }) {
    return (
        <WagmiConfig client={client}>
            <SessionProvider session={pageProps.session} refetchInterval={0}>
                <RainbowKitProvider chains={chains}>
                    <Component {...pageProps} />
                </RainbowKitProvider>
            </SessionProvider>
        </WagmiConfig>
    );
}

export default MyApp;
Moreover, we also ensure to include RainbowKit configurations in this file, which is essential if you want to add a sign in with RainbowKit to all your applications.
Step 3 – Creating a Request Message Endpoint
With our pages wrapped in “WagmiConfig” and “SessionProvider“, you need to create a request message endpoint. Furthermore, this endpoint will make requests to “Moralis.Auth” and generate a unique message signed on the client side. Moreover, to add the endpoint, you can go ahead and create a new API file called “pages/api/auth/request-message.js” and add the following content:
import Moralis from 'moralis';

const config = {
    domain: process.env.APP_DOMAIN,
    statement: 'Please sign this message to confirm your identity.',
    uri: process.env.NEXTAUTH_URL,
    timeout: 60,
};

export default async function handler(req, res) {
    const { address, chain, network } = req.body;

    await Moralis.start({ apiKey: process.env.MORALIS_API_KEY });

    try {
        const message = await Moralis.Auth.requestMessage({
            address,
            chain,
            network,
            ...config,
        });

        res.status(200).json(message);
    } catch (error) {
        res.status(400).json({ error });
        console.error(error);
    }
}
Now, with a request message endpoint at hand, we can move forward. Accordingly, we will advance to the fourth step and take a closer look at how you can configure “NextAuth” and create a sign in page for your application.
Step 4 – Configuring NextAuth and Creating a Sign In Page
In this step, you can go ahead and create a new ”pages/api/auth/[…nextauth].js” file. Furthermore, this will be used to configure “NextAuth“. Moreover, the file should look like this:
import CredentialsProvider from 'next-auth/providers/credentials';
import NextAuth from 'next-auth';
import Moralis from 'moralis';

export default NextAuth({
    providers: [
        CredentialsProvider({
            name: 'MoralisAuth',
            credentials: {
                message: {
                    label: 'Message',
                    type: 'text',
                    placeholder: '0x0',
                },
                signature: {
                    label: 'Signature',
                    type: 'text',
                    placeholder: '0x0',
                },
            },
              async authorize(credentials) {
                try {
                  // "message" and "signature" are needed for authorisation
                  // we described them in "credentials" above
                  const { message, signature } = credentials;

                  await Moralis.start({ apiKey: process.env.MORALIS_API_KEY });

                  const { address, profileId } = (
                    await Moralis.Auth.verify({ message, signature, network: 'evm' })
                  ).raw;

                  const user = { address, profileId, signature };
                  // returning the user object and creating  a session
                  return user;
                } catch (e) {
                  console.error(e);
                  return null;
                }
              },
        }),
    ],
    // adding user info to the user session object
    callbacks: {
        async jwt({ token, user }) {
            user && (token.user = user);
            return token;
        },
        async session({ session, token }) {
            session.user = token.user;
            return session;
        },
    },
});
Creating a Sign In Page
Following the “NextAuth” configuration, you must create a new page file, “pages/signin.jsx”. Moreover, this file needs to have the following content:
import { ConnectButton } from '@rainbow-me/rainbowkit'
import { signIn, useSession } from 'next-auth/react'
import { useAccount, useSignMessage, useNetwork } from 'wagmi'
import { useEffect } from 'react'
import { useRouter } from 'next/router'
import axios from 'axios'

function SignIn() {
  const { isConnected, address } = useAccount()
  const { chain } = useNetwork()
  const { status } = useSession()
  const { signMessageAsync } = useSignMessage()
  const { push } = useRouter()

  useEffect(() => {
    const handleAuth = async () => {
      const userData = { address, chain: chain.id, network: 'evm' }

      const { data } = await axios.post('/api/auth/request-message', userData, {
        headers: {
          'content-type': 'application/json',
        },
      })

      const message = data.message

      const signature = await signMessageAsync({ message })

      // redirect user after success authentication to '/user' page
      const { url } = await signIn('credentials', {
        message,
        signature,
        redirect: false,
        callbackUrl: '/user',
      })
      /**
       * instead of using signIn(..., redirect: "/user")
       * we get the url from callback and push it to the router to avoid page refreshing
       */
      push(url)
    }
    if (status === 'unauthenticated' && isConnected) {
      handleAuth()
    }
  }, [status, isConnected])

  return (
    <div>
      <h3>Web3 Authentication</h3>
      <ConnectButton />
    </div>
  )
}

export default SignIn
Some key takeaways are that we make sure that the “handleAuth” functionality calls the request message endpoint you created in the third step. What’s more, in addition to calling the request message, we also add the “next.auth” authentication we just finalized. Lastly, we also made sure to include the proper RainbowKit configurations. For example, we made sure to add a button from “@rainbow-me/rainbowkit”.
Step 5 – Setting Up a User Page
In this final step of the tutorial on how to add a sign in with RainbowKit, you are going to set up a user page. So, to begin, create a “pages/user.jsx” file. With the page at hand, you can continue by implementing the following content into the file:
import { getSession, signOut } from 'next-auth/react';

// gets a prop from getServerSideProps
function User({ user }) {
    return (
        <div>
            <h4>User session:</h4>
            <pre>{JSON.stringify(user, null, 2)}</pre>
            <button onClick={() => signOut({ redirect: '/signin' })}>Sign out</button>
        </div>
    );
}

export async function getServerSideProps(context) {
    const session = await getSession(context);

    // redirect if not authenticated
    if (!session) {
        return {
            redirect: {
                destination: '/signin',
                permanent: false,
            },
        };
    }

    return {
        props: { user: session.user },
    };
}

export default User;
Congratulations on finishing the above tutorial steps! At this point, you’ve installed dependencies and libraries. You have also wrapped the application and created an endpoint. In addition, you configured “Next.Auth” and set up a user page. But that were just a few honorable mentions. Also, you know how to add a sign in with RainbowKit. However, there is one more thing we need to do. So, before concluding the article, we will illustrate how you can test your application. As a result, you can ensure everything runs smoothly. Hence, follow along in the next section as we demonstrate this process.
Add a Sign In with RainbowKit – Testing the Application
At this point, we are ready to test the application. Accordingly, start the localhost server using “npm run dev” and open the sign in page that we created in step four using “http://localhost:3000/signin“. Once you launch the application, you need to click on the “Connect Wallet” button:

From there, you need to select a wallet, and since you are utilizing RainbowKit, you will have a few options, including MetaMask, Rainbow, Coinbase Wallet, etc. But, in our case, we will choose MetaMask. However, if either alternative is selected, you must sign a message. In the following image, you’ll see an example of this message:

Once you successfully authenticate, it should redirect you to the “/user” page. From there, you can read the address, profile ID, and signature. Furthermore, if you end up here after singing the message, you will know that you have successfully added a sign in with RainbowKit!
What’s more, you can also make sure that no bugs exist by visiting “http://localhost:3000/user” directly. Moreover, if a user is authenticated, it should display the information regarding the user. Also, it should redirect them back to the original “/signin” page if they are not authenticated.
If you get the same results, you will know how to add a sign in with RainbowKit. So, it is now up to you to add this functionality to all your future blockchain projects! However, if you have any issues with the process, look closer at the GitHub repository to which we linked initially. In addition, you can also check out the official RainbowKit authentication documentation.
Did you enjoy this guide? If so, we strongly encourage checking out our other articles jam-packed with how-to guides. For example, you can learn how to buy NFTs in-game, and add attributes to NFT metadata!
Add a Sign In with RainbowKit in 5 Steps – Summary
We initiated this article with a brief explanation of RainbowKit and what it entails. Accordingly, you know RainbowKit is a React library that allows developers to build great wallet authentication UIs with only a few code snippets. Moreover, some prominent features of RainbowKit are customizability and wallet management capabilities. Hence, when working with RainbowKit, you provide your app users with several options to verify their Web3 identity.
Furthermore, once we understood the kit more deeply, we demonstrated how to add a sign in with RainbowKit. In doing so, we created a simple authentication application where users could sign in using their Web3 wallets. Moreover, as we utilize Moralis, we were able to create the app and add a sign in with RainbowKit in just five simple steps:
- Installing Dependencies, Libraries, and RainbowKit
- Wrapping the Application with “WagmiConfig” and “SessionProvider”
- Creating a Request Message Endpoint
- Configuring “NextAuth” and Creating a Sign In Page
- Setting Up a User Page

However, Web3 authentication is only one of the areas in which Moralis shines. For example, you can also implement Web3 syncs and Web3 webhooks easily. Furthermore, Moralis also offers a selection of great Web3 APIs. Moreover, if you want to become a blockchain developer, we highly recommend checking out Moralis’ NFT API or Solana API. These tools allow you to create dapps and tokens quickly and easily.
Additionally, if you want to extend your knowledge and learn more about Web3 development, visit Moralis’ blog. There, you’ll find content regarding Moralis’ NodeJS SDK for Web3, blockchain syncs, or different types of DAOs. Also, you can learn how to fetch NFTs, and code a blockchain app in five steps! Furthermore, Moralis Workshops teaches you how to clone Web2 applications. Moreover, the excellent APIs, SDKs, and content are a few reasons to sign up with Moralis!
