To set up Web3 webhooks, utilizing the best tool available is of utmost importance. The enterprise-grade Web3 Streams API from Moralis provides the easiest and most accessible way for developers to set up Web3 webhooks to stream on-chain data into the backend of their projects.
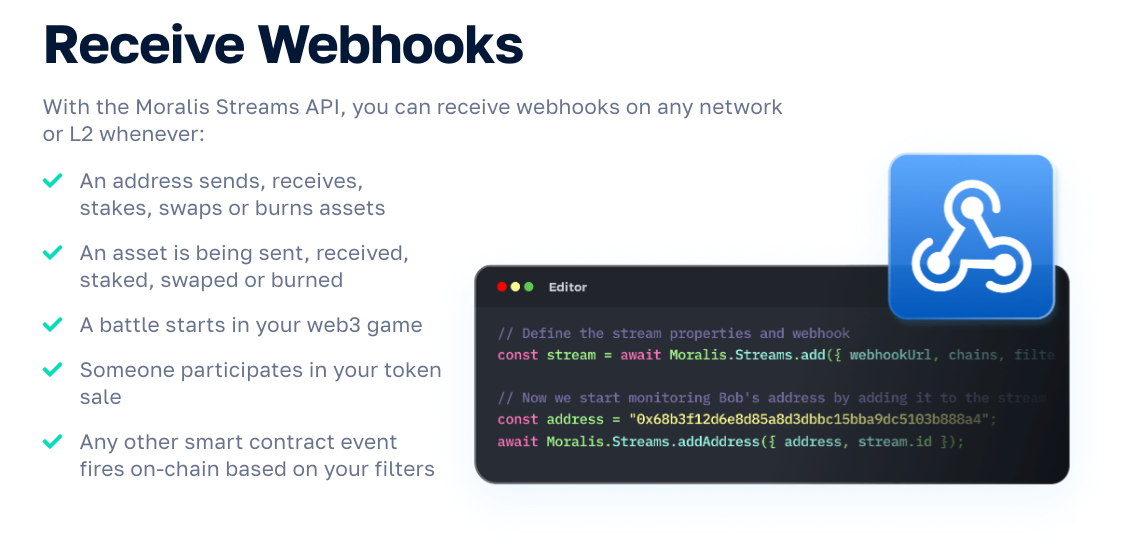
If you complete all the prerequisites in this guide, you can set up blockchain webhooks programmatically using Moralis’ JS SDK, and here is an example of what the code might look like:
import Moralis from 'moralis';
import { EvmChain } from "@moralisweb3/common-evm-utils";

Moralis.start({
  apiKey: 'YOUR_API_KEY',
});

const stream = {
  chains: [EvmChain.ETHEREUM, EvmChain.POLYGON], // List of blockchains to monitor
  description: "monitor Bobs wallet", // Your description
  tag: "bob", // Give it a tag
  includeNativeTxs: true, // select the events to monitor
  webhookUrl: "https://YOUR_WEBHOOK_URL", // Webhook URL to receive events
}

const newStream = await Moralis.Streams.add(stream);
const { id } = newStream.toJSON(); // { id: 'YOUR_STREAM_ID', ...newStream }

// Now we attach Bobs address to the stream
const address = "0x68b3f12d6e8d85a8d3dbbc15bba9dc5103b888a4";

await Moralis.Streams.addAddress({ address, id });
Overview
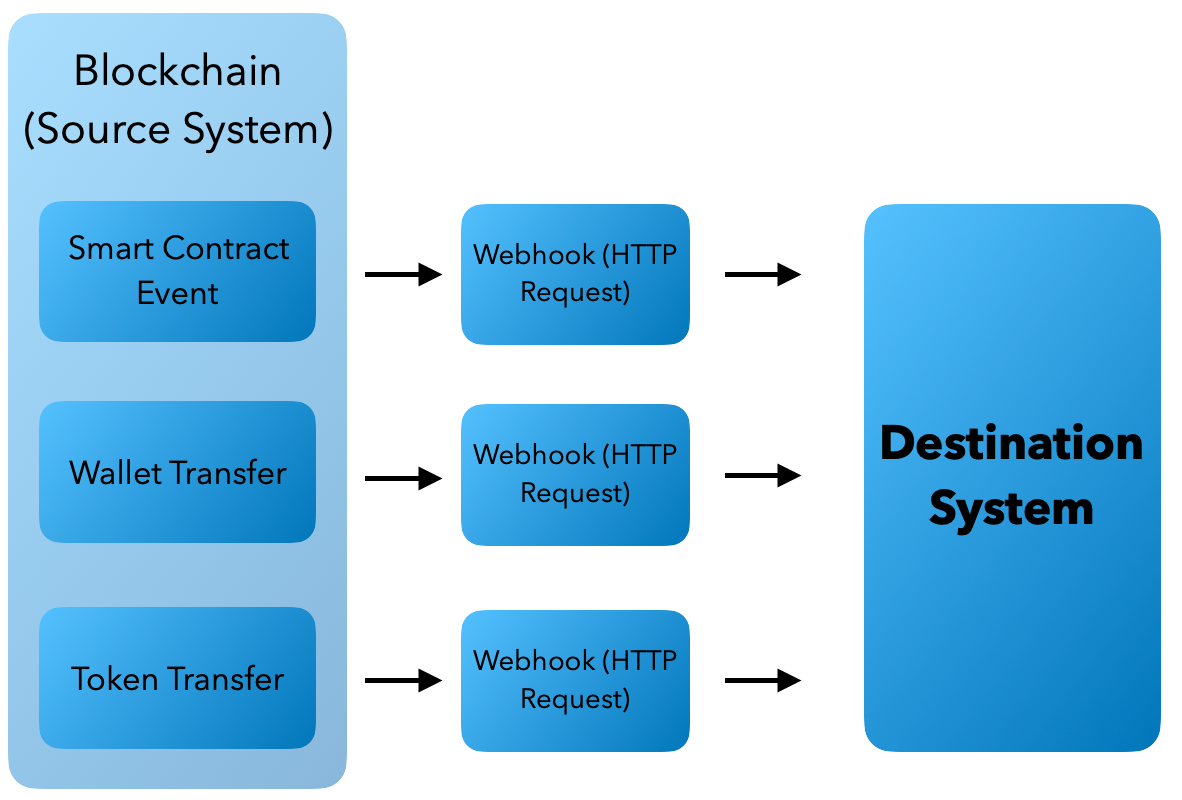
There are several ways in which applications and other platforms can communicate. However, the most efficient and effective way tends to be webhooks. Just like conventional webhooks are essential to digital intercommunications in Web2, Web3 webhooks (blockchain webhooks) are equally vital for the decentralized web. But how can developers easily establish webhook communication among decentralized applications and other traditional services? Read on as we explore this topic further and dive deep into the intricacies of Web3 webhooks! Also, as we move further, we’ll explain how to listen to blockchain events and emit HTTP requests based on predefined filters by setting up webhooks. In the context of Web3, the source system is the blockchain, and the destination system is your project.
Furthermore, in combination with exploring the ins and outs of blockchain webhooks, this guide demonstrates how to create them using one of Moralis’ enterprise-grade Web3 APIs – the Web3 Streams API. However, Moralis supplies other APIs, including the Web3 Auth API, that can aid in your development endeavors. So, if you want to become a blockchain developer, sign up with Moralis immediately. Moralis’ APIs unlock a more seamless developer experience to bridge the Web2 and Web3 development gap. As such, with Moralis, you can build smarter and faster!
Now, before we take a closer look at the main topic of setting up Web3 webhooks, we must get you all up to speed. Thus, let’s start with the basics!
What are Webhooks?
To adequately grasp Web3 webhooks, you need to start by exploring conventional webhooks and what makes them essential. In short, webhooks are HTTP requests triggered by certain events in a source system (sender) and sent to a destination system (receiver).
Moreover, in a highly connected online world where systems do not function optimally in isolation, it is essential that online systems can communicate with one another to share data. This is where webhooks enter the equation by providing an efficient way for systems to” speak” with each other. Source systems communicate with destination systems through HTTP requests sent to a webhook URL when given events occur. The source system shares additional information regarding an event through a “request payload”. Setting this up is essential for blockchain developers as you need to know how to monitor and listen to real-time blockchain activity. This being such a vital task, this article will teach you how to create webhooks based on blockchain events!
Nevertheless, since webhooks play such an essential role, it is quite evident that knowing how to use webhooks to push data between systems autonomously is highly beneficial!
What are Web3 Webhooks?
With a better understanding of conventional webhooks, it is time to delve deeper into what they are in the context of the decentralized web. As such, this section dives deeper into blockchain webhooks and sets out to answer the question, ”what are Web3 webhooks?”.

Web3 webhooks serve the same purpose as traditional webhooks, to enable cross-system communication. However, things are slightly different since Web3 is decentralized and runs on programmable blockchains powered by smart contracts. Consequently, Web3 webhooks listen to different events occurring on the blockchain and, in turn, receive real-time request payloads into your backend. The various activities can, for example, be asset transfers, a particular wallet performing a specific action, or a contract emitting an event.
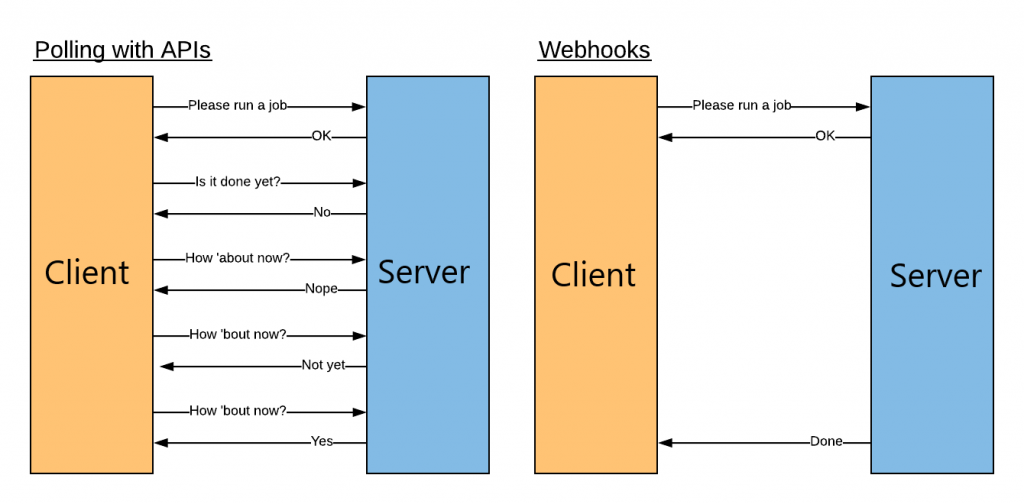
Just like conventional webhooks, Web3 webhooks enable you to avoid the tedious task of constantly polling databases and checking if the state has been altered. Instead, it is possible to utilize blockchain webhooks to automatically target events that interest you to trigger the delivery of request payloads.
When a smart contract event you are interested in occurs, the sender system pushes associated data to a webhook URL specified by you, the receiver. Moreover, the destination system can, in turn, return callback messages. These messages contain HTTP status codes, informing the sender that the data was delivered successfully.
Web3 Webhook Examples
Imagine you are using a crypto exchange to trade blockchain-related assets. As trades occur, you both send and receive assets. However, even when you are not actively trading, someone might send assets to your Web3 wallet. In this scenario, the exchange might want to send push notifications informing you of the newly received assets. So, to automate this process, the exchange subscribes to your Web3 wallet to receive webhooks whenever you receive assets. In this instance, the exchange is the destination system, and the blockchain is the source system.
Another example might be that you want to monitor transfers of particular transfer amounts occurring on-chain. In that case, you can set up a webhook listening to USDT transfers of an amount larger than $100,000, for example.
Moreover, since webhooks play such an essential role, it is quite evident that knowing how to use webhooks to push data between systems autonomously is highly beneficial. So, if you found the aforementioned examples interesting, read on as we will show you how to set up webhooks with similar purposes!
Moralis’ Web3 Streams API Explained
In Web3 development, it is essential to acquire blockchain data for dapps and other projects since this is vital for the user experience. From a conventional perspective, it has been quite a tedious task since it requires developers to run buggy RPC nodes, build abstractions, waste time setting up complex data pipelines, etc. However, fortunately, this is no longer the case since you have the option to use Moralis’ Streams API!

The Streams API allows you to stream blockchain data into the backend of your blockchain projects by setting up Web3 webhooks easily. Moreover, Moralis supports several networks such as Ethereum, Polygon, BNB Chain, and many more. Consequently, you have the option to receive webhooks on almost any network or layer-2 solution!
Furthermore, the Moralis Web3 Streams API is the backbone of Moralis’ infrastructure. But how does it work?
- Provide an address. If the address is a Web3 contract, specify the particular event you are interested in.
- Apply filters and pick when to receive webhooks based on conditions.
- Specify the networks you want to monitor.
- Add a webhook URL.
- Receive webhooks and request payloads when events trigger, matching your filters.
Nevertheless, the following section will dive deeper into this process to explain how to create Web3 webhooks with Moralis!
Set Up Web3 Webhooks with Moralis’ Web3 Streams API
Now, with a more profound understanding of blockchain webhooks, the following sections will illustrate how to set up Web3 webhooks using Moralis’ Streams API. The API is the backbone of Moralis’ infrastructure and supplies everything you need to set up Web3 webhooks in no time. Moreover, when working with Moralis, you can easily stream on-chain data into any of your future blockchain projects!
You have two options for building your first stream and receiving Web3 webhooks on any network or layer-2 solution:
- Programmatically – The first alternative is to set up streams programmatically through the use of Moralis’ SDK or API.
- Via Moralis’ Admin Panel – The second alternative is to create streams using Moralis’ web UI.
Both options are relatively straightforward; however, this guide provides a walkthrough for each option to make the process as understandable as possible. In doing so, we will illustrate how to set up a blockchain webhook for monitoring a Web3 wallet. More specifically, you will use the Web3 webhook to stream blockchain data regarding all incoming and outgoing transactions to the particular wallet.
Programmatically
This section explains how to set up a Web3 webhook programmatically using Moralis’ JS (JavaScript) SDK. To start, you initially need to launch your favorite IDE (integrated development environment) and set up a new project containing a JS file. From there, make sure you install all Moralis dependencies. If you, for example, use NodeJS, you can do so by running npm install moralis @moralisweb3/common-evm-utils in a new terminal.
With a JS project at hand, you can progress to initialize the Moralis SDK by inputting the following at the top of the file:
import Moralis from 'moralis';
import { EvmChain } from "@moralisweb3/common-evm-utils";
Moralis.start({
  apiKey: 'YOUR_API_KEY',
});
However, when inspecting the code snippet above in further detail, you’ll notice that you need to enter your Moralis API key. As such, if you have not already, register your Moralis account for free immediately!
Once you log in, you will find yourself in the Moralis admin panel. From there, you can find your key directly under the “Home” tab. You can then copy the key and replace “YOUR_API_KEY” in the code:

With Moralis initialized, create a new “stream” object where you can specify the chain(s), provide a description, add a tag, and your webhook URL. Here is an example of what it might look like:
const stream = {
  chains: [EvmChain.ETHEREUM, EvmChain.POLYGON], // list of blockchains to monitor
  description: "monitor Bobs wallet", // your description
  tag: "bob", // give it a tag
  includeNativeTxs: true, // select the events to monitor
  webhookUrl: "https://YOUR_WEBHOOK_URL", // webhook url to receive events,
}
Lastly, pass the ”stream” object as a parameter when calling Moralis’ ”Moralis.Streams.add(stream)” function, add a new ”{ id }” object, and the address you want to monitor:
const newStream = await Moralis.Streams.add(stream);
const { id } = newStream.toJSON(); // { id: 'YOUR_STREAM_ID', ...newStream }
// Now we attach Bobs address to the stream
const address = "0x68b3f12d6e8d85a8d3dbbc15bba9dc5103b888a4";
await Moralis.Streams.addAddress({ address, id });
All in all, this is what the entire file should look like:
import Moralis from 'moralis';
import { EvmChain } from "@moralisweb3/common-evm-utils";

Moralis.start({
  apiKey: 'YOUR_API_KEY',
});

const stream = {
  chains: [EvmChain.ETHEREUM, EvmChain.POLYGON], // list of blockchains to monitor
  description: "monitor Bobs wallet", // your description
  tag: "bob", // give it a tag
  includeNativeTxs: true, // select the events to monitor
  webhookUrl: "https://YOUR_WEBHOOK_URL", // webhook url to receive events,
}

const newStream = await Moralis.Streams.add(stream);
const { id } = newStream.toJSON(); // { id: 'YOUR_STREAM_ID', ...newStream }

// Now we attach bobs address to the stream
const address = "0x68b3f12d6e8d85a8d3dbbc15bba9dc5103b888a4";

await Moralis.Streams.addAddress({ address, id });
That is it for the code; all that remains is running the program. Open a new terminal, then “cd” into the location of the file containing the code, and run the following command with the name of the file:
node “FILE_NAME”
Via Moralis’ Web UI
We’ll now show you how to set up a Web3 webhook to stream on-chain data using Moralis’ web UI. More specifically, we’re going to demonstrate how to monitor USDC transactions. Here’s a complete step-by-step breakdown of the process:
- Step 1: Create a Moralis account and visit the following page: “https://admin.moralis.io/streams“. From here, click the “+ Create Stream” button:

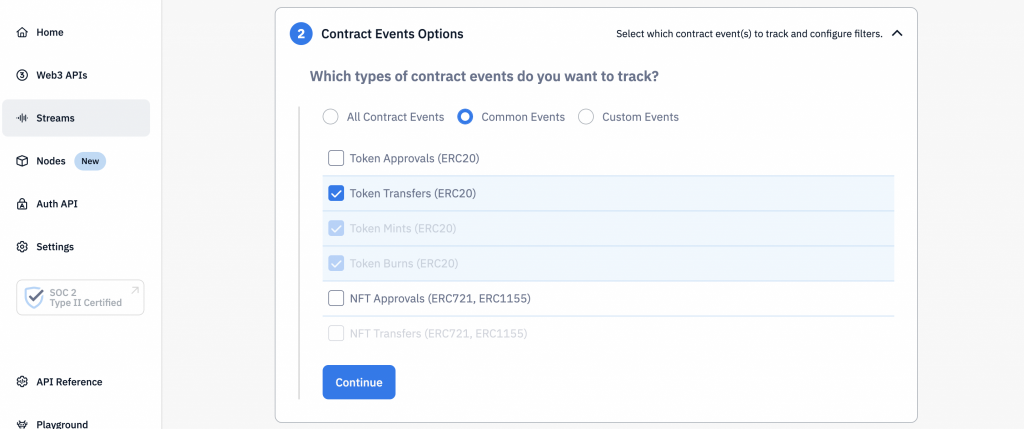
- Step 2: Give your stream a name and select the type of events you wish to monitor. In our case, we’ll choose “Contract Events”:

- Step 3: Select the smart contract events you want to track. For this tutorial, we’ll choose “Common Events” and “Token Transfers”:
- Step 4: Add a tag to your stream and select additional data you want to include in the responses:

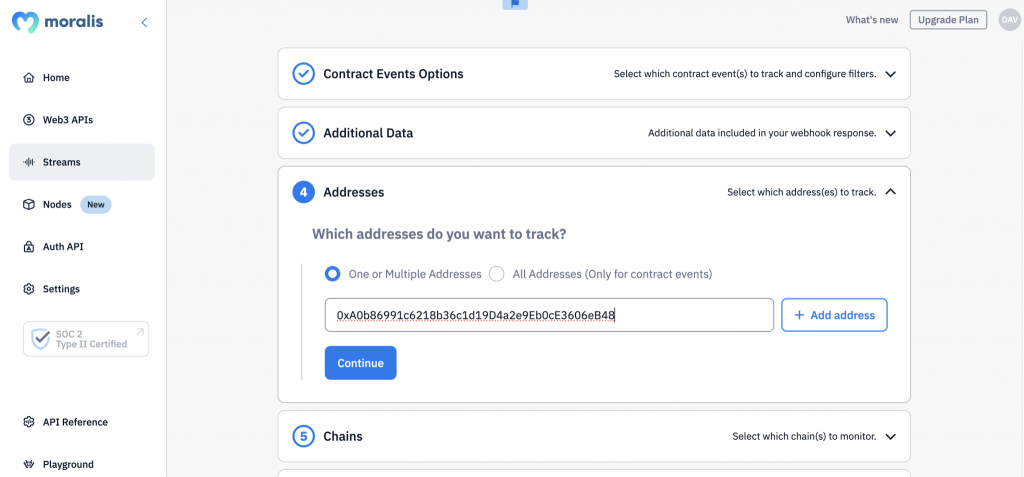
- Step 5: Add the contract address(es) you want to track. In our case, we’ll go for the USDC contract:
- Step 6: Select the blockchain(s) you want to monitor. For this tutorial, we’ll go for Ethereum, but you can pick any network(s) you’d like:

- Step 7: Test your stream (optional):

- Step 8: Add a webhook URL and hit the “Continue” button, followed by “Save & Deploy”:

From here, you’ll receive a Web3 webhook response as soon as a new USDC transaction occurs. Here’s what it might look like:
//...
{
  transactionHash: '0x1a3807aa7f7d1f4806245115d7b8a32ec105ce20f2b4a8ca31f9a305127c0201',
  logIndex: '409',
  contract: '0xa0b86991c6218b36c1d19d4a2e9eb0ce3606eb48',
  triggered_by: [Array],
  from: '0x47fbac3d17dcd481c3bb428adde4272b458cf724',
  to: '0x8ad599c3a0ff1de082011efddc58f1908eb6e6d8',
  value: '5187003613',
  tokenName: 'USD Coin',
  tokenSymbol: 'USDC',
  tokenDecimals: '6',
  valueWithDecimals: '5187.003613',
  possibleSpam: false
},
/...
That’s it! You now know how to set up a stream using Moralis’ admin UI. You can follow the same steps to monitor any smart contract or wallet events!
For a more in-depth walkthrough of the steps above, please check out the Moralis YouTube video below:
Mandatory Test Webhook
You now know how to create streams by setting up Web3 webhooks in two different ways. However, no matter which alternative you pick, you will receive a test webhook once you launch the stream.
For this, you will need to return status code 200 in order for the stream to start. Moreover, this is what the test body will look like:
{
  "abi": {},
  "block": {
    "hash": "",
    "number": "",
    "timestamp": ""
  },
  "txs": [],
  "txsInternal": [],
  "logs": [],
  "chainId": "",
  "tag": "",
  "streamId": : "",
  "confirmed": true,
  "retries": 0,
  "erc20Approvals": [],
  "erc20Transfers": [],
  "nftApprovals": [],
  "nftTransfers": []
}
Once you return the status code, you should have your stream set up through a Web3 webhook. Consequently, when the address you specified is involved in an incoming or outgoing transaction, you will receive a webhook with transaction details!
If you have followed along this far, you know how to build your first stream programmatically and via Moralis’ web UI. As such, you now know how to utilize Moralis’ Streams API to stream on-chain data into the backend of your Web3 projects via Web3 webhooks!
However, if you experienced problems during the process, check out the quickstart guide for more information.
Web3 Webhook Firebase Integration
At this point, you know that it’s a blockchain listener that enables you to listen to any on-chain event. Furthermore, some examples of activities you can monitor are smart contract events, ERC-20 token transfers, NFTs being minted, and much more! However, even though you can set up a Moralis stream in no time, you need a way to seamlessly store the data in your backend, which is where the Moralis Streams API Firebase integration enters the picture!
The Firebase integration makes it super quick and accessible for Web2 developers to start using Web3 webhooks without the need to set up their own backend infrastructure. Instead, Firebase takes care of all the heavy lifting by providing a complete hosting solution. Furthermore, with the Firebase integration, you can easily stream blockchain data into your backend via Web3 webhooks in real time! As a result, you do not need to worry about connecting and maintaining RPC nodes, building unnecessary abstractions, setting up complex data pipelines, etc.
Additionally, the Firebase integration features the Moralis Streams extension. By adding the extension, you can easily trigger any cloud function based on certain events, and the information streamed into Firebase will be neatly displayed in documents. This can, for example, include wallet addresses, chain IDs, gas prices, and much more relating to particular events!
To learn more about Moralis’ Streams API Firebase integration, check out the video from Moralis’ YouTube channel below. In this clip, one of Moralis’ talented developers provides a brief overview of the Web3 Streams API and a walkthrough of how you can listen to any blockchain events!
Summary – Web3 Webhooks Explained
In this article, we explored the intricacies of Web3 webhooks, and you learned how to set them up using Moralis and the Web3 Streams API. Also, you learned that Web3 webhooks are requests triggered by particular events in a source system (sender). Once triggered, a response is sent to a destination system (receiver) along with a request payload. Accordingly, Web3 webhooks eliminate the need to poll databases continuously, making communications between systems more efficient!
In addition to exploring the ins and outs of Web3 webhooks, the article also demonstrated how to set up webhooks programmatically via Moralis’ SDK and through Moralis’ web UI. As a result, you hopefully know two ways of establishing Web3 webhooks and using them in any future Web3 projects!
Nevertheless, if you found this tutorial helpful, check out more amazing content here at Moralis’ Web3 blog. For example, learn all you need to know about the Sui blockchain, Solana smart contract building, or how to use Firebase as a proxy API for Web3!
So, if you are looking to create Web3 webhooks or want to build dapps in general, sign up with Moralis! Creating an account is free, and you can access a more seamless developer experience in no time. As a result, you will be able to build powerful Web3 projects more efficiently and beat the competition to market!
