Solana is a programmable blockchain, meaning that the network supports smart contracts, which is where we will direct our attention in this article. More specifically, this article will show you how to write a Solana smart contract in no time! Furthermore, in combination with illustrating how to write a Solana smart contract, this article will further cover how to deploy and run the contract using a simple test application. To make this more accessible, we will use Moralis’ Ethereum boilerplate, allowing us to launch the application with little to no effort. But this might sound confusing since it is an Ethereum template; however, worry not, the Ethereum boilerplate is Solana compatible!
The accessibility of writing, deploying, and calling the Solana smart contract originates partly from the enterprise-grade Web3 APIs supplied by Moralis. If you want to learn more about these excellent development tools, we would, for instance, recommend checking out the Solana API, allowing you to create sophisticated Solana projects with ease. For example, with the API, you can quickly learn how to build a Solana NFT explorer.
Nevertheless, in order to follow along in this ”How to Write a Solana Smart Contract?” tutorial, you will need a Moralis account. Thus, if you have not already, sign up with Moralis straight away! This will provide immediate access to the platform’s various APIs, making all your future development endeavors more accessible!
What is a Solana Smart Contract?
In short, a Solana smart contract is a contract running on the Solana network. However, to answer the ”what is a Solana smart contract?” question more adequately, it might be a good idea to begin by diving into the intricacies of Solana and smart contracts separately. So, let’s initiate this article by taking a closer look at the Solana network!
Solana was first introduced in 2017 by Solana Labs, which is the organization behind the network. Solana is an open-source, programmable blockchain, indicating that the network supports smart contracts. The blockchain emphasizes speed and scalability as Solana can process transactions more economically and faster than, for example, Ethereum.
The native currency of Solana is called SOL, which is used to keep the network safe and secure. Moreover, one factor making the blockchain unique is that Solana implements two consensus mechanisms: PoH (proof-of-history) and PoS (proof-of-stake). This hybrid consensus mechanism allows Solana to keep transaction speeds high while keeping costs low.
With a brief understanding of Solana, it is time to dive deeper into smart contracts. As such, let us try to answer the question, ”what are smart contracts?”.
Smart contracts, also called Web3 contracts, are programs stored on a blockchain network. These programs execute predefined actions as soon as predefined conditions meet. Consequently, smart contracts are ideal for automating agreements between two or more actors so that each participant can be certain of particular outcomes. Moreover, since code mediates smart contracts, it suggests that participants do not need to worry about intermediaries or unnecessary losses.
In the context of Solana, smart contracts are essentially contracts stored on the Solana network. Now, with that covered, let us take a closer look at how you can write a Solana smart contract!
Write a Solana Smart Contract – Complete Breakdown
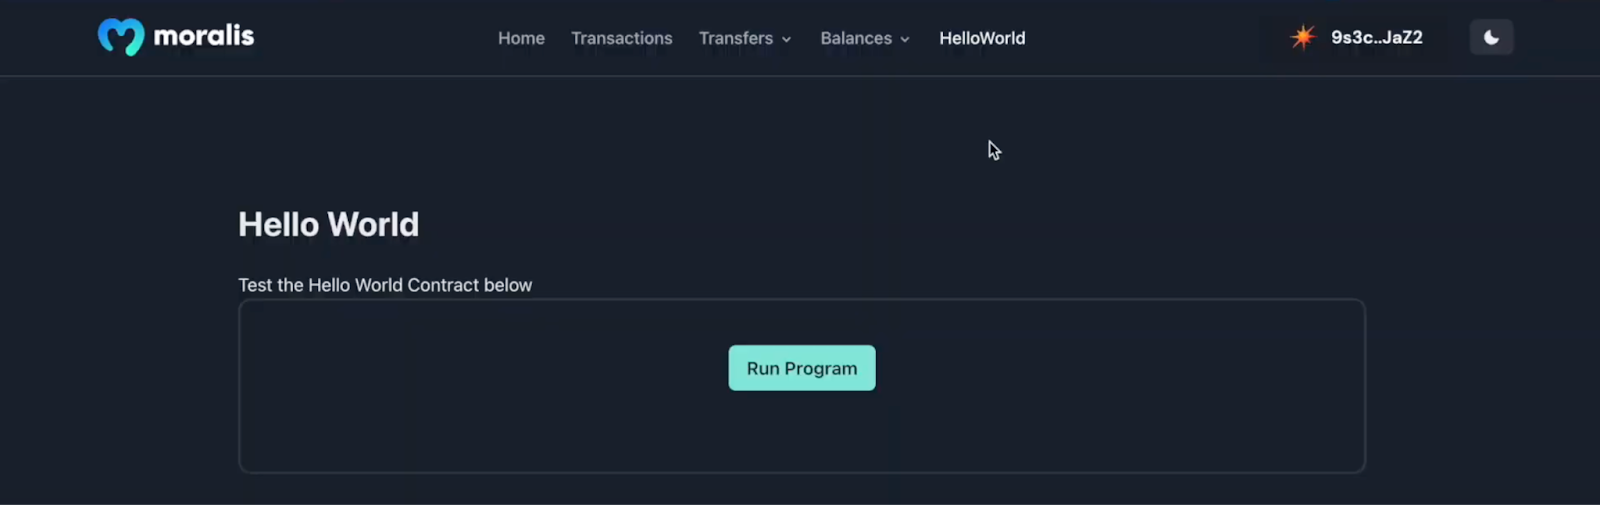
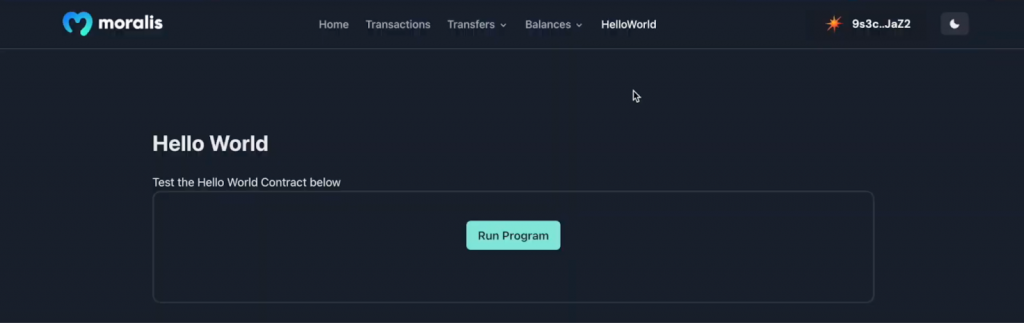
Now that you are more familiar with Solana smart contracts, the following sections will dive deeper into Solana smart contract development. We will show you how to write, deploy, and call a smart contract from a testing application as we move forward. The application will be a straightforward ”Hello World!” project where users can push a ”Run Program” button to call the smart contract. Moreover, this is what the UI (user interface) looks like:
The application utilizes the Ethereum boilerplate from Moralis, allowing us to build this testing application for smart contracts more efficiently. For example, the template features Moralis’ Web3 Auth API, allowing us to easily implement various authentication mechanisms. If you want to learn more about the different alternatives, you can, for instance, check out our guide on how to add a sign in with RainbowKit!
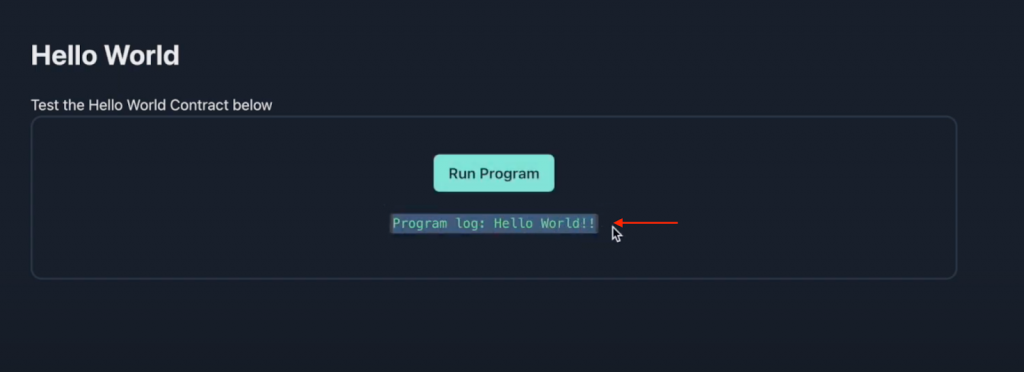
Nevertheless, once the users click on the ”Run Program” button above, it should prompt their Web3 wallet, allowing them to call the smart contract by signing a message. Once signed, the app will return the data log from the smart contract. In this case, the app returns a ”Hello World!!” message:
To make the structure of this tutorial even more straightforward, we’ve divided the process of writing a Solana smart contract into the following three sections:
- Installing Rust and the Solana CLI
- Creating and Deploying the Smart Contract
- Calling the Smart Contract – The Testing App
It’s worth noting that we will be using a macOS device throughout the article. Consequently, if you have Windows, remember that the process might occasionally differ. Nonetheless, if this sounds interesting and you want to write a Solana smart contract on your own, join us and learn everything you need about Solana smart contract development!
Installing Rust and the Solana CLI
In this initial section of the tutorial, we will showcase how to set up Rust and the Solana CLI. If you already have these installed, feel free to skip this part and jump straight into the following section. Otherwise, join us as we will begin by showing you how to set up Rust.
To begin with, go ahead and open a new Unix terminal and run the following command:
curl --proto '=https' --tlsv1.2 -sSf https://sh.rustup.rs | sh
Once you run the command, you must pick between several installation types. In this instance, we recommend picking the default option by inputting ”1” and hitting enter:

Once Rust successfully installs, the next step is installing the Solana CLI. To install the CLI, you will only need a couple of commands, and you can begin by inputting the following into the terminal and hitting enter:
sh -c "$(curl -sSfL https://release.solana.com/stable/install)"
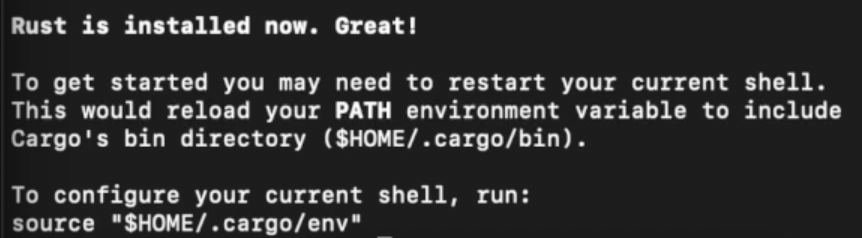
When the installation finalizes, you need to set the ”env path”, which you can find in the terminal logs.
From there, create a new local Solana key pair through these commands:
mkdir ~/my-solana-wallet
solana-keygen new --outfile ~/my-solana-wallet/my-keypair.json
Once you have a Solana wallet on your machine, acquire the wallet address through the following input:
solana address
Set the devnet cluster to use with local transactions by inputting this command:
solana config set --url https://api.devnet.solana.com
Lastly, airdrop test SOL tokens to the wallet by running this command in the terminal:
solana airdrop 1
Now that’s it for this initial section of this tutorial. We will now dive deeper into the central part of the tutorial and show you how to write a Solana smart contract!
Creating and Deploying the Smart Contract
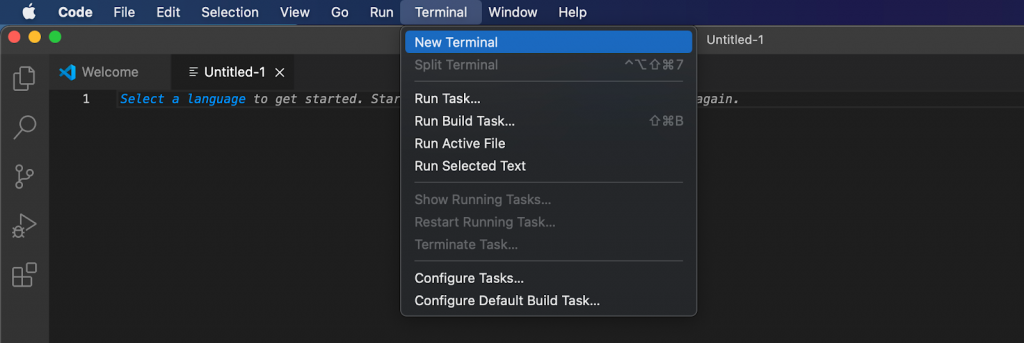
It is now time to write a Solana smart contract. To initiate this process, go ahead and open your preferred IDE. We will use VSC (Visual Studio Code); however, you are free to choose any IDE you might be more comfortable working with. With an IDE open, create a new folder and launch a new terminal. If you, like us, use VSC, you can do so by clicking on ”Terminal” at the top and hitting ”New Terminal”:
Next up, create a new Rust project with Cargo by inputting the command below into the terminal:
cargo init hello_world --lib
Once you hit enter and run the command, it will result in a straightforward Cargo library, which will be added to your IDE’s directory. Here is what it will look like in VSC:

From there, go ahead and navigate to the correct location with this command:
cd hello_world
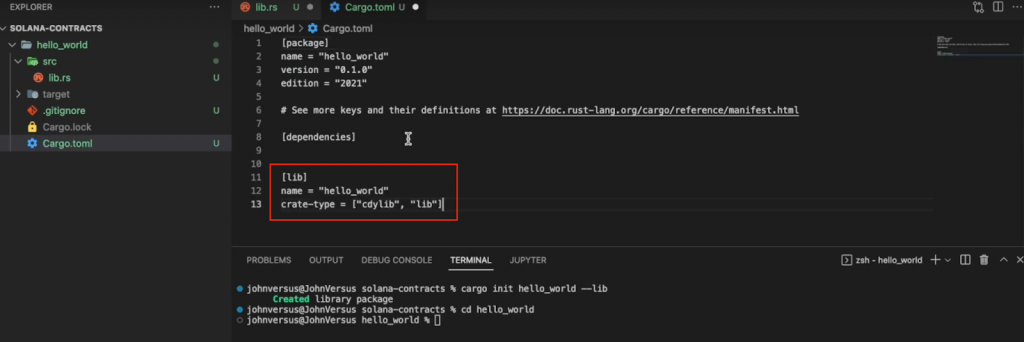
You can then proceed by updating the ”Cargo.toml” file by adding the code snippet below:
[lib]
name = "hello_world"
crate-type = ["cdylib", "lib"]
It should now look like this:
Next up, remove all the code within the ”src/lib.rs” file. From there, you can add the Solana program package to the project by running this command:
cargo add solana_program
All that remains is adding the contract code to the ”src/lib.rs” file. First up, you need to import the Solana program:
use solana_program::{
    account_info::AccountInfo,
    entrypoint,
    entrypoint::ProgramResult,
    pubkey::Pubkey,
    msg,
};
Following this, define the “entrypoint” with the ”process_instruction” function:
entrypoint!(process_instruction);
Finally, create the ”process_instruction” function itself and add the code for logging the ”Hello World!!” message:
pub fn process_instruction(
    program_id: &Pubkey,
    accounts: &[AccountInfo],
    instruction_data: &[u8]
) -> ProgramResult {
    msg!("Hello, world!");
    Ok(())
}
This will be the code for the final version of the ”src/lib.rs” file:
use solana_program::{
    account_info::AccountInfo,
    entrypoint,
    entrypoint::ProgramResult,
    pubkey::Pubkey,
    msg,
};

entrypoint!(process_instruction);
pub fn process_instruction(
    program_id: &Pubkey,
    accounts: &[AccountInfo],
    instruction_data: &[u8]
) -> ProgramResult {
    msg!("Hello, world!");
    Ok(())
}
From there, build the project by inputting the following command into the terminal:
cargo build-bpf
Once the project is built, deploy the smart contract through the “solana program deploy” command and specify the ”./target/deploy/hello_world.so” path:
solana program deploy ./target/deploy/hello_world.so
Running this will return the program ID, which you will need in the last section:

Calling the Smart Contract – The Testing App
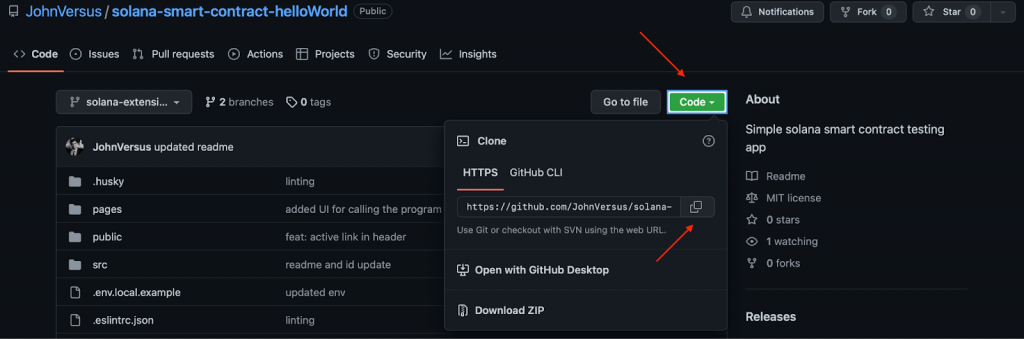
In this last section, we will show you how to create the application you can use to call and test the Solana smart contract you just created. We will clone an already-developed template to make the process as seamless as possible. From there, you only need to configure the code slightly by adding your Moralis Web3 API key and the program ID. Nevertheless, you will find the GitHub repository for the app below:
Solana Smart Contract Test App Docs – https://github.com/johnvsnagendra/solana-smart-contract-helloWorld
First up, open the link above, click on the green ”Code” button, and copy the repository URL:
You can then, once again, open your favorite IDE, create a folder, and launch a new terminal. From there, clone the project to your local directory by inputting the following command using the repo URL:
git clone “REPOSITORY_URL”
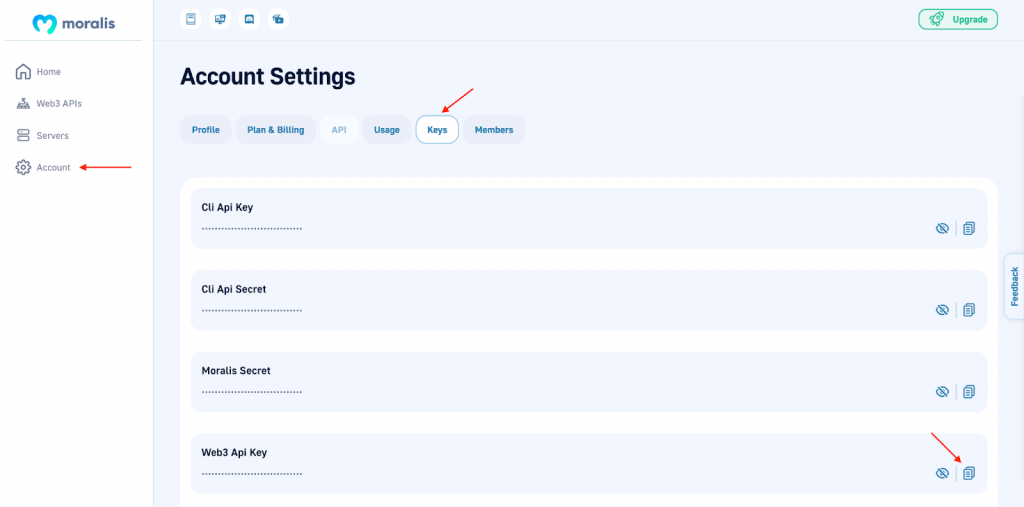
Once you have cloned the project, open the ”.env.local.example” file containing several environment variables. In this case, you need to add your Moralis Web3 API key to the ”MORALIS_API_KEY” variable. To get the key, log in to Moralis. Then, navigate to ”Account”, select the ”Keys” tab, and copy the Web3 API key:
With the API key added to the environment variables, you can navigate to the ”/src/components/templates/helloWorld/HelloWorld.tsx” file. From there, scroll down to the nineteenth line and implement the program ID you acquired when deploying the contract.

Testing the App
Once you have added these two components to the code, you should be able to launch and test the application in your browser. Moreover, if everything works, you should now be able to click on the ”Run Program” button, sign a message, and run the smart contract. Also, you should receive the ”Hello World!!” message!
If you have further questions, please join Moralis’ Discord channel and get excellent guidance from our community engineers!
Summary – How to Write a Solana Smart Contract?
This article illustrated how to write, deploy, and call a Solana smart contract. To call and test the contract, the article showcased how to build a simple testing app using Moralis’ Ethereum boilerplate. Moreover, thanks to the accessibility of Moralis, you were able to write, deploy, and call a Solana smart contract in only three steps:
- Installing Rust and the Solana CLI
- Creating and Deploying the Smart Contract
- Calling the Smart Contract – The Testing App
Following the steps above allowed you to write a Solana smart contract, deploy it to the Solana devnet, launch an application and call the smart contract. Also, you could call and test the smart contract through the app with a simple click of a button. Once clicking on the button in the app’s UI, it prompts your Web3 wallet to sign a message and call the smart contract. In turn, a ”Hello World!!” message should show up.
If you found this article helpful, take a closer look at some additional content here at Moralis’ Web3 blog. For example, if you are interested in developing dapps for other networks, you will find that Moralis is the fastest way to build a Web3 app. If this excites you, check out our guides explaining how to build dapps using Moralis’ Polygon boilerplate and BNB Chain boilerplate! Furthermore, check out how to use the leading Web3 website template for numerous networks! In addition, if you want to focus on NFTs, make sure to check out the multichain NFT API. With it, you can build cross-chain NFT dapps quickly and easily!
So, no matter if you want to write a Solana smart contract or build more sophisticated Web3 projects, sign up with Moralis immediately and access a more accessible developer experience!
