In this article, we’ll take our NFT smart contract example for a spin and deploy an NFT (non-fungible token) on the Goerli testnet. If you’d like to follow along, all you need is the following smart contract example for our NFT, a MetaMask account, and enough Goerli ETH to cover the gas fee:
contract NFT is ERC721URIStorage {
    using Counters for Counters.Counter;
    Counters.Counter private _tokenIds;
    address public owner;

    constructor() ERC721("ContractNftTest", "CNT") {
        owner = msg.sender;
    }

    function createToken() public returns (uint) {
        require(_tokenIds.current() < 10000, "No more NFTs can be minted");
        _tokenIds.increment();
        uint256 newItemId = _tokenIds.current();
        string memory tokenURI = "https://ipfs.io/ipfs/QmTBFrmexeAHbBMgrD81NXRretDAu9MHj5mfqW8rDm5ssf/metadata/2.json";

        _mint(msg.sender, newItemId);
        _setTokenURI(newItemId, tokenURI);
        return newItemId;
    }
}
Once you’ve minted your NFT, you can use the NFT API from Moralis to view its details using a single line of code:
const response = await Moralis.EvmApi.nft.getContractNFTs(options)
If you wish to learn more about our NFT smart contract example and how to properly implement the above, create your free Moralis account and follow our lead!

Overview
In today’s article, we’ll take another look at our NFT smart contract example, which is already live on the Goerli testnet. Then, we’ll dive into today’s tutorial. As we do so, we’ll show you how to access our example contract on Etherscan. Once on the smart contract page, we’ll lay out the step-by-step instructions to connect your MetaMask account to Etherscan and mint your NFT (non-fungible token). After successfully minting your NFT, we’ll demonstrate how to create a simple NodeJS backend dapp (decentralized application) that fetches NFTs by contract. This is where you’ll learn how easy it is to use the Moralis JS SDK. After all, you just need to obtain your Web3 API key and initialize Moralis.
In the second part of this article, you can catch up on the theory behind today’s topic. We’ll explain what an NFT smart contract is, what types of smart contracts currently dominate the crypto realm, and what languages NFT smart contracts are written in. Now, without further ado, let’s dig into the main topic!
Example of a Smart Contract for an NFT
The NFT smart contract example we’ll focus on in this article is already live on the Goerli testnet, and we used Remix (a.k.a. Remix IDE) to deploy it:
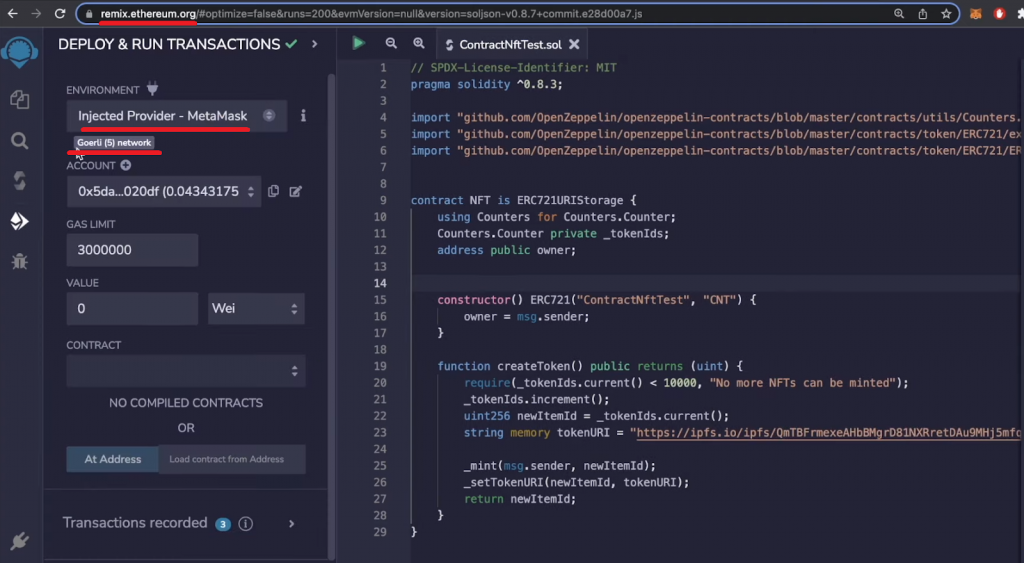
As you can see on the right side of the above screenshot, we imported OpenZeppelin in Remix, which made our job much simpler. This shortcut enabled us to utilize the existing verified smart contract and its functions instead of creating ours from scratch. Also, thanks to proper OpenZeppeling imports, we were able to create our NFT smart contract example with just a few lines of code. Aside from the MIT license line, pragma line, and OpenZeppelin imports, here’s our smart contract:
contract NFT is ERC721URIStorage {
    using Counters for Counters.Counter;
    Counters.Counter private _tokenIds;
    address public owner;

    constructor() ERC721("ContractNftTest", "CNT") {
        owner = msg.sender;
    }

    function createToken() public returns (uint) {
        require(_tokenIds.current() < 10000, "No more NFTs can be minted");
        _tokenIds.increment();
        uint256 newItemId = _tokenIds.current();
        string memory tokenURI = "https://ipfs.io/ipfs/QmTBFrmexeAHbBMgrD81NXRretDAu9MHj5mfqW8rDm5ssf/metadata/2.json";

        _mint(msg.sender, newItemId);
        _setTokenURI(newItemId, tokenURI);
        return newItemId;
    }
}
Looking at the lines of code above, you can see that our contract is called “ContractNftTest”. You can also see that the NFTs (non-fungible tokens) minted with this contract will have the “CNT” symbol. Additionally, the contract caps the number of NFTs to 9,999. It also includes a link to a metadata file (JSON file). You can see that we decided to use IPFS (InterPlanetary File System) for the NFT metadata. Of course, we previously stored that JSON file and NFT-representing image to IPFS.
If you wish to deploy your instance of our NFT smart contract example, simply use the above lines of code with Remix or Hardhat. Now, if you’re not yet familiar with NFT metadata, NFT metadata storage, and uploading NFT-representing files to the leading Web3 storage solution, use our “IPFS Ethereum” tutorial, which you can find on our blog.
NFT Smart Contract Example Tutorial
Note: Moving forward, we will focus on our smart contract’s address. However, if you deploy your own instance of our NFT smart contract example, simply replace our address with yours.
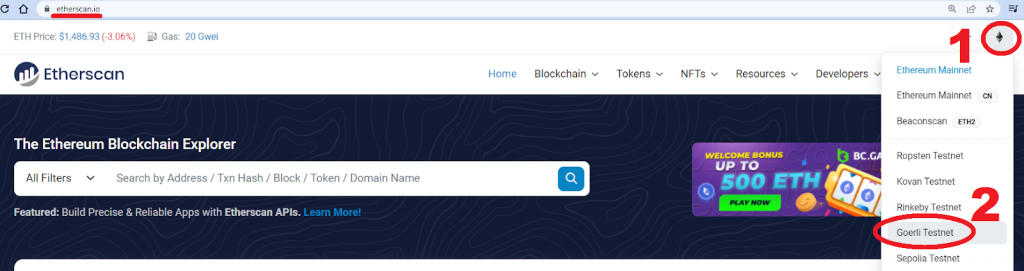
Start by visiting “etherscan.io“. By default, as one of the Ethereum development tools, Etherscan focuses on the Ethereum mainnet. However, for this tutorial, you need to switch to the Goerli testnet on Ethereum. To do so, click on the Ethereum icon in the top-right corner and select “Goerli Testnet”:
After switching the network, you should be on the “goerli.etherscan.io” page:

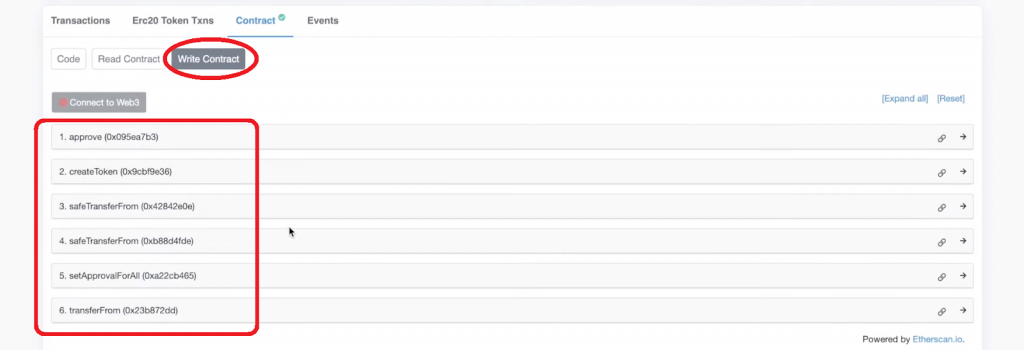
Now, you can use the search option by pasting your smart contract’s address or using ours (0xf351614ff81C770CE245609cd3b3eD3dd6E72c2a). Once on the page for the smart contract, select the “Contract” tab:
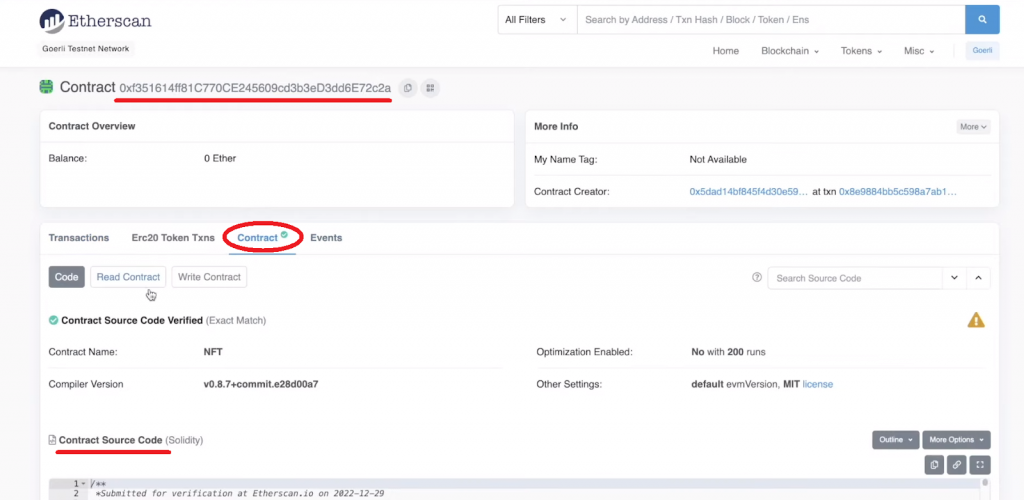
Then, on the “Contract” tab, you can view the contract’s code, ABI, and other details. Plus, this is where you can actually interact with the contract’s “read” and “write” functions. The former are “non-invasive” and do not change the state of the blockchain. However, minting NFTs requires new token details to be stored on the blockchain. This means that you need to focus on the “Write Contract” option:
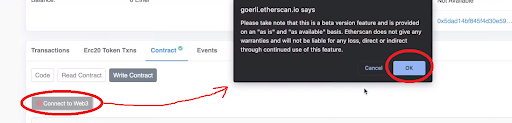
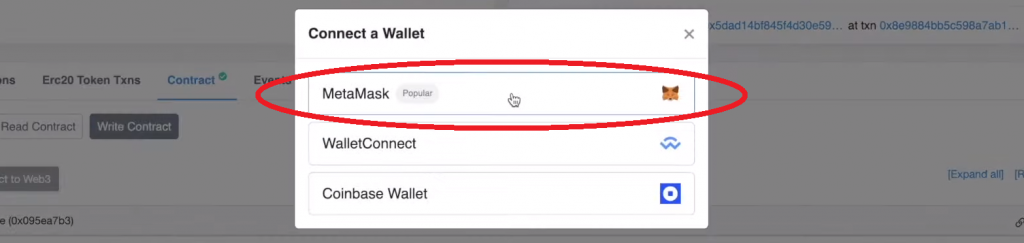
To execute any of the above functions, you need to use the “Connect to Web3” button and connect your MetaMask wallet. First, you’ll have to confirm Etherscan notifications:
Then, select MetaMask:
Mint via Etherscan
Once you’ve successfully connected your Web3 wallet, you can click on the “Write” button under the “createToken” function:
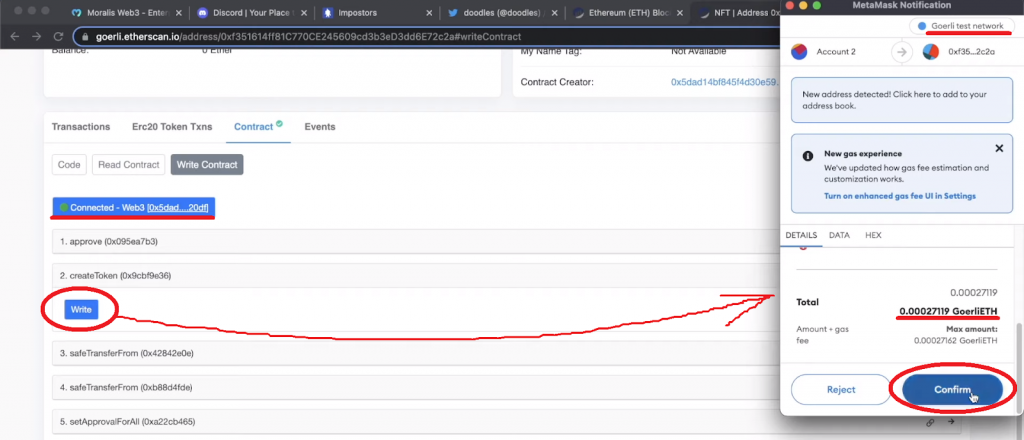
As indicated in the screenshot above, the “Write” button prompts your MetaMask and asks you to confirm the transaction. It’s worth pointing out that our NFT smart contract example allows you to mint NFTs for free. However, you still need enough “test” funds to cover the transaction gas fee. So, make sure to use a reliable Goerli faucet to obtain some Goerli ETH. Once you hit the above-outlined “Confirm” button, the smart contract will mint your NFT.
Once the transaction is confirmed, the NFT will be assigned to your wallet address. Then, you can use various ways to view that NFT. Remember, if you plan on building dapps incorporating NFTs, using the Moralis NFT API is the way to go.
Building NFT Dapps
Note: If you need help creating your first NodeJS app, use our “Quickstart NodeJS” guide.
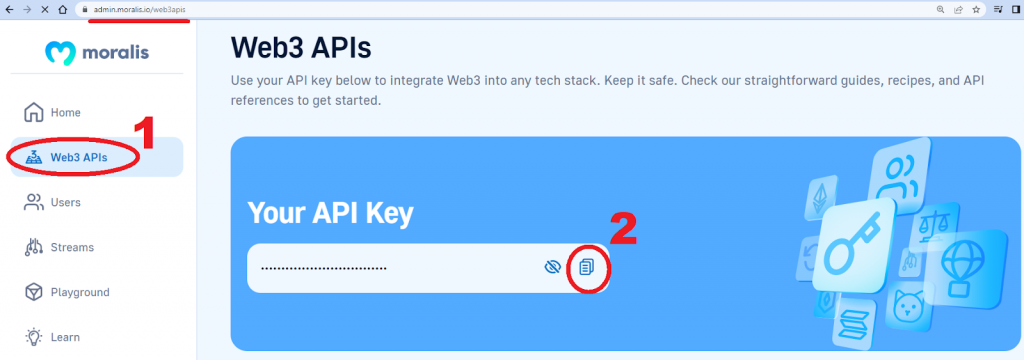
When creating your NodeJS app, you should have “package.json” and “package-lock.json” files in your project’s folder. Then, you need to create two additional files: “.env” and “index.js”. Use the first one to store your Moralis Web3 API key under the “MORALIS_KEY” variable. To obtain your key, log in to your Moralis account and copy it from the “Web3 APIs” admin page:
With your Web3 API key in place, you can create a simple “index.js” script that will fetch all NFTs by a contract. You’ll be able to use the contract address from above, determine the chain, and fetch the relevant on-chain data. Of course, there are many other powerful NFT API endpoints Moralis offers. However, in this tutorial, we’ll focus on using the “getContractNFTs” endpoint. Below are the lines of code correctly implementing the “Moralis.EvmApi.nft.getContractNFTs” method from the intro:
const Moralis = require (“moralis”).default
const { EvmChain } = require('@moralisweb3/common-evm-utils')
require(‘dotenv’).config()

Moralis.start({
     apiKey: process.env.MORALIS_KEY
 }).then(async()=>{

    	const response = await Moralis.EvmApi.nft.getContractNFTs({
        	    address: “0xf351614ff81C770CE245609cd3b3eD3dd6E72c2a”
    chain: EvmChain.GOERLI
    	});

   	console.log(response.raw.result);
})
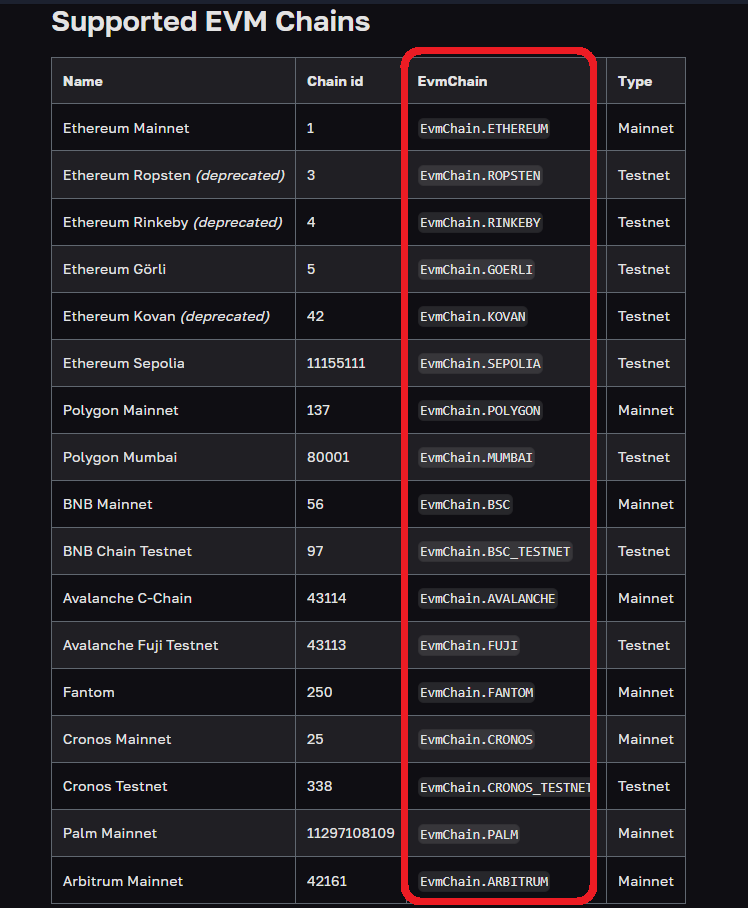
Looking at the code above, you can see that we used our smart contract’s address and focused on the Goerli network. However, since Moralis is all about cross-chain interoperability, you can use the same method to fetch NFTs on other EVM-compatible chains by simply replacing “.GOERLI” accordingly:
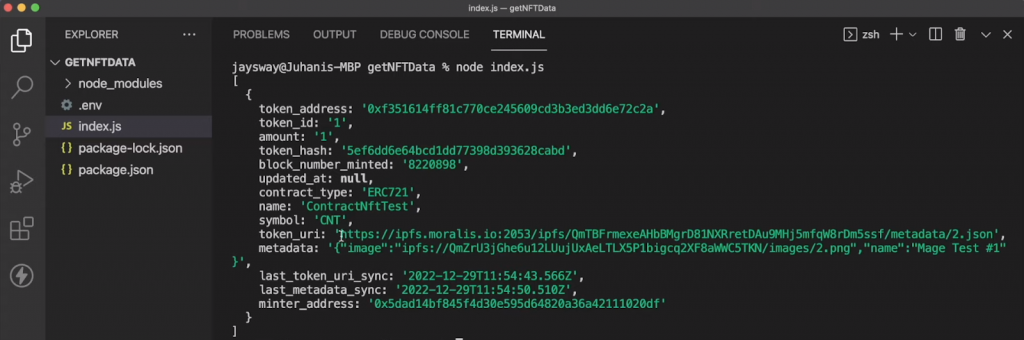
Finally, you are ready to run the script by entering the following command into your terminal:
node index.js
In response, your terminal will show you the results in the following format:
NFT Metadata and NFT-Representing Files
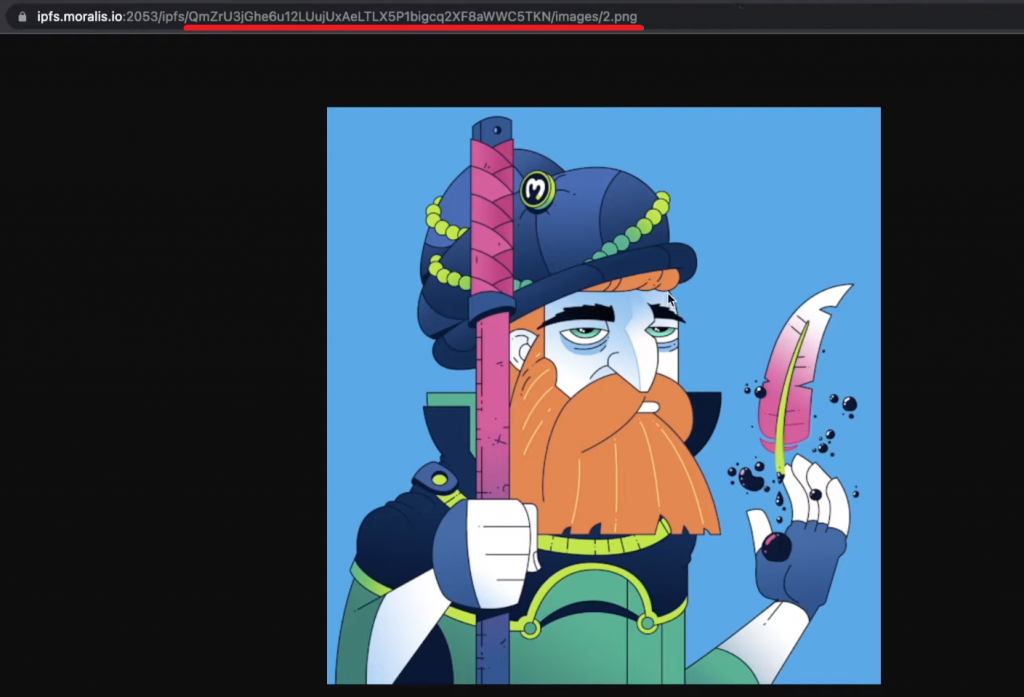
Looking at the above results, you can see that you also get NFT metadata via the token URI. If you copy that address into your browser, you can see the token’s metadata:

If you use the image hash, you can view the NFT-representing image in your browser:
So, if you were to build a proper frontend, you’d be able to neatly incorporate NFT metadata and NFT-representing files in a user-friendly dashboard. As such, you could, for example, create a neat NFT portfolio dapp (decentralized application).

The “getContractNFTs” NFT API endpoint is just one of many enterprise blockchain solutions from Moralis. This means you don’t need to use slower and less reliable solutions such as the Alchemy NFT API or Notify API. In many instances, you can even replace Web3 libraries.
With the Moralis trio – Web3 Data API, Web3 Authentication API, and Web3 Streams API – you can create the best Web3 wallets, portfolio trackers, and other types of dapps (decentralized applications). Not only can you target all leading programmable blockchains, but you can also use your legacy dev skills. After all, Moralis is also all about cross-platform interoperability. So, if you are serious about blockchain app development, use Moralis and start BUIDLing!

What is an NFT Smart Contract?
An NFT smart contract is a smart contract (on-chain program) managing the creation, ownership, transactions, and even burning of a particular non-fungible token (NFT) or an NFT collection. Every NFT smart contract contains predefined rules. These are applied to execute predefined actions when predefined conditions are met. Furthermore, NFT smart contracts can be constructed to mint all the corresponding NFTs at the time of deployment. Or, they can be designed to allow users to mint NFTs post-deployment (as in the example above). The latter option is commonly known as lazy minting.
Types of Smart Contracts
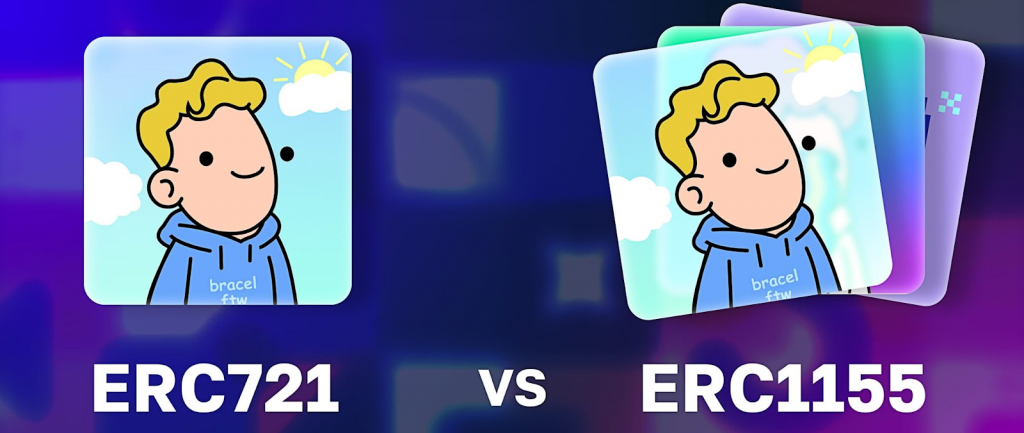
There are many types of smart contracts, and most of them follow specific standards. For instance, ERC-20 still remains the most popular standard for fungible tokens. However, when it comes to NFTs, ERC-721, and ERC-1155 dominate the scene.
If you wish to explore the two standards, make sure to read our “ERC721 vs ERC1155” comparison. However, in short, ERC-1155 is the go-to standard for production purposes, while ERC-721 may be a better choice when looking to create individual NFTs in a simple manner. That said, what makes the ERC-1155 standard so special is the fact that it also covers fungible and semi-fungible tokens.
In case you steer away from Ethereum and EVM-compatible chains, you’ll probably encounter Solana. In that case, you’ll need to explore the SPL token standard. With tools like Metaplex, you can create Solana smart contracts for NFT purposes with minimum effort. If you want to get started with Solana blockchain app development, the Moralis Solana API is the number one choice.

What Languages are NFT Smart Contracts Written In?
When it comes to Ethereum and other EVM-compatible blockchains, Solidity is still the king. Solidity is also the smart contract programming language we used for the NFT smart contract example in the above tutorial. However, there are other programming languages that you can use to write Web3 contracts. For Ethereum and EVM-compatible chains, Vyper is a popular alternative. But for other blockchains, legacy programming languages dominate the scene. The three leading options for non-EVM-compatible chains are as follows:
- Rust (Solana, Polkadot, NEAR, and others)
- JavaScript (Hyperledger Fabric, NEAR)
- C++ (EOS)
All in all, the chain you want to focus on will determine the programming language you need to use to create your NFTs.

How to Deploy an NFT Using an NFT Smart Contract Example – Summary
In today’s article, you had the opportunity to use our NFT smart contract example, and you learned how to utilize Etherscan to mint NFTs. We also demonstrated how easy it is to fetch on-chain data for NFTs using the Moralis NFT API. Along the way, you also learned how to obtain your Web3 API key, which is the gateway to creating dapps the easy way.
With the skills and knowledge obtained from this article, you might be ready to start building user-friendly functionalities around smart contracts. In that case, dive into the Moralis documentation and tackle your projects. However, if you need more ideas or practice, make sure to use our video tutorials. Do not forget to expand your blockchain development horizons by exploring the Moralis blog. If NFTs are your main interest, select the “NFTs” filter:
In the “NFTs” category, you can explore all you need to know about non-fungible tokens. For example, our Chainlink NFT tutorial can teach you how to incorporate true randomness. If you plan on creating your own smart contracts, do not forget to learn the basics of smart contract security. Plus, you may want to consider completing a Solidity course or two. If so, Moralis Academy has your back. There, you can start with the Ethereum Smart Contract Programming 101 course. Once you’ve finalized that course, we recommend checking out Ethereum Smart Contract Programming 201, which is an advanced Solidity course, perfect for anyone wanting a career as a smart contract developer! In that course, you’ll get the chance to build a DEX on the Ethereum network!
