With the birth of social media, the way people interact, communicate and present themselves has changed. As such, the awareness of how much these platforms impact daily living is increasing, and as users of centralized social media behemoths fall victim to privacy breaches, people are turning their attention to blockchain, where decentralized social media profiles reign. However, since Web3 is only in its infancy, many are unfamiliar with how to build a decentralized social media profile. Fortunately, with Moralis and Lens Protocol, you can create a decentralized social media profile in about 20 minutes. Follow along herein as we explore the steps on how to accomplish this!
If you take on today’s challenge, you’ll learn how to use NextJS to create a fantastic social media dapp. Along the way, you’ll learn how to use the ultimate enterprise-grade Web3 API provider – Moralis – to fetch on-chain data. Of course, you will also learn how to work with Lens Protocol – a composable and decentralized social graph. Essentially, Lens Protocol is a backend solution for storing social media data in a decentralized manner. This excellent tool enables you to build a decentralized social media profile, and lets users own their data and content. Moreover, since users get to own their social media elements, they can utilize them further. For instance, they can assign fees to followers or provide them with prizes, such as unique NFTs (non-fungible tokens).
So, if you believe in a decentralized future and the right to own your content, create your free Moralis account and follow our lead. We will start with a quick demo of our finished decentralized social media profile. Hence, you will know what to expect from today’s tutorial.

Our Decentralized Social Media Profile Demo
Here’s the initial screen of our example social media dapp:

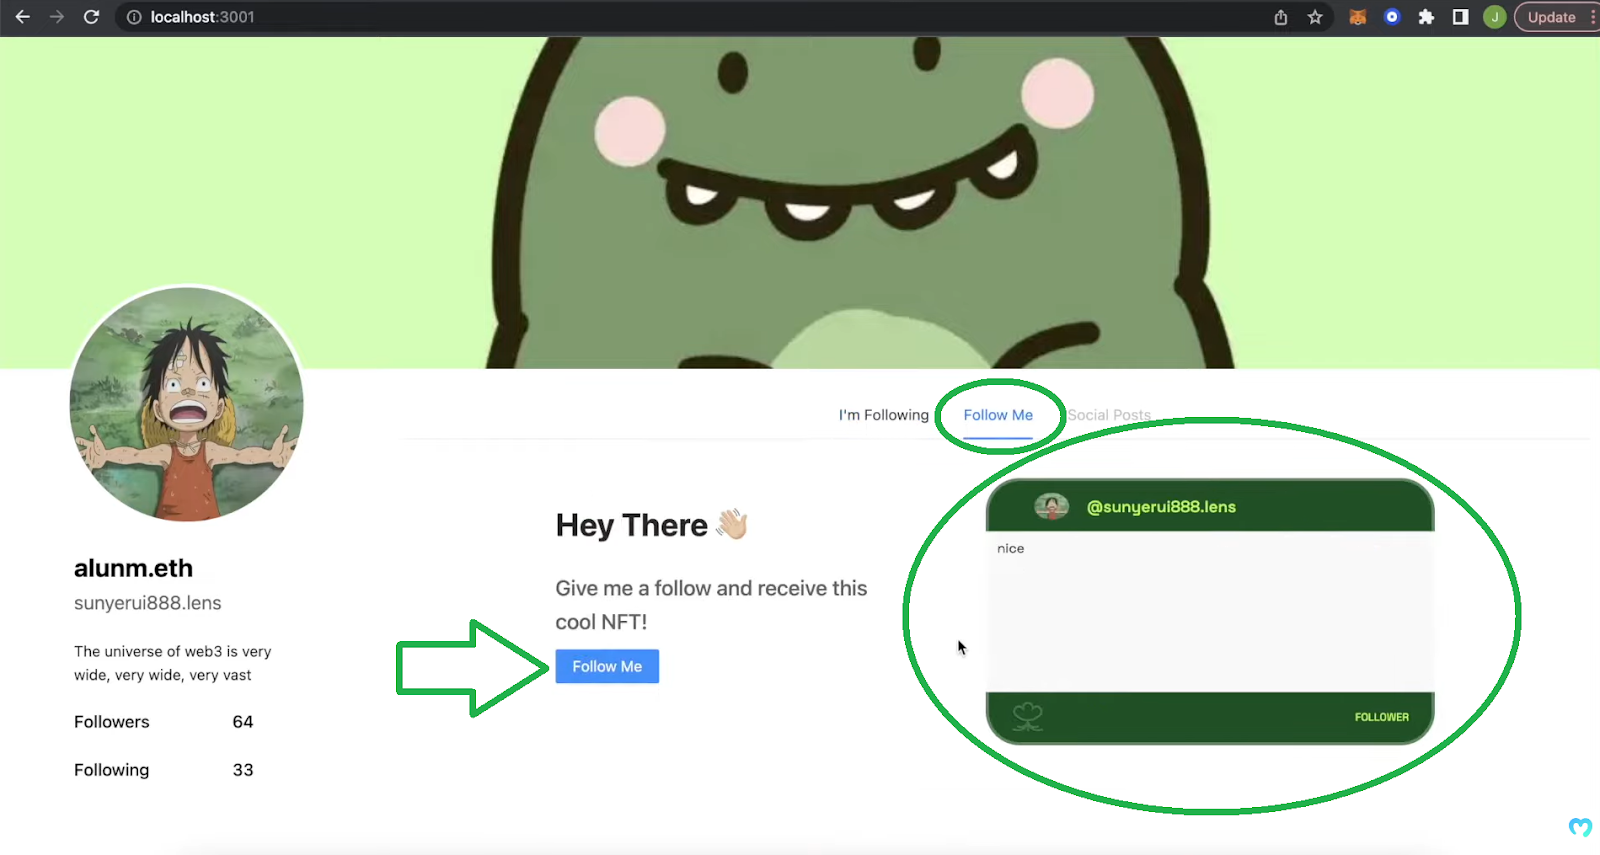
As you can see, we somewhat “modeled” Twitter. At the top of each profile page, you’ll see a banner. Following is a profile picture on the bottom-left side of the banner. Below the profile picture are some details about the profile at hand. This is where our dapp displays user names, “Lens” addresses, statuses, and numbers of followers and following.
The screenshot above represents our dapp when selecting the “I’m Following” page. This page displays animated NFTs of profiles that “alunm.eth” follows. However, let’s say an example user wants to follow the “alunm.eth” profile. In that case, they need to go to the “Follow Me” tab and click on the “Follow Me” button. By following this profile, followers receive a “nice” NFT (displayed in the bottom-right corner of the screen):
When users actually click on the “Follow Me” button, their MetaMask extension pops up. Moreover, it asks them to confirm the transaction and pay the related gas fee.

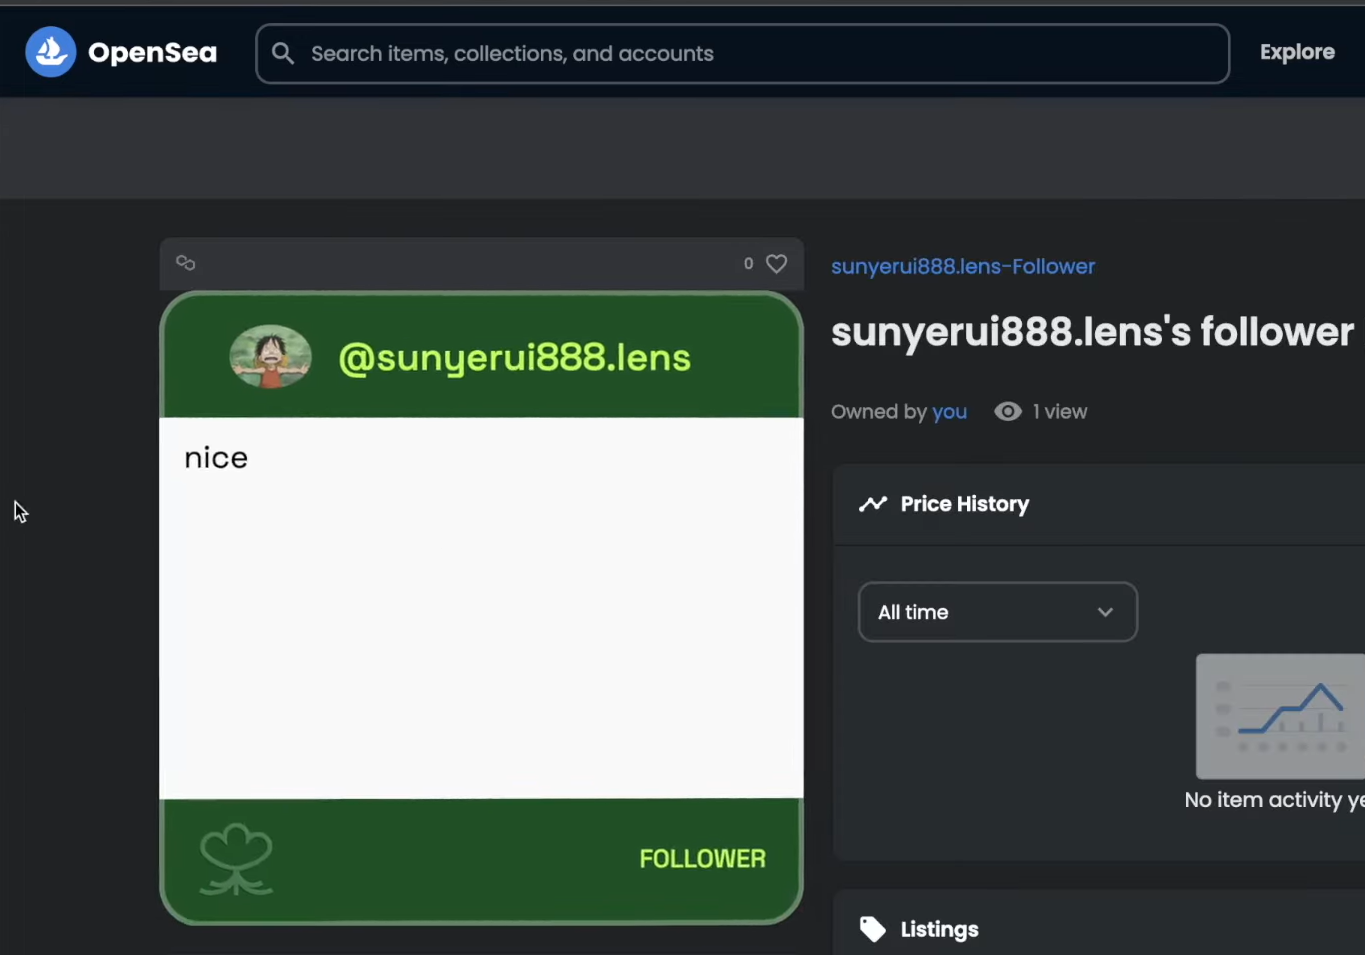
Once they confirm the transaction, the “nice” NFT has been sent to their wallet. As such, they can use an NFT platform, such as OpenSea, to view their new “follower” NFT:
If you think our example dapp is cool, jump to the next section. There, you’ll start building your own instance of this decentralized social media profile dapp. To make things as straightforward as possible, we will provide you with the starter code you can clone. Nonetheless, you can also go for the finished code and simply use our tutorial as a code walkthrough.
Building a Decentralized Social Media Profile with Lens Protocol and Moralis
As mentioned above, our instructions presume you start by cloning the “web3profile-starter” code, which awaits you on GitHub. So, make sure to visit that repository and get our code first:

Next, open the project in your favorite code editor. For extra convenience, we recommend you follow our lead and use Visual Studio Code (VSC). Using VSC’s terminal, you need to install all dependencies using the “npm i” command:
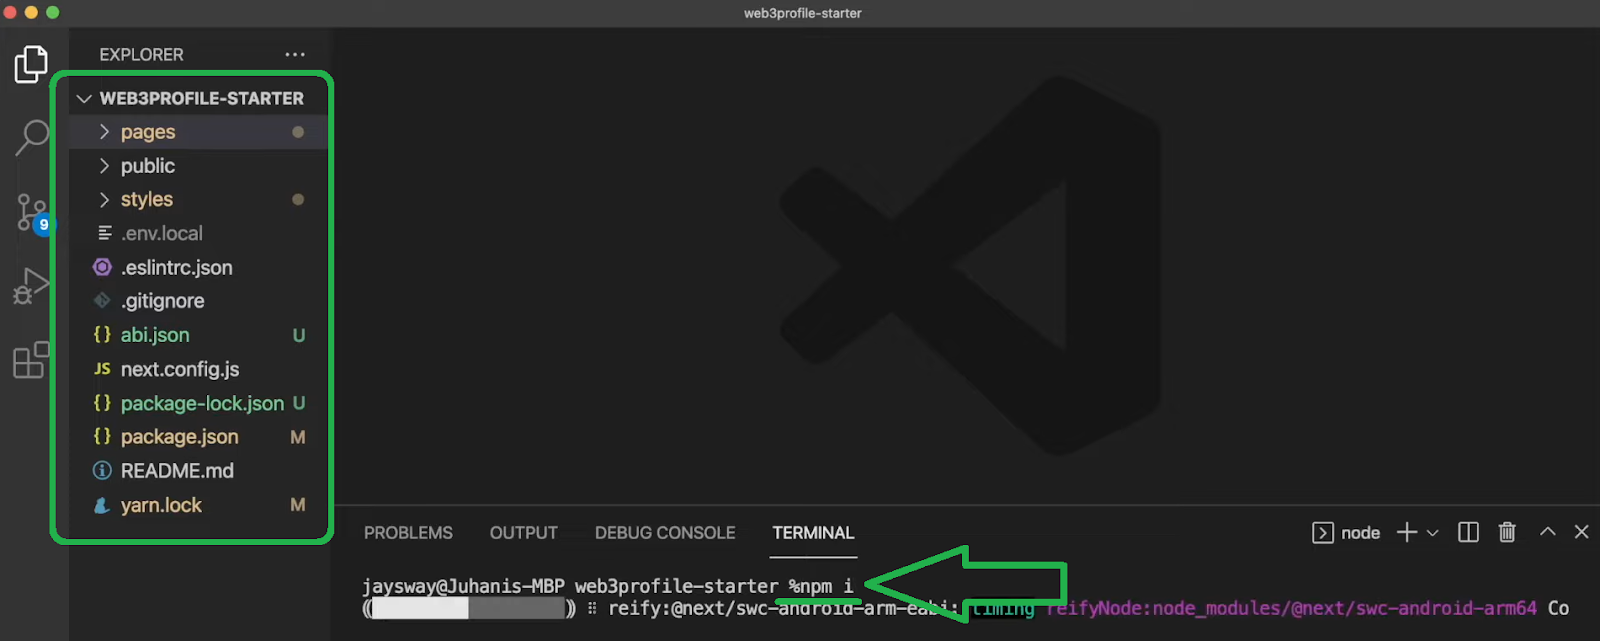
With all dependencies installed, you can use the “npm run dev” command to run a local server. Then, you can use your browser to view the initial state of our social media dapp. Moreover, this is what you should be seeing:
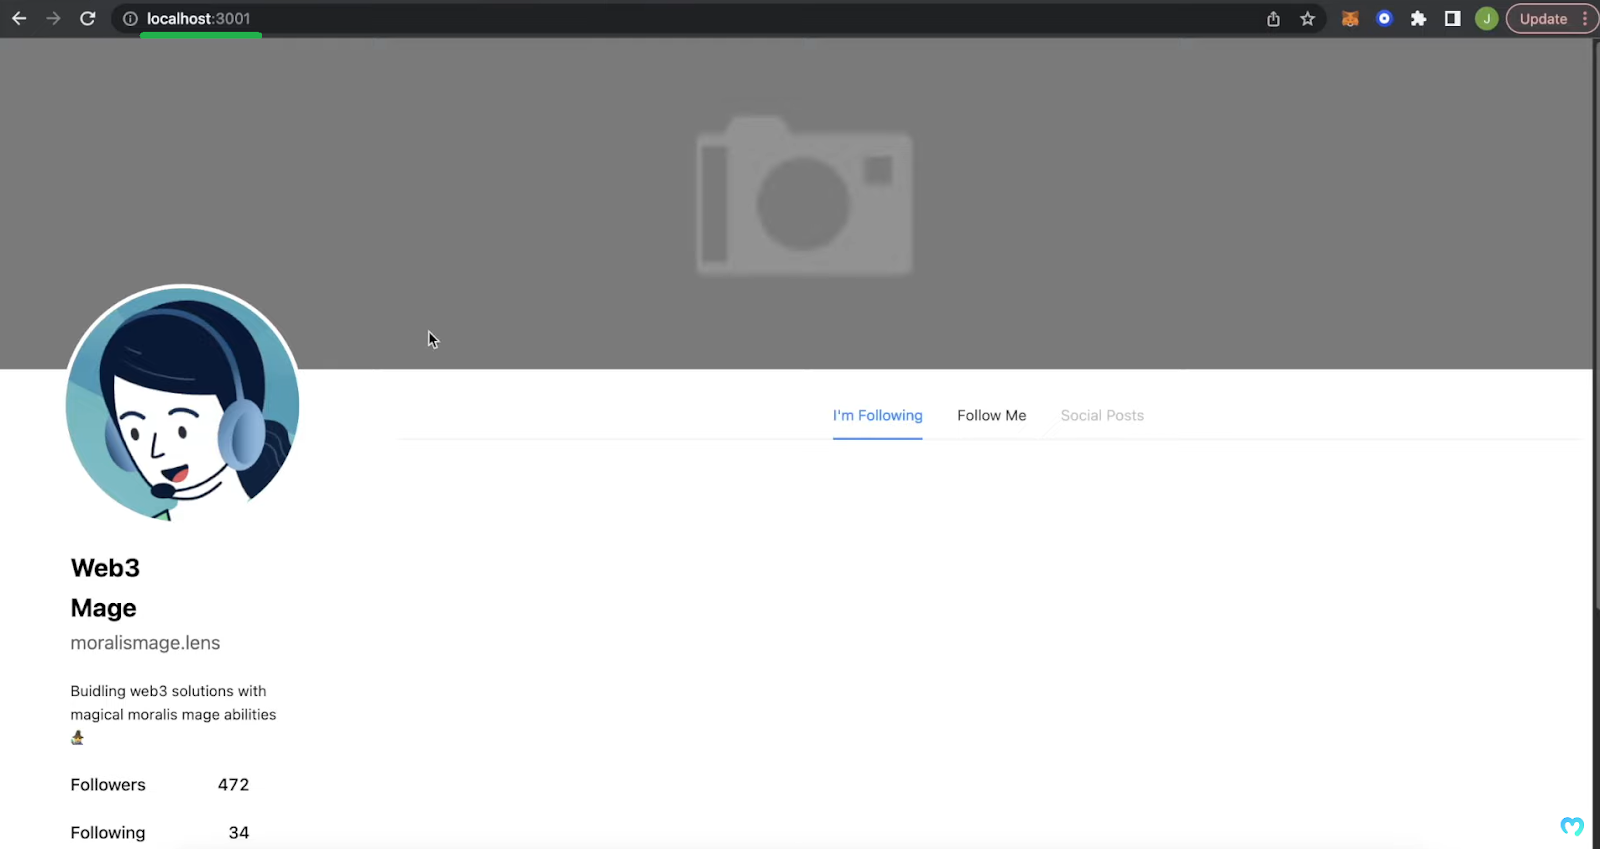
Looking at the screenshot above, you’ll notice that our code provides the layout you need. Also, it already includes the banner template, the default profile image, and default profile details. The layout also already includes the “I’m Following”, “Follow Me”, and “Social Posts” tabs.
Hence, this is a perfect starting point for you to focus on implementing Web3 functionalities. Additionally, as mentioned earlier, we will use Lens Protocol to cover decentralized social media profile functionalities. Moreover, Moralis will help us fetch all the on-chain data we need with single lines of code.

How to Use Lens Protocol to Build a Decentralized Social Media Profile
We will use the Lens API to build a decentralized social media profile. Furthermore, according to the Lens Protocol documentation, we must first make sure we can query from our dapp. Since we’ll be using URQL, we need to focus on installing and using that GraphQL client:

As such, we need to follow the instructions provided by Lens’ docs, and we’ll be good to go. We can copy the lines from the “Exposing the client” section. Then we return to VSC, where we create the “lensCalls.js” file inside the “pages/api” folder. Inside that file, we paste the copied code:
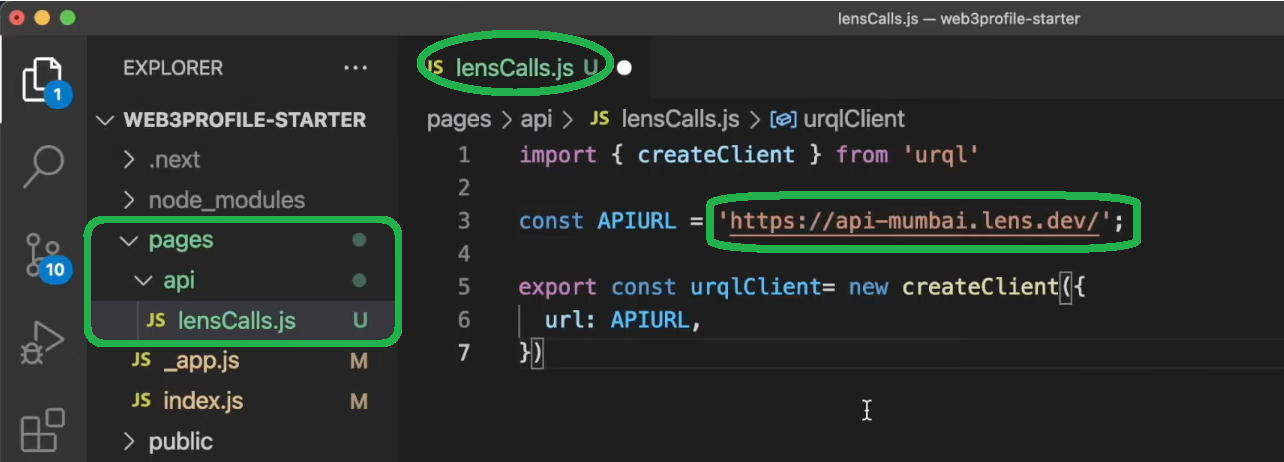
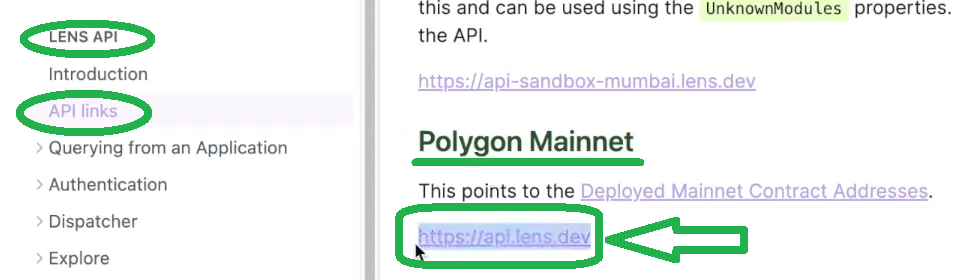
As you can see in the image above, the copied code focuses on the Polygon testnet (Mumbai). However, if you recall our demo, you know our dapp runs on the Polygon mainnet (the Matic mainnet). As such, we need to change the above-marked “HTTPS” accordingly. Hence, we return to Lens’ docs and copy that address. We can find it in the “API links” section:
With the correct address in place, we want to focus on querying profiles. Hence, we use the “Get profile” section of the Lens docs. There we can find the code needed to query profiles. Then, we simply copy it:

Next, we return to the “lensCalls.js” file. There, we must first export our query using this line of code:
Export const Profile= ‘

‘
Then, we paste the copied “Get by profile id” lines of code inside the single quotation marks above. Moreover, the copied code focuses on the “0x01” profile ID. As such, we need to know the ID of other profiles we want to focus on. For example, let’s change the profile ID to “0x09“:

Our Dapp’s Frontend
Open the “index.js” file, which covers our dapp’s frontend as demonstrated in its initial stage. To fetch an actual decentralized social media profile, we need to add the proper code. As such, scroll down to the bottom of the “index.js” file and use the following lines of code:
export async function getServerSideProps() {
  const response = await client.query(Profile).toPromise();
However, to make the above query function, we also need to import “urqlClient” and “Profile“. Thus, we add this line of code at the top of the “index.js” file:
import { client, Profile } from "./api/lensCalls";
We can then also add a proper “return” to the “getServerSideProps” function:
  return {
    props: { profile: response?.data.profile, nftArray: nftArray, myNFT: myNFT },
  };
Moreover, to get the above return, we need to add “profile” to our “Home” component and also log that for convenience:

The above lines of code provide us with all the details for a particular user ID. As such, we can now populate the necessary fields of our dapp’s frontend. Thus, we need to focus on tweaking the content of the “Home” component by replacing default values.
First, we replace the default banner by replacing the current address next to “src” with “{profile.coverPicture.original.url}“. For more details, use the video below, starting at 8:50.
Furthermore, we do the same for the profile image by using “{profile.picture.original.url}“. Then, do the same for the user name, handle, and bio. Here, we replace default values with “{profile.name}“, “{profile.handle}“, and “{profile.bio}“. Finally, we must also ensure that the numbers of “followers” and “following” are properly populated. Hence, we replace the default values with “{profile.stats.totalFollowers}” and “{profile.stats.totalFollowing}”. Here’s the result for “0x09“:

Taking a Decentralized Social Media Profile Dapp to the Next Level
Looking at the screenshot above, you can see that with the above-implemented tweaks, our dapp collects and populates all user details. However, you can also see that the “I’m Following” page is still empty. That’s because our dapp is not fetching users’ NFTs. Fortunately, the fetched details that are inside the user object include the users’ wallet addresses (9:55):

As such, we can use the power of Moralis’ Web3 API to use that address and fetch all the NFTs owned by it. In order to obtain this power, you must complete the initial Moralis setup.
Obtaining Your Moralis Web3 API Key
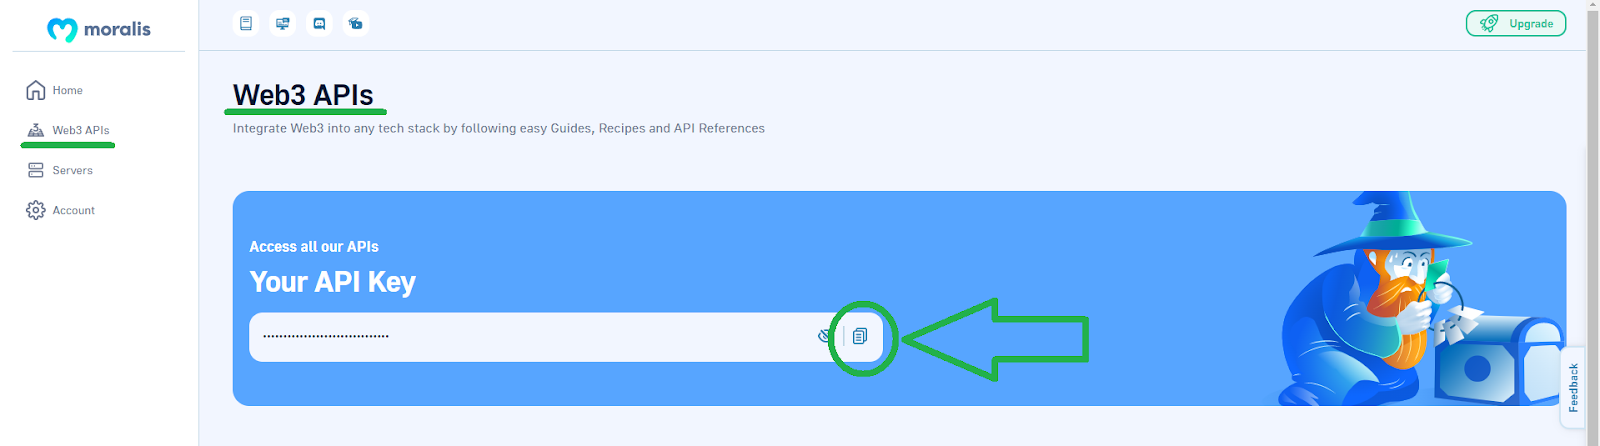
If you haven’t created your free Moralis account yet, do so now. You can use the “create your free Moralis account” link in the intro or visit the Moralis homepage. Once you have your Moralis account up and running, you can access your Moralis dashboard. This is where you’ll see the “Web3 APIs” tab in the side menu:

After clicking the above menu option, you will land on the “Web3 APIs” page. There, you can use the “copy” icon to get your Moralis Web3 API key:
Finally, return to VSC and paste the above-copied key inside the “.env.local.example” file. Nonetheless, also make sure to rename the “.env.local.example” to “env.local”:

Making Moralis API Calls
Now that you have your Moralis Web3 API in place, you can follow our lead as we start making Moralis API calls. To do this, we need to return to the “index.js” file and first import the Moralis SDK. Hence, we add the following line of code at the top of the file:
import Moralis from "moralis";
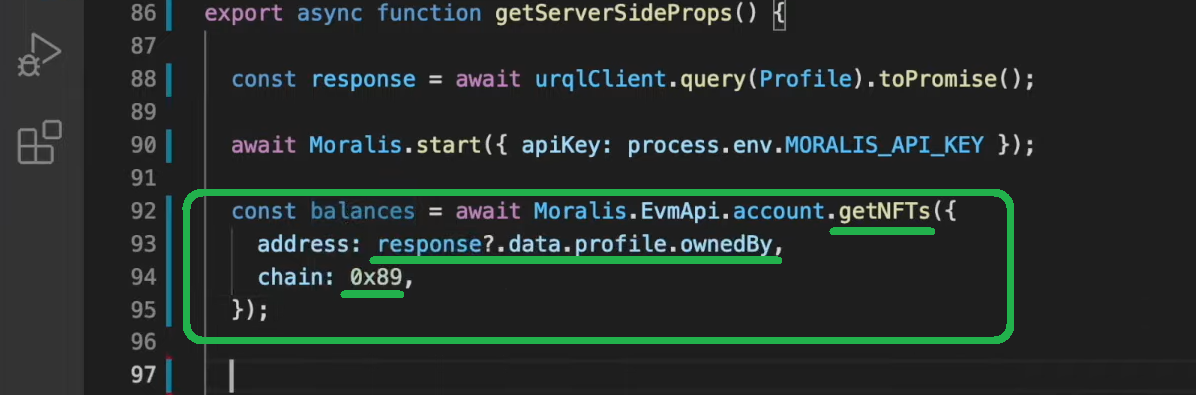
Then, we scroll down to the “getServerSideProps” function. Within that function, we’ll focus on adding API calls above “return” (11:04). However, we first initialize Moralis:

Next, we simply use the Moralis documentation to see what’s the best solution it offers to query accounts’ NFTs. We find that the “getNFTs” endpoint will do the trick. All this endpoint requires is an address and a chain. Fortunately, we have both of these parameters – the above “ownedBy” address and the Polygon mainnet chain ID (“0x89″). As such, we just copy the lines of code from the Moralis documentation and replace the two parameters with proper values:
Displaying Only Lens Protocol NFTs
Next, we want to display only the Lens Protocol NFTs on the “I’m Following” page. As such, we need to implement the lines of code that will do the proper filtering. For a detailed walkthrough, use the video below, starting at 12:10. Ultimately, these are the lines of code we use:
  let nftArray = [];
  let nfts = balances?.data.result;

  for (let i = 0; i < nfts.length; i++) {
    if (nfts[i].metadata !== null) {
      if (
        "animation_url" in JSON.parse(nfts[i].metadata) &&
        JSON.parse(nfts[i].metadata).animation_url !== null &&
        JSON.parse(nfts[i].metadata).animation_url.includes(".lens")
      ) {
        nftArray.push(JSON.parse(nfts[i].metadata).animation_url);
      }
    }
  }
In addition, we must also add “nftArray” to the “Home” component.
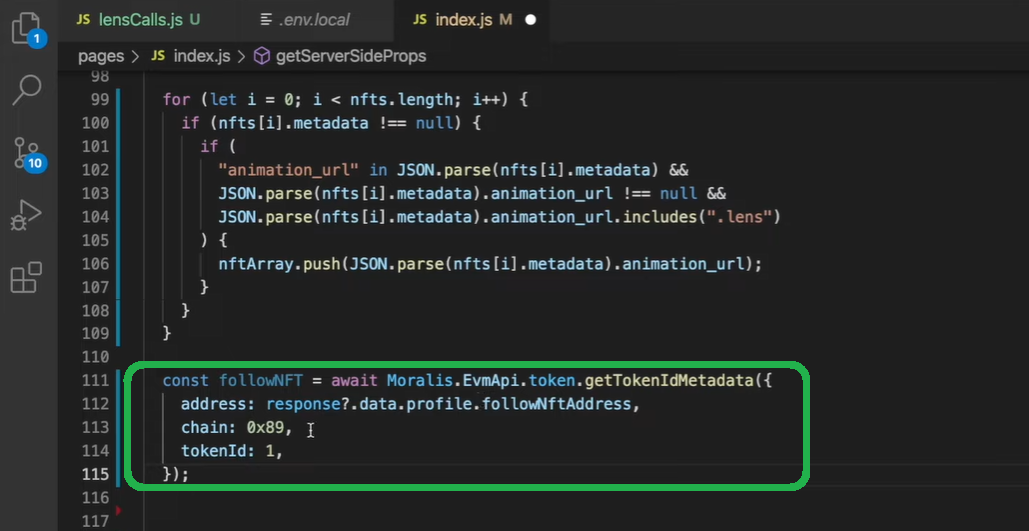
Moving on, we also want to display NFTs users get by following that account on the “Follow Me” page. This is where we’ll use the “getTokenMetadata” Moralis API endpoint (14:16):
For details on how to present the “Follow Me” NFTs as presented in the demo, use the video below (15:27).
Last but not least, you also want to activate the “Follow Me” button. This is where we hand you over to our in-house expert’s capable hands. He will guide you through this final stage of building a decentralized social media profile dapp in the video below (16:17).
How to Build a Decentralized Social Media Profile – Summary
We covered quite a distance in today’s article. However, if you followed our lead and the video above, you had a chance to create your own instance of a decentralized social media profile dapp in less than 20 minutes. Of course, that was possible because you didn’t have to start from scratch. Instead, you used our starter code and just incorporated Web3 backend functionality. The latter was straightforward, thanks to Moralis’ and Lens Protocol’s docs. Along the way, you also obtained your Moralis Web3 API key, which gave you access to the ultimate Web3 API. Furthermore, you used “getNFTs” and “getTokenMetadata“.
If you enjoyed today’s tutorial, you should explore the Moralis YouTube channel and the Moralis blog for Web3. The tutorials there vary from the most basic ones to more advanced feats. As such, you can pick the ones that suit your current skills. However, thanks to Moralis, your Web2 dev skills are all you need. Additionally, since Moralis is all about cross-platform interoperability, you can join the Web3 revolution utilizing familiar tools. ReactJS, NextJS, Firebase, Supabase, Unity, and other platforms can be your ticket to start creating killer dapps. It’s also worth pointing out that Moralis supports all leading programmable chains. As a result, you get to future-proof your dapps.
Last but not least, you may also want to go full-time crypto as soon as possible. This is where Moralis Academy can make all the difference. By becoming blockchain certified, you will greatly increase your chance of landing an excellent crypto job in no time.