With a reliable token allowance checker, you can see all open approvals related to any ERC-20 token for any wallet address. If you’d like to build such a checker, you can now easily do so, thanks to the Moralis Token API. You only need a simple backend script (you can use NodeJS) and a React frontend. As such, you can build a token allowance checker dapp (decentralized application) in minutes. Here’s the core method of viewing wallet token approvals:
const response = await Moralis.EvmApi.token.getTokenAllowance(options);
If you wish to learn how to properly implement the getTokenAllowance Token API endpoint using NodeJS, then the tutorial below is exactly what you need. Of course, if you prefer videos, you can use the one at the top, as it will also get you to the finish line. Whichever path you choose, you’ll learn all the essentials to create a token allowance checker. What’s more, you need to have a Moralis Web3 API key to accomplish this task. Therefore, don’t forget to sign up with Moralis before getting your hands dirty!

Overview
Most of you are probably eager to learn how to use the “get ERC-20 token allowance” (getTokenAllowance) endpoint with JavaScript (JS). As such, we will dive right into the “token allowance checker” tutorial in the next section. There, we’ll show you how to create a simple JS script that implements the above-presented code snippet. This will be the backend of your token allowance checker dapp. Along the way, we’ll also show you how to install the Moralis SDK and how to obtain your Web3 API key. Plus, we’ll go through the getTokenAllowance endpoint documentation page.
We’ll also ensure you can confidently answer the “what is a token allowance checker?” question. To ensure that, we’ll do a demo of our example dapp, which looks for wallet token approvals. By looking at our example frontend and DEX approval examples, you’ll understand the data that the endpoint returns better. It will also show you that a very simple React app can do the trick and potentially inspire you to create your own frontend.
Tutorial: Build a Token Allowance Checker
Note: If you feel like you need to get a better understanding first of what token allowance is and how DEXs ask for your approval before building your NodeJS backend, look at the demo below the tutorial.
This tutorial focuses on using NodeJS. However, since Moralis is cross-platform interoperable, you can also use Python or other leading programming languages and frameworks to build dapps (decentralized applications). With that in mind, first, make sure that you have NodeJS v.14 or higher installed on your machine. You’ll also need a package manager, so you should install npm or yarn as well. With these prerequisites under your belt, you can move to the first step.
Step 1: Set Up Moralis
In case you haven’t done so yet, create your Moralis account. You can start with a free account; however, if you plan on building dapps with lots of traffic, we recommend getting the Moralis Pro, Business, or Enterprise plans. Once you have your Moralis account up and running, you can access your admin area. From there, you’ll be able to copy your Web3 API key with the following two clicks:
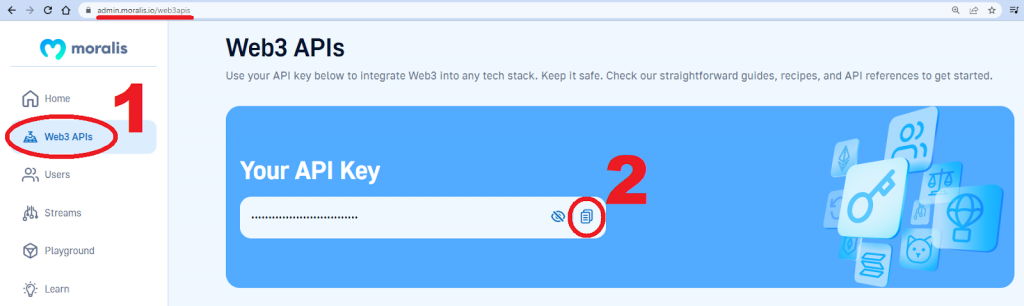
Note: Hold on to your API key for now – you’ll get to paste it into the script as we move forward.
Next, you need to install the Moralis SDK. The following command will take care of that:
- NPM:
npm install moralis @moralisweb3/common-evm-utils
- Yarn:
yarn add moralis @moralisweb3/common-evm-utils
Step 2: Getting the Spender Allowance of ERC-20 Tokens
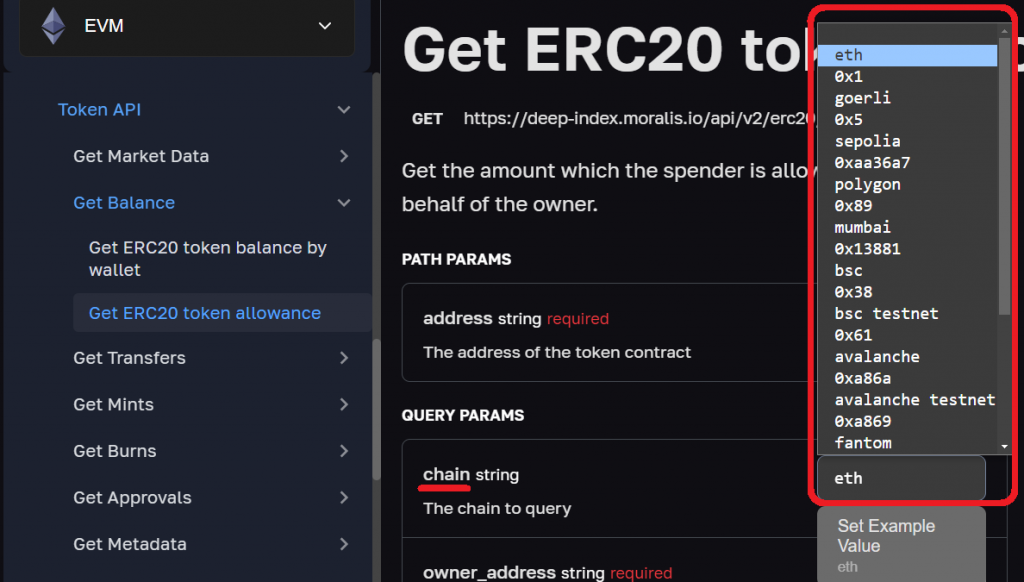
By this point, you already know that we’ll be using the getTokenAllowance endpoint. That said, you need to get acquainted with this endpoint better. So, let’s together look at a relevant API reference documentation page:
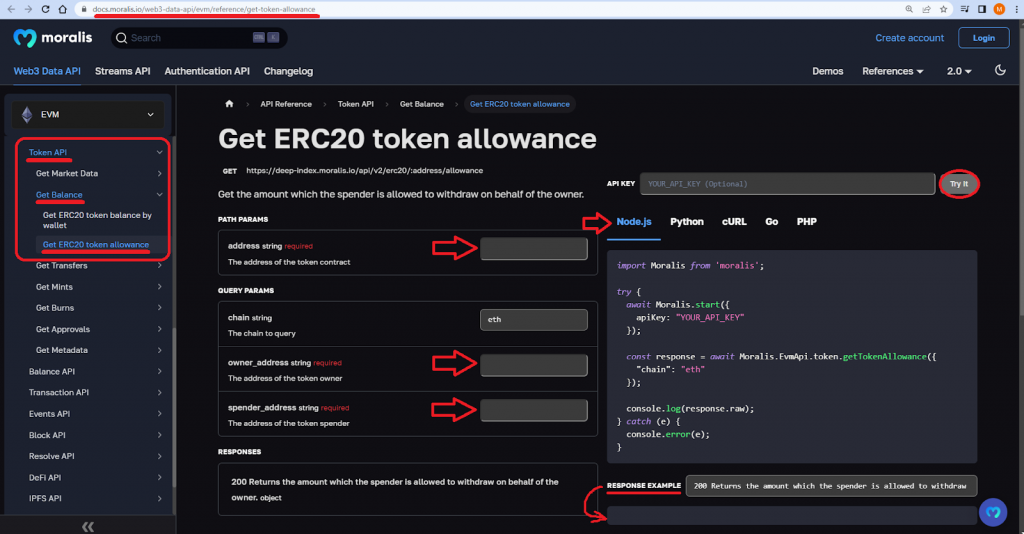
Looking at the above screenshot, you can see that the endpoint in question belongs to the “Get Balance” group of the Token API. The above image illustrates the general structure of all Moralis API reference pages. As you can see, they allow you to select the programming language/framework that you want to use and execute the code via the “Try It” button. However, before you can do that, you need to enter the required parameters. So, when it comes to building a token allowance checker with Moralis, these are the required parameters:
address– The address of the token contract.owner_address– The address of the token owner (this is a wallet address that gave approval to the DEX).spender_address– The address of the token spender.
Note: In more advanced instances, you want to check different spender and token addresses. Hence, all of the above parameters can come in the form of arrays of strings.

Aside from the above-presented required parameters, the getTokenAllowance endpoint also offers an option to query other supported chains. By default, Ethereum is the targeted chain; however, thanks to Moralis’ cross-chain interoperability, you get to choose among all the leading EVM-compatible chains and their testnets:
If you looked at the above documentation page carefully, you must have seen the box with the lines of code. The code in this box matches the programming language/framework you select. Accordingly, you can simply copy those lines into your code editor to create your backend scripts with minimum effort.
An Example NodeJS Script
At the top of our example script, we first import Moralis and evm-utils:
const Moralis = require("moralis").default;
const { EvmChain } = require("@moralisweb3/common-evm-utils");
Then, we initialize Moralis:
const runApp = async () => {
  await Moralis.start({
    apiKey: "YOUR_API_KEY",
});
Looking at the lines of code above, you can see that this is the place to paste your Web3 API key. Simply replace the YOUR_API_KEY placeholder with the above-obtained API key. Next, you want to define the parameters that will go into the getTokenAllowance endpoint. For the sake of this simple tutorial, we are using a single address for each parameter – that is, for address, owner_address, and spender_address:
const chain = EvmChain.ETHEREUM;

const address = "0x514910771AF9Ca656af840dff83E8264EcF986CA";

const ownerAddress = "0x7c470D1633711E4b77c8397EBd1dF4095A9e9E02";

const spenderAddress = "0xed33259a056f4fb449ffb7b7e2ecb43a9b5685bf";
Finally, we get to implement the line of code from the intro, including the above parameters. Plus, we console-log the response and execute the runApp function:
const response = await Moralis.EvmApi.token.getTokenAllowance({
  address,
  chain,
  ownerAddress,
  spenderAddress,
});

console.log(response.toJSON());
};

runApp();
Nonetheless, here’s the complete example script:
const Moralis = require("moralis").default;
const { EvmChain } = require("@moralisweb3/common-evm-utils");

const runApp = async () => {
  await Moralis.start({
    apiKey: "YOUR_API_KEY",
    // ...and any other configuration
  });

  const chain = EvmChain.ETHEREUM;

  const address = "0x514910771AF9Ca656af840dff83E8264EcF986CA";

  const ownerAddress = "0x7c470D1633711E4b77c8397EBd1dF4095A9e9E02";

  const spenderAddress = "0xed33259a056f4fb449ffb7b7e2ecb43a9b5685bf";

  const response = await Moralis.EvmApi.token.getTokenAllowance({
    address,
    chain,
    ownerAddress,
    spenderAddress,
  });

  console.log(response.toJSON());
};

runApp();
Step 3: Run the Script
The above script is your token allowance checker, which you can now run with the following command:
node index.js
For the addresses used in the above script, the token allowance checker lets us know there are no open wallet token approvals. So, this is the JSON response that you should see in your terminal:
{
  "allowance": "0"
}
What is a Token Allowance Checker?
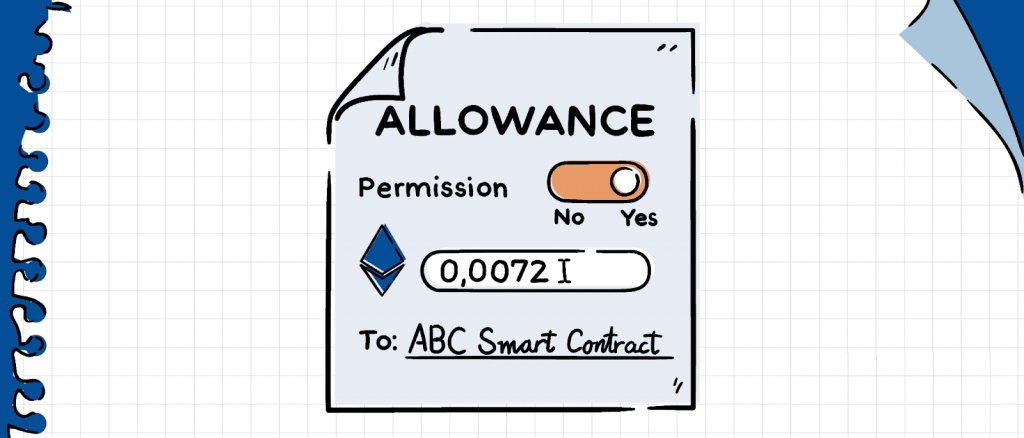
A token allowance checker is a tool (a script or a Web3 app/dapp) that shows all approvals for ERC-20 tokens belonging to a specific wallet. In some cases, it can also let you control or change open allowances. Additionally, these approvals are assigned to specific smart contracts, such as the ones powering DEXs or aggregators. To help you better understand this, let’s do a simple demonstration.
With our example MetaMask wallet that holds several ERC-20 tokens (LINK, USDT, USDC, and UNI), we visit the 1inch aggregator. When we connect with our wallet and select any of the tokens we hold, we first need to give 1inch the token approval before we can actually swap them. Here’s an example for USDT:
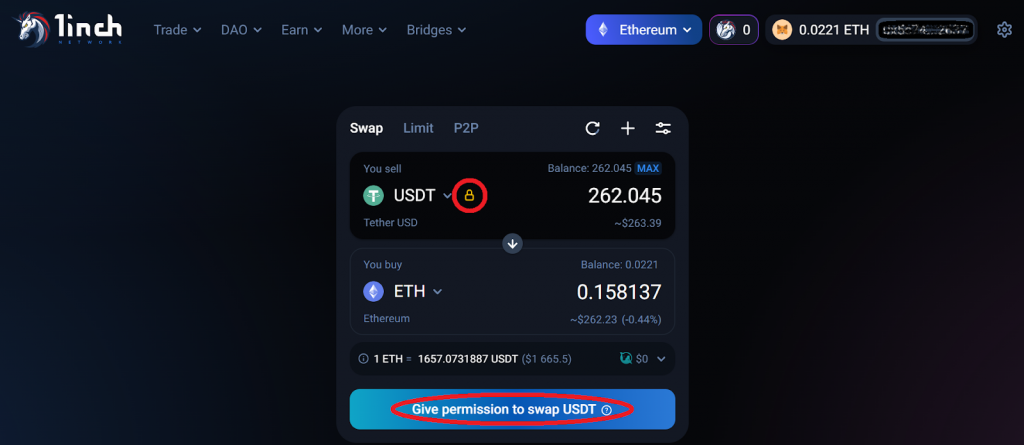
Looking at the above screenshot, you can see the “lock” icon. The latter indicates that we haven’t yet approved a token allowance for that asset. However, for the sake of this demonstration, we went on and gave 1inch approvals for LINK, USDT, and USDC. So, once a token allowance has been approved, there’s no “lock” icon, and we can swap our tokens:

Let’s also visit Uniswap and approve our UNI token there:
So, above, we gave token approvals to 1inch for LINK, USDT, and USDC tokens and to Uniswap for UNI. With that in mind, let’s look at our example token allowance checker dapp that we built using the getTokenAllowance endpoint from the above tutorial:
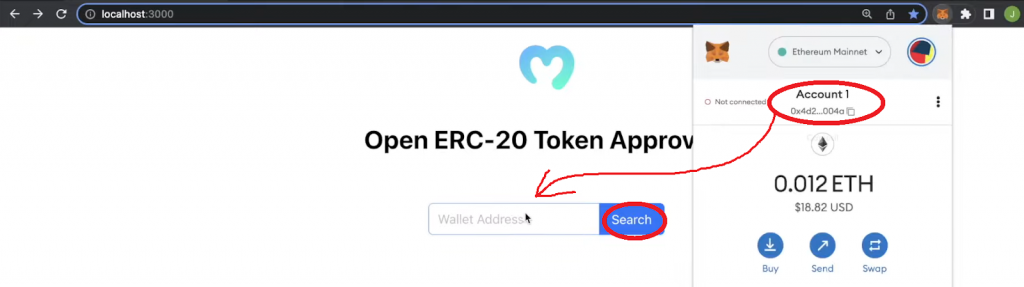
As indicated in the above image, we first copy our MetaMask wallet address that holds the approved tokens and paste it into the designated field of our React dapp. After hitting the “Search” button, our dapp displays all the active token approvals:
Additional Explanation of Involved Parameters
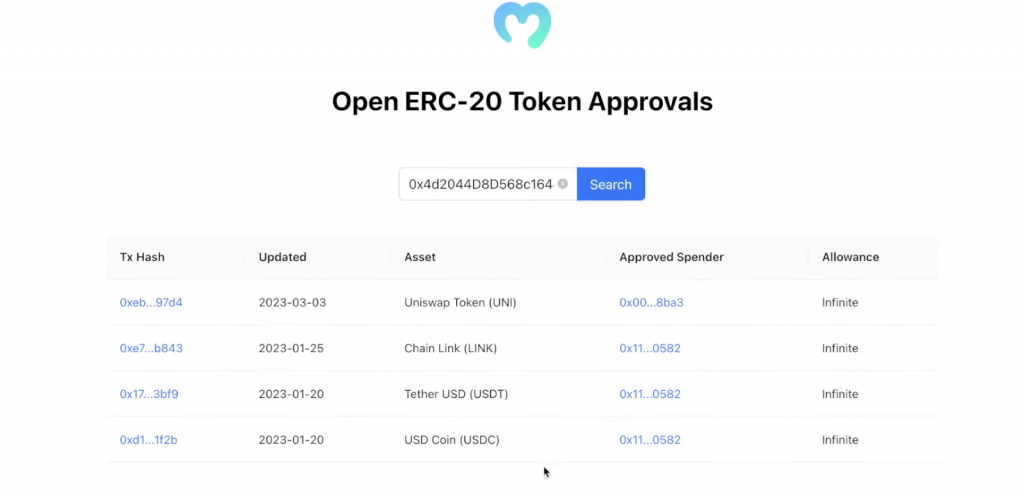
Looking at the above screenshot, you can see that our token allowance checker also displays some details regarding the active token approvals. These details include the allowance transaction hash, time of approval, assets in question, approved spender’s address, and amount of allowance. You can see that LINK, USDT, and USDC all have the same “Approved Spender” address. That’s because we gave the 1inchs aggregator allowance approvals for these assets. As for the UNI token, the approved spender is Uniswap’s wallet address.
To ensure that you properly understand how we got from the “get ERC20 token allowance” endpoint to the above details, let’s look at the above-displayed addresses from the endpoint parameters’ perspective. The entry field takes a wallet address and passes it to our backend, which assigns it to ownerAddress. We also equipped our example dapp with lines of code that explore the connected wallet address and create an array of token contract addresses owned by this wallet. These token contract addresses are assigned to the address parameter. As for the spenderAddress parameter, we created a JSON file that stores the addresses of all the popular DEXs. Thus, we covered all the required parameters while focusing on the Ethereum chain.
Our Backend Response
Our backend’s Express server is running on “localhost:3001”. Let’s look at its response for further clarification:
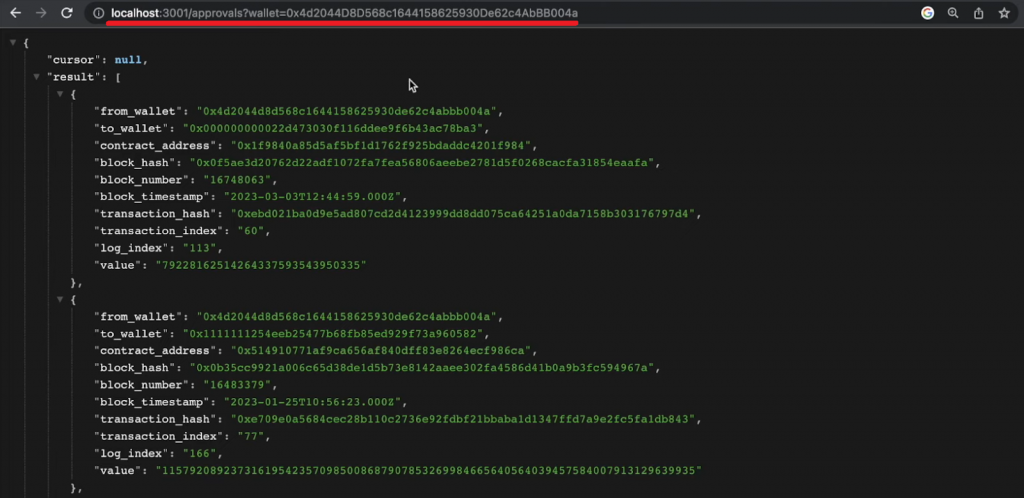
Looking at the above screenshot, you can see that we also created the /approvals endpoint that displays responses. So, from_wallet is our MetaMask address that holds LINK, USDT, USDC, and UNI tokens. Also, this parameter is the same for all responses. Next, we have to_wallet representing a DEX’s wallet address – the spenderAddress parameter. Plus, contract_address represents an ERC-20 token’s smart contract address. This covers the input parameters.
The rest of the responses are on-chain information related to the approval transaction that the getTokenAllowance endpoint returns. These include a block hash, block number, block timestamp, transaction hash, transaction index, log index, and value of the approved allowance. So, we use these details to populate our frontend as presented above.
Now that you know what a token allowance checker is and how it works, we urge you to upgrade the above basic backend script accordingly and create your unique frontend around it. In addition, feel free to include other powerful Moralis Web3 API endpoints. After all, now that you have your Moralis API key, they are all at your disposal.

Token Allowance Checker – View Wallet Token Approvals – Summary
Today’s article taught you how to check any wallet’s token approvals with a short code snippet. As such, you met the getTokenAllowance endpoint. The latter takes on three different addresses (token owner, token spender, and token smart contract) and, in return, tells you whether or not there are any open token approvals for a wallet address in question. Plus, in case there are some open token approvals, the endpoint also provides allowance details. Additionally, you had an opportunity to follow our lead and create a simple NodeJS script that may serve as a token allowance checker.
To even better understand today’s topic, we did a demonstration of our example dapp (decentralized application) that lets you view wallet token approvals. So, by covering the above sections, you should have a proper understanding of how to make the most of the on-chain data related to token allowances.
You also learned that with your Web3 API key, you can use many other Moralis Web3 Data API endpoints. Plus, you can rely on the Moralis Auth API to cover Web3 authentication. Also, using the Moralis Streams API, you can create real-time notifications based on on-chain events.
If you already know the basics of Web3 development, you can dive into the Moralis docs and start BUIDLing. However, you may need some guidance, inspiration, or more info about blockchain development. In that case, make sure to visit the Moralis YouTube channel and the Moralis blog. Some of the latest topics there focus on Alchemy’s Notify Custom Webhooks, how and where to buy an ENS domain, how to get real-time crypto wallet balance updates, what is an xNFT (executable NFT), building a crypto dashboard project, how to create a blockchain explorer, and much more.
