With the getNativeBalances endpoint from the Moralis Streams API, you can track a Web3 wallet (or wallets) and detect any on-chain activity. At the same time, you can get real-time wallet balance updates. The getNativeBalances endpoint enabling you to get the real-time balance of a wallet takes in selectors and type:
getNativeBalances: [
  {
    selectors: ["$to"],
    type: 'erc20transfer'
  }
]
Of course, you need to implement the above code snippet correctly to make it work. That means you need to add the snippet to other options of your Web3 stream within your backend script. With all the options in place, you get to create your stream with the following line of code:
const newStream = await Moralis.Streams.add(options)
If you wish to learn how to implement the “Get Native Balances” endpoint, complete our tutorial below. In it, we’ll show you how to create a simple JS script that detects ERC-20 token transfers. Plus, thanks to the endpoint, the script also gets the real-time wallet balance of the native cryptocurrency. If that sounds interesting, sign up with Moralis and follow our lead!

Overview
In today’s article, you’ll have an opportunity to create a simple NodeJS dapp that detects ERC-20 token transfers on the Polygon Mumbai testnet. As we move forward, we’ll complete multiple steps and substeps:
- Prerequisites
- Initialize a NodeJS application
- Set up an Express server
- Fetch native real-time wallet balance and transferred ERC-20 tokens
- This step contains multiple substeps
- Run and Test Your Backend Dapp
The ERC-20 token example we will focus on in this article is LINK. However, since Moralis is all about cross-chain interoperability, you can use the exact same principle on Ethereum and other popular EVM-compatible testnets and mainnets.
Our NodeJS dapp will detect transfers of LINK tokens and return a message in the terminal as a response. That message will inform us which address acquired the ERC-20 tokens and how many. Plus, the message will provide us with the acquirer address’ native real-time wallet balance. In the case of Mumbai, the native currency is “testnet” MATIC.
If you are not sure why real-time wallet balances matter, we also have an extra section below the tutorial addressing that topic. In addition, you can also learn more about the Moralis Streams API and other powerful tools that Moralis offers.
Tutorial: Get Real-Time Wallet Balance While Tracking ERC-20 Transfers
To complete this tutorial, you need to complete multiple steps. So, to start, let’s look at the necessary prerequisites!
Prerequisites
- A Moralis account
- Visual Studio Code (VSC) or any other code editor of your choice
- NodeJS (install NodeJS and npm)

With the above prerequisites under your belt, you’re ready to create your NodeJS dapp.
Initialize a NodeJS Application
First, create a new project – feel free to follow our lead and call it “GetNativeBalances”. Next, open that project in VSC. Inside that directory, create another folder: “webhook”. Then, use VSC’s terminal to initialize a new project by entering the following command:
npm init
Inside the terminal, you’ll be asked to give your project a name and to set up several options. Feel free to stick to the default options by simply pressing “enter” several times. As a result, you should see a “package.json” file in your project tree. The script contains the following lines by default:
{
  "name": "simple-nodejs-demo",
  "version": "1.0.0",
  "description": "",
  "main": "index.js",
  "scripts": {
    "test": "echo \"Error: no test specified\" && exit 1"
  },
  "author": "",
  "license": "ISC"
}
Before you can proceed to set up an Express server, you should also install the required dependencies. To do this, run the following command:
npm install moralis express @moralisweb3/common-evm-utils cors dotenv

Set Up an Express Server
Within the “webhook” folder, create a new “index.js” file. You want this file to represent an Express server and a webhook endpoint, which you can call /webhook. Start by requiring Express and CORS and defining local port:
const express = require("express");
const app = express();
const port = 3000;
const cors = require("cors");
With the above lines of code in place, you are ready to create the /webhook endpoint. We want our dapp to console-log the native real-time wallet balance and the amount of ERC-20 tokens transferred. So, we’ll create a separate NodeJS dapp to fetch those details. However, this “index.js” script will ensure the details are properly console-logged. So, these are the lines of code that will take care of that:
app.post("/webhook", async (req, res) => {

  const {body} = req;

  try {

    let amount = Number(body.erc20Transfers[0].valueWithDecimals)
    let token = body.erc20Transfers[0].tokenSymbol
    let to = body.erc20Transfers[0].to
    let matic = Number(body.nativeBalances[0].balanceWithDecimals)

    console.log("--------------------------------------------")
    console.log(to + " with MATIC Balance of " + matic.toFixed(2));
    console.log("Aquired " + amount.toFixed(2) + token);
    console.log("--------------------------------------------")

  } catch (e) {
    console.log(e);
    return res.status(400).json();
  }

    return res.status(200).json();
});

app.listen(port, () => {
  console.log(`Listening to streams`);
});
Finally, run your webhook by entering the following command:
node index.js
Note: The above script will fetch the data from our “stream.js” script, and it will return some errors before you create and run that script.

Fetch Native Real-Time Wallet Balance and Transferred ERC-20 Tokens
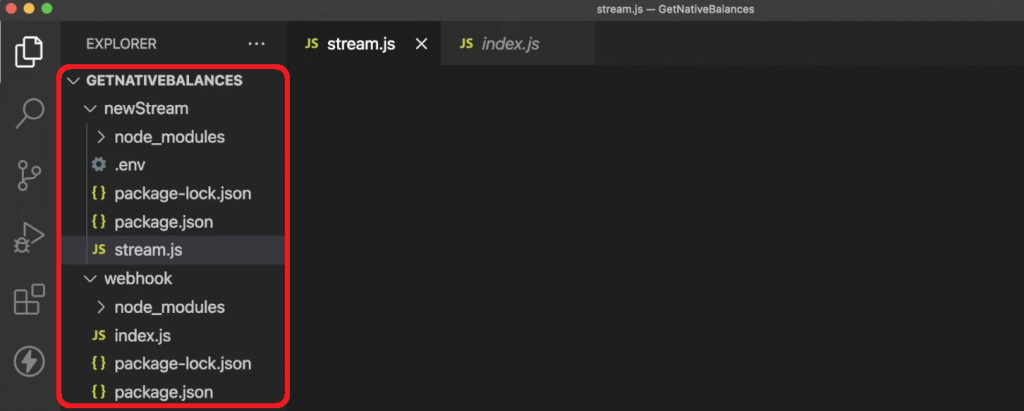
Inside your project directory, create another folder: “newStream”. While inside that folder, follow the steps outlined in the “Initialize a NodeJS Application” section above to create another NodeJS dapp. To avoid confusion, we recommend you name the main script “stream.js“. Aside from this file, which will be our main focus moving on, you also need to create a “.env” file. All in all, at this point, your “GetNativeBalances” project tree should look like this:
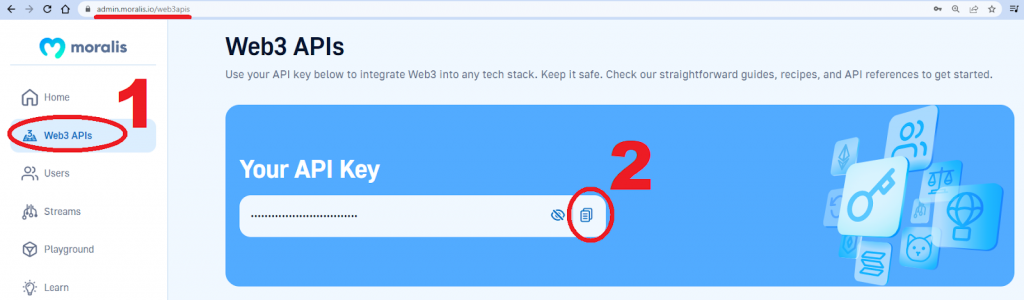
Obtain Your Moralis Web3 API Key
In case you haven’t created your Moralis account yet, make sure to do so now. You will need your account to access the Moralis admin area. There, you’ll want to visit the “Web3 APIs” page and copy your API key:
Then, return to VSC and paste the above-copied key into your “.env” file under the MORALIS_KEY variable.
Create a Webhook URL
When working with the Moralis Streams API, you must provide a webhook URL. When building for production, this would be your dapp URL. However, when creating dapps on testnets and localhosts, you need to generate a webhook URL. Fortunately, you can do that easily with ngrok. Just open a new terminal and run the following command:
npx ngrok http 3000
The terminal will return a URL address that you should use as a webhook in the “stream.js” script:
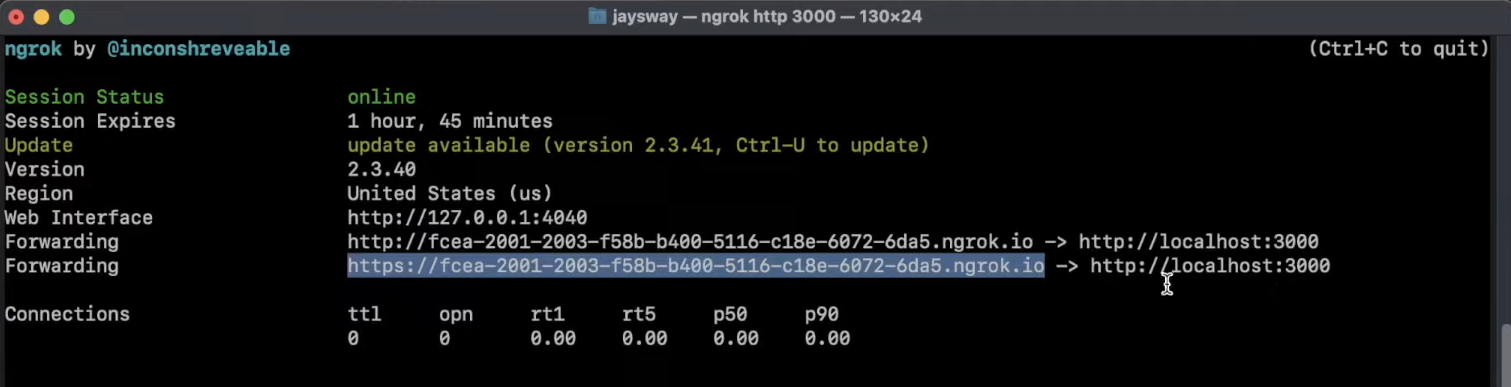
You now have everything ready to populate the “stream.js” file.
Create an ERC-20 Transfer-Detecting Web3 Stream
At the top of the “stream.js” script, you should import Moralis and its EvmChain utils and dotenv:
const Moralis = require("moralis").default;
const { EvmChain } = require("@moralisweb3/common-evm-utils");
require("dotenv").config();
Next, you need to initialize Moralis using your Web3 API key with the Moralis.start method:
Moralis.start({
  apiKey: process.env.MORALIS_KEY,
});
Smart Contract ABI
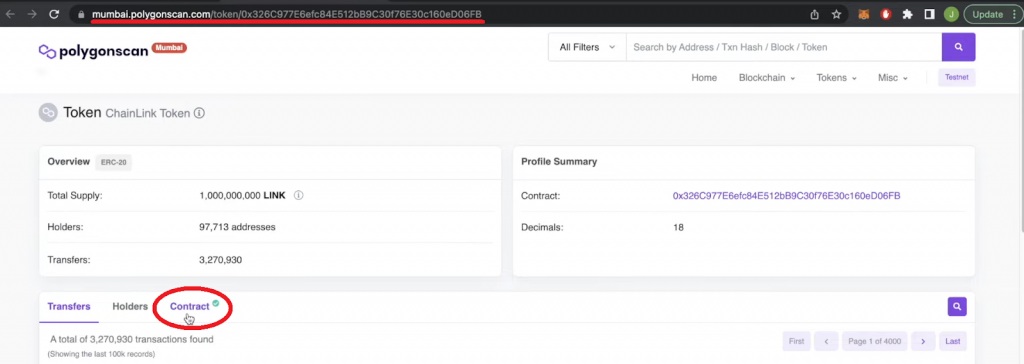
As you probably know, each ERC-20 token belongs to a smart contract. The latter is deployed at the time of token creation and handles the token transfers, ownership, and other rules. Herein, we will focus on the LINK token on the Mumbai testnet. Consequently, you need to add that contract’s ABI (application binary interface) under the erc20TransferAbi variable:
const erc20TransferAbi = [{"anonymous":false,"inputs":[{"indexed":true,"internalType":"address","name":"from","type":"address"},{"indexed":true,"internalType":"address","name":"to","type":"address"},{"indexed":false,"internalType":"uint256","name":"value","type":"uint256"}],"name":"Transfer","type":"event"}]
If you were to obtain the above ABI yourself, you’d need to use PolygonScan (Mumbai). Of course, when working with other chains, you need to use the relevant chain’s block explorer. Fortunately, all EVM-compatible chains use similar explorer layouts. So, once on the smart contracts page, you need to select the “Contract” tab:
Then, you just scroll down a bit, and you should see “Contract ABI”:
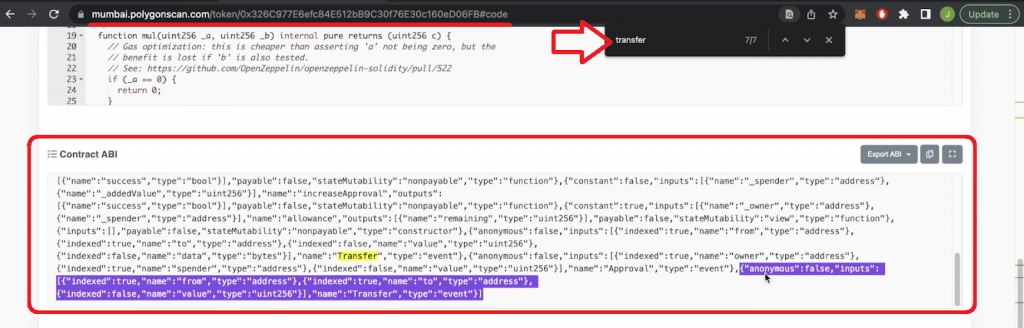
As the above screenshot indicates, you can use your browser’s search option to locate a particular event. For this tutorial, you want to focus on the Transfer event.
Another great thing about the Streams API is that you can create all sorts of filters. That way, you can focus only on specific on-chain events. For example, feel free to add the following filter. The latter focuses on transactions of more than one and less than two LINK tokens:
const erc20Filter = {
  "and": [
    { "gt": ["value", "1000000000000000000"] },
    { "lt": ["value", "2000000000000000000"] },
  ],
};
Note: The above filter serves the upcoming demonstration, and it helps us filter out other LINK transfers. It’s also worth noting that ERC-20 tokens use 18 decimal places.
Creating a streams Function
With the token contract ABI and filter in place, it’s time to finally create a stream that detects LINK transfers. As such, you need to create a streams async function and define the basic options. These include chain, description, tag, abi, topic0, includeContractLogs, and webhookUrl. However, to implement the getNativeBalances option as presented in the intro and the above-defined filter, you also need to define advanced options:
async function streams(){

  const options = {
    chains: [EvmChain.MUMBAI],
    description: "Finding MATIC Whales Buying LINK Tokens",
    tag: "linkTransfers",
    abi: erc20TransferAbi,
    topic0: ["Transfer(address,address,uint256)"],
    includeContractLogs: true,
    webhookUrl: "your webhook url",
    advancedOptions: [
      {
        topic0: "Transfer(address,address,uint256)",
        filter: erc20Filter
      }
    ],
    getNativeBalances: [
      {
        selectors: ["$to"],
        type: 'erc20transfer'
      }
    ]
  }

  const newStream = await Moralis.Streams.add(options)

  console.log("Stream -- Created")

  const {id} = newStream.toJSON();

  const address = "0x326C977E6efc84E512bB9C30f76E30c160eD06FB";

  await Moralis.Streams.addAddress({address, id})

  console.log("ERC20 Contract to Follow -- Added")

}

streams()
The advanced getNativeBalances option is the key that fetches native real-time wallet balance whenever a LINK transfer that matches your filter takes place. For more details about this advanced option, check out the “Get Native Balances” documentation page.
To make the above lines of code work, you must also replace your webhook url with your ngrok URL. Do not forget to add the /webhook endpoint at the end, like so:

Here’s an overview of the rest of the above portion of the “stream.js” script:
Moralis.Streams.add– Adds the above-defined options to a new stream.console.log("Stream -- Created")– Console-logsStream -- Created.const {id} = newStream.toJSON();– Reconstructs the new stream’s ID.address– Variable that holds the LINK smart contract address.await Moralis.Streams.addAddress({address, id})– Adds the smart contract address to your stream.
Note: If you are using the Moralis Business or Enterprise account, you can use a single stream to focus on multiple token addresses. In that case, you’d need to add allAddresses: true among your stream’s options:

Run and Test Your Backend Dapp
Keep your “index.js” script that is powering your webhook running:

Open a new terminal and make sure to cd into the “newStream” folder. Then, run the “stream.js” script with the following command:
node stream.js
Here’s what you should see in your new terminal:

Now that you have both of your scripts running, you can use your “webhook” terminal to see the result as you execute some test transfers of LINK. With the above filter in mind, make sure to send more than one and less than two LINK tokens.
To test your dapp, you will also want to get your MetaMask wallet ready. Thus, add the Mumbai network to your MetaMask and connect it to that testnet. Then, top your wallet with some free MATIC and free LINK, which you can get from a vetted Polygon Mumbai faucet. With that said, here’s a screenshot that demonstrates the gist of our real-time wallet balance fetching backend dapp demo:
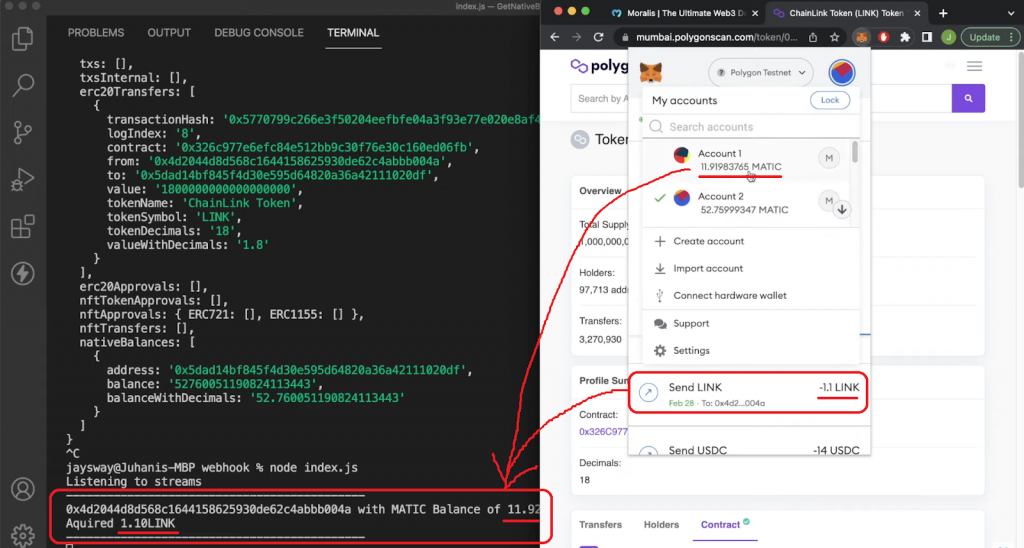
As you can see in the above screenshot, the second we send the amount of LINK that matches our filter from one of our accounts to another, our stream detects this transfer. Then, “index.js” instantly console-logs the amount of this transfer as well as the recipient’s real-time wallet balance of MATIC.
Why is Real-Time Wallet Balance Important?
Aside from creating crypto wallets and portfolio trackers, Moralis Streams enable you to create all sorts of alerts based on live on-chain activities. Whale alerts are a great example, which you can learn more about in our “Twitter Bot for Crypto” tutorial.
Plus, keep in mind that the Moralis Streams API is only part of this Web3 provider’s arsenal. There’s also the Moralis Web3 Auth API, making the implementation of Web3 authentication a breeze. In addition, with the Web3 Data API set, you can query parsed on-chain data across all the leading chains. What’s more, you get to implement all this using your legacy programming skills and concise snippets of code.

How to Get Real-Time Crypto Wallet Balance Updates – Summary
In this article, you learned how to use the Moralis Streams API to detect token transfers and a real-time wallet balance at the same time. You now know that this is possible thanks to the getNativeBalances stream option. The latter can be used with different types of selectors and on-chain events. While today’s tutorial focused on the Mumbai testnet and LINK token transfers, you can apply the same principles to other leading chains and tokens. If you opt for a Moralis Business or Enterprise account, you can even listen to all token addresses in a single stream by setting the allAddresses option to true.
We urge you to use the above principles to create your own Web3 streams for different events. That way, you will properly master the powerful getNativeBalances feature. However, feel free to explore other blockchain development topics and tutorials that await you on the Moralis YouTube channel and Moralis blog. For example, you can follow our lead and build a Polygon portfolio dapp or create a blockchain explorer.
If you would like to future-proof your Web3 career, make sure to check out Moralis Academy. There, you can start with the Crypto for Beginners course. Or, if you already possess solid crypto fundamentals, why not check out the Ethereum Smart Contract Programming course? Once you’ve finalized that course, we recommend checking out Smart Contract Programming 201, which is an advanced Solidity course, perfect for anyone wanting a career as a smart contract developer! If you decide to tackle that advanced course, you will get the chance to build a DEX (decentralized exchange) on the Ethereum network!