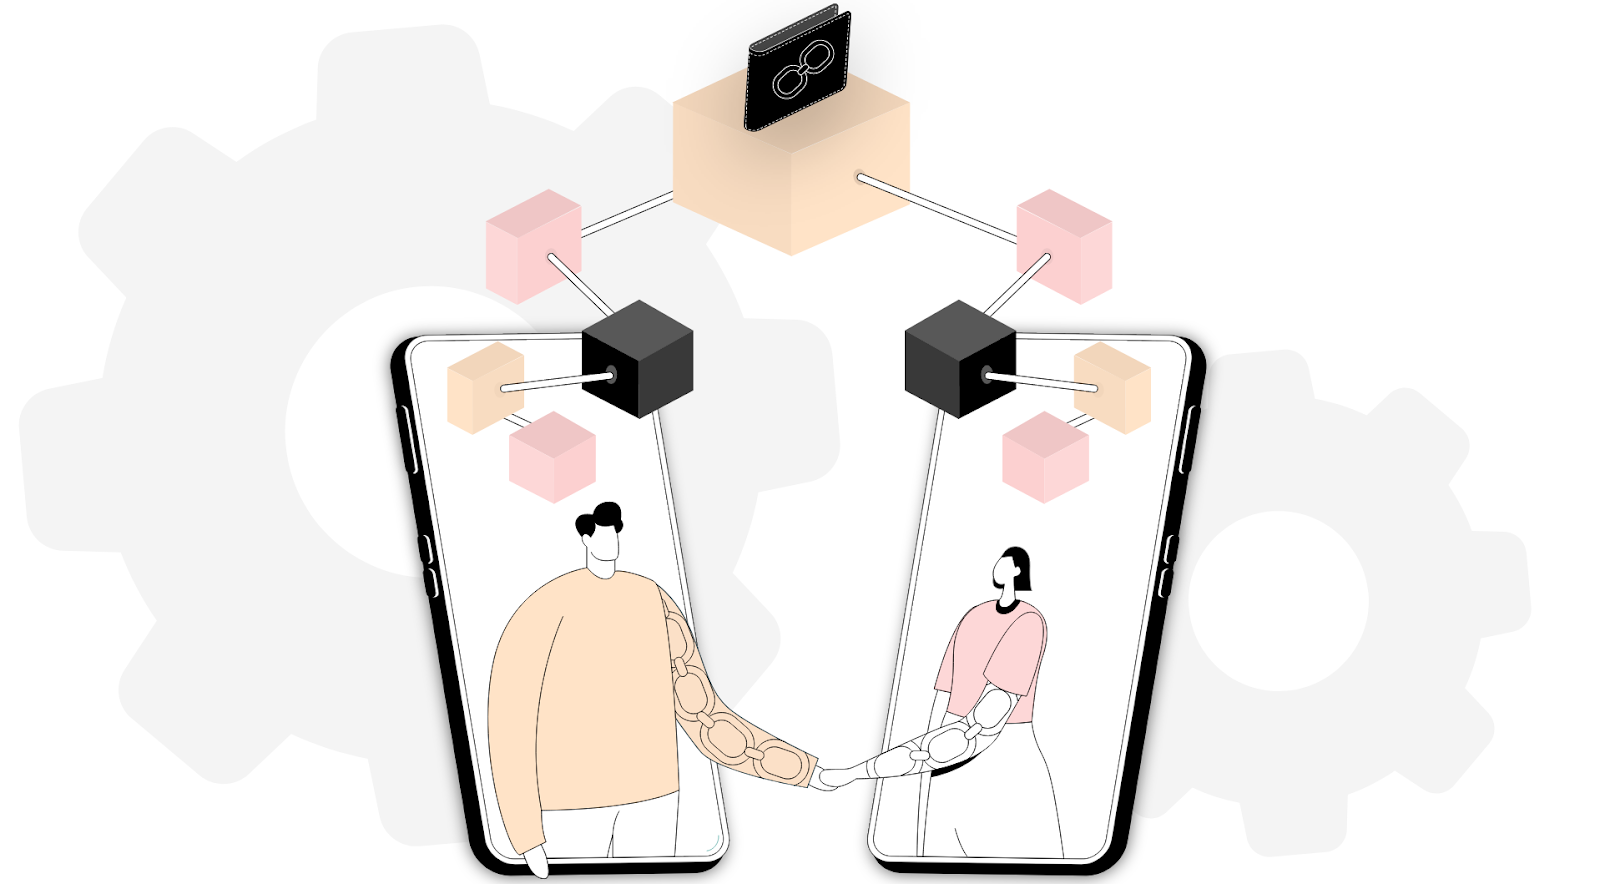
According to experts, those who learn how to code blockchain apps will likely thrive in the upcoming years. After all, most tech professionals unanimously agree that Web3 is here to stay – and that the Web3 revolution has already started. So, learning how to code a blockchain app is undoubtedly one of the top skills one should master in 2022. Sadly, many use primitive tools when they first dive into blockchain programming. However, the Web3 tech stack has come a long way in recent years. As such, you can now easily avoid some of the old constraints, such as the limitations of RPC nodes. Moreover, by using the proper tools, you can learn how to code a blockchain app quickly and easily with your legacy programming skills. This is where Moralis enters the picture.
Moralis focuses on providing you with three core solutions that essentially cover the entire blockchain-related backend. With Web3 authentication, on-chain events, account syncs, and the ultimate Web3 API, Moralis lets you focus on creating the best possible frontend. Moving forward, we will show you how to code an example blockchain app that focuses on market sentiments. As such, you will learn how to get started with Moralis and work with Moralis’ Web3 syncs. Furthermore, along the way, you’ll also learn how to compile, deploy, and verify smart contracts using Hardhat. Ultimately, we’ll take you through the following five main steps:
- The initial project setup
- Deploying smart contracts
- Building your dapp’s frontend
- Moralis setup – creating your Moralis dapp
- Implementing a Web3 backend
Of course, we’ll break the above five steps into multiple smaller steps to make the journey even simpler for you. So, if you want to learn how to code a blockchain app, create your free Moralis account and follow our lead.
What is a Blockchain App?
Before we show you what kind of a blockchain app we’re about to build, we need to cover the basics. Let’s first answer the “what is a blockchain app?” question. Unless you’ve been living under a rock, you most likely know that a blockchain is a digitally distributed, decentralized ledger that exists across a peer-to-peer network. Furthermore, odds are you also know that Ethereum was the first programmable blockchain. The latter gave birth to smart contracts – the core of decentralized applications (dapps).
With that in mind, you may be able to conclude that blockchain apps are special kinds of applications that somehow interact with programmable blockchains. It’s also worth pointing out that blockchain apps are most commonly referred to as “dapps” or “Web3 apps”.
If you want to learn more about decentralized applications and Web3, make sure to visit the Moralis blog. There you can find these concepts and many other crypto terms explained in a simple manner.
Blockchain App Development – Example Dapp Demo
As we continue our “how to code a blockchain app” discussion, we’ve decided to look at a demo of our example dapp. If nothing else, this will help you decide whether or not you want to get your hands dirty moving forward.
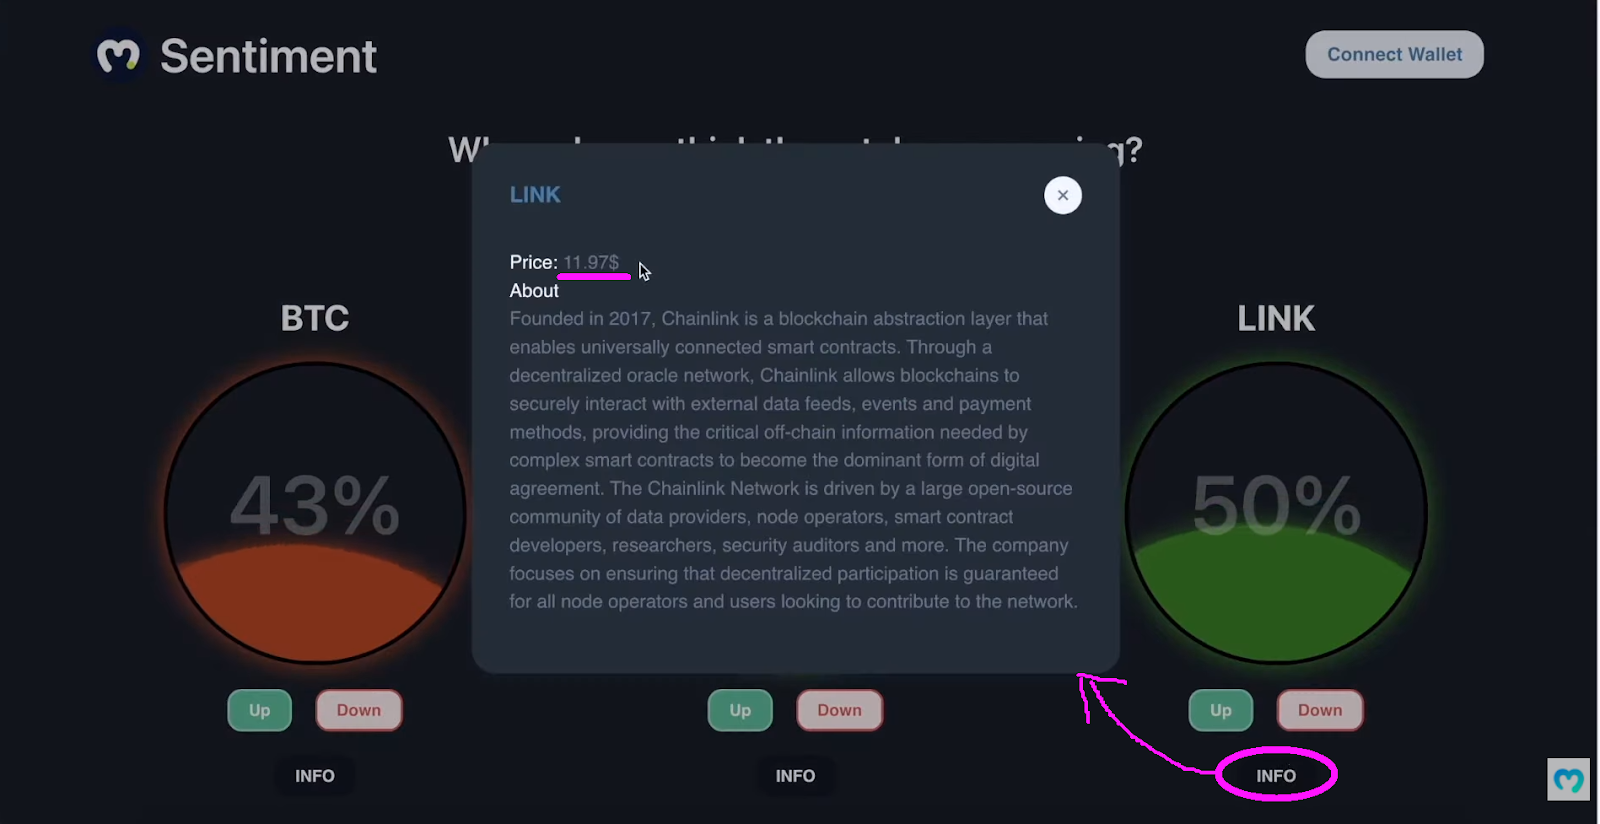
So, the following screenshot covers the gist of our example blockchain app’s frontend:
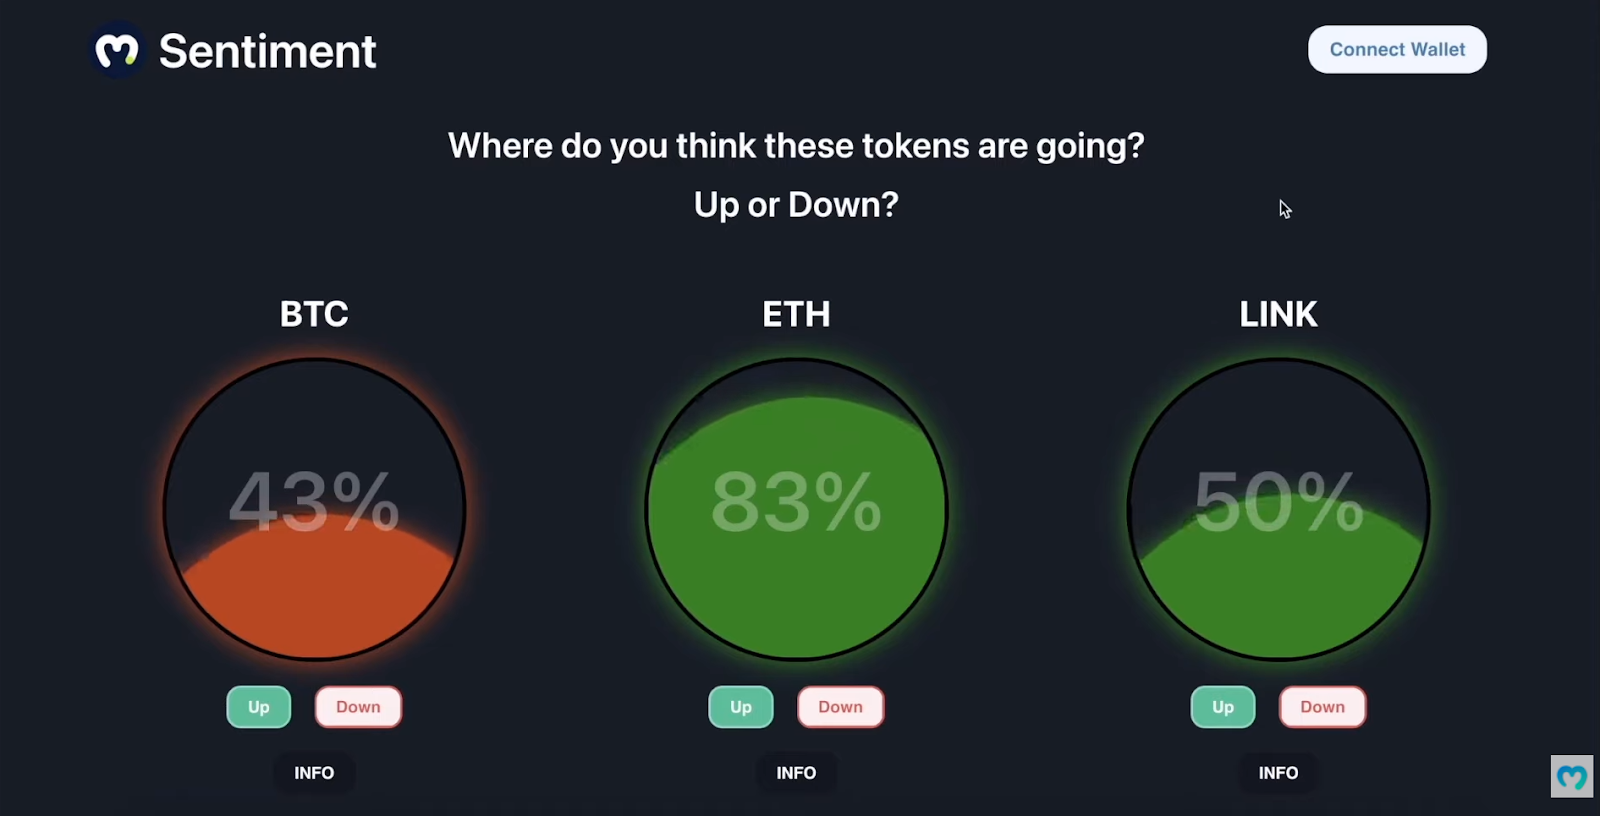
As mentioned above, our example dapp focuses on crypto sentiment. Furthermore, the above image indicates that our dapp has a clean design and an intuitive UI. After all, the latter is always extremely important if you want people to actually use your dapps. Let’s also point out that the “liquid” inside the bubble is actually animated, which you can see in the video tutorial at the bottom of this article.
In addition to BTC, ETH, and LINK, our dapp also displays some other leading coins (their ticker symbols):
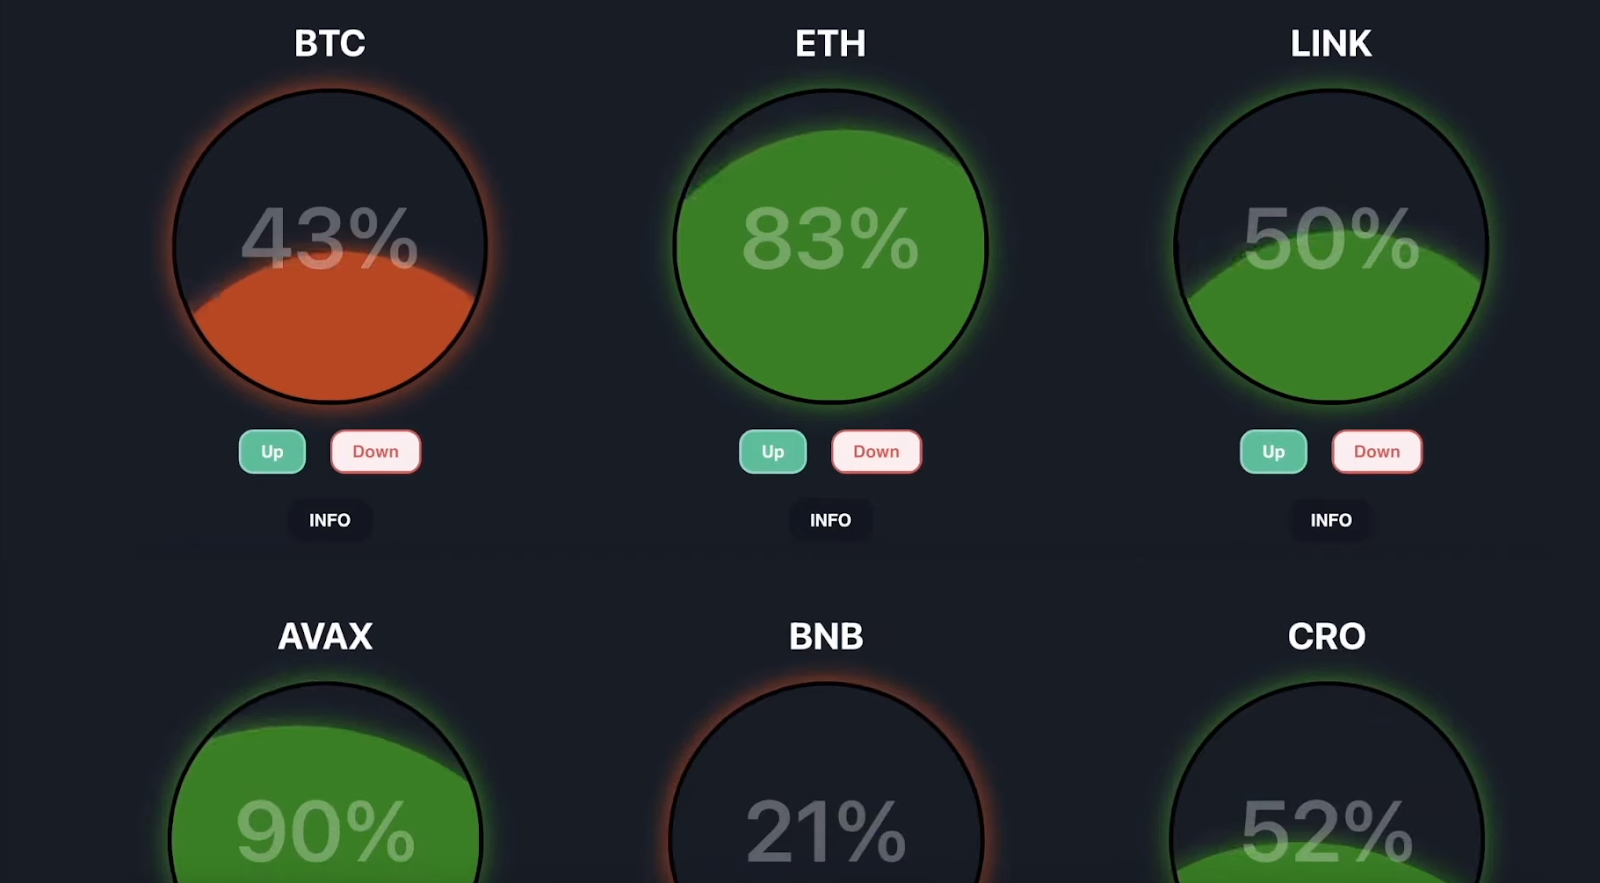
Furthermore, looking at the above two screenshots, you can see percentage values inside the bubbles. These values match voters’ cumulative opinions. For the crypto coins that the majority of voters expect the price to go up, the “liquid” is green. However, the red “liquid” indicates that more than 50% of voters believe the price will drop.
Moreover, you can see that our sentiment blockchain app has four types of buttons. These include the “Up” and “Down” voting buttons, the “info” buttons, and the “Connect Wallet” button located in the top-right corner. The latter takes care of Web3 login. The voting buttons need no explanation. However, we must point out that the “info” buttons open the “about” info and the related coin’s current price:
Blockchain App Login and Voting Functionality
At this point, you already know that Web3 authentication is the starting point of all dapps. Moreover, it is an important part of the “how to code a blockchain app” quest. Fortunately, with Moralis’ Web3 Auth API and web3uikit, you can cover that in minutes.
When non-authenticated users try to vote in our blockchain app, they receive a warning message:
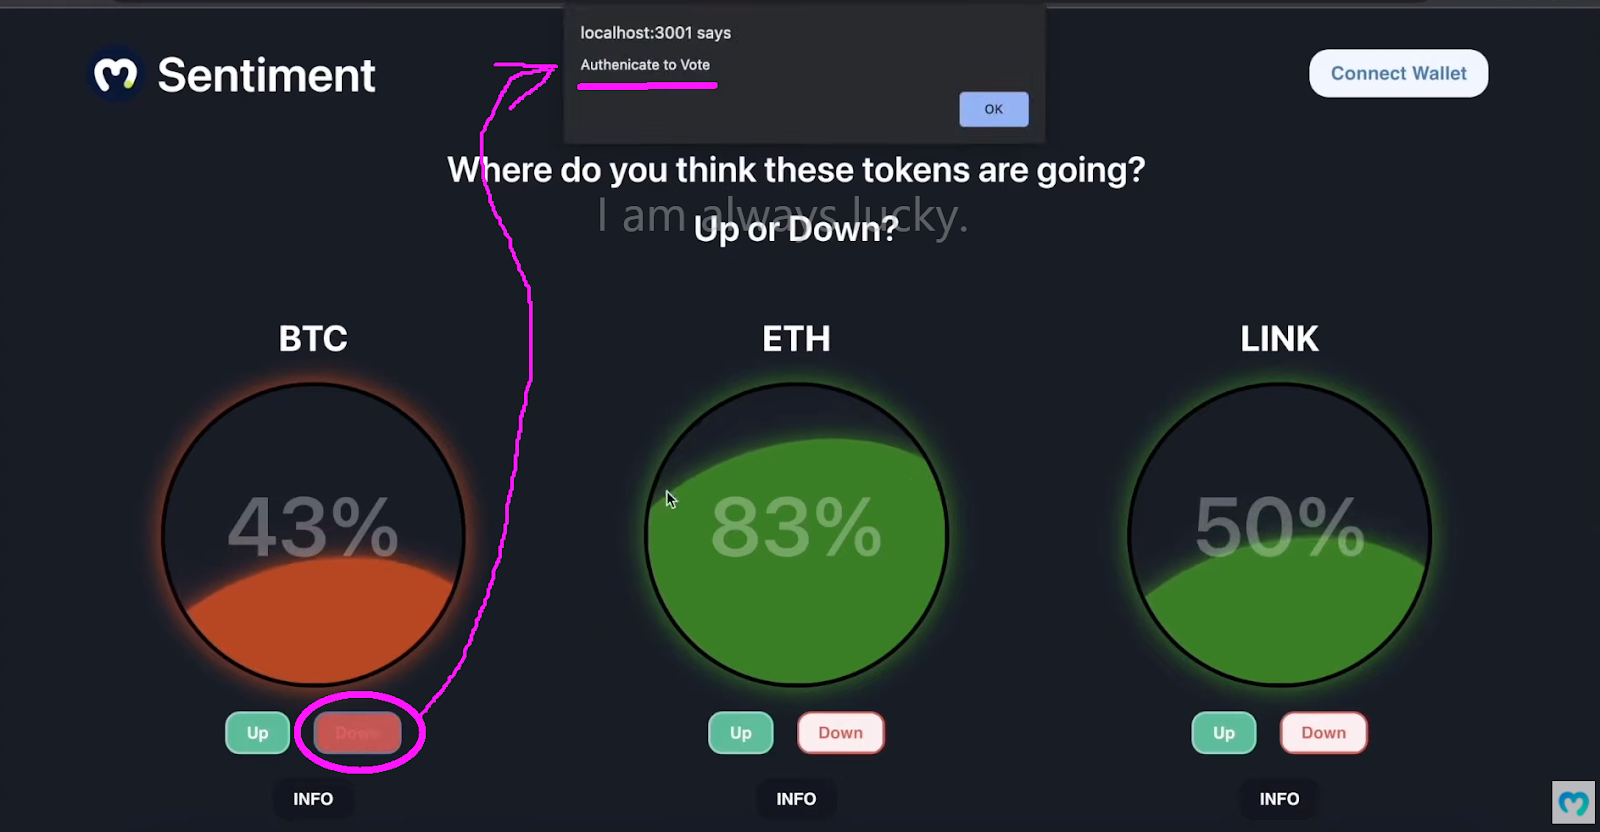
Thus, users need to click on the “Connect Wallet” button to use our example dapp fully:

As the screenshot above indicates, for the sake of this demo, let’s focus on example users that decide to use MetaMask. So, once they click on that popular Web3 wallet’s icon, their MetaMask extensions ask them to sign the signature request:
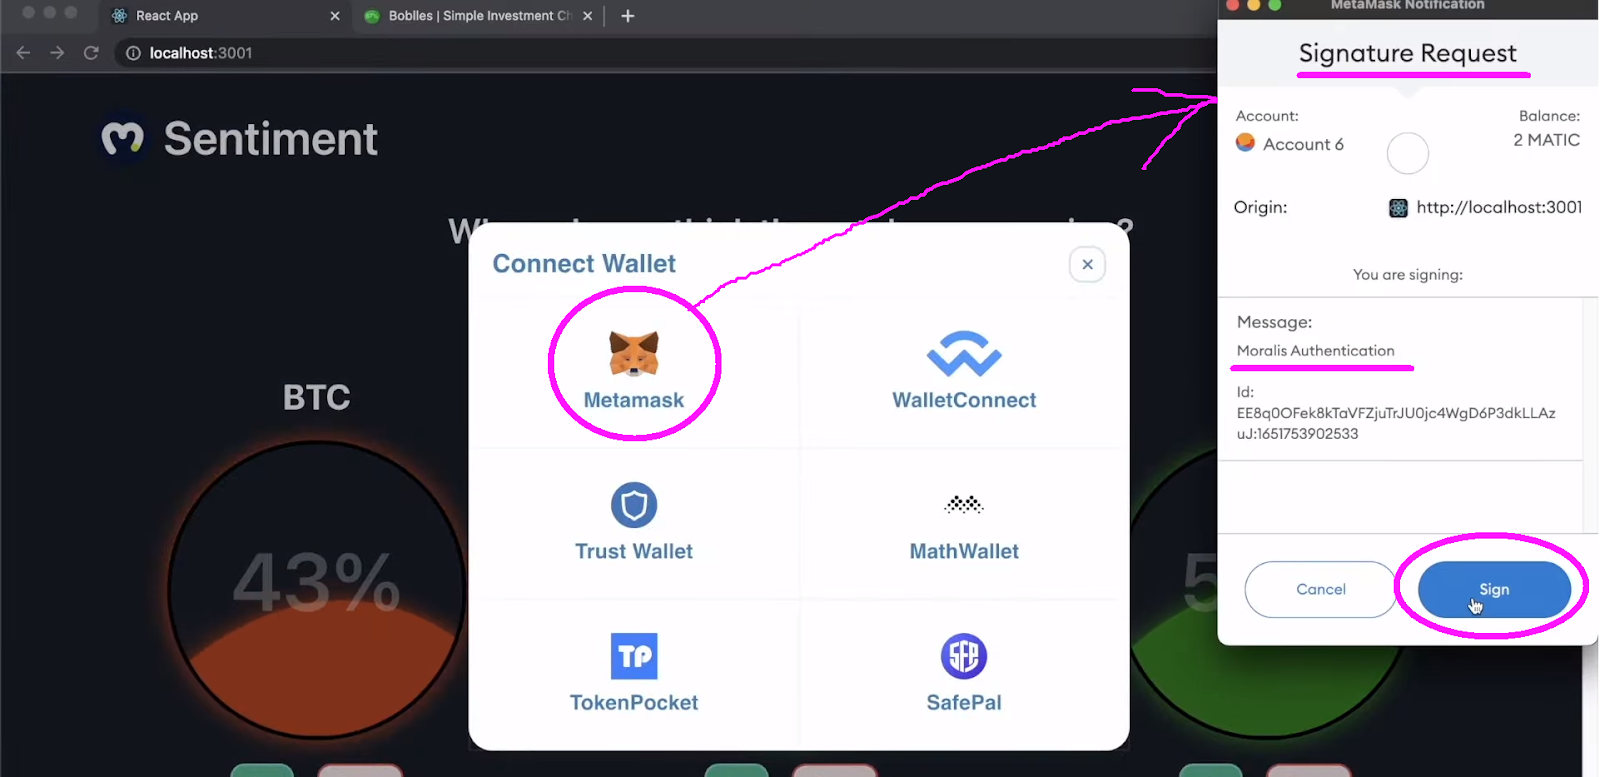
After signing the signature request, users get to cast their votes. If users expect the price of LINK to go down, they click on “Down” under LINK. Since our dapp includes on-chain voting, users need to confirm that they vote using their crypto wallets:

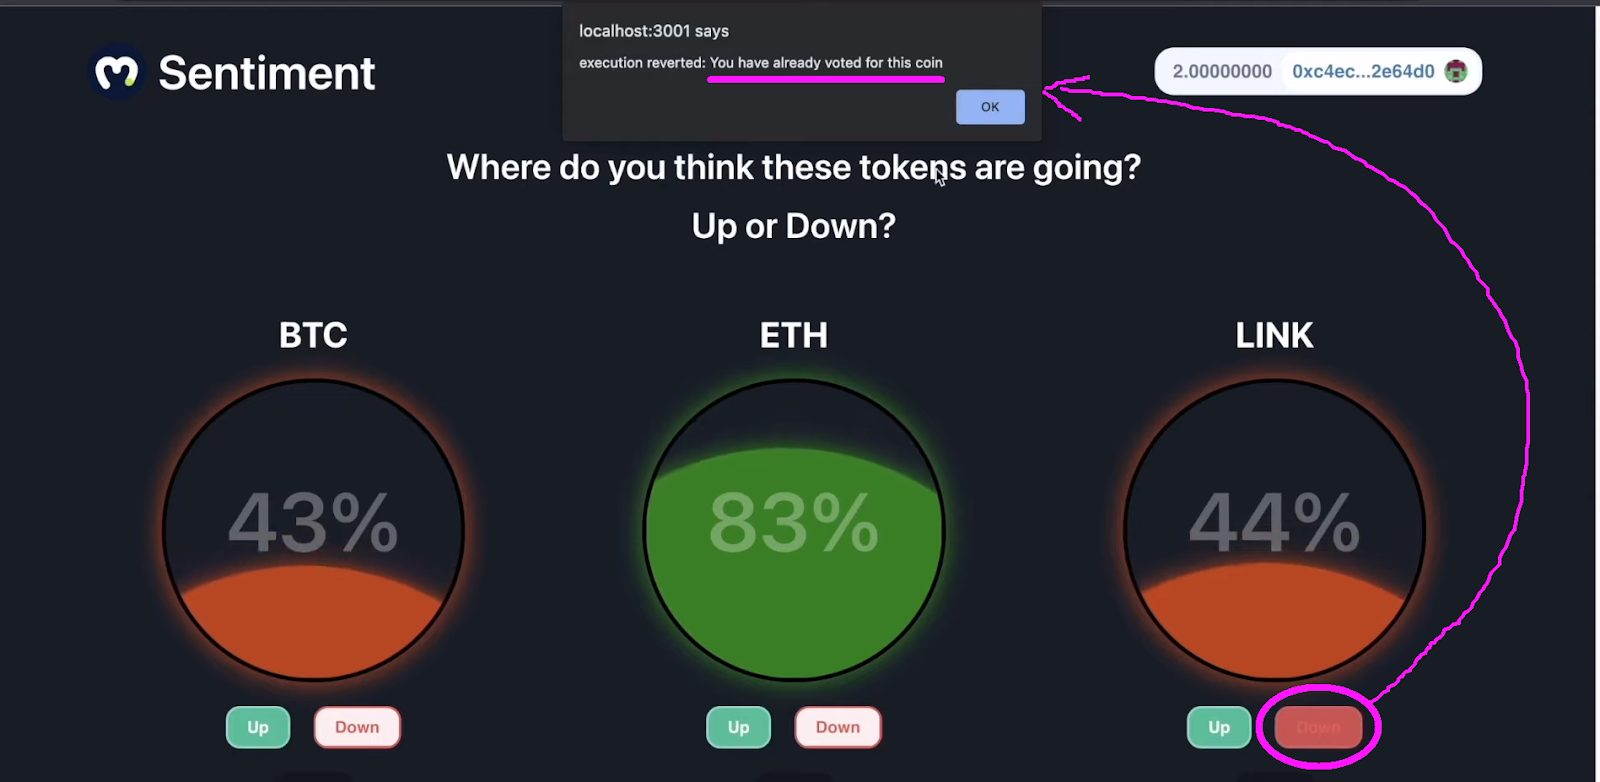
Once users confirm the above on-chain transaction, their vote is directly included in the overall sentiment. Of course, in our case, there are not many users. Hence, the sentiment changes. Moreover, our smart contract behind this blockchain app also ensures that users can vote only once per ticker:
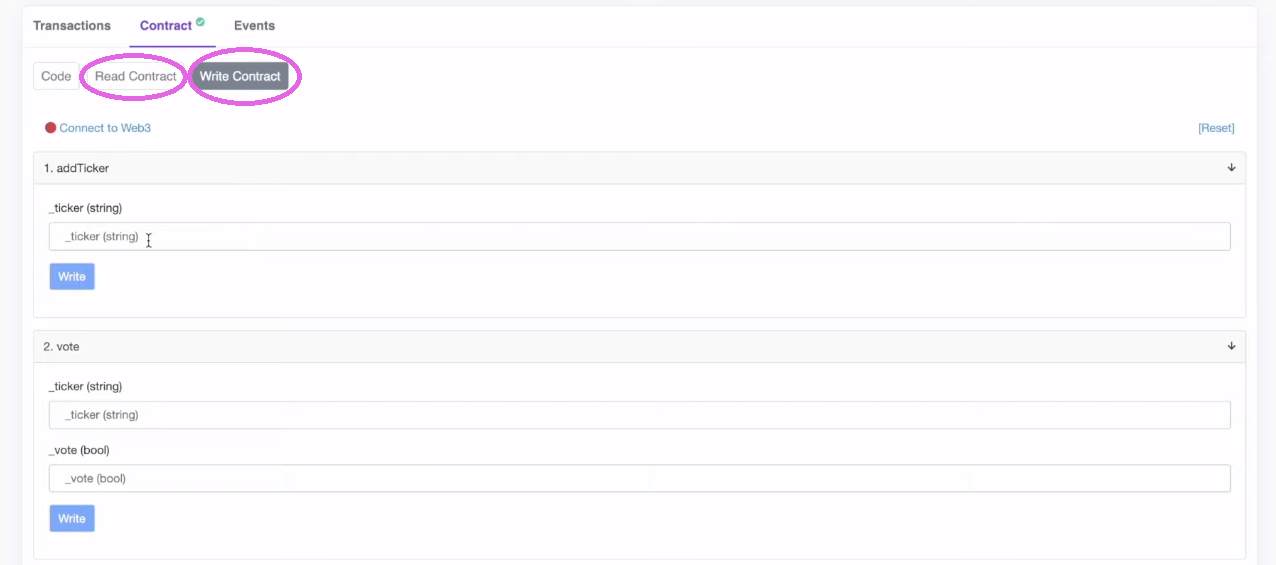
The above wraps up our demonstration. However, it also makes sense to confirm that the above-demonstrated transaction really took place on a blockchain. Since our dapp is running on Mumbai (Polygon’s testnet), we need to use PolygonScan (testnet) to explore the backend activity:
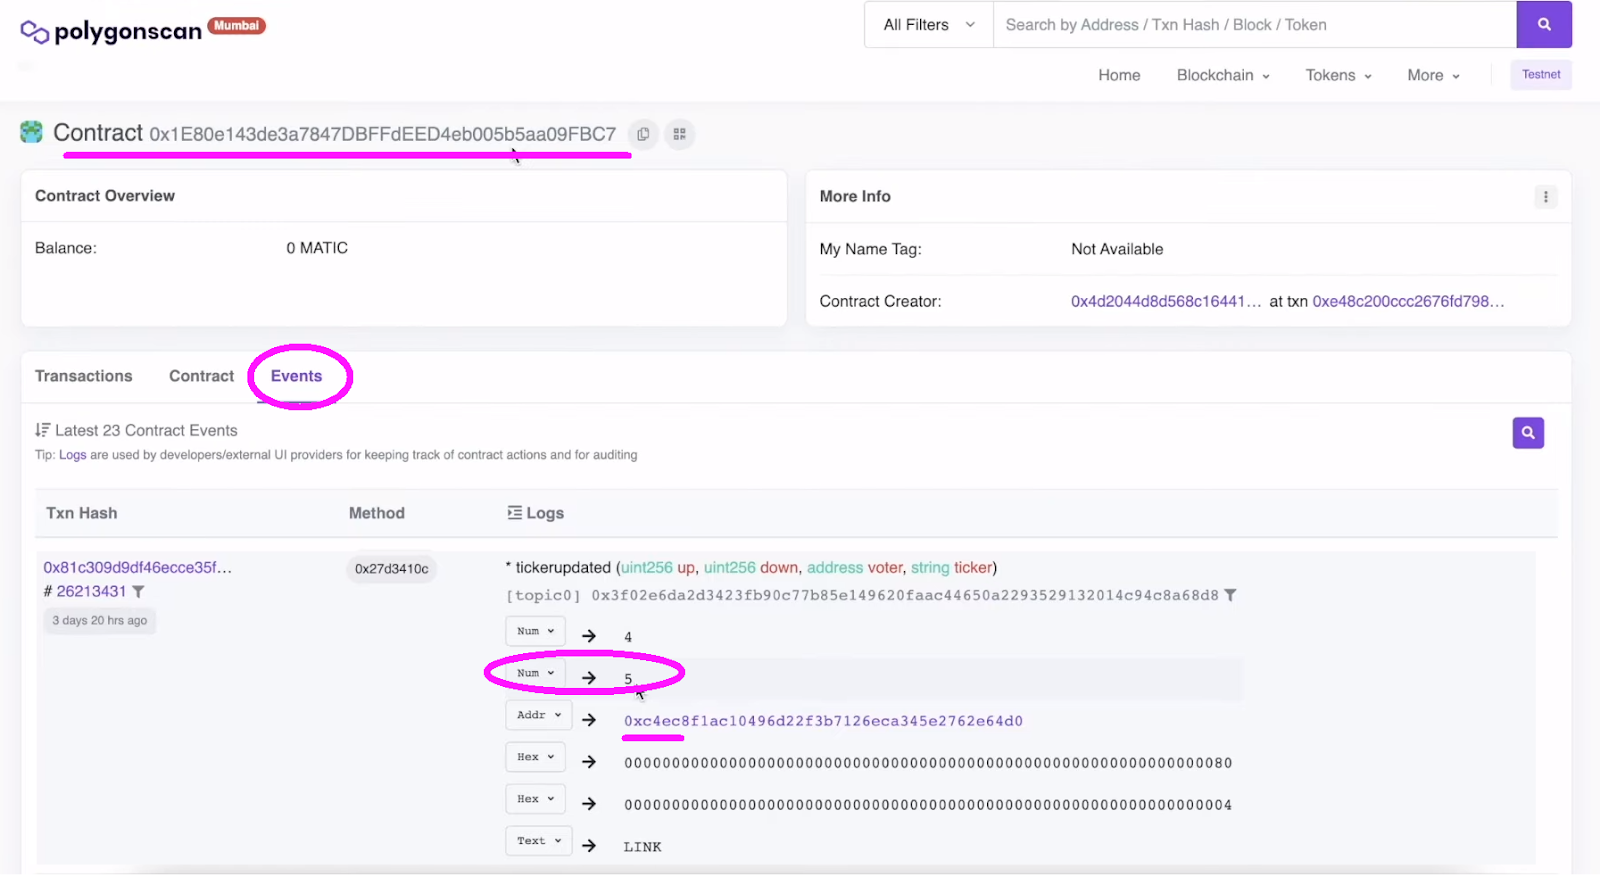
The above screenshot clearly indicates our smart contract’s event. The marked value is the one related to LINK’s downvotes.
How to Code a Blockchain App Using Hardhat, React, and Moralis
If the above demo caught your interest, it’s time to learn how to code a blockchain app. By rolling up your sleeves and following our lead, you’ll learn how to complete the initial project setup, deploy smart contracts, use React to build your dapp’s frontend, activate the Moralis SDK, and implement the Web3 backend.
Moving forward, we will often refer to the video tutorial at the bottom of this article. There, you can view all the necessary actions in detail. Furthermore, we must also point out that our in-house expert used the legacy Moralis admin UI. So, if you want, you may switch to that UI:

However, as far as the screenshots go, you’ll be able to see the new UI in action. Moreover, the upcoming sections and the video tutorial assume you’ll use our starter code.
Step 1 of How to Code a Blockchain App: The Initial Setup
Start by cloning our starter code. Then, open the project in your favorite code editor. You can follow our lead and use Visual Studio Code (VSC):
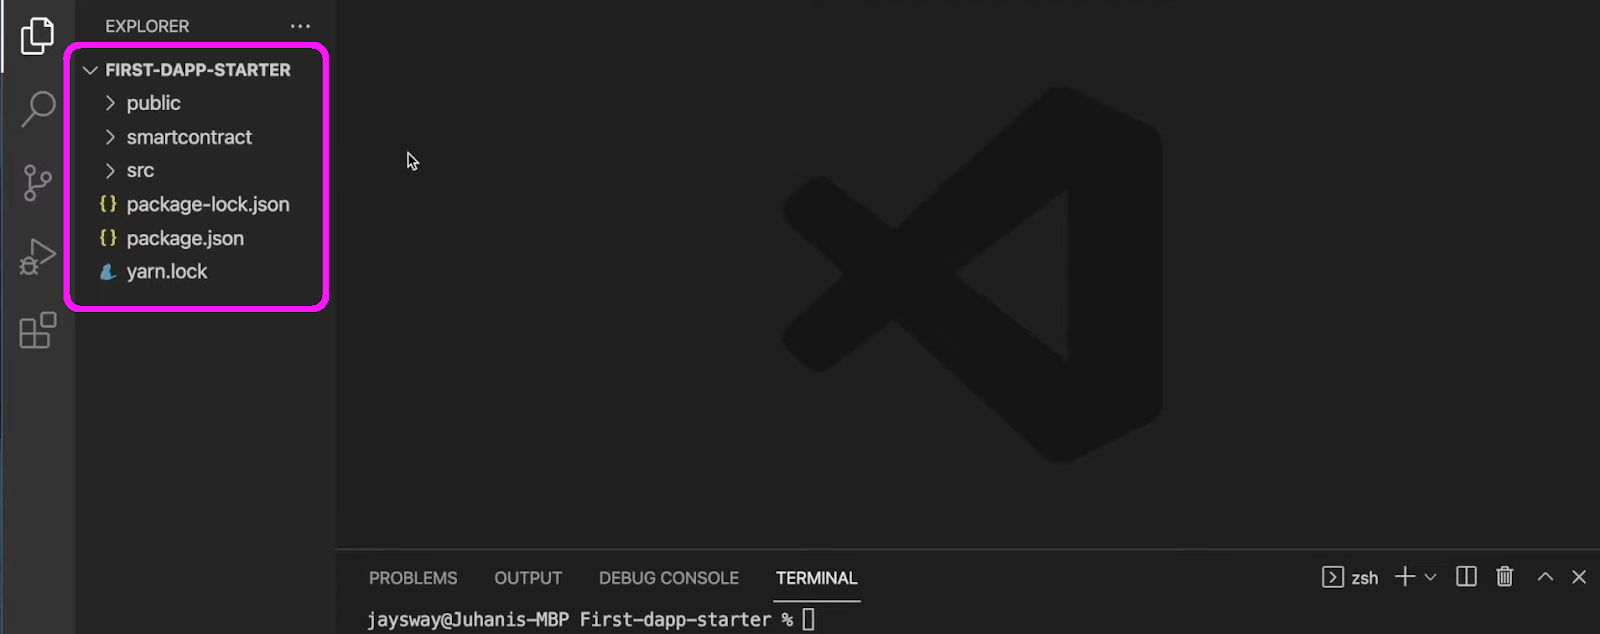
Looking at the image above, you can see the initial layout of our example project. Next, you need to complete some Hardhat setups (4:16). The latter will enable you to use this dev environment to work with smart contracts. First, you’ll use the “cd smartcontract” command to navigate to the “smartcontract” folder. Next, you’ll need to enter “npm i -D hardhat” to install Hardhat:

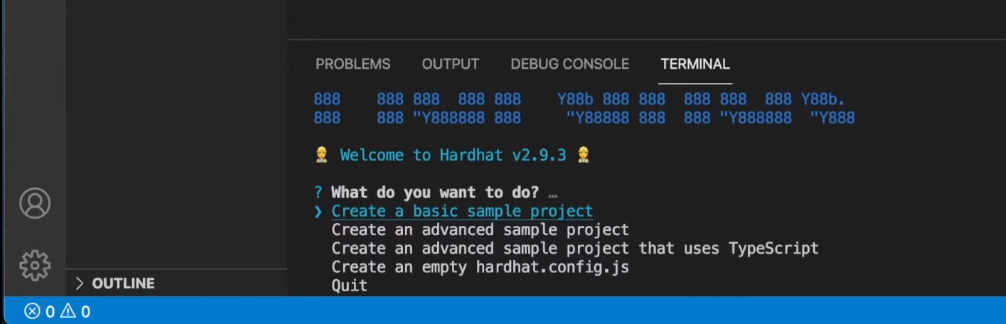
Then, enter “npx hardhat” to initiate a new Hardhat project. Moving on, select “Create a basic sample project” and press “enter” several times:
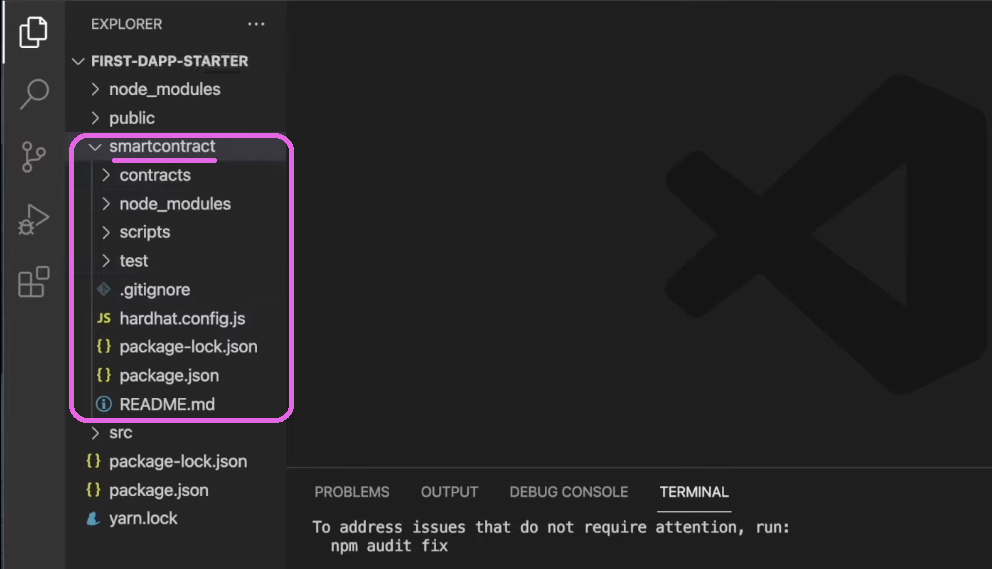
After successfully creating your Hardhat project, you will have some additional elements inside the “smartcontract” folder:
Before you can deploy your instance of our smart contract, you also need to install the following dependencies:
- “npm i -D dotenv”
- “npm i -D @nomiclabs/hardhat-etherscan”
Step 2 of How to Code a Blockchain App: Deploying Smart Contracts
To learn how to create a proper smart contract, use the video below (5:35). This is where you will rely on an existing template file (“Greeter.sol”). You’ll be changing the file’s name and deleting its content. Next, you can write the contract yourself by following the video tutorial or copying our code from GitHub. After all, you can often rely on verified smart contracts, thanks to platforms such as OpenZeppelin.
Once you set the Solidity code in place, you need to use Hardhat to compile and deploy your smart contract. This is where you decide on which blockchain you want to focus on. Since Moralis is all about cross-chain interoperability, you can choose among many reputable programmable blockchains. However, for the sake of simplicity, we recommend you follow our lead and focus on Mumbai. Moreover, starting at 16:58, you’ll need to tweak “sample-script.js” so it matches your smart contract. Next, you’ll also tweak the “hardhar.config.js” file (18:05). This is where you’ll learn to create your “.env” file and obtain the necessary details. Nonetheless, starting at 21:10, you’ll again focus on “hardhat.config.js” to set in place some final tweaks:
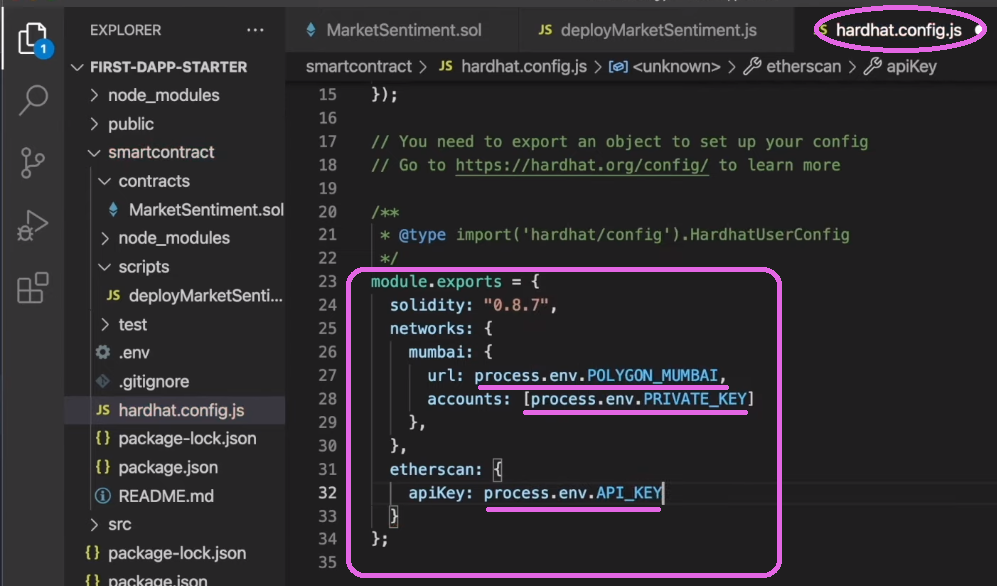
With the “hardhat.config.js” file ready, you’ll get to deploy and verify your contract (22:38). In addition, starting at 23:38, you’ll also learn how you can interact with your smart contract using PolygonScan:
Step 3 of How to Code a Blockchain App: Building a Frontend
The third step of the “how to code a blockchain app” challenge is all about the frontend. Assuming that you have some experience in that department with Web2, you should have no problem following our video tutorial. The latter will first show you how to initialize your React app (29:01). Next, you’ll create your single page dapp’s header (30:03), and starting at 32:26, you’ll learn to add the coin component. Finally, you’ll implement the voting buttons (38:23).
Step 4 of How to Code a Blockchain App: Moralis Setup
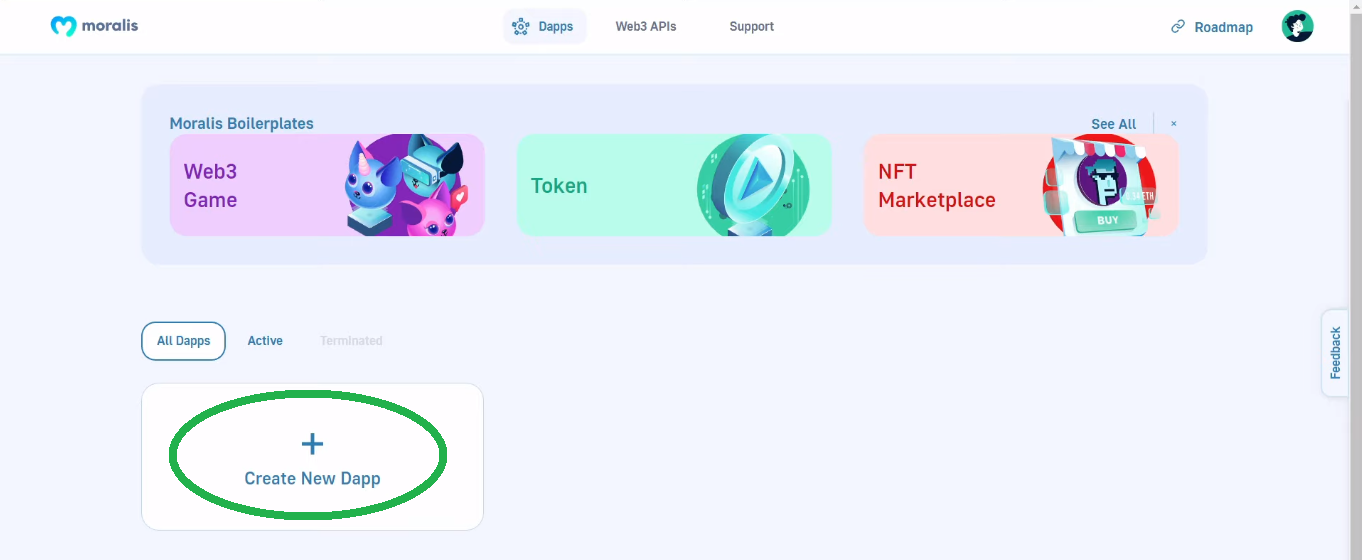
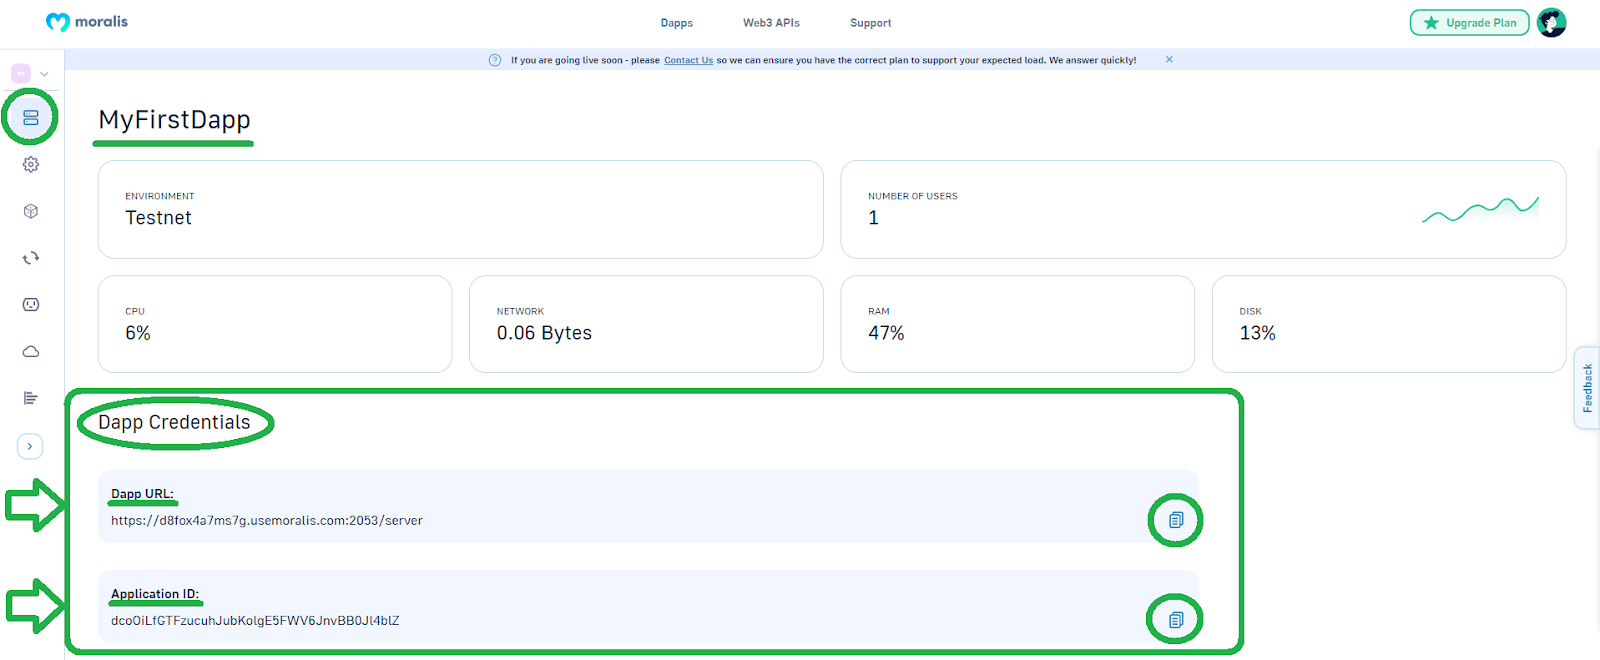
At this point, you should have your own instance of our smart contract deployed and the frontend established. Hence, it’s time to take your blockchain application live. This is where you will want to create a Moralis dapp (40:12) and copy its credentials into the “index.js” file. Use the section below to obtain your Moralis dapp credentials. With your dapp’s ID and URL in place, you’ll code the info modal (41:26). This is also where you’ll use the power of Moralis’ Web3 API to include token prices effortlessly (47:27).
How to Obtain Your Moralis Dapp Credentials Using the New UI
- Use the “create your free Moralis account” link mentioned at the outset of this article or visit Moralis’ homepage, where you need to click on “Start for Free”:

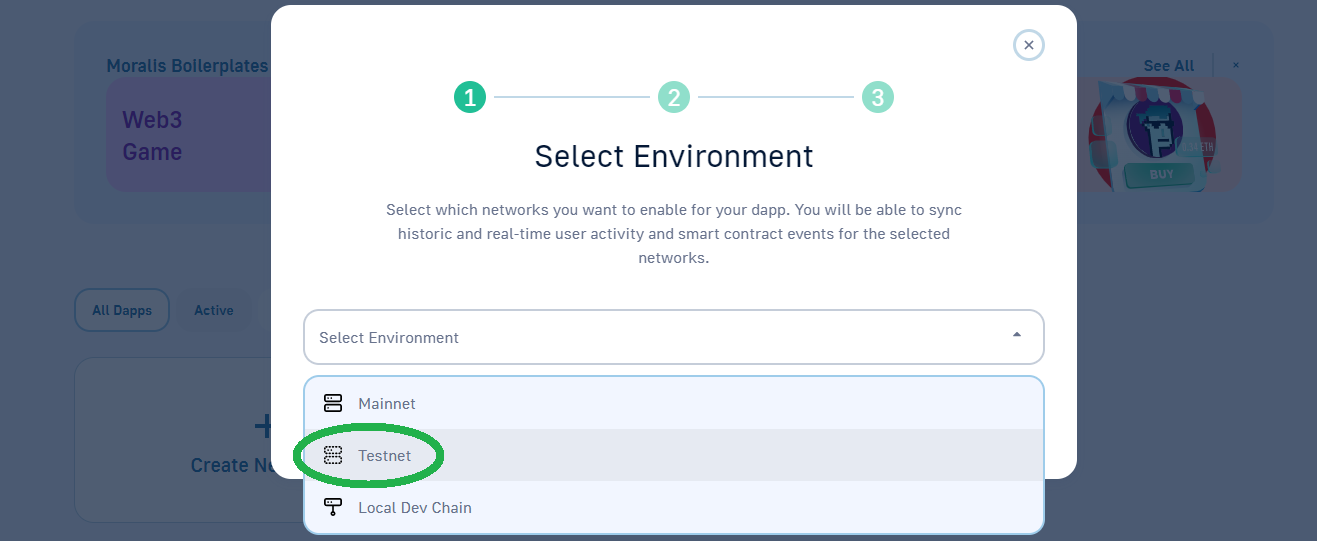
- Once logged in, use the “Create New Dapp” button:
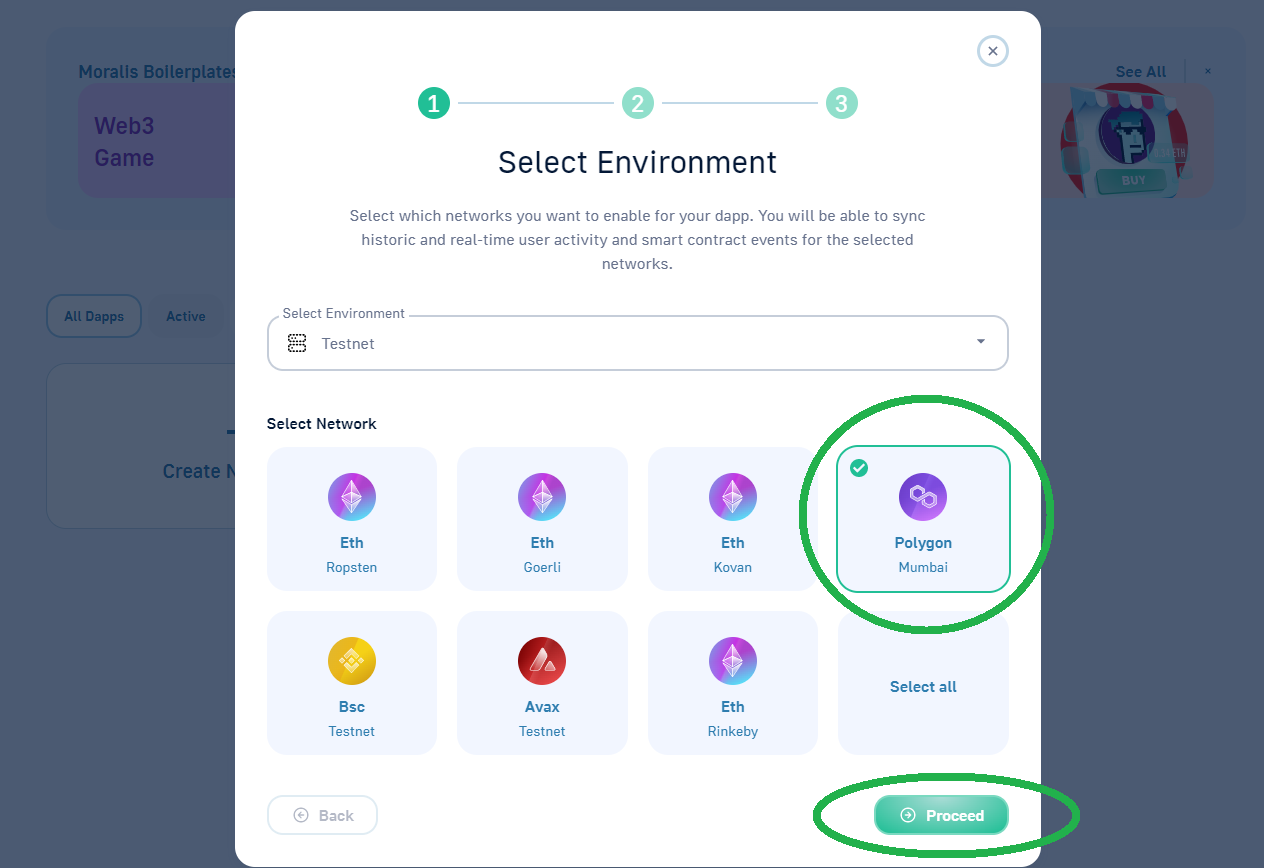
- Select “Testnet”:
- Choose “Polygon Mumbai” and click on “Proceed”:
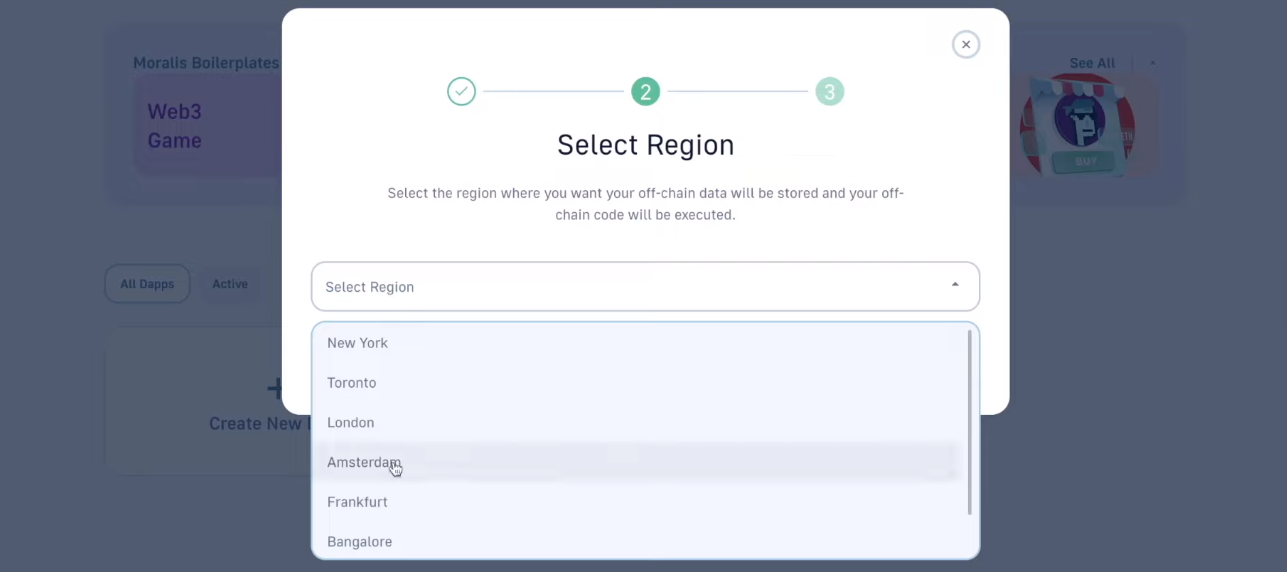
- From the drop-down menu, select the city closest to your actual location:
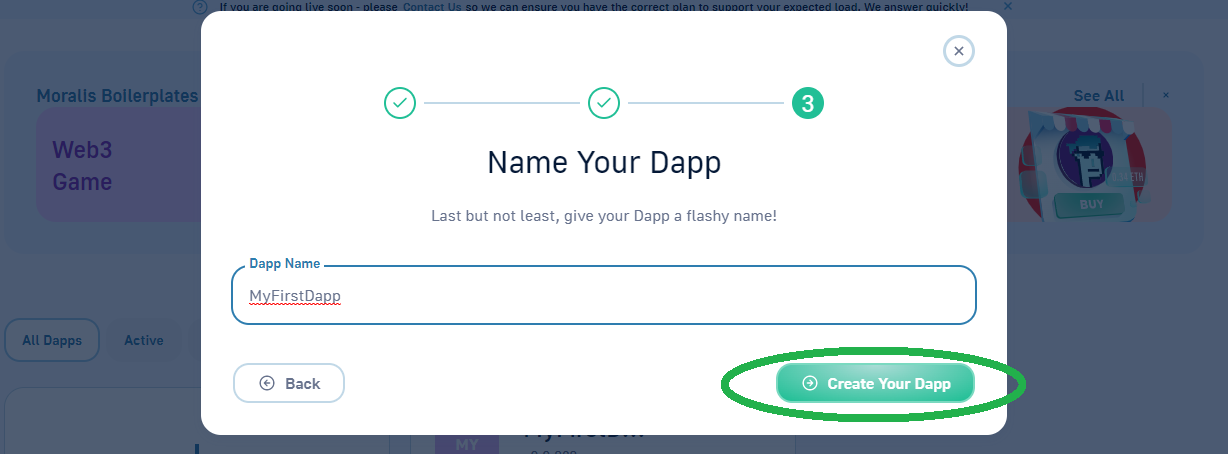
- Give your dapp a name:
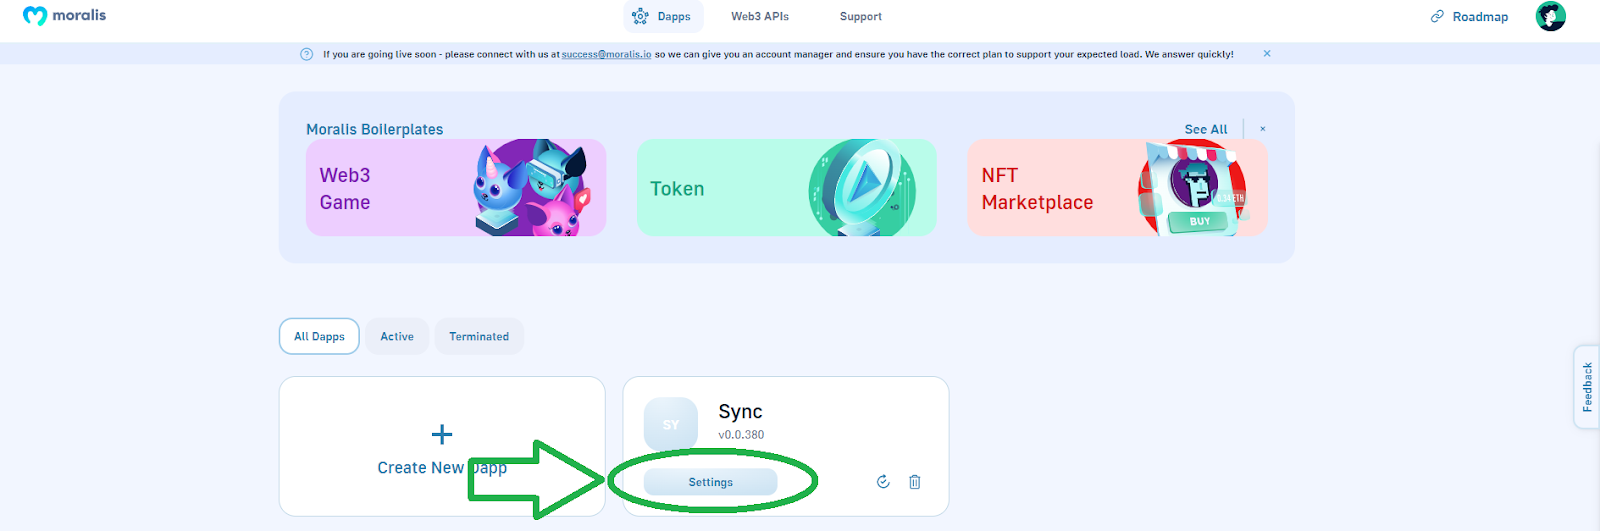
Once your dapp is up and running, use the “Settings” button to access its details:
By default, you’ll land on the top option from the sidebar, where you’ll be able to obtain your dapp’s credentials:
Step 5 of How to Code a Blockchain App: Implementing a Web3 Backend
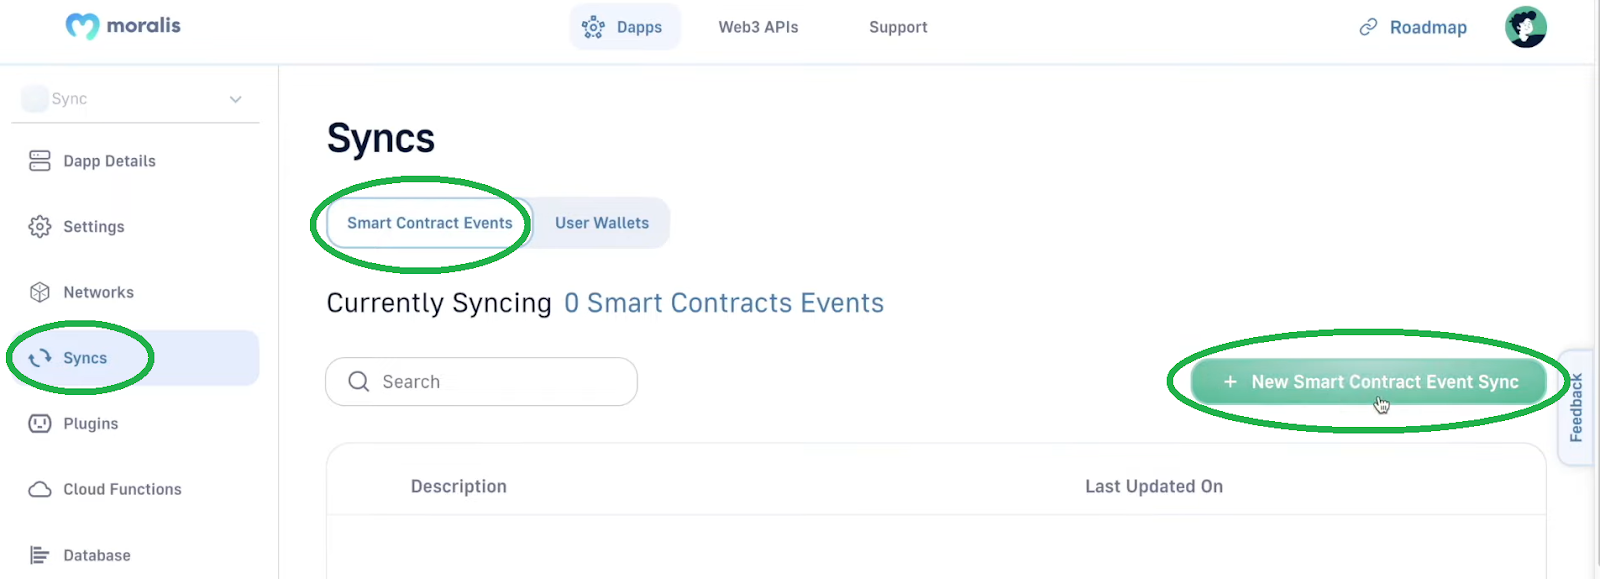
This is the final part of the “how to code a blockchain app” puzzle. As such, you’ve now reached the point where you need to implement the Web3 backend functionality. Thus, starting at 50:30, you’ll learn how to connect your React application to your smart contract (50:30). Fortunately, Moralis’ Web3 syncs and database make that pretty straightforward.
If you are using the new admin UI, you must return to your Moralis dapp setting. Then select the “Sync” tab. There, you’ll need to click on the “New Smart Contract Event Sync” button:
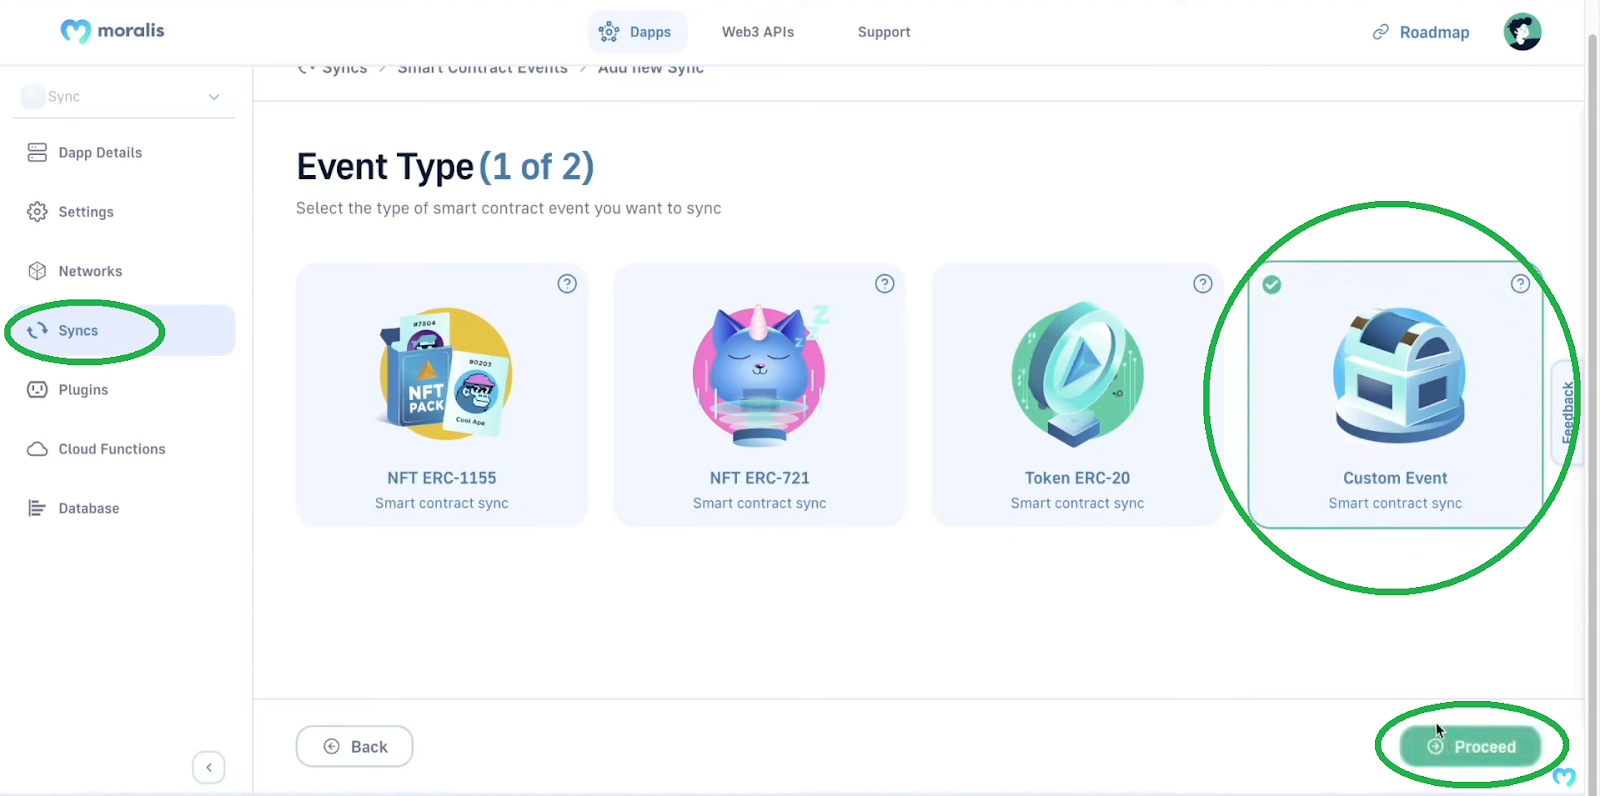
Next, click on “Custom Event” and follow the video below to enter the necessary details:
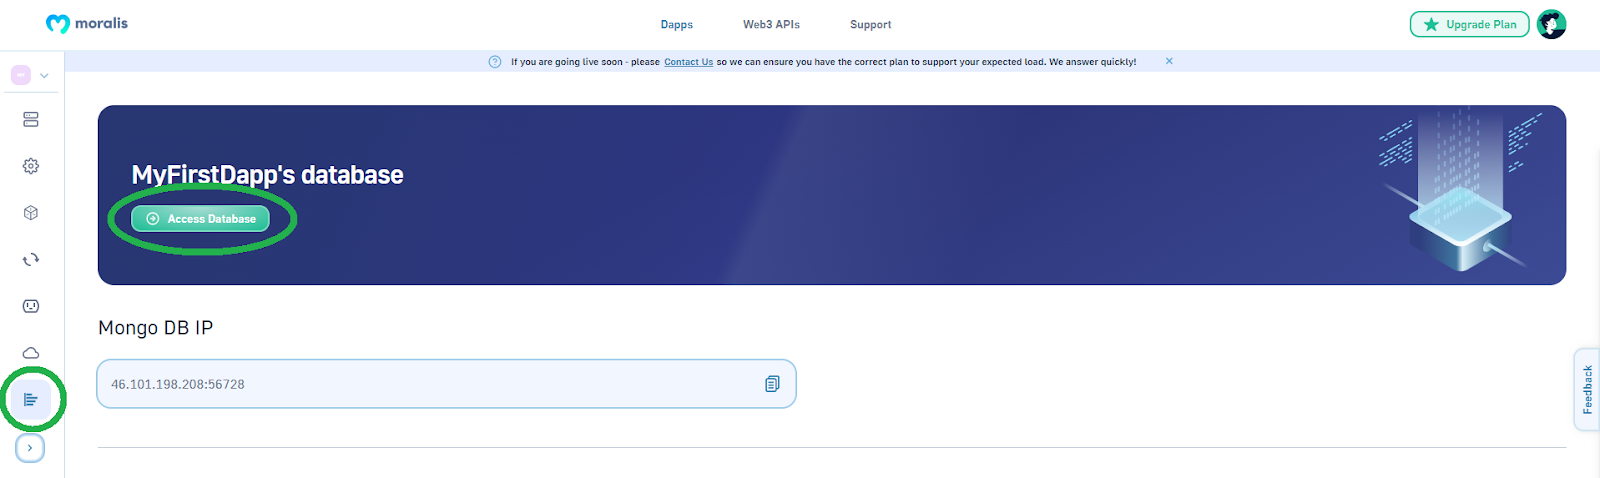
With your smart contract event sync in place, your Moralis database will automatically index the events. As such, you just need to access the database:
Finally, here’s the video tutorial that will show you the details of how to code a blockchain app:
How to Code a Blockchain App in 5 Steps – Summary
You might be a bit overwhelmed if this was your first time hearing about blockchain apps or dapps. In that case, we encourage you to go through the above sections again at a slower pace. The goal is to get a clear picture of all major aspects of dapp development, including smart contracts, the frontend, and the backend. That’s exactly what this article covers. Furthermore, the article clearly illustrated how to get started with Moralis and how to use Moralis’ Web3 API and Web3 sync feature. However, if you want to start with some simpler example projects, you can find a ton of them on Moralis’ blog and the Moralis YouTube channel. On the other hand, these are also the outlets showing you how to create several rather advanced dapps. If that interests you, you ought to check out our “clone” tutorials!
Ultimately, by completing several of our tutorials, you’ll learn how to code a blockchain app effortlessly. Then, you’ll be ready to tackle your own ideas and projects. Nonetheless, you might be eager to go full-time crypto as soon as possible. If that’s the case, becoming blockchain certified can make all the difference. So, make sure to consider enrolling in Moralis Academy. With a personalized study path, expert mentorship, and amazing support from a remarkable community, you’ll become a Web3 developer in no time.
