Would you like to build a platform that enables you to explore and manage crypto assets? If so, follow along in this tutorial as we showcase how to clone Zapper in less than one hour! As such, you’ll be able to neatly organize blockchain data, such as DeFi assets, and display it to your dapp’s users. Moreover, you’ll get to implement backend functionalities quickly and easily. But wait, there’s more. By extending our one-hour tutorial a little further, you’ll also get to create a stylish frontend for your Zapper clone.
To complete today’s challenge, we’ll show you how to use some great Web3 tools to make the process as straightforward as possible. We’ll use NodeJS to create a backend server. Then, we’ll use the power of Moralis’ EVM API to fetch all sorts of on-chain data with short snippets of code. Hence, make sure to create your free Moralis account. Furthermore, we will use React to create the frontend portion of our example dapp. The latter will query data from our backend. Last but not least, to clone Zapper in style, we will also use Moralis’ web3uikit. As a result, we will have eye-catching buttons and other components ready in minutes.
In addition, it’s worth pointing out that Moralis is all about cross-chain interoperability. As such, you can target all leading chains with the same lines of code. But in this tutorial, we focus on the Ethereum and Polygon chains. However, before we show you what you will have a chance to build moving forward, we need to cover some basics. For one, before you clone Zapper, you ought to know what it is.

What is Zapper?
Zapper is a fintech platform that enables you to explore and manage all DeFi assets from one simple interface. One of Zapper’s goals is to level the playing field for decentralized finance (DeFi) newcomers and advanced investors. They do so by providing various shortcuts (“Zaps”). These shortcuts enable users to enter DeFi lending, liquidity provisions, and automated yield farming.

Furthermore, Zapper is also a sort of explorer dapp. It enables users to connect their wallets and explore their assets. In addition, they can search for other accounts, NFTs, DAOs, tokens, and more. Nonetheless, Zapper also includes a swap, where users can exchange their tokens. Nonetheless, there’s also a bridge that enables users to move tokens from one blockchain network to another.
If this is the first time you hear about Zapper, we encourage you to visit “zapper.fi” and explore it. However, knowing your way around Zapper is by no means a prerequisite if you want to clone Zapper.

How to Clone Zapper with NodeJS, React, Moralis, and Web3UIKit
In order to clone Zapper, we must set up a NodeJS backend and a React frontend. Then, we will show you how to use this backend to fetch on-chain data using the Moralis EVM API. Of course, we’ll also ensure that the frontend obtains that data and displays it properly. Furthermore, for the sake of this tutorial, we’ll focus on obtaining the following details for a connected wallet:
- Native balance and the USD value of the native balance
- ERC-20 token balances
- Portfolio of total USD value
- Transfer history
- NFTs and a way to filter NFTs
Obviously, we’ll devote our attention to implementing the explorer features. However, thanks to the 1inch aggregator, you can easily add the token swap functionality. Moreover, before we invite you to roll up your sleeves and clone Zapper, let’s take a closer look at a demo of our example dapp.

Our Zapper Clone Demo
This is the gist of our dapp that resulted from our feat of cloning Zapper:
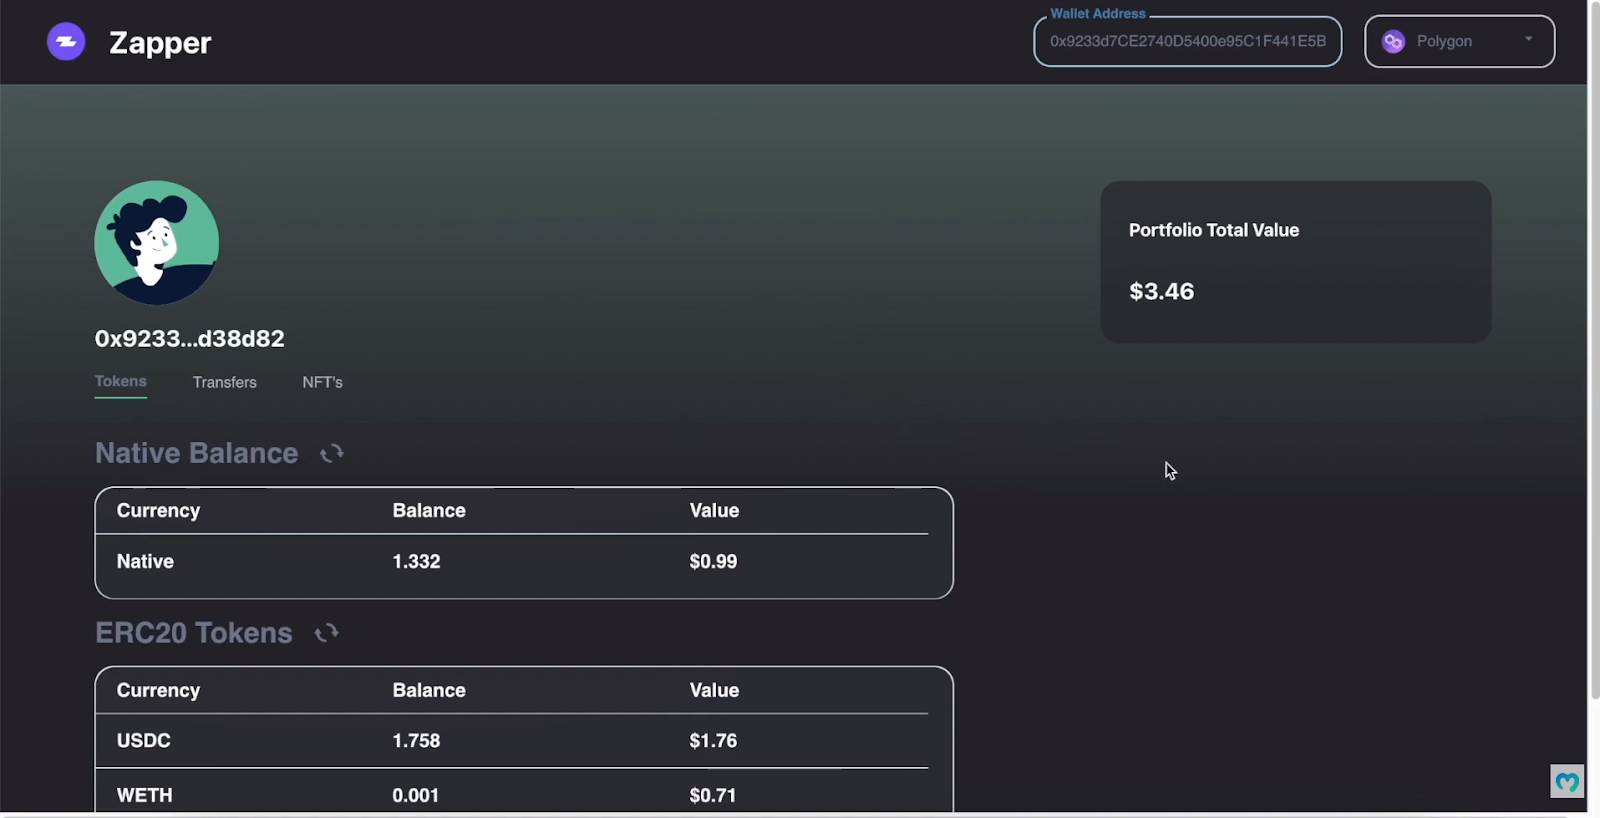
Looking at the above screenshot, you can see the “Zapper” logo in the top-left corner. On the opposite side of the top bar, you can see the “Wallet Address” field and the chain selection menu (currently on “Polygon”):

So, the wallet address and the chain are the entry parameters. Our Zapper clone displays native, ERC-20, and NFT balances based on these two parameters. Furthermore, our example dapp also displays transfers for the given wallet address:

As you can see in the above image, our decentralized application displays the portfolio’s total value in USD on the right-hand side. On the left-hand side, it displays the user icon and the connected wallet’s address. Moreover, below the address are the three tabs: “Tokens”, “Transfers”, and “NFTs”.
Furthermore, when the “Tokens” option is selected, our dapp displays users’ native token balance and ERC-20 balances:
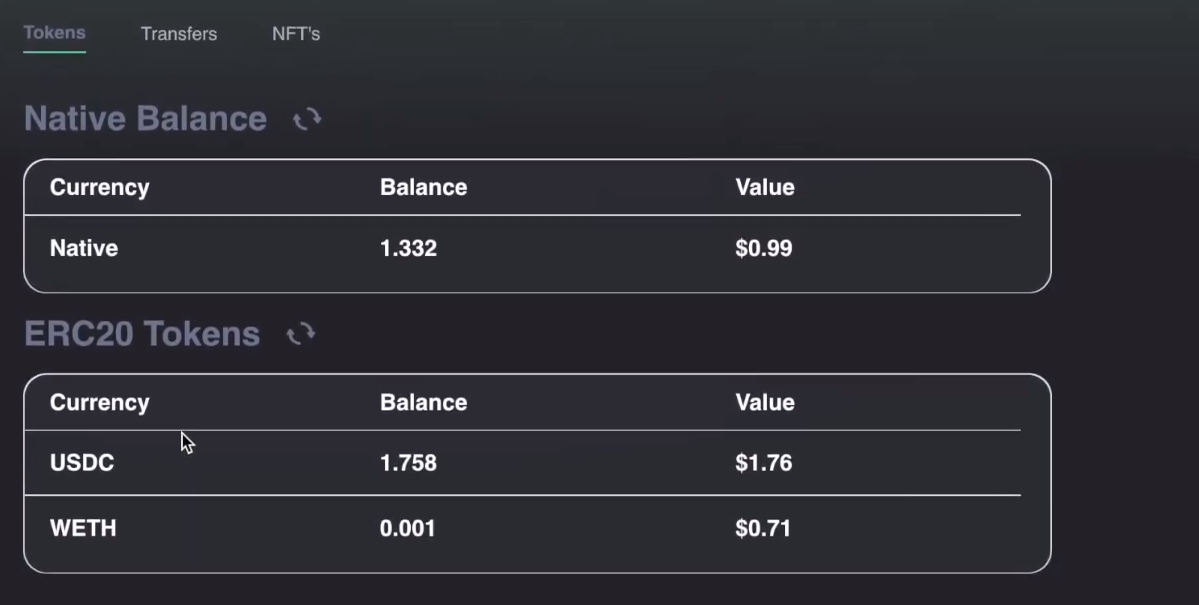
So, the above-connected wallet holds 1.332 MATIC (native coin for the Polygon chain), 1.758 USDC, and 0.001 WETH. If we select the “Transfers” tab, we get to see the connected wallet’s transaction history:

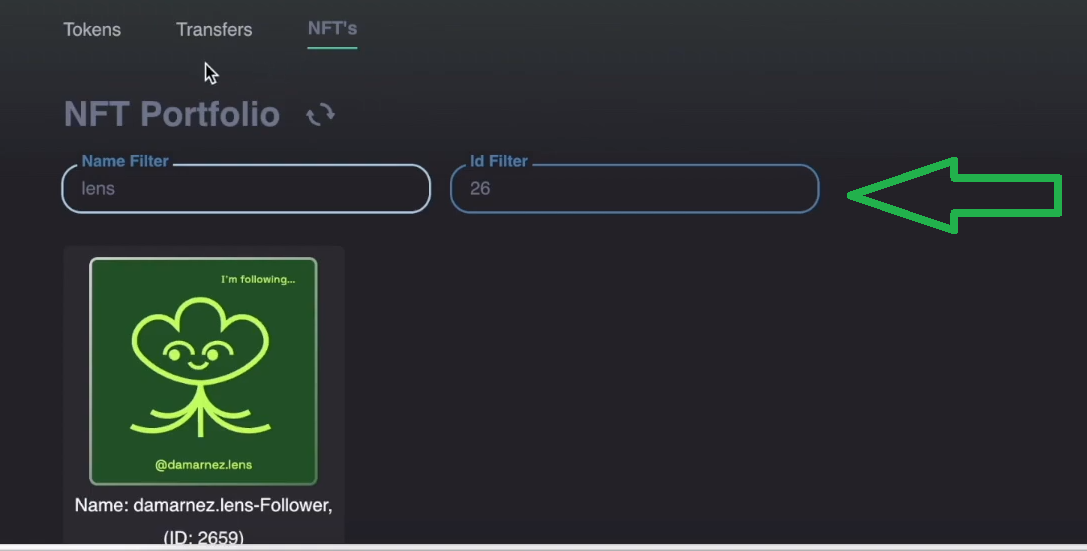
Nonetheless, the “NFTs” tab displays that wallet’s NFT portfolio:

Last but not least, the “NFT Portfolio” page also enables users to filter NFTs either by name or token ID:
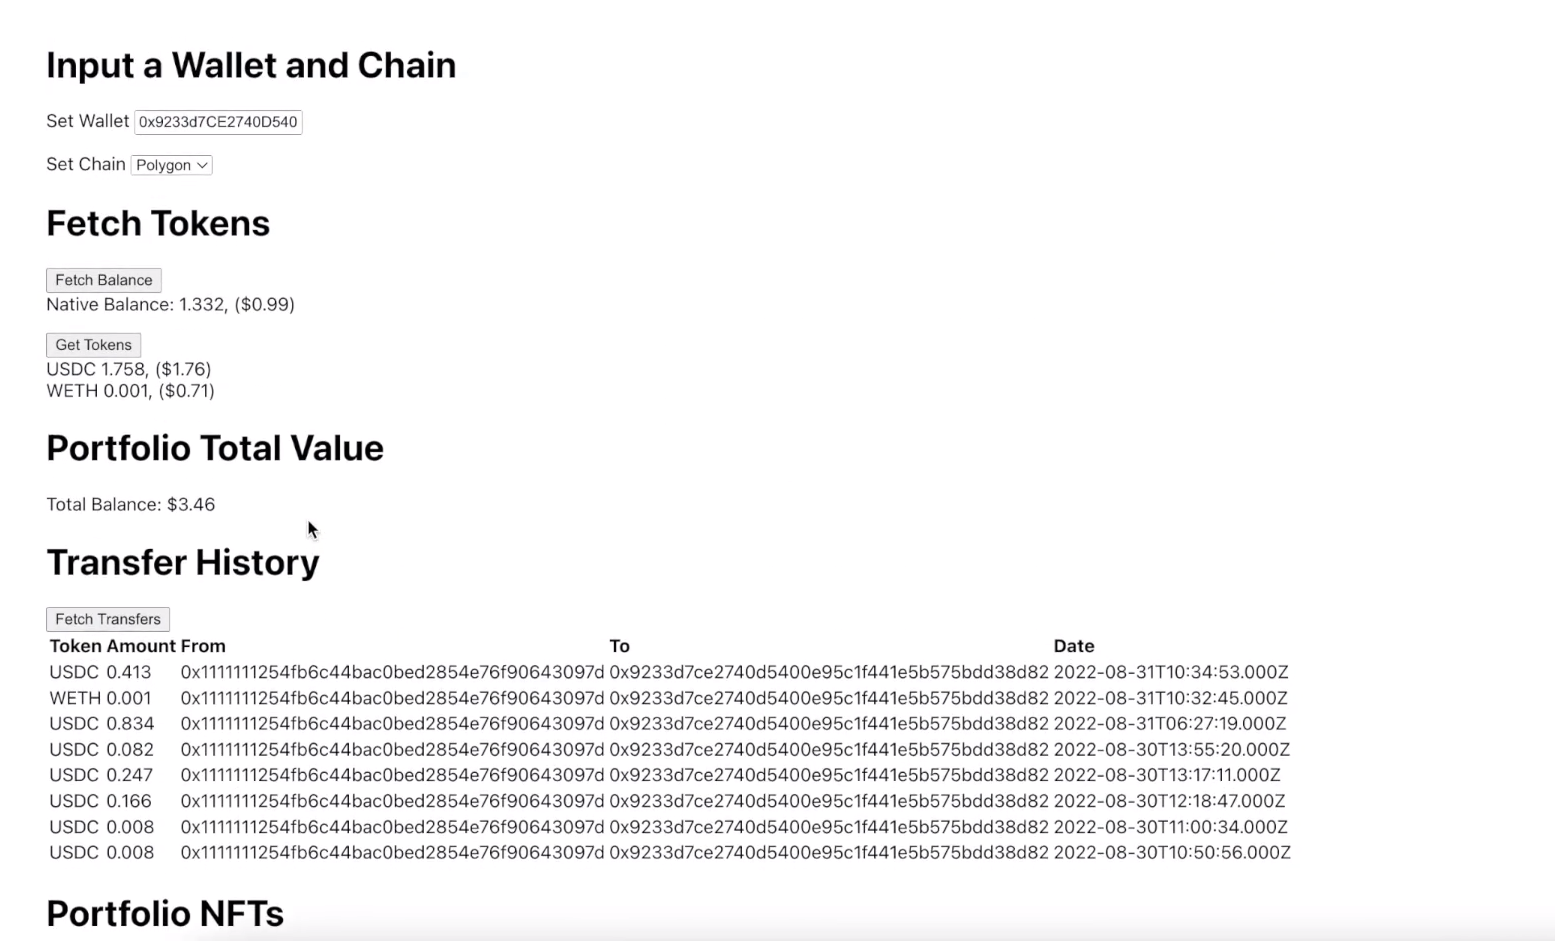
As you can see in the above screenshots, our example dapp includes neat styling. However, this will be the final stage of today’s “clone zapper” feat. Initially, we will focus on functionality. Hence, this is our example dapp without any fancy styling:
Setting Up Your NodeJS Backend
Note: Make sure that you have NodeJS and the “npm” package installed.
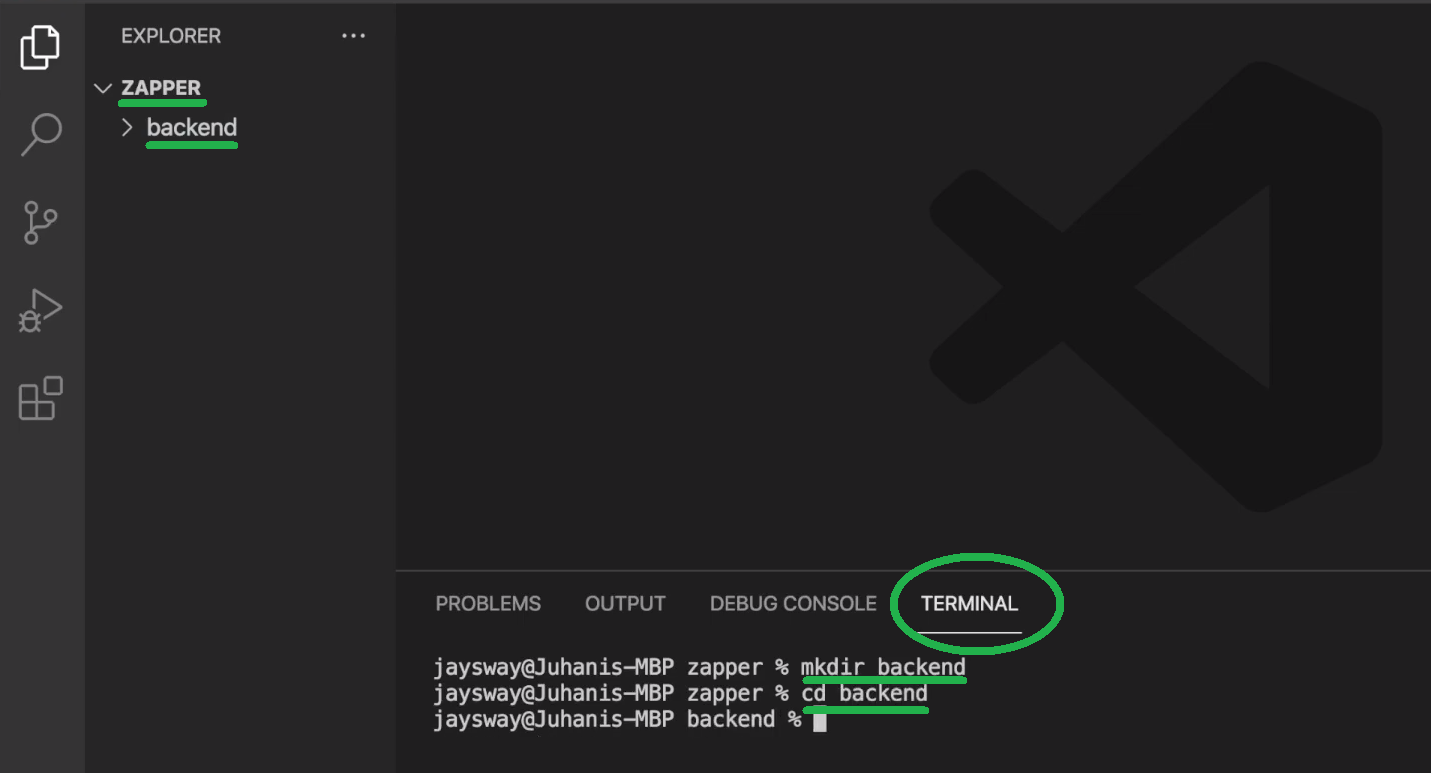
As mentioned above, we’ll show you how to use NodeJS to set up a backend server. The latter will query the above-presented on-chain data using Moralis’ Web3 EVM API. Start by creating your “zapper” folder inside Visual Studio Code (VSC). Next, use VSC’s terminal to create your “backend” directory using the “mkdir backend” command. Then “cd” into that folder:
Now, you can run the “npm init” command to initialize your project. Furthermore, press “enter” several times to go through the initialization options. As a result, you should now have your “package.json” file inside the “backend” folder:

Next, create your “index.js” file using the “touch index.js” command. Then, install all dependencies that will help you cover the required backend functionalities. You do this with the “npm i moralis express cors dotenv nodemon” command.
So, with all dependencies in place, you can populate your “index.js” file. To save some time, you can use the “hello world example express” template:
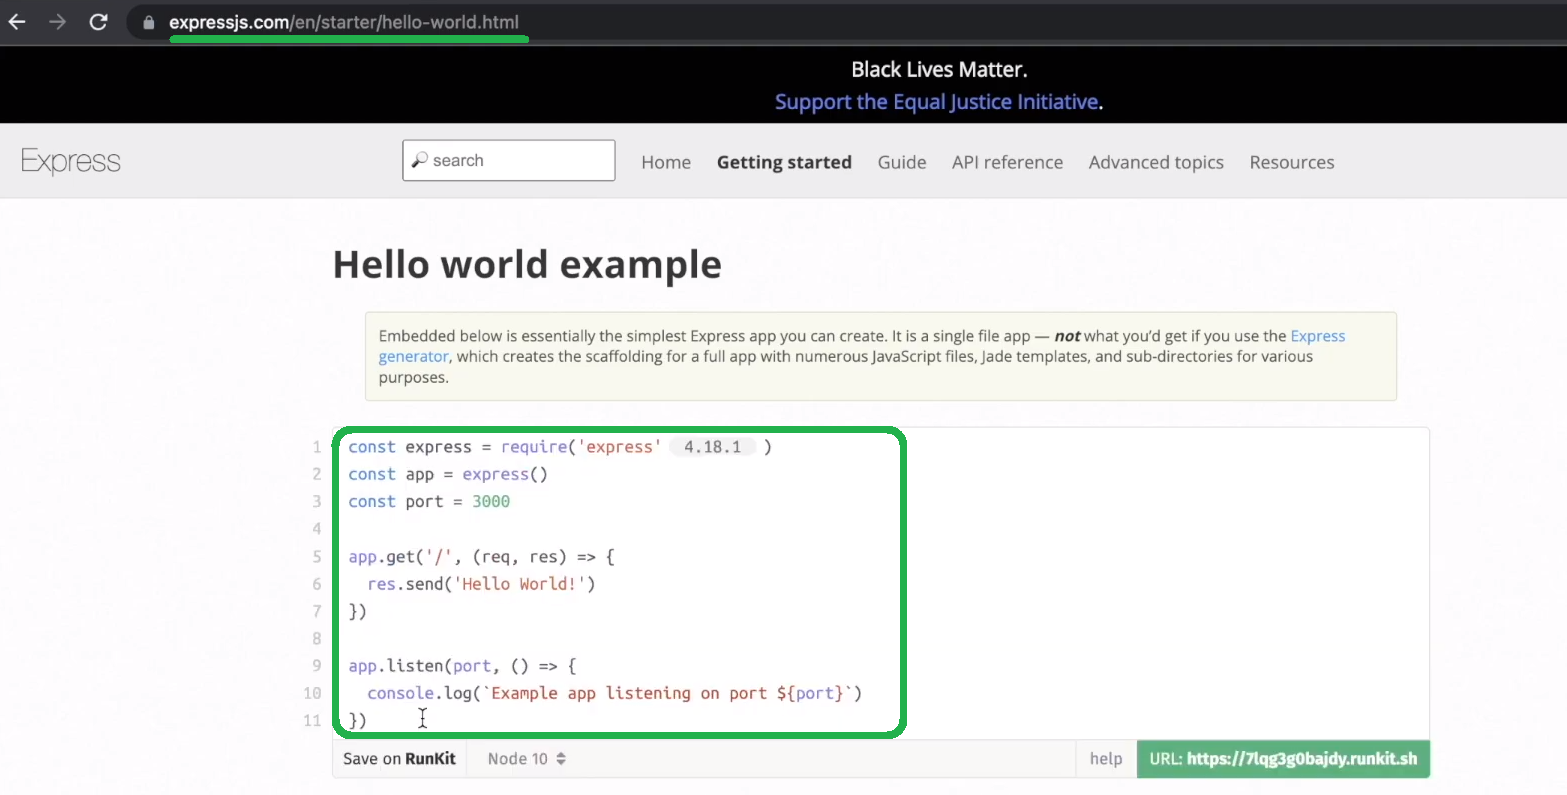
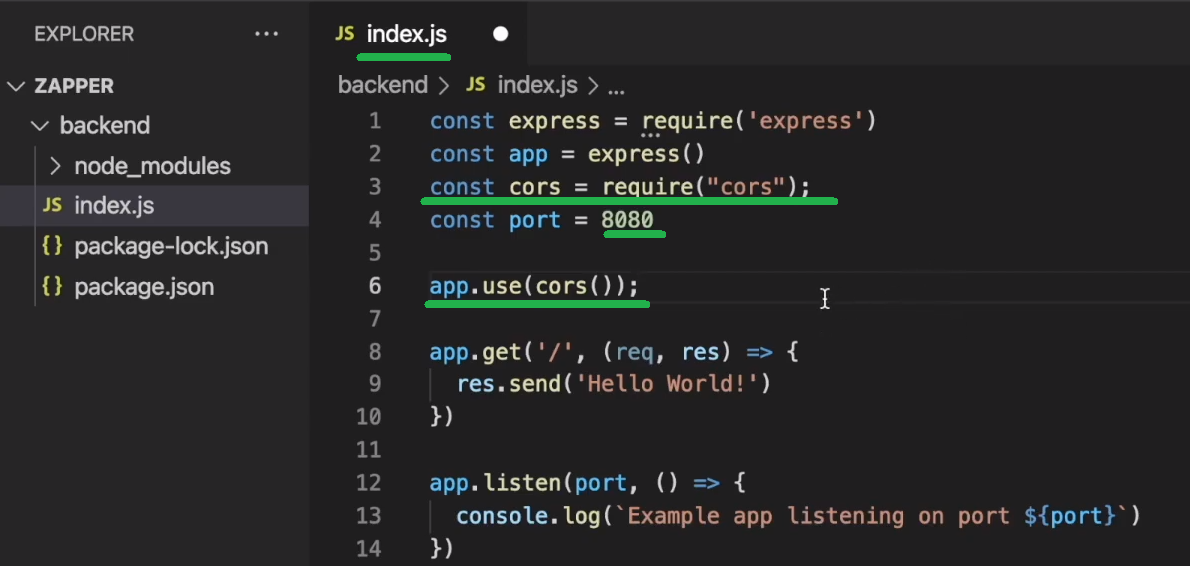
So, paste the above lines of code into your “index.js” file. Next, change the port from “3000” to “8080” and bring in the “cors” package:
Then, open your “package.json” file and add the “start” script:
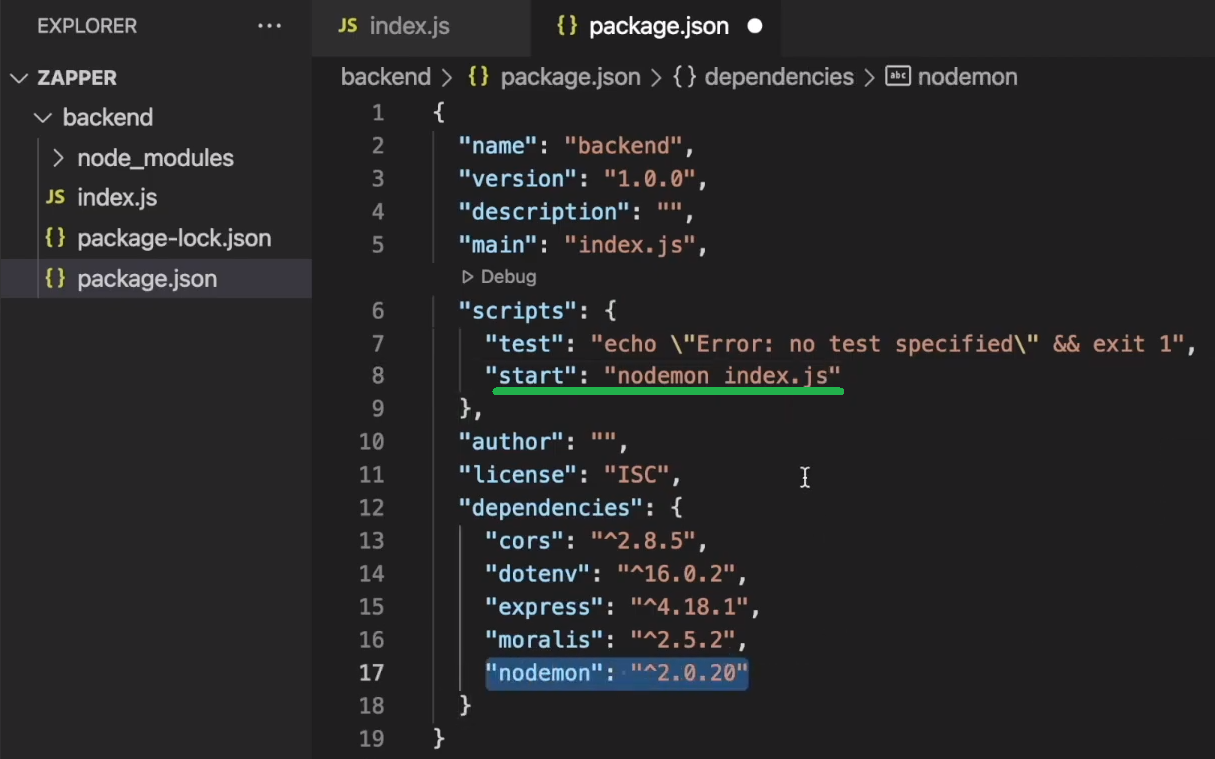
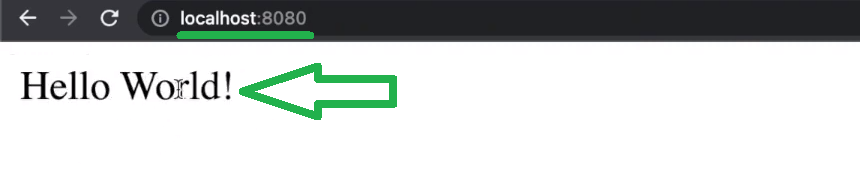
The above line of code will refresh your backend every time you make some changes to the “index.js” file. So, that concludes your simple backend setup. Hence, you can use the “npm start” command to start listening on “localhost: 8080“:

Of course, you can also use your favorite browser to access your backend:
The next stage for your backend would evolve around creating endpoints. However, you should first set up your frontend and connect it with your backend. Moreover, make sure you keep your backend running.
Setting Up Your React Frontend
Start by creating a new terminal instance:

Next, create your “frontend” React app using the “npx create-react-app frontend” command:

Once your frontend app is ready, you will see all the relevant files inside the “frontend” folder:

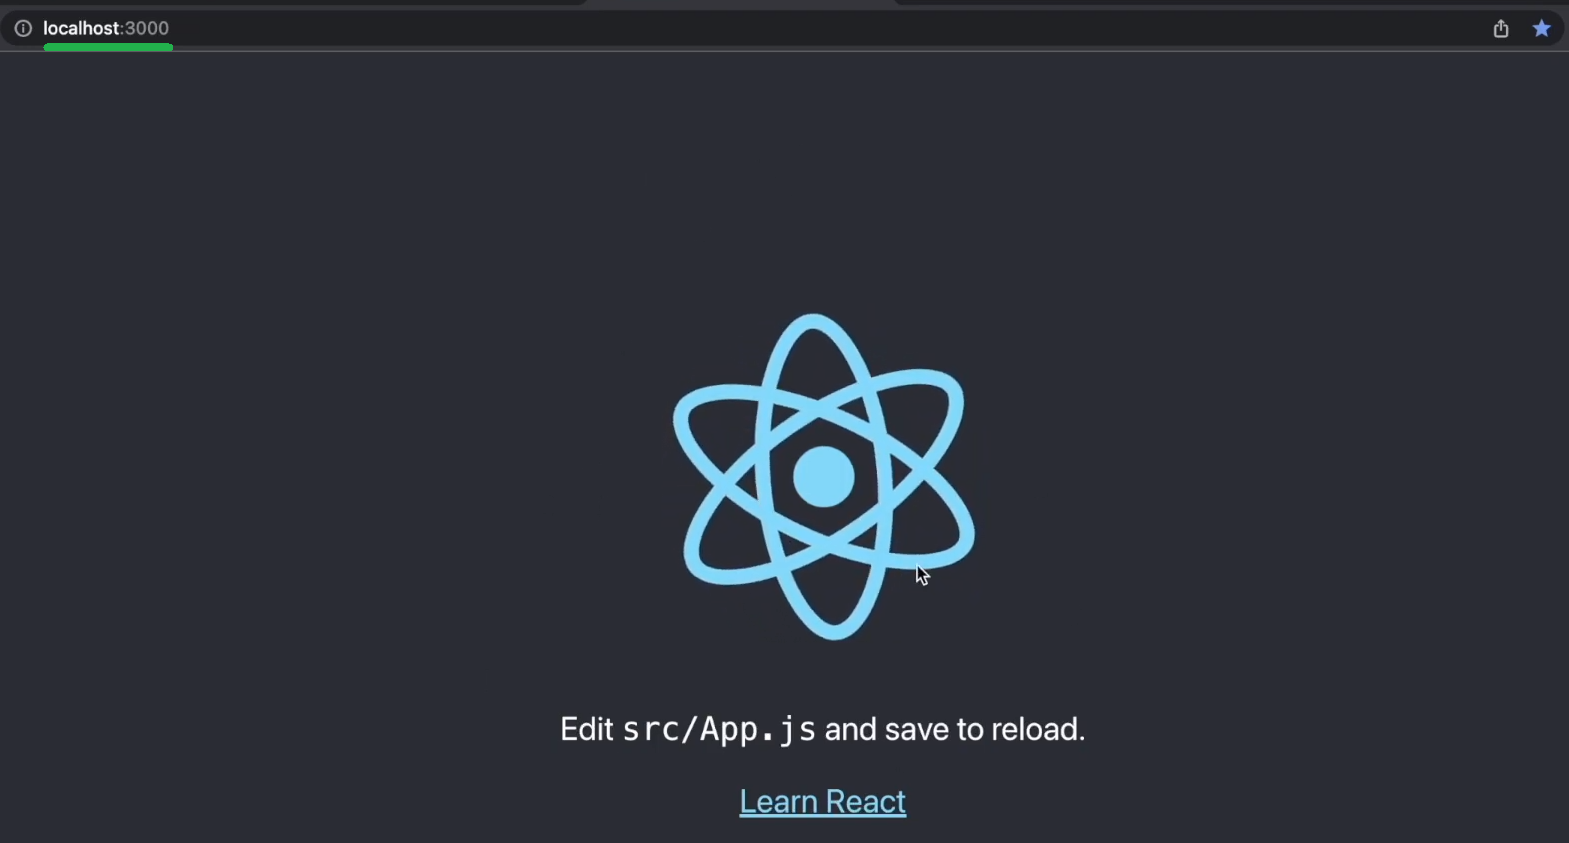
Next, you need to “cd” into the “frontend” folder. Then, you can launch your frontend app with the “npm start” command. With your frontend app launched, you can access your template React app at “localhost: 3000“:
Moving forward, you need to connect your frontend with your backend. Hence, open the “App.js” file and first remove the React logo by deleting the top row. Next, delete the content inside the “App” div:

Then, you can just add a simple button to that “div” that will fetch the data from your backend. But first, install Axios using the “npm i axios” command. Also, make sure to import Axios to the “App.js” file. Nonetheless, to make the “Fetch Hello” button functional, you also need to add the “backendCall” async function:
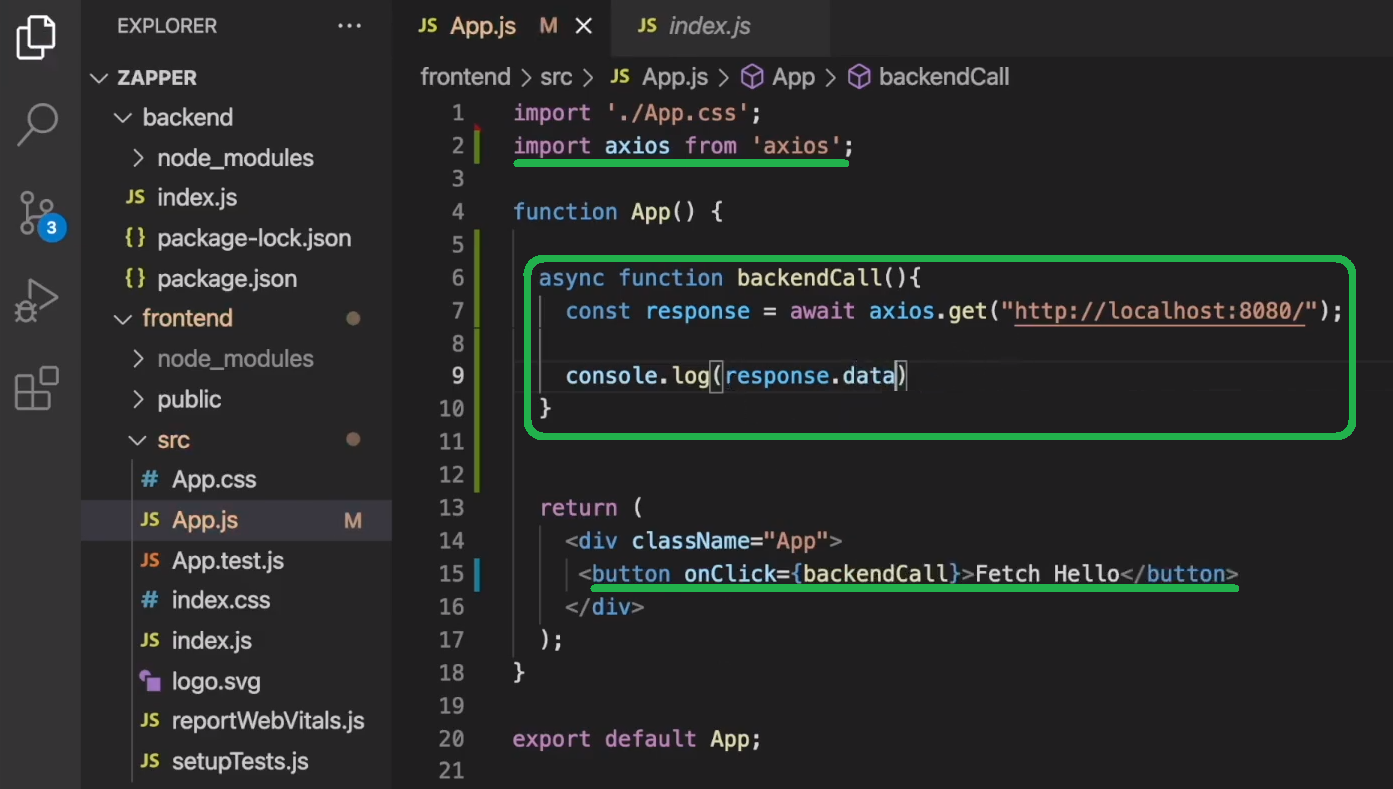
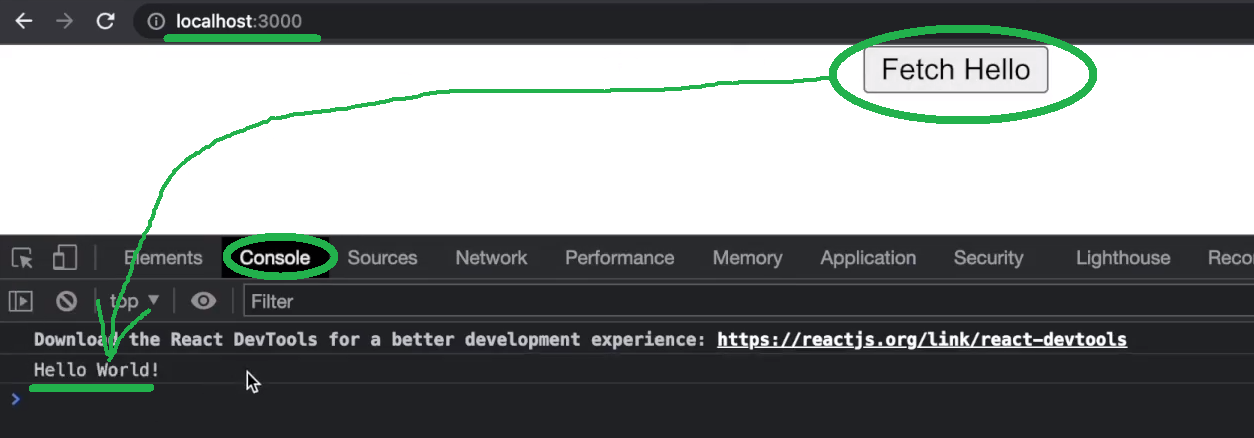
Furthermore, if you now run your frontend app again with the “npm start” command, you can see that the “Fetch Hello” button uses the “get” endpoint to fetch the data from your backend:
You’ve now successfully connected your client side with your server side. As such, you are ready to start implementing the Moralis API calls to your backend and display the results on the frontend.
Clone Zapper Functionalities with Moralis API Calls
To start using the ultimate EVM API, you need your Moralis account. So, if you haven’t done so yet, use the “create your free Moralis account” link in the introduction. Of course, you can also visit Moralis’ homepage and click on the “Start for Free” button:

Once you have your Moralis account up and running, you can access your Moralis admin area. There, you need to complete two simple steps to obtain your Moralis Web3 API key:

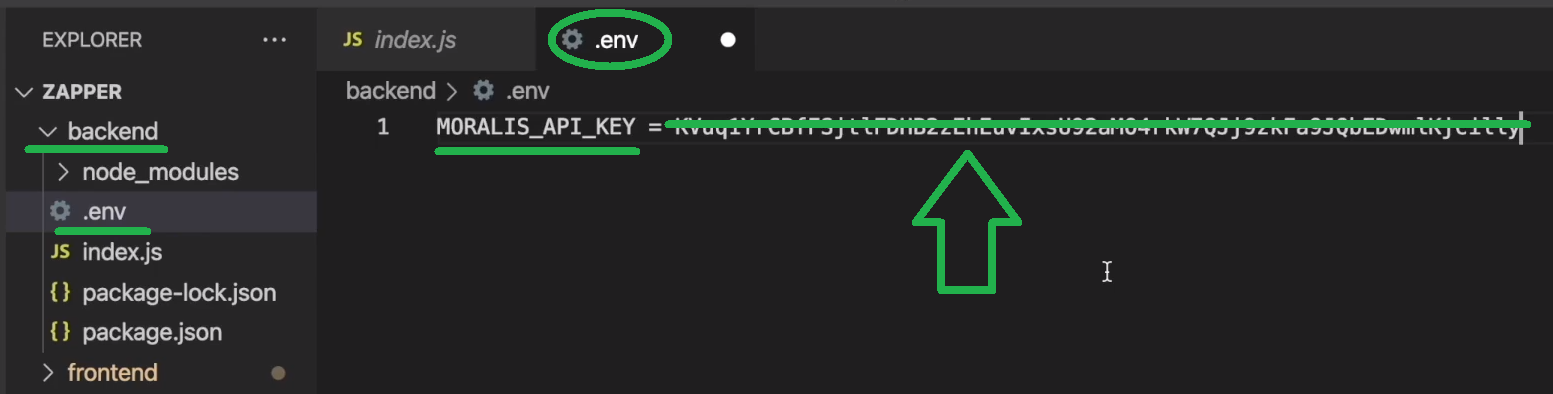
As indicated by the above image, you must first go to the “Web3 APIs” page. Then, you get to copy your Web3 API key using the copy icon. Next, return to your “backend” folder and create your “.env” file. Inside that file, create the “MORALIS_API_KEY” variable and set its value by pasting the above-copied API key:
Next, return to the “index.js” file and “require” the “.env” file. Also, make sure to import Moralis:

The “getNativeBalance” and “getTokenPrice” Moralis Web3 API Endpoints
With the above lines of code in place, you are ready to use Moralis’ EVM API endpoints to obtain the native balance. In the Moralis documentation, you can obtain all the necessary details about the “getNativeBalance” and “getTokenPrice” endpoints. Moreover, here’s the “getNativeBalance” page:
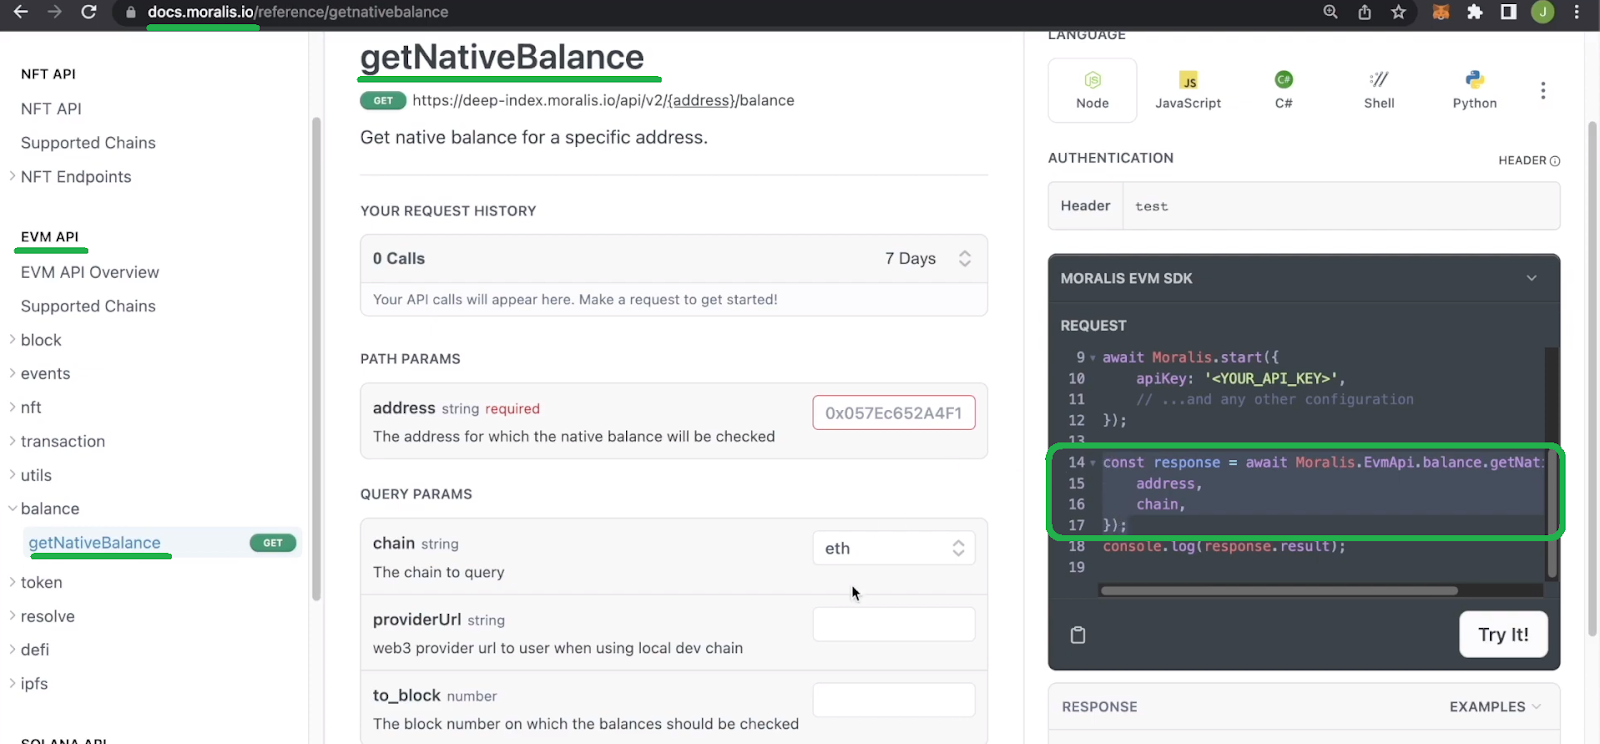
To clone Zapper functionality, you must add the relevant EVM API calls inside the “index.js” file. Here are the lines of code to implement the “getNativeBalance” endpoint:

If you want to see the above endpoint in action, make sure to use the video at the bottom of this article (14:24). Next, starting at 15:45, you’ll learn how to get the USD value of the native balance. This is where the “getTokenPrice” endpoint will make things pretty straightforward. Of course, you’ll also need to use an “if” statement to determine which is the currently selected chain:

Now that your backend is able to fetch the native balance and the value of the native currency in USD, you need to pass that to your frontend (19:04).
Clone Zapper – Going the Distance
In this section, you’ll get to implement ERC-20 balances, total portfolio USD value, wallet transfer history, and displaying NFTs. As such, you’ll get to add the rest of the functionalities to your Zapper clone. Starting at 27:50 of the video below, our in-house expert will show you how to fetch and display ERC-20 balances. For this part, you will focus on the “getWalletTokenBalances” endpoint. Moreover, you’ll also get to learn how to filter out the tokens with extremely low values (31:26). Of course, you will also use your frontend to display ERC-20 token balances (33:58).
Moving forward, you will learn how to create a component displaying the portfolio’s total USD value. As far as the backend goes for this part, you already have all the data you need. Hence, this is a completely frontend-focused task (40:45).
Next, you will fetch a wallet’s transfer history (44:57). Again, you will need to take care of this aspect on the backend following the previous two examples. However, this time you will use the “getWalletTokenTransfers” endpoint. Moreover, starting at 56:27, you’ll learn how to fetch NFTs with the “getWalletNFTs” endpoint. Then, at 1:06:27, you’ll get to implement NFT filtering features as presented in the demo above.
Last but not least, our in-house expert will take you through the frontend styling (1:14:21). This is where you’ll get to clone the Zapper dashboard. By completing this final stage, you’ll get acquainted with Moralis’ web3uikit. The latter enables you to implement various frontend elements without breaking a sweat.
How to Clone Zapper in Less Than 1 Hour – Summary
If you went through all the sections above and used the linked video tutorial, you now know how to clone Zapper. Along the way, you learned how to set up backend and frontend applications and connect the two. You also learned how to obtain your Moralis Web3 API key. The latter is your gateway to using the ultimate EVM API. Then, you used the “getNativeBalance”, “getTokenPrice”, “getWalletTokenBalances”, “getWalletTokenTransfers”, and “getWalletNFTs” endpoints to clone Zapper features. Finally, you tweaked the styling of your example dapp using CSS and web3uikit.
Being able to clone Zapper is quite a useful skill. It requires working with some of the most popular Moralis Web3 API endpoints. So, you can use the skills and knowledge obtained herein to create other kinds of DeFi dapps. However, you may explore the Moralis YouTube channel and the Moralis blog if you need more development practice. Aside from various DeFi dapp ideas, these are the places to learn more about Web3 development. For instance, you can also focus on creating Web3 games by combining the power of Moralis with Unity or Firebase.
On the other hand, you may want to go full-time crypto sooner rather than later. If so, becoming blockchain certified can make a world of difference. Hence, make sure to consider enrolling in Moralis Academy. This online blockchain development education platform also provides you with a personal study path. Moreover, this is also the place to get expert mentorship and become a member of one of the most advancing crypto communities.

