Learn how to create a blockchain explorer using JavaScript (NodeJS and NextJS) in just over one hour by following along in this article. The explorer will be an Etherscan clone that will fetch parsed on-chain data using the Moralis Web3 Data API. As we progress, you’ll see how easy it is to work with this API to cover our blockchain explorer’s blockchain-related backend aspects. Now, before we move into the tutorial section, let’s look at the endpoints we will use:
- The Token API’s
getTokenPriceendpoint to get the ERC-20 token price:
const response = await Moralis.EvmApi.token.getTokenPrice({
  address: "0xc02aaa39b223fe8d0a0e5c4f27ead9083c756cc2",
  chain: "0x1",
});
- The Block API’s
getDateToBlockandgetBlockendpoints to get the block by date and hash:
const latestBlock = await Moralis.EvmApi.block.getDateToBlock({
  date: Date.now(),
  chain: "0x1",
});
const previousBlockNrs = await Moralis.EvmApi.block.getBlock({
  chain: "0x1",
  blockNumberOrHash: blockNrOrParentHash,
});
- The Transaction API’s
getWalletTransactionsVerboseendpoint to get decoded transactions by wallet:
const response =
  await Moralis.EvmApi.transaction.getWalletTransactionsVerbose({
    address: query.address,
    chain,
});
Odds are you already have some experience with frontend development, so we decided to focus on the backend aspects of a blockchain explorer. That said, we will make sure you learn how to implement the above code snippets correctly. As far as the frontend goes, you can rely on the video at the top as it explores that part in more detail.
So, if you wish to create a blockchain explorer following our lead, make sure to sign up with Moralis now! You can start with a free plan, as it gives you access to all Moralis Web3 API endpoints. However, if you expect your dapps to receive a larger amount of users, the Moralis Pro plan is the go-to choice.

Overview
Blockchain explorers, also known as “block explorers”, enable devs and other blockchain users to explore on-chain data. We’ve previously touched on this topic as we created a simple guide showing how to easily build a block explorer. That article is also a great place to learn what blockchain explorers are and their benefits. However, this article is more of a complete, detailed guide on how to create an Etherscan-grade blockchain explorer.
Throughout the following sections, we will focus on showing you how to create a blockchain explorer backend with NodeJS and Moralis. We’ll also do a quick demo, helping you decide whether or not you want to build the frontend part and create your own instance of our Etherscan clone. Below the backend tutorial and our demo, you can also find the answer to the “what is a blockchain explorer?” question.
Tutorial: Create a Blockchain Explorer Backend with NodeJS and Moralis
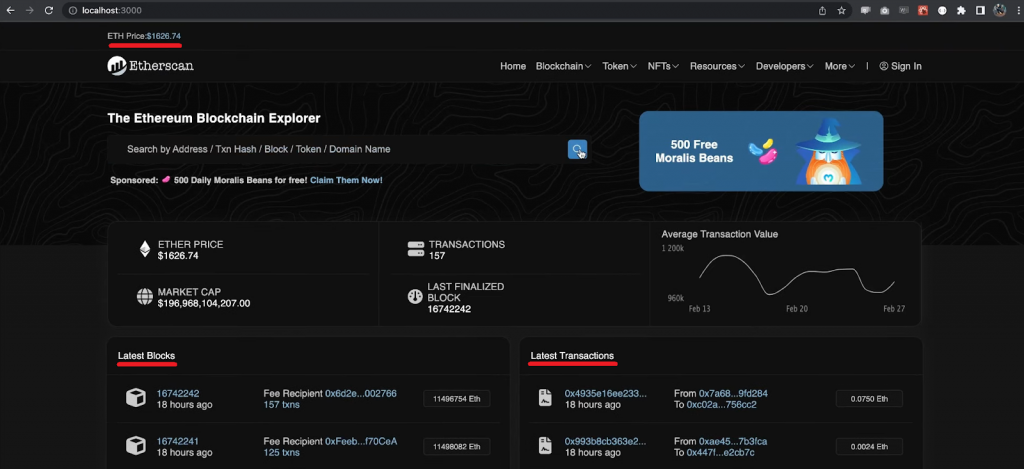
The above screenshot shows our Etherscan dapp running on “localhost: 3000”. It marks some of the on-chain data that the backend needs to fetch. Aside from the current Ethereum price, the latest blocks, and the latest transactions, our block explorer also allows users to search for transactions by the wallet address. Also, our backend queries all the related on-chain data with the endpoints presented in the intro. However, before we show you how to implement those snippets of code to create a blockchain explorer backend, let’s make sure you set things up correctly.

Backend Setup
Start by creating a new project directory. You can follow our lead and name it “etherscan-moralis-clone”. In fact, you can use your terminal and enter the following command to do exactly that:
mkdir etherscan-moralis-clone
Then, you need to cd into that directory to create a “backend” folder with this command:
mkdir backend
Next, cd into the “backend” folder and initialize a new NodeJS app:
npm init -y
Finally, install all the required dependencies with the following command:
npm i cors moralis express dotenv
Moving on, open your project in Visual Studio Code (VSC). First, focus on the “package.json” script and add start under scripts like so:
"scripts": {
  "start": "node index.js",
  "test": "echo \"Error: no test specified\" && exit 1"
With the above line of code added to your script, save it and create a new “.env” file:
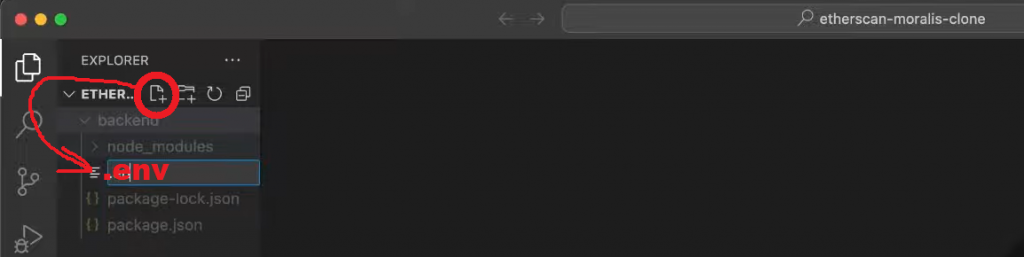
Inside the “.env” file, create an environmental variable and call it MORALIS_API_KEY. As for this variable’s value, you need to obtain your Web3 API key and use that value. This is where you need to use your Moralis account. Once signed in, go to the “Web3 APIs” page of your admin area and copy your API key:

Finally, return to the “.env” file and paste the above-copied key next to the MORALIS_API_KEY variable.
Coding Your Blockchain Explorer’s Backend Script
Inside your “backend” folder, create a new “index.js” file and first import the above-installed dependencies and determine a local port for your backend:
const express = require("express");
const app = express();
const port = 5001;
const Moralis = require("moralis").default;
const cors = require("cors");

require("dotenv").config({ path: ".env" });
Next, you also need to instruct your app to use CORS and Express:
app.use(cors());
app.use(express.json());
Before you actually start implementing the Moralis Web3 Data API endpoints, make sure to also define a new variable that stores your API key in this script:
const MORALIS_API_KEY = process.env.MORALIS_API_KEY;
Add the Moralis.start function to initialize Moralis using your API key. This should also be the cue to start listening to your backend port:
Moralis.start({
  apiKey: MORALIS_API_KEY,
}).then(() => {
  app.listen(port, () => {
    console.log(`Listening for API Calls`);
  });
});
With the above lines of code in place, you are ready to start implementing the endpoints from the intro.
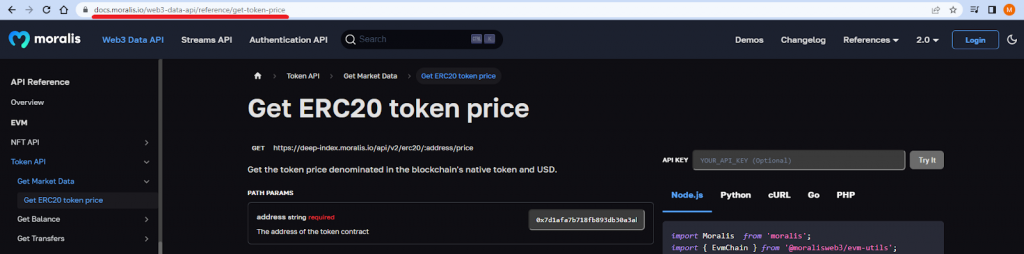
Fetch ETH Price
The first endpoint we’ll implement is one of the Moralis Token API endpoints: getTokenPrice. This endpoint fetches the token price denominated in the blockchain’s native token and USD. In our case, we’ll use this endpoint to fetch the price of ETH, which is Ethereum’s native coin, in USD. We need to pass two parameters: the token’s contract address and the chain ID. So, here are the lines of code querying the price of ETH:
app.get("/getethprice", async (req, res) => {
  try {
    const response = await Moralis.EvmApi.token.getTokenPrice({
      address: "0xc02aaa39b223fe8d0a0e5c4f27ead9083c756cc2",
      chain: "0x1",
    });

    return res.status(200).json(response);
  } catch (e) {
    console.log(`Something went wrong ${e}`);
    return res.status(400).json();
  }
});
Looking at the lines of code above, you can see that we also catch potential errors and respond to them with “Something went wrong”.
Fetch Block Details
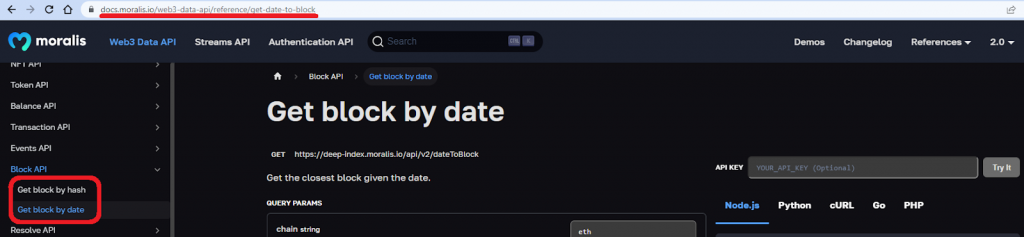
The above endpoint will enable our dapp to display the ETH price; however, we also want it to display the latest block and the latest transactions. For that purpose, we’ll use the following two Moralis endpoints: getDateToBlock and getBlock. The former takes in the unix date in milliseconds and returns the closest block to that date. As such, it provides us with the latest block and some of its details, including its date, block number, timestamp, hash, and parent hash. Then, we can use that block’s block number or hash as a parameter for the getBlock endpoint. In return, the latter provides us with the details of that block, including the on-chain transactions. Here’s how we utilize the two endpoints in a new /getblockinfo endpoint:
app.get("/getblockinfo", async (req, res) => {
  try {
    const latestBlock = await Moralis.EvmApi.block.getDateToBlock({
      date: Date.now(),
      chain: "0x1",
    });

    let blockNrOrParentHash = latestBlock.toJSON().block;
    let previousBlockInfo = [];

    for (let i = 0; i < 5; i++) {
      const previousBlockNrs = await Moralis.EvmApi.block.getBlock({
        chain: "0x1",
        blockNumberOrHash: blockNrOrParentHash,
      });

      blockNrOrParentHash = previousBlockNrs.toJSON().parent_hash;
      if (i == 0) {
        previousBlockInfo.push({
          transactions: previousBlockNrs.toJSON().transactions.map((i) => {
            return {
              transactionHash: i.hash,
              time: i.block_timestamp,
              fromAddress: i.from_address,
              toAddress: i.to_address,
              value: i.value,
            };
          }),
        });
      }
      previousBlockInfo.push({
        blockNumber: previousBlockNrs.toJSON().number,
        totalTransactions: previousBlockNrs.toJSON().transaction_count,
        gasUsed: previousBlockNrs.toJSON().gas_used,
        miner: previousBlockNrs.toJSON().miner,
        time: previousBlockNrs.toJSON().timestamp,
      });
    }

    const response = {
      latestBlock: latestBlock.toJSON().block,
      previousBlockInfo,
    };

    return res.status(200).json(response);
  } catch (e) {
    console.log(`Something went wrong ${e}`);
    return res.status(400).json();
  }
});
Looking at the above lines of code, you can see that you get to create a blockchain explorer that displays details for the latest block and the previous four blocks. This is what the above for loop is responsible for. The latter ensures that our script uses the Moralis.EvmApi.block.getBlock method on the last five blocks. Also, using the parent hash (t.i., previous block hash), our code can obtain blocks’ details (transactionHash, time, fromAddress, toAddress, and value). Finally, it pushes those details to the previousBlockInfo array. Nonetheless, we also check for potential errors.
Fetch Decoded Transaction Details
We also want to create a blockchain explorer backend that is capable of obtaining transaction details for any wallet address. Fortunately, Moralis offers a powerful endpoint that can obtain those details and decode them on our behalf. This is where the getWalletTransactionsVerbose endpoint enters the scene.
Since we are focusing our blockchain explorer on the Ethereum chain, our chain parameter must again match Ethereum (0x1). The second required parameter is a wallet address. In this case, we don’t want to use a fixed address. Instead, we want the endpoint to use the address users enter in the search field on the client side. Plus, just like with the previous two app.get functions, we also want to catch any potential errors. As such, these are the lines of code that obtain decoded transactions details:
app.get("/address", async (req, res) => {
  try {
    const { query } = req;
    const chain = "0x1";

    const response =
      await Moralis.EvmApi.transaction.getWalletTransactionsVerbose({
        address: query.address,
        chain,
      });

    return res.status(200).json(response);
  } catch (e) {
    console.log(`Something went wrong ${e}`);
    return res.status(400).json();
  }
});
Note: If you wish to learn more about or test the Moralis Web3 API endpoints, make sure to visit the API reference pages (as indicated in screenshots above each of the last three subsections). You can find the pages in the market’s industry-leading Web3 documentation.
The above-outlined endpoints handle all the blockchain-related backend aspects of our Etherscan clone. As such, all that’s left to do is to create a proper frontend that neatly utilizes the above-built backend. For that purpose, you get to create a NextJS app and several JavaScript components. If you wish to follow our lead and create a blockchain explorer frontend as well, make sure to use the video a the top of the article, starting at 20:49. To help you decide if our frontend is worthy of your time, make sure to check out a demo below.
Our Etherscan Clone Blockchain Explorer Demo
The following screenshot shows all the details of our blockchain explorer dapp:

All of the underlined details in the above screenshots are fetched by the powerful endpoints from Moralis. These include the ETH price, latest transactions, block number of the last finalized block, details of the last five blocks, and details of the latest transactions. Of course, there is also a search box, which is the core of our blockchain explorer. This is where users can paste any wallet address to explore all its transactions:

Our frontend displays all the transactions and their details in a neat table that follows Etherscan’s looks:

If you wish to take our example blockchain explorer dapp for a spin but don’t wish to code it from scratch, simply clone the code that awaits you on our “etherscan-clone” GitHub repo page. Aside from all the frontend scripts, this is also where you can find the complete “index.js” backend script covered above.
Note: In case you’re wondering what “Moralis Beans” are, make sure to check out the leading specialized blockchain explorer: Moralis Money. This is where you can find true crypto alpha tokens and collect 500 Moralis Beans daily.
What is a Blockchain Explorer?
A blockchain explorer is a special kind of decentralized application (dapp) enabling you to explore the publicly available on-chain data. With a proper blockchain explorer, you can view token details, transactions, address balances, and more.
You probably know that there are many programmable blockchains up and running, and each blockchain has its own official blockchain explorer. Leading examples include Etherscan for Ethereum, PolygonScan for Polygon, BscScan for BNB Chain, SnowTrace for Avalanche, FTMScan for Fantom, etc. Aside from Ethereum and EVM-compatible chains, there are also blockchain explorers for non-EVM-compatible chains. A great example of that is the Solana explorer Solscan.
Since all chains have their official blockchain explorers, why should you create a blockchain explorer yourself? Well, the two main reasons are simplification and user retention. If you’ve used any of the aforementioned block explorers, you know that their UX experience is not great, especially not for crypto beginners. Thus, it makes sense to create blockchain explorers with great UIs that simplify the experience. Perhaps you can achieve that by focusing only on specific features. Moreover, by adding a user-friendly blockchain explorer to your dapps, you can ensure that your users stay around while checking if their transactions went through.
How to Create a Blockchain Explorer – Summary
In today’s article, you had a chance to follow our lead and create a blockchain explorer backend. If you decided to stick around and complete our tutorial, you created a NodeJS dapp powered by an “index.js” script. Inside that script, you implemented four powerful Moralis Web3 Data API endpoints. You also learned how to obtain your Web3 API key and store it in a “.env” file. Additionally, you had an opportunity to get inspired by our demo to create a frontend for your blockchain explorer. Now, if you decided to create a NextJS app that handles the frontend, you had two options:
- You could build it from scratch following the video tutorial at the top of this article.
- Or, you could’ve simply cloned our frontend script from our GitHub repository.
All in all, you now know how to create a rather complex dapp using JavaScript and Moralis. As such, you are ready to tackle other kinds of dapps.
If you have your own dapp ideas, just dive into the Moralis docs and start BUIDLing. However, if you need inspiration, motivation, and/or want to learn more about Web3 development, visit the Moralis YouTube channel and blog. This is where you can find numerous excellent tutorials and blockchain development topics. Some of the latest articles dive into the Solana devnet, Web3 marketplace development, building a Polygon portfolio tracker, exploring the leading Goerli faucet, and much more. In case you need assistance with the technical aspects of scaling your dapps, make sure to reach out to our sales team!