Did you know you can build a dapp on Ethereum using a simple three-step process? If you’d like to explore these steps further, follow along as this dapp tutorial takes you through the create, test, and deploy stages. Along the way, you’ll notice that building Ethereum dapps can be pretty straightforward. In short, we’ll create a backend and a frontend, connecting the two, and then use Moralis’ enterprise-grade Web3 API to fetch all sorts of on-chain data on the backend. Finally, we must ensure that the frontend presents data neatly and in a user-friendly manner.
Furthermore, when building dapps on Ethereum, you must also add Web3 authentication. Fortunately, Moralis’ Auth API enables you to solve that in minutes. What’s more, thanks to Moralis’ web3uikit, you even save time on adding stylish buttons and other widgets. Also, since Moralis is cross-chain interoperable, you can not only develop Ethereum dapps but also build for other EVM-compatible chains. If all of the above sounds interesting, today’s dapp tutorial is for you. However, before we initiate the main task of this tutorial, we need to cover some basics. Now, if you already know what decentralized applications on Ethereum are, you may want to get your hands dirty immediately. If so, feel free to jump to the “Dapp Tutorial – Building Ethereum Dapps with Moralis” section. Even so, make sure you have your free Moralis account ready first.
What are Decentralized Applications on Ethereum?
Decentralized applications, or dapps, are applications that in some way interact with one or more blockchain networks. So, when we talk about dapps on Ethereum, we refer to dapps interacting with the Ethereum chain. Furthermore, it’s important to point out that dapps come in various forms. Some are simple explorer dapps that just fetch certain on-chain data. Still, most dapps come with Web3 authentication. This means that users get to authenticate themselves using their Web3 wallets. Once users connect their crypto wallets to dapps, they get to interact with the blockchain they are connected to.
Remember that the available Web3 features vary from dapp to dapp. Thus, in some cases, some dapps only fetch the data related to the connected wallet and present it to the connected user, which is what we will focus on in today’s dapp tutorial. However, in other instances, other dapps enable users to execute all sorts of on-chain transactions. Moreover, the implemented features of the dapp determine its classification. For example, dapps allowing users to trade NFTs are called NFT marketplaces. Or, dapps that offer financial services are called DeFi platforms or dashboards. Even Web3 games are just special kinds of dapps. With that in mind, it’s obvious that there’s a lot to learn about building dapps on Ethereum.
Additionally, many underlying principles apply to all dapps. Hence, you don’t need to reinvent the wheel whenever you want to build one. In fact, even when building Ethereum dapps for the first time, you don’t need to start from scratch. After all, there are many quality code repositories and tools that enable you to get to the finish line rather effortlessly.
How to Build a Dapp on Ethereum
The Web3 tech stack has come a long way in the last couple of years. As such, you no longer need to deal with all the limitations of RPC nodes when building dapps. Instead, you just need to use the proper tools that enable you to fetch on-chain data and interact with smart contracts. So, if you want to build a dapp on Ethereum, you must complete the following steps:
- Create your dapp’s backend using legacy tools.
- Build your dapp’s frontend using legacy tools.
- Connect your frontend to your backend.
- Use the ultimate Web3 API to make calls and fetch all sorts of on-chain data on the backend.
- Ensure that your frontend presents data in a neat and user-friendly manner.
Furthermore, when you want to create more advanced dapps – the ones that interact with smart contracts – you also need to learn how to deploy smart contracts. But, as far as syncing and triggering on-chain events, Moralis makes things as straightforward as possible, thanks to Moralis’ Streams API.
However, in today’s dapp tutorial, we’ll stick to fetching on-chain data. Moreover, we’ll use NodeJS, NextJS, and Moralis’ EVM API. In addition, while building a dapp on Ethereum, we will use web3uikit and some CSS to create a production-worthy UX.

Best Way to Get Started When Building Dapps
If you are a beginner wondering how to build a dapp on Ethereum quickly, the Ethereum boilerplate is the answer. It is, without a doubt, the easiest way to build dapps. By exploiting that ultimate shortcut, you can have your own dapp up and running in about seven minutes.
However, if you want to learn to be more independent, building dapps on Ethereum by following tutorials such as the one below is an even better option. This way, it takes a bit longer to have your dapp up and running; however, you also learn more. As a result, you know how to better accommodate your specific wants and needs. With that said, if your time is quite limited, make sure to focus on the easiest way to build dapps. However, if you can spare about 90 minutes of your time, take on the dapp tutorial that awaits you below.

Dapp Tutorial – Building Ethereum Dapps with Moralis
We’ve now reached the main part of this tutorial – building Ethereum dapps. If you follow our lead, the dapp on Ethereum we’re about to create is sort of a “Zapper-like” dapp. Further, you’ll need to complete the following steps:
- Set Up Your NodeJS Backend
- Set Up Your React Frontend
- Obtain Your Moralis Web3 API Key
- Access Moralis’ EVM API Endpoints
- Adding Web3 Functionality and Frontend Styling
Create Dapp
Moreover, the steps outlined above are the steps that we will guide you through in this article. However, to also implement the necessary Web3 functionalities and advanced styling, make sure to follow along with the video tutorial that awaits you below.
Set Up Your NodeJS Backend
So, we’ll start by setting up our NodeJS backend. As such, we need to install NodeJS and the “npm” package. With these two prerequisites under our belts, we proceed by creating a new folder, which we’ll name “zapper”, and open it in Visual Studio Code (VSC).
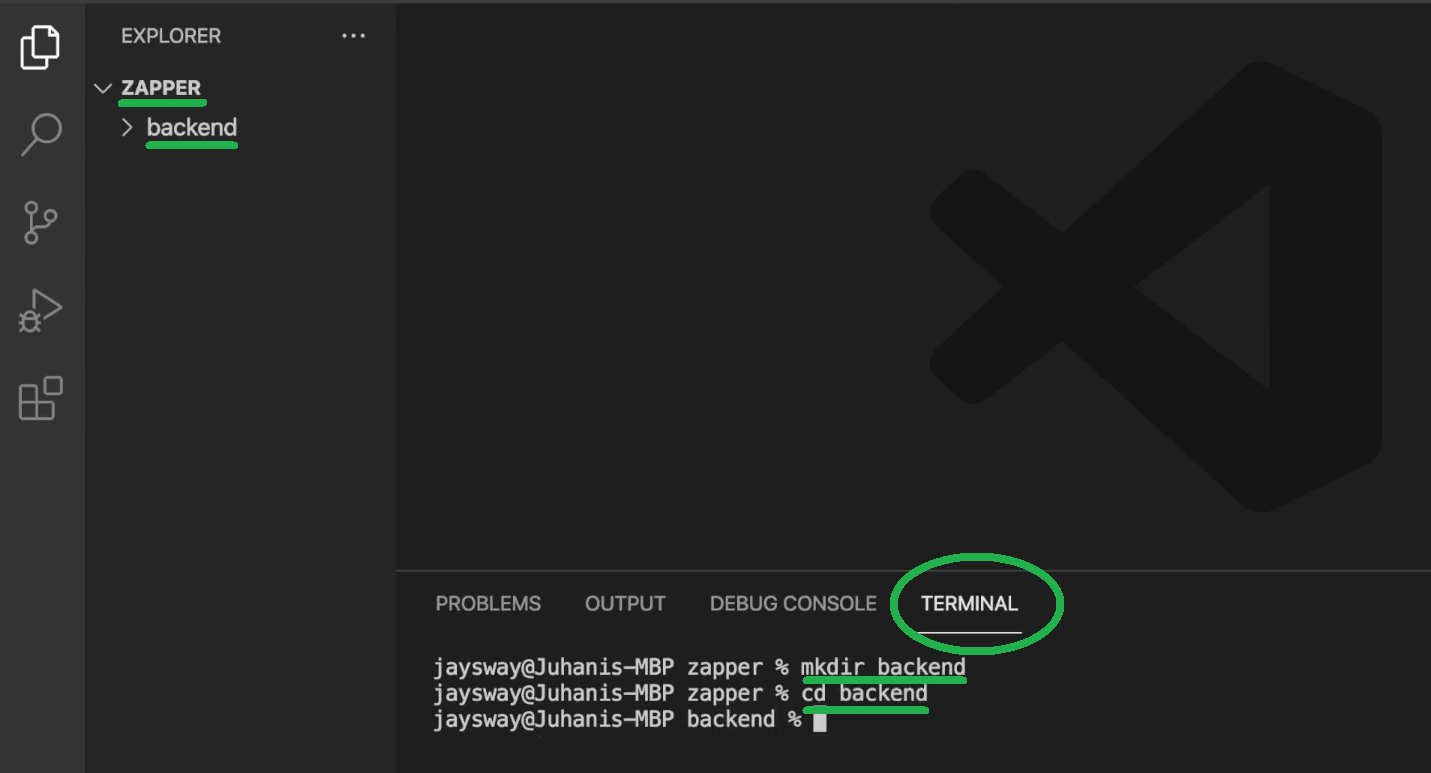
Next, we open a new VSC terminal and use the “mkdir backend” command to create our “backend” directory. We then “cd” into that folder:
Then, we enter the “npm init” command to initialize a new project, which will prompt us with some initial options. However, we’ll stick with the default settings. Hence, simply press “enter” several times. After successfully initializing our project, we get a new “package.json” file inside the “backend” folder:

Moving forward, we enter “touch index.js” into our terminal to create an “index.js” file. Next, we enter the “npm i moralis express cors dotenv nodemon” command, which installs all the required dependencies.
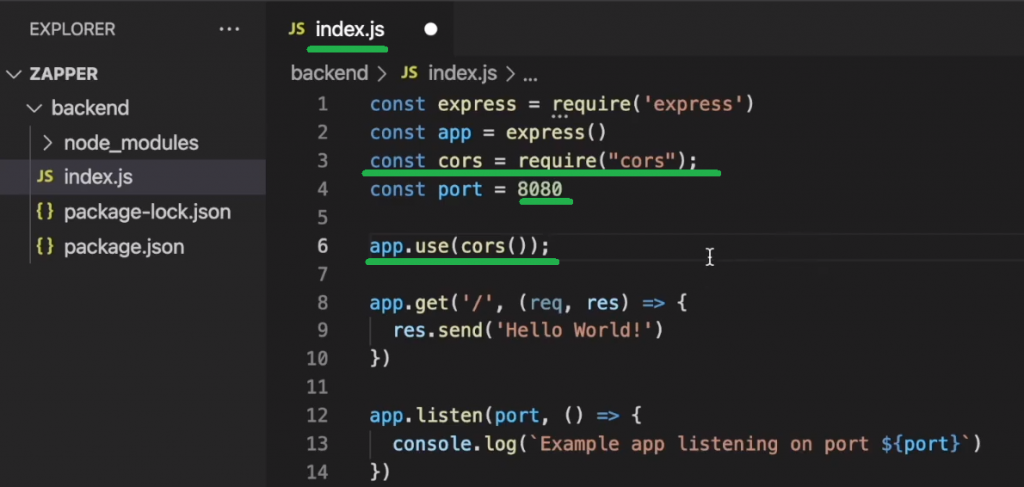
Then, we populate our “index.js” file using the “hello world example express” template:

With the above lines of code in place, we change the port from “3000” to “8080“. We also import the “cors” package:
Nonetheless, we must not forget to add the “start” script to our “package.json” file:

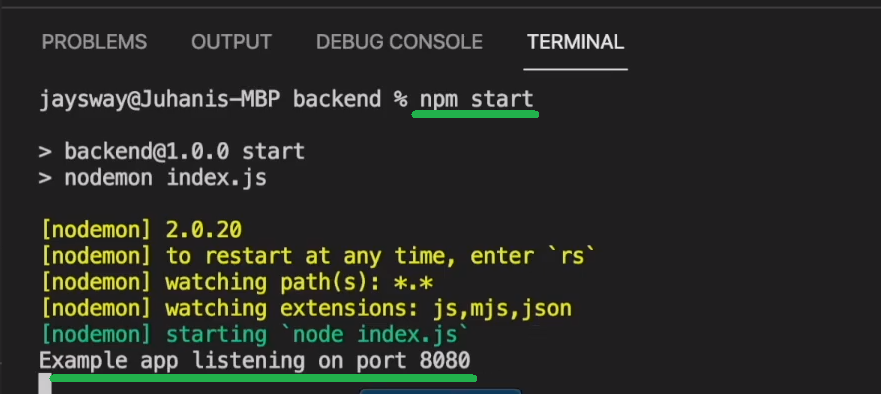
We use “nodemon index.js” to automatically refresh our backend after any changes to the “index.js” file. We now have our basic backend set in place, and we can view its functionality on “localhost: 8080“. To do this, we need to use the “npm start” command:
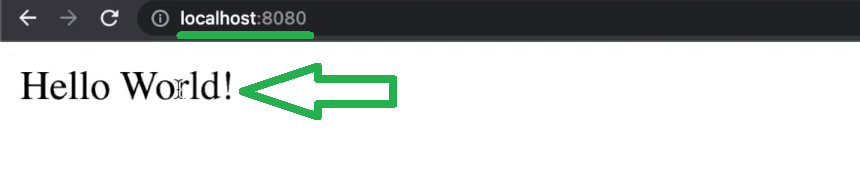
With our example app listed on port “8080”, we can access it with a browser:
Note: We need to keep our backend running as we create our frontend.
Set Up Your React Frontend
We start by creating a new terminal instance:

Next, we enter “npx create-react-app frontend” to create our React app:

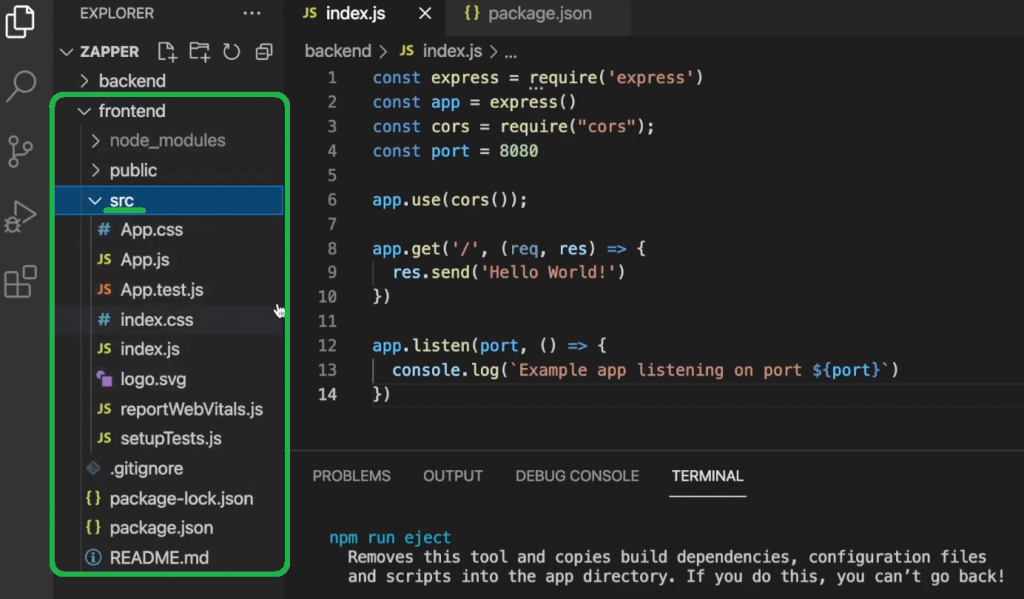
As a result, we get several folders and files inside the “frontend” folder:
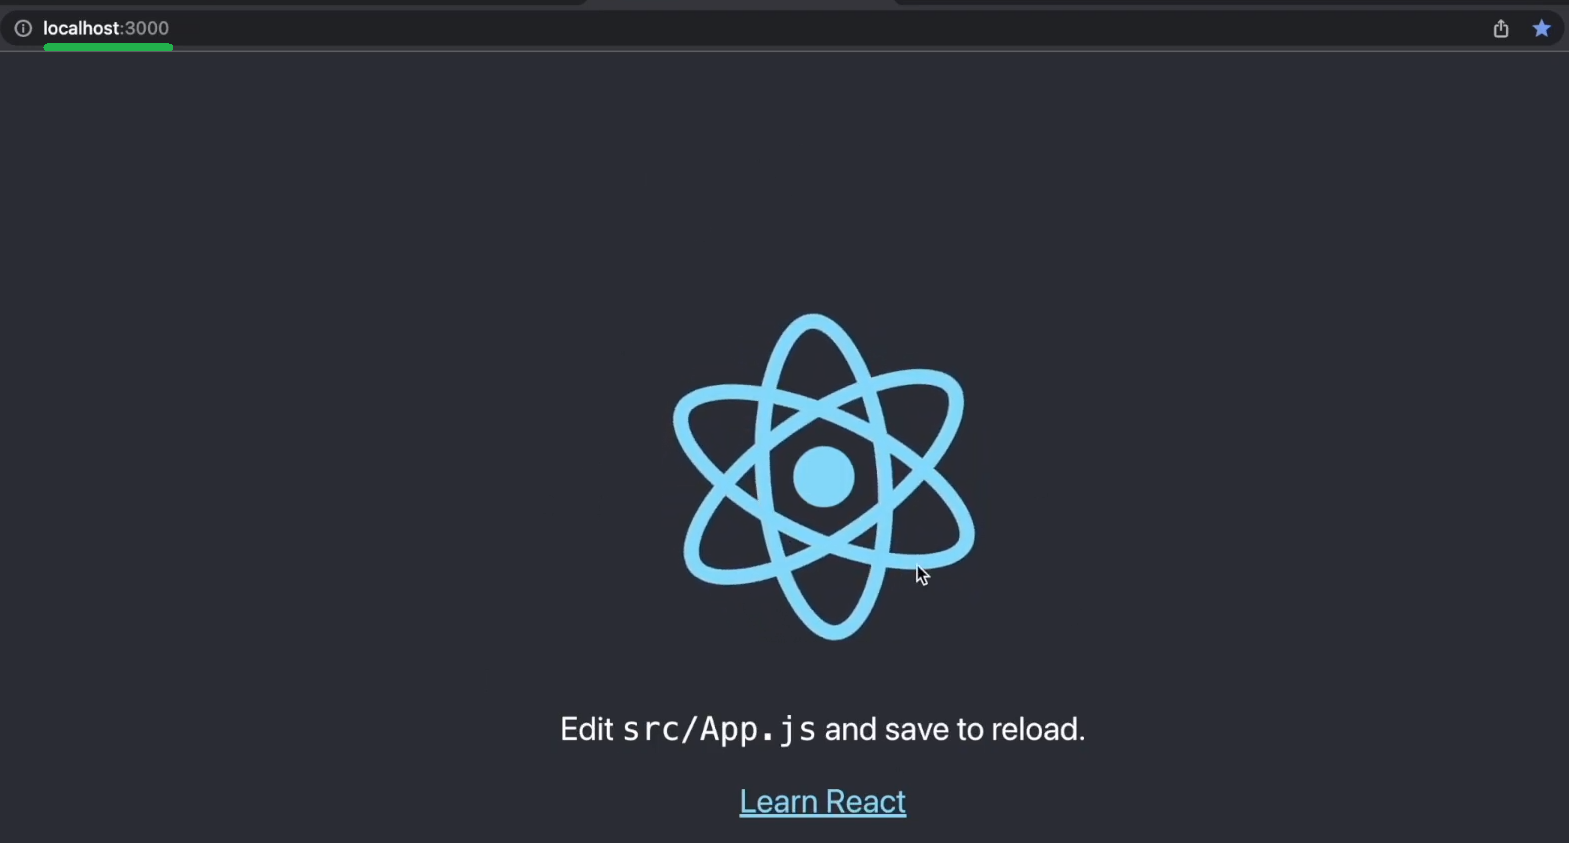
Then, we “cd” into the “frontend” folder. Next, we run our template dapp with the “npm start” command. We can already access our React app template at “localhost: 3000“:
We now need to tweak the “App.js” file to connect our frontend with the above-created backend. First, we remove the React logo and the content inside the “App” div:
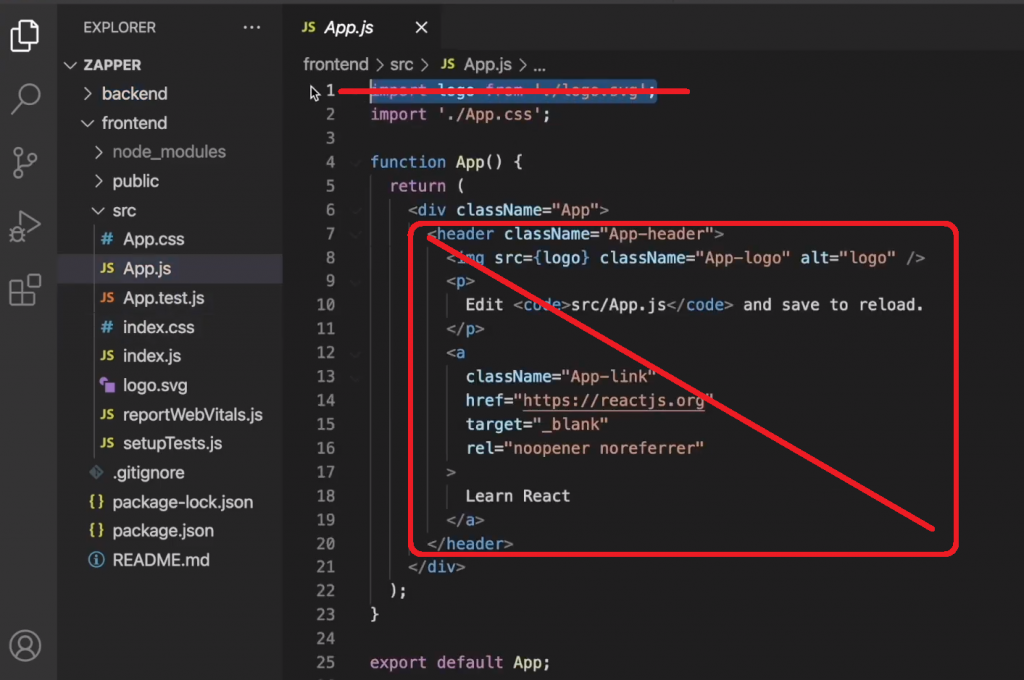
Then, we install Axios with the “npm i axios” command. We also need to import Axios to the “App.js” file. Next, we create the “Fetch Hello” button inside the “App” div. Furthermore, to use that button to fetch the data from our backend, we must also define the “backendCall” async function:

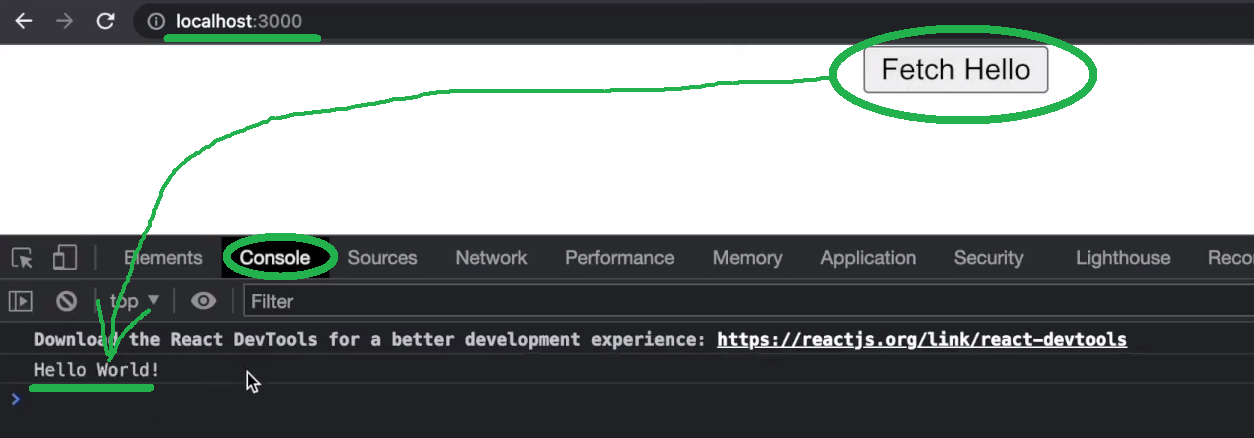
By entering “npm start” and going to the browser, we can explore the current results of our frontend app. In addition, to see if the button is functioning properly, we use the browser’s console:
Obtain Your Moralis Web3 API Key
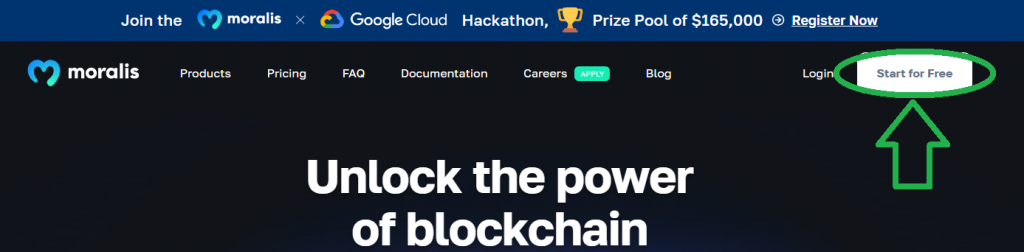
Now that we’ve successfully connected our backend and frontend, we can start adding Web3 functionalities. This is also where building Ethereum dapps becomes interesting. Moreover, this is where we’ll show you how to build a dapp on Ethereum the easy way. As such, we’ll use Moralis’ EVM API. This means that we need to create our Moralis account. To do so, we can use the link at the outset or visit Moralis’ homepage and click on the “Start for Free” button:
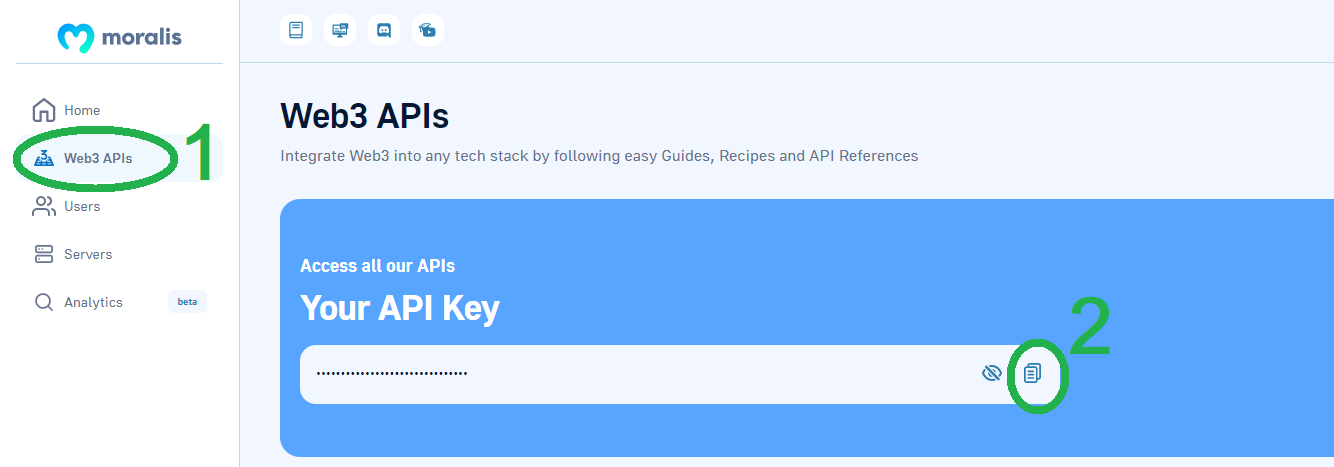
Using our credentials, we get to access our admin area. There, we can copy our Moralis Web3 API key:
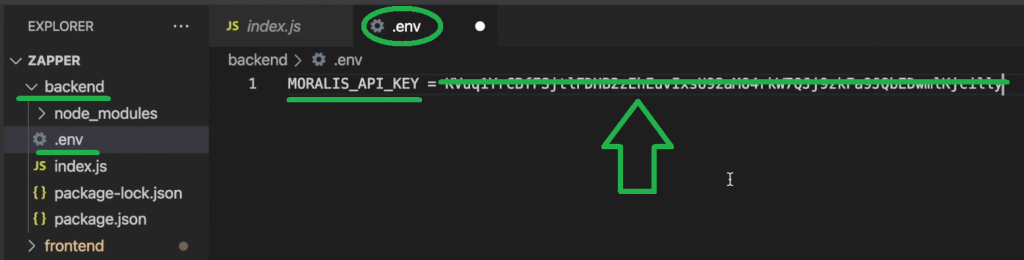
We take the above-copied API key and paste it inside the “.env” file, which we create inside the “backend” folder:
Then, we refocus on the “index.js” file, where we import Moralis and “require” the “.env” (“dotenv”) file:

Access Moralis’ EVM API Endpoints
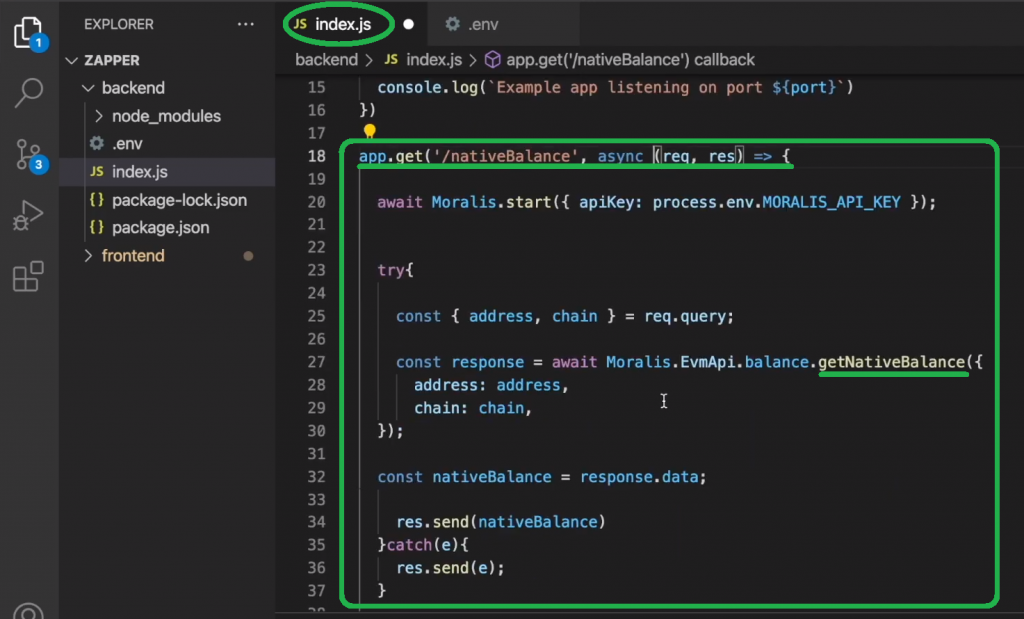
We have everything ready to start implementing Web3 API calls at this point. Furthermore, when using Moralis, you have many useful endpoints that make building a dapp on Ethereum much simpler. However, we’ll focus on getting connected wallet’s native balance, ERC-20 token balances, and NFTs. Moreover, you can find all the details regarding Moralis’ API endpoints in the Moralis documentation. For instance, here’s the “getNativeBalance” page:
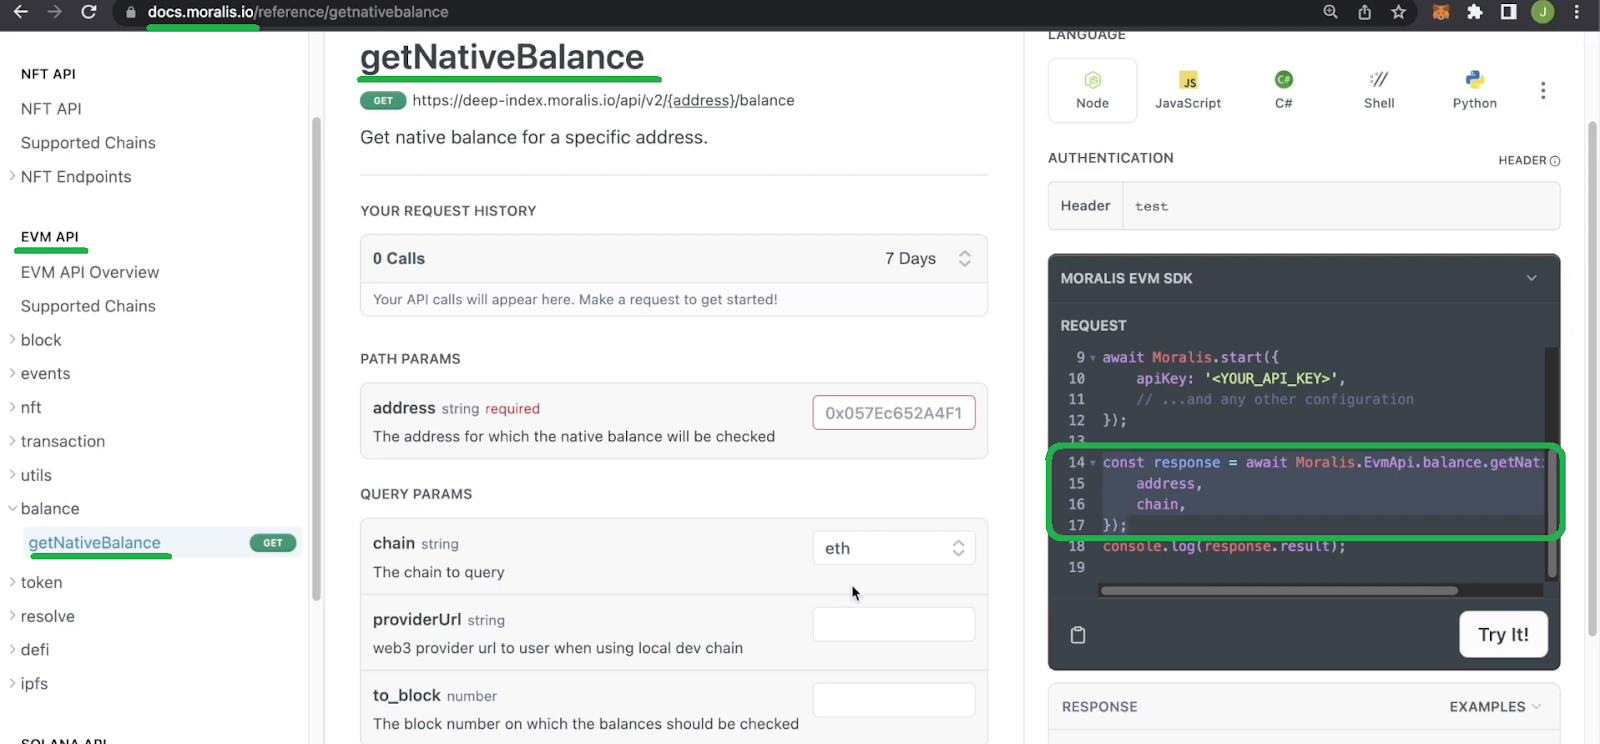
By selecting the language/framework we are using for our project, we can simply copy the required lines of code. Then we return to our “index.js” file and paste these lines of code in the right spot:
In the video below, starting at 14:24, you’ll be able to see the above endpoint in action. This is also where you’ll learn how to get the current USD value of the native balance using the “getTokenPrice” endpoint. You’ll also find out how to use a simple “if” statement to choose between two chains:

Once your backend is properly fetching on-chain data, you just need to pass it on to your frontend, just like you did for the “Hello World!” greeting (19:04). That is the essence of building dapps on Ethereum!
Adding Web3 Functionality and Frontend Styling
The video below will take you to the finish line. It will show you how to build a dapp on Ethereum from scratch, including a polished frontend. Here’s what you’ll cover along the way:
- 27:50 – Start implementing the code required to fetch and display ERC-20 balances using the “getWalletTokenBalances” endpoint.
- 40:45 – Add the necessary functionality to display the portfolio’s total USD value.
- 44:57 – Focus on implementing transfer history using the “getWalletTokenTransfers” endpoint.
- 1:06:27 – Add NFT fetching and displaying functionality using the “getWalletNFTs” endpoint.
- 1:14:21 – Use web3uikit and CSS to cover the frontend styling.
Finally, here’s the video that will teach you all the essentials to building dapps on Ethereum using NodeJS, NextJS, and Moralis:
Note: If you don’t like coding from scratch, you can access the final code on GitHub.
Test Dapp
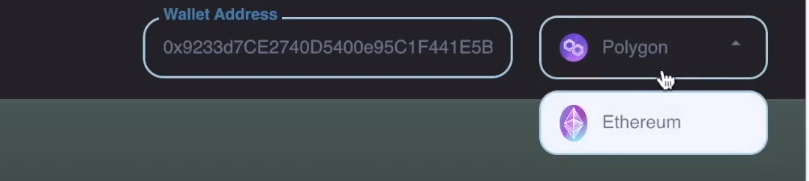
After building your dapp, you can take it for a spin and test all of its features by visiting “localhost: 3000“. If you completed all the steps above correctly, you could now explore any wallet address by pasting it in the “Wallet Address” field:

You should also be able to select between Polygon and Ethereum:
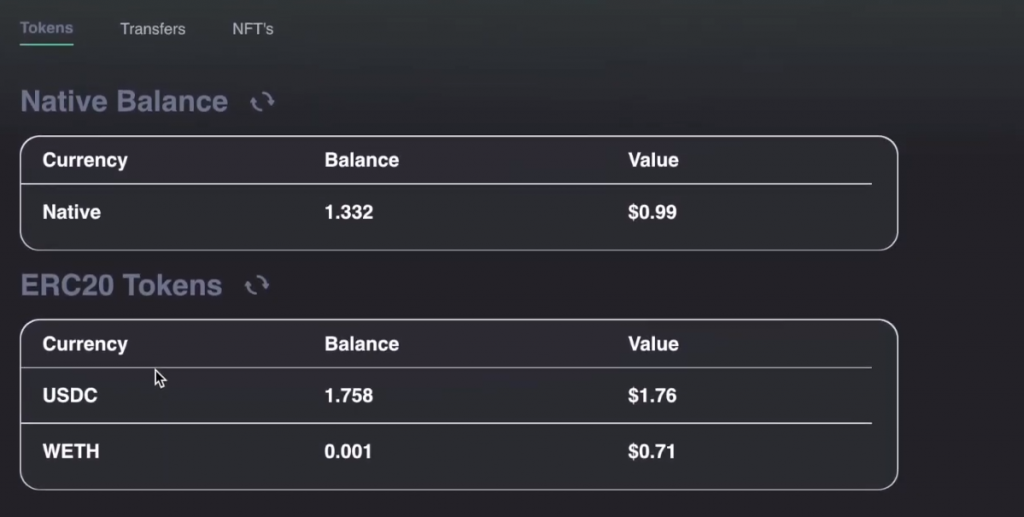
Moreover, with the two entry parameters (the wallet address and the chain) in place, you’ll be able to see that address’s native, ERC-20, and NFT balances. Furthermore, building a dapp on Ethereum following our lead should also enable you to see the portfolio’s total value:

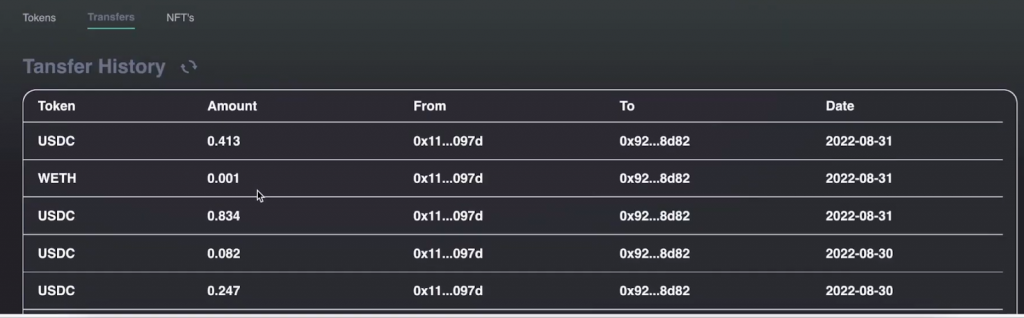
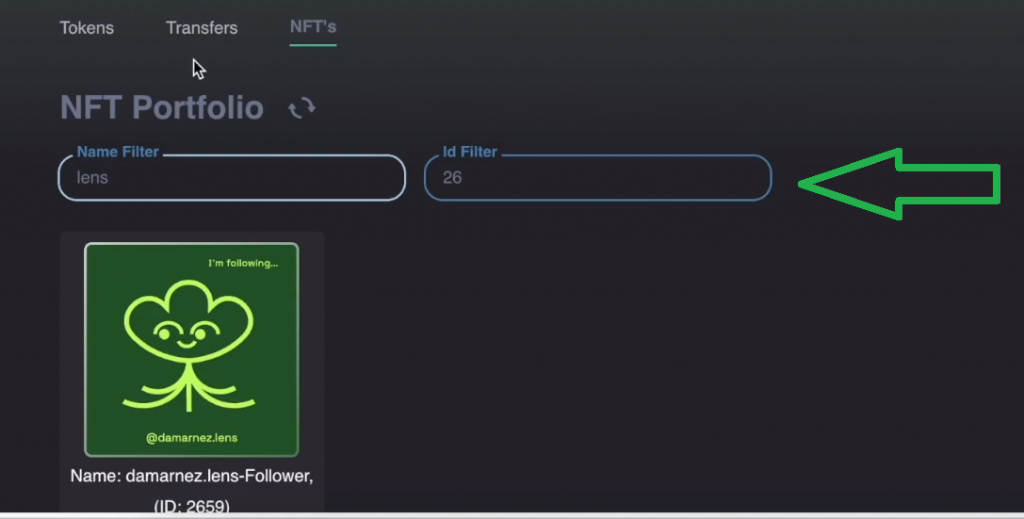
In addition, to explore the balances and transfers, you’ll be able to use the “Tokens”, “Transfers”, and “NFTs” tabs:
- ERC-20 balances example:
- “Transfers” tab example:
- “NFTs” tab example, where you can also use the “name” and “ID” filters:
Deploy Dapp
In the above dapp tutorial, we showed you what steps you need to complete when building dapps on Ethereum. If you remember, we focused on local servers, which means you can test your dapp, but users can’t reach it. So, if you are interested in building a dapp on Ethereum and making it accessible to the public, you’ll also need to deploy it. To do this, you will need a domain. This is where things also differ for truly decentralized dapps. Of course, you could use centralized domain providers and protocols; however, we encourage you to explore truly decentralized services.
So, you should obtain your domain from Ethereum Name Service (ENS). Next, you need to upload your dapp’s files to IPFS (InterPlanetary File System). For detailed step-by-step instructions on deploying your dapp in a truly decentralized manner, make sure to use docs from ENS and IPFS.
Building Ethereum Dapps – Create, Test, and Deploy: Summary
We covered quite a distance in today’s article. Before showing you how to build a dapp on Ethereum, we explained what decentralized applications on Ethereum are. Then, we did an overview of the steps involved in building Ethereum dapps. We even told you that using the Ethereum boilerplate is the easiest way to get started when building dapps on the Ethereum network. Last but not least, you had a chance to roll up your sleeves and create your own dapp following our lead.
If you enjoyed this tutorial, we encourage you to visit the Moralis YouTube channel and the Moralis blog. Some of the latest articles focus on writing a Solana smart contract, implementing blockchain-based authentication, using an Avalanche boilerplate, creating Cronos dapps, building Polygon dapps, and much more. Aside from great example projects, these outlets also explain the core concepts of dapp development. Moreover, they are great resources that can help you become a Web3 developer for free.
On the other hand, you may be interested in going full-time crypto sooner rather than later. In that case, becoming blockchain certified is the way to go. As such, make sure to consider enrolling in Moralis Academy. We recommend starting with the “Blockchain and Bitcoin Fundamentals” course.
