Do you want to create an ERC721 token? If so, pay close attention to the content presented in this tutorial, as we will show you how to create and deploy an ERC721 token in three straightforward steps. If you are eager to jump straight into the code, this is what the complete contract for our token looks like:
// SPDX-License-Identifier: MIT
pragma solidity ^0.8.0;

import "@openzeppelin/contracts/token/ERC721/ERC721.sol";

contract MNFT is ERC721 {
    constructor() ERC721("Moralis NFT", "MNFT") {
        // mint an NFT to yourself
        _mint(msg.sender, 1);
    }
}
In addition to showing you how to create and deploy a token following the ERC721 standard, the article also illustrates how to get associated token data using Moralis. As such, you will familiarize yourself with Moralis’ NFT API and the ”getContractNFTs” endpoint. Check out the get NFTs by contract documentation page for more info on this.
If you want to access these enterprise-grade blockchain development resources, remember to sign up with Moralis. You can create an account for free and try out all Moralis features in no time!

Overview
In today’s tutorial, we will show you how to create an ERC721 token in the following three steps:
- Set Up a Hardhat Project
- Build the ERC721 Contract
- Create the ERC721 Token
After completing the aforementioned steps, you will know the fundamental principles for creating any ERC721 tokens in the future. So, if this sounds exciting, join us as we cover the entire process from start to finish!
Now, unless you’ve been living under a rock for the past couple of years, odds are you haven’t missed the non-fungible token (NFT) boom in 2021. During this time, NFTs became one of the Web3 industry’s most prominent components, and even with the decline in trading volume last year, they remain an exciting prospect. That said, you might be interested in creating your own ERC721 tokens (a.k.a. NFTs). For this reason, we will take this article to teach you how to create an ERC721 token in no time! Along with showing you how to create an ERC721 token, the article illustrates how you can get NFT token data based on a contract address using Moralis. In doing so, you will learn how to use Moralis’ NFT API and the ”getContractNFTs” endpoint.
The NFT API is one of many industry-leading APIs offered by Moralis. So, if you are serious about getting into Web3 development, we recommend you check out the other APIs. For instance, explore the Auth API, enabling you to authenticate users easily with only a single line of code!
If you sign up with Moralis, you gain immediate access to these enterprise-grade development tools and can fully leverage the power of Web3 technology!

Tutorial: How to Create an ERC721 Token
In the following sections, we will show you how to create an ERC721 token using NodeJS, Hardhat, and Solidity. We will also illustrate how you can confirm the transaction and get token data using Moralis!
If this sounds exciting, join us as we cover the ins and outs of creating ERC721 tokens. If you prefer watching videos to learn, you can also check out the clip below from the Moralis YouTube channel. In this video, one of our talented software engineers walks you through the steps presented in this tutorial in more detail:
If you are unfamiliar with the ERC721 standard or just need to refresh your memory, you will find a section answering the question, ”what is an ERC721 token?” after the tutorial.
Now, without further ado, join us as we kickstart this tutorial on how to create an ERC721 token by covering the required prerequisites!
Prerequisites
Before moving forward to the central part of this article – ERC721 token creation – you need to have the following ready:
- NodeJS – Visit “https://nodejs.org/en/download/” and install NodeJS.
- MetaMask – Go to “metamask.io” and set up a Web3 wallet.
- QuickNode – Create a QuickNode account.
Step 1: Set Up a Hardhat Project
We will kickstart this tutorial on how to create an ERC721 token by showing you how to set up the fundamental project. As such, open a new terminal and create a new directory using the command below:
mkdir PROJECT_NAME
From there, ”cd” into the project folder:
cd PROJECT_NAME
Next, initialize a new “npm” project:
npm init -y
With the ”npm“ project initialized, install the “dotenv” dependencies:
npm i dotenv
From there, install Hardhat and the associated dependencies:
npm install --save-dev hardhat @nomicfoundation/hardhat-toolbox
Next, create a new Hardhat project using the following terminal input:
npx hardhat
Running the command above prompts your terminal, and you can choose to create a JavaScript project:
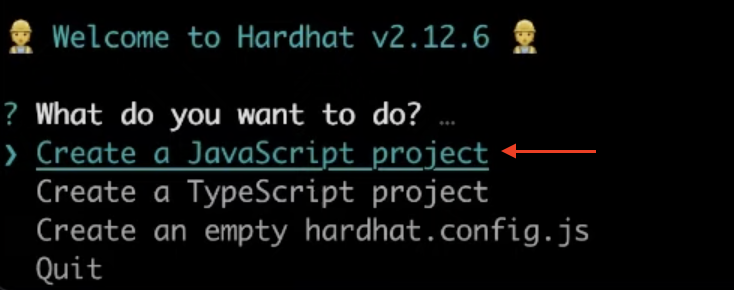
If everything worked, you should now see a success message in your terminal:
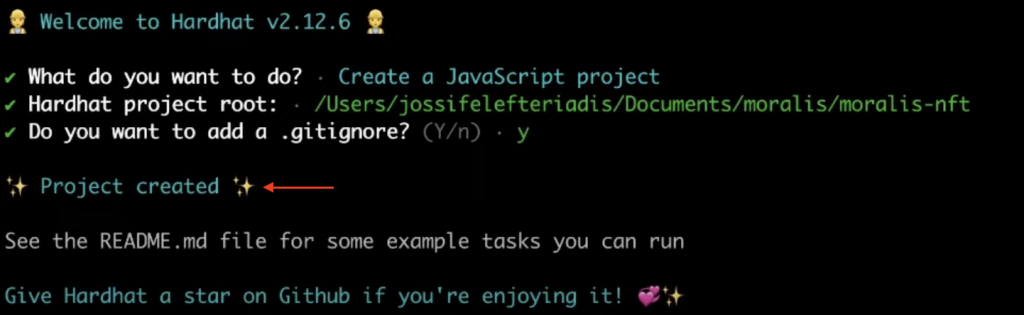
Lastly, in this tutorial on creating ERC721 tokens, we will use OpenZeppelin. As such, install the dependencies with this command:
npm install @openzeppelin/contracts
Step 2: Build the ERC721 Contract
After setting up the project, open the directory in your preferred integrated development environment (IDE). We will be using Visual Studio Code (VSC), and you should find yourself with a file structure similar to the one below:
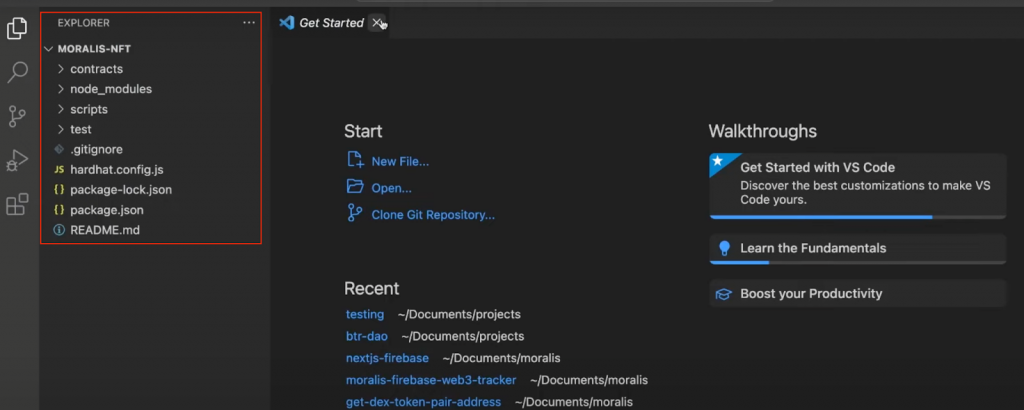
From there, open the ”contracts” folder and remove the example contract:

Next, create a new ”.sol” file in the ”contracts” folder, which is where you will add the contract code itself. In our case, we will name the file ”MNFT.sol”.
First, specify what version of Solidity you want to use. To do so, add the following code snippet at the top of the file:
// SPDX-License-Identifier: MIT
pragma solidity ^0.8.0;
Next, import the OpenZeppelin ERC721 token standard:
import "@openzeppelin/contracts/token/ERC721/ERC721.sol";
Lastly, add the custom code for the contract itself:
contract MNFT is ERC721 {
    constructor() ERC721("Moralis NFT", "MNFT") {
        // mint an NFT to yourself
        _mint(msg.sender, 1);

    }
}
On the first line, we provide a name and specify that the contract is an instance of the ERC721 token standard. Next, we define a constructor, which is a function that automatically executes when deploying the contract. Within the constructor, there is another constructor taking two parameters: the token name and symbol.
Finally, we add the ”_mint” function, which takes two parameters. The first ”msg.sender” parameter specifies that the one deploying the contract receives the token. The second parameter determines the number of tokens that will be created.
All in all, your contract file should now look something like this:
// SPDX-License-Identifier: MIT
pragma solidity ^0.8.0;

import "@openzeppelin/contracts/token/ERC721/ERC721.sol";

contract MNFT is ERC721 {
    constructor() ERC721("Moralis NFT", "MNFT") {
        // mint an NFT to yourself
        _mint(msg.sender, 1);

    }
}
Lastly, open a new terminal, ”cd” into the project folder, and compile the contract by running this command:
npx hardhat compile
Step 3: Create the ERC721 Token
Not only will the last step of this tutorial illustrate how to create the ERC721 token, but it will also show you how to deploy it. To do so, open the ”deploy.js” file and replace its contents with the following snippet:
const { ethers } = require("hardhat");

async function main() {

  const nftContract = await ethers.getContractFactory("MNFT");

  const deployedNFTContract = await nftContract.deploy();

  await deployedNFTContract.deployed();

  console.log("NFT Contract Address:", deployedNFTContract.address);

}

main()

  .then(() => process.exit(0))

  .catch((error) => {

    console.error(error);

    process.exit(1);

  });
On the initial line, we require ethers.js from Hardhat. Next, we define ”main()”, where we first call the ”getContractFactory()” function using the token symbol. From there, we call the ”deploy()” function and wait for it to finish. Finally, we log the contract address.
Next, you must create a new ”.env” file in the project’s root folder. For this file, you need to add two environment variables:
QUICKNODE_HTTP_URL=”REPLACE_ME”

PRIVATE_KEY=”REPLACE_ME”
For the first one, replace ”REPLACE_ME” with a QuickNode URL, and for the second, add your MetaMask’s private key.
Once done configuring the environment variables, let us open the ”hardhat.config.js” file. From there, replace the contents of this file with the code down below:
require("@nomicfoundation/hardhat-toolbox");

require("dotenv").config({ path: ".env" });

const QUICKNODE_HTTP_URL = process.env.QUICKNODE_HTTP_URL;

const PRIVATE_KEY = process.env.PRIVATE_KEY;

module.exports = {

  solidity: "0.8.9",

  networks: {

    goerli: {

      url: QUICKNODE_HTTP_URL,

      accounts: [PRIVATE_KEY],

    },

  },

};
Here, we start by importing the libraries installed during the second step and the environment variables. What’s more, through ”module.exports”, we deploy the contract.
Finally, all that remains from here is running the code to deploy the contract to the Goerli testnet by executing the command below in the terminal:
npx hardhat run scripts/deploy.js --network goerli
That’s it; congratulations! You have now created your very own ERC721 token in just three straightforward steps! From here, you can follow the same process for creating more ERC721 tokens in the future.
If you experienced trouble during this walkthrough at any point, check out the video at the top of the tutorial. You can also find the code for this project in the GitHub repository below:
Complete Create an ERC721 Token Documentation – https://github.com/MoralisWeb3/youtube-tutorials/tree/main/moralis-erc721-token
Beyond Creating ERC721 Tokens – Get Token Data Using Moralis
When you create the ERC721 token through the steps of this tutorial, you will receive the contract address as a response. From there, you can use the address to confirm the transaction and get data associated with the token, and the easiest way to do so is with Moralis’ NFT API and the ”getContractNFTs” endpoint.
If this sounds interesting, you can try it out directly in your browser by visiting the get NFTs by contract documentation page. This will take you to the following page:
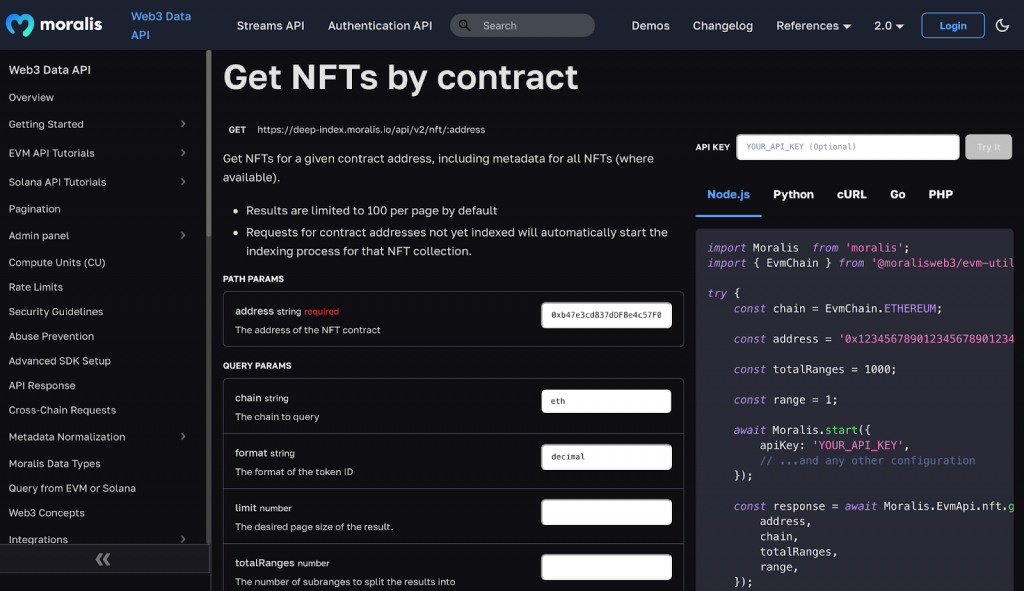
To the left, you will find a bunch of input fields. In this case, you can input the contract address and select the chain to which you deployed the contract:
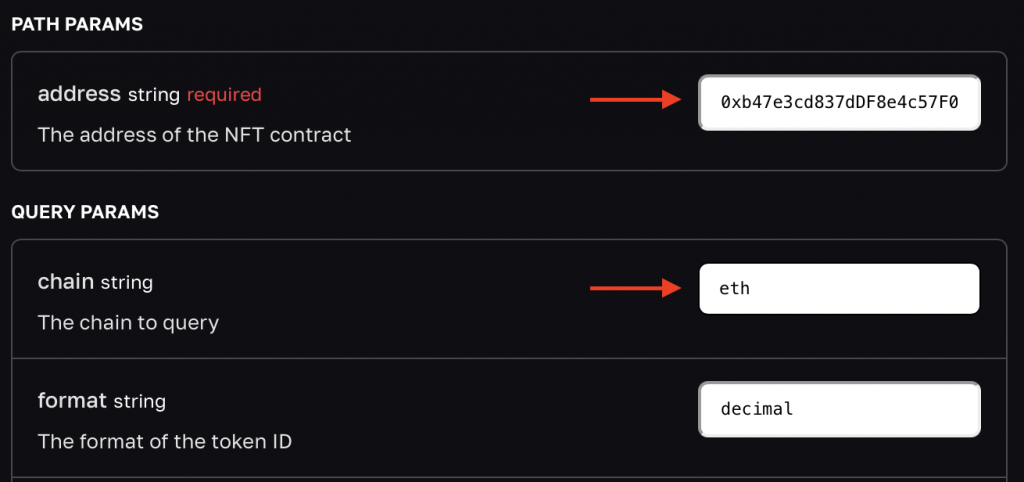
Next, press ”Try It” at the top right, which will execute the code below using your parameters:

In return, you will receive a response looking something like this :
{

  "total": 1,

  "page": 0,

  "page_size": 100,

  "cursor": null,

  "result": [

    {

      "token_hash": "aa9c01b4eda16cc12774e2c4256fee1f",

      "token_address": "0x900c08fd7ac99dd530558386886a67c756322c0b",

      "token_id": "1",

      "block_number_minted": "8298496",

      "amount": "1",

      "contract_type": "ERC721",

      "name": "Moralis NFT",

      "symbol": "MNFT",

      "token_uri": null,

      "metadata": null,

      "last_token_uri_sync": "2023-01-12T11:44:23.074Z",

      "last_metadata_sync": null,

      "minter_address": "0x449b02452b6d6af4d630bd69fa1f53be7bdff774"

    }

  ]

}
As you can see, you get a lot of information, such as the token address, token ID, contract type, etc. Moreover, you can easily implement this endpoint into your projects if you are planning to build an NFT-related platform. If you want to learn more about how this works, check out our guide on how to get all NFTs from a contract.
In addition, if you are serious about NFT development, we recommend our tutorial on how to get all NFTs owned by a wallet. This tutorial explains how you can query all NFTs a wallet holds based on its address!
What is an ERC721 Token?
In short, an ERC721 token is a token implementing the ERC721 standard. Accordingly, to adequately answer the question in this section’s title, we must start by exploring the ERC721 standard. So, what is the ERC721 standard?
ERC721 is an Ethereum standard for smart contracts and non-fungible tokens (NFTs). The standard ensures that tokens originating from an ERC721 contract implement a minimum standard interface. Therefore, the ERC721 standard, for instance, ensures the following:
- It is possible to query a token’s balance
- A token is tradable between accounts
- Anyone can fetch the total supply of a token
Along with these features, a contract needs to implement certain methods and events to be considered an ERC721 contract. You can read more about these events and methods in our guide explaining ERC721 smart contacts further.
Even though the ERC721 standard was initially created for the Ethereum ecosystem, it is not exclusively limited to this network. ERC721 is generally a common NFT standard on all Ethereum Virtual Machine-compatible (EVM) blockchain networks.
When Was ERC721 Created?
ERC is an abbreviation for ”Ethereum Request for Comments”. Furthermore, various ERC proposals are used to suggest protocol updates or new standards for the Ethereum network. The number ”721” simply indicates that this was comment number 721, which is an indication of when the standard was introduced.
However, to be more specific, ERC721 was proposed by William Entriken, Jacob Evans, Dieter Shirley, and Nastassia Sachs in January 2018.
Other ERC Tokens
ERC721 is not the only token standard out there. Two other prominent examples are ERC20 and ERC1155:
- The ERC20 Standard – Unlike ERC721, ERC20 is a standard for fungible tokens. A great example of a token implementing the ERC20 standard is ETH, which is the native currency of Ethereum. You can read more about the standard in the following article: “What are ERC20 Contracts?”.
- The ERC1155 Standard – ERC1155 targets fungible, semi-fungible, and non-fungible tokens, making it somewhat more dynamic. If you want to read more about this standard, check out our guide answering the question, ”what is the ERC-1155 standard?”.
Additionally, if you want to explore the differences between the ERC721 and ERC1155 standards, check out our article on ERC721 vs ERC1155!
Summary – How to Create an ERC721 Token
In this article, we taught you how to create an ERC721 token in just three steps:
- Set Up a Hardhat Project
- Build the ERC721 Contract
- Create the ERC721 Token
If you have followed along this far, you should have no trouble creating ERC721 tokens in the future!
If you found this tutorial helpful, consider checking out more content here on the Web3 blog. For instance, read about the best Ethereum faucet, learn what a Polygon Mumbai faucet is, or explore the intricacies of danksharding.
In addition, if you want to become a Web3 developer yourself, check out Moralis Academy. The academy offers excellent courses for new as well as more experienced developers. If you are new to the space, you can, for example, check out the following course: ”Ethereum 101”.
Lastly, if you want to build your own Web3 projects, remember to sign up with Moralis. By registering, you gain immediate access to the Web3 APIs, enabling you to fully leverage the power of blockchain technology. In doing so, you can build dapps and other Web3 projects smarter and more efficiently!
