To fetch NFTs from a contract and present them to users is a basic yet essential task developers must know how to do. With the following endpoint from Moralis, a developer can easily get all NFTs from contract:
const response = await Moralis.EvmApi.nft.getContractNFTs({
With the endpoint above, you’ll get non-fungible tokens for a given contract address, including metadata for all available NFTs. If you’re an experienced dev wanting to get going right away, first make sure to sign up with Moralis, and you can then visit the documentation page and get going right away! However, if you want to see a step-by-step process of implementing and completing the entire file for the above code snippet, read on!
Overview
During the last bull market, numerous NFT-related projects emerged, including NFT-gated websites, marketplaces, etc. Now, there is an increasing number of use cases and various utility features developers have discovered for these tokens. As such, now’s the best time to learn how to easily build all sorts of decentralized applications (dapps) around these kinds of tokens. With that said, a great place to start is a neat NFT explorer – a dapp that enables you to get all NFTs from contract. While this task might sound challenging, it is quite a straightforward process when you use the right tools.
Thanks to Moralis’ ultimate NFT API and its “getContractNFTs” endpoint, you can have a fully functional NFT explorer up and running in minutes, which is exactly what you’ll learn in the final stage of today’s article. However, before we can focus on showing you how to get all NFTs from contract the easy way, we need to cover some basics. Thus, we’ll first ensure you know what NFTs and smart contracts are and how they are related. Next, we’ll look closely at the most important NFT development tools. Finally, before inviting you to roll up your sleeves, we’ll also ensure you get acquainted with Moralis’ “getContractNFTs” endpoint. After all, the latter will do all the hard work for you in the backend if you decide to complete this tutorial. Moreover, in that case, you’ll also need your free Moralis account.
Exploring NFTs and Smart Contracts
Non-fungible tokens, or NFTs, are unique kinds of crypto assets. As the “non-fungible” word illustrates, these tokens are not interchangeable. After all, each NFT has unique encryption (on-chain signature). Consequently, this property makes NFTs great for all sorts of use cases that involve uniqueness. Furthermore, this is why digital art and digital collectibles are the most obvious applications of non-fungible tokens. However, NFTs have much greater potential – they can help create a more transparent, just, and trustless future. After all, NFTs are perfect for all sorts of ownership proofs and certifications. Hence, they can revolutionize both the digital and the real world when implemented properly.
As with fungible tokens, smart contracts also play a vital role in creating (minting) NFTs. These pieces of software with predefined conditions and actions existing on-chain are essential pieces of the puzzle. As such, there is a smart contract behind every NFT. Of course, it depends on the type of NFT and how many NFTs are actually governed by a particular smart contract. For instance, on the Ethereum network and other EVM-compatible chains, ERC-721 and ERC-1155 NFT smart contracts run the show.
Smart contracts also include essential and optional details about the NFT(s). These details come in the form of metadata. In addition, links to NFT files (such as PNGs, JPEGs, MP3s, PDFs, etc.) are also contained inside the metadata files.
Finally, once the NFT smart contracts are deployed, they can automatically initiate the minting process of NFTs or offer a “cold” minting functionality. The latter enables minting at later times. To learn more about different NFT standards and the mining processes, make sure to explore the Moralis blog.
NFT Development Tools
As mentioned above, digital files, such as images, are files represented by NFTs. It’s important to keep in mind that the files themselves are no different than any other files. The real value of NFTs is in their encryption, hidden in the backend. Thus, when we talk about NFT development tools, we focus on the minting process and the tools that enable the development of NFT dapps.
So, if you were to mint your own NFTs, you’d need to have “NFT-representing” files and corresponding metadata files (JSON) ready. Moreover, you can always use NFT development tools to build dapps utilizing existing NFTs. That said, it’s important to create a proper plan when you want to create an NFT project.
The following are the most necessary NFT development tools that can help you tackle all sorts of NFT projects:
- Building and Testing NFT Dapps:
- Legacy dev tools
- Moralis (Web3 APIs, including the NFT API) – this is the simplest way to get all NFTs from contract
- Web3 wallets
- NFT Files and Metadata Storing:
- Decentralized storage solutions (e.g., IPFS)
- NFT Minting on EVM-Compatible Chains:
- EVM-compatible Web3 wallets
- Solidity or Viper to create EVM-compatible smart contracts
- OpenZeppelin to get verified smart contract templates
- The Remix IDE and Hardhat platform to compile, deploy, and verify smart contracts
- NFT Minting on Solana:
- Metaplex’s Candy Machine
- Rust for projects that may require unique on-chain Solana programs
- A Solana wallet (e.g., Phantom)
Get All NFTs from Contract – The “getContractNFTs” Endpoint
In the next section, you will have a chance to get your hands dirty and create your own NFT explorer dapp. Since Moralis’ “getContractNFTs” endpoint will play the main role, you must learn more about it before actually using it. Furthermore, this endpoint enables you to get all NFTs from contract, including metadata for all NFTs for a given smart contract. Moreover, since the endpoint is limited to presenting 100 results per page, you need to use the cursor parameter to get more than 100 NFTs.
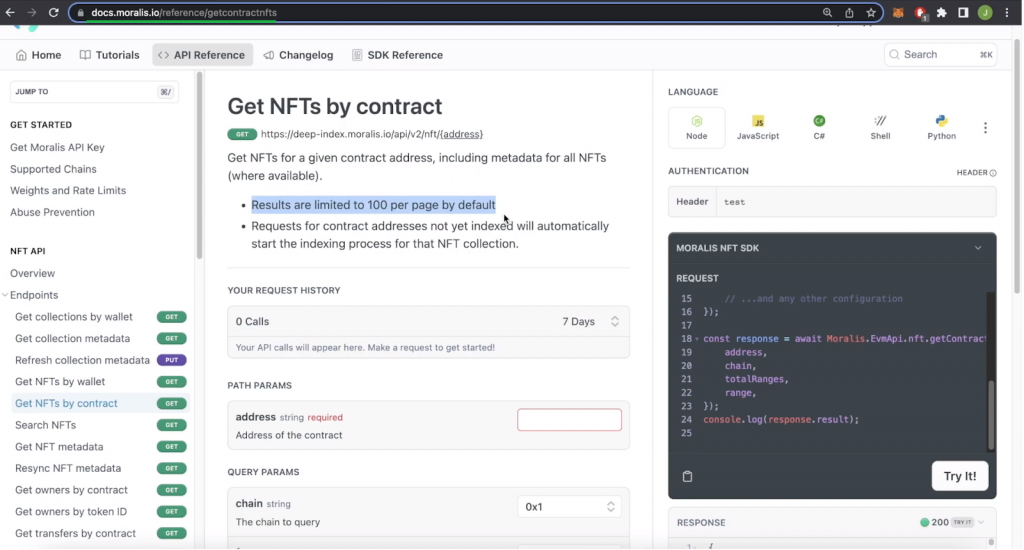
The above screenshot shows the “Get NFTs by contract” documentation page. This is the place where you can explore this endpoint’s details and even copy the code you need. Moreover, the “getContractNFTs” endpoint takes in the following parameters:
- “address“ – Here, you need to provide an NFT smart contract address. This is the only required parameter (all other parameters are optional).
- “chain“ – You can determine which programmable chain to focus on (Moralis supports all leading Web3 networks).
- “format“ – You can determine what type of token ID format you want to work with.
- “limit“ – You can set the desired page size of the result.
- “totalRange“ – You can determine the number of subranges to split the results into.
- “range“ – You can set the desired subrange to query.
- “cursor“ – This parameter enables you to get to the next page.

How to Get All NFTs from Contract – Step-by-Step Guide
In today’s tutorial, we’ll focus on using NodeJS. As such, we’ll create a simple NodeJS backend dapp that will get all NFTs from contract using the “getContractNFTs” endpoint. However, before we look at the code, let’s show you what you’ll be building.
An Example Dapp Enabling You to Get All NFTs from Contract – Demo
If you look at the above image, you can see all the input fields our example NFT explorer dapp offers. As such, you can see that in order to use the “Get NFTs” button, we need to provide a smart contract address and select the matching chain. Here are the results we see for an example NFT collection (“Cool Cats”) on Ethereum:

Looking at the above screenshot, you can see that the “Get NFTs” button returns twenty NFTs. However, our dapp also includes the “Load More” button that loads an additional twenty NFTs every time we click on it.
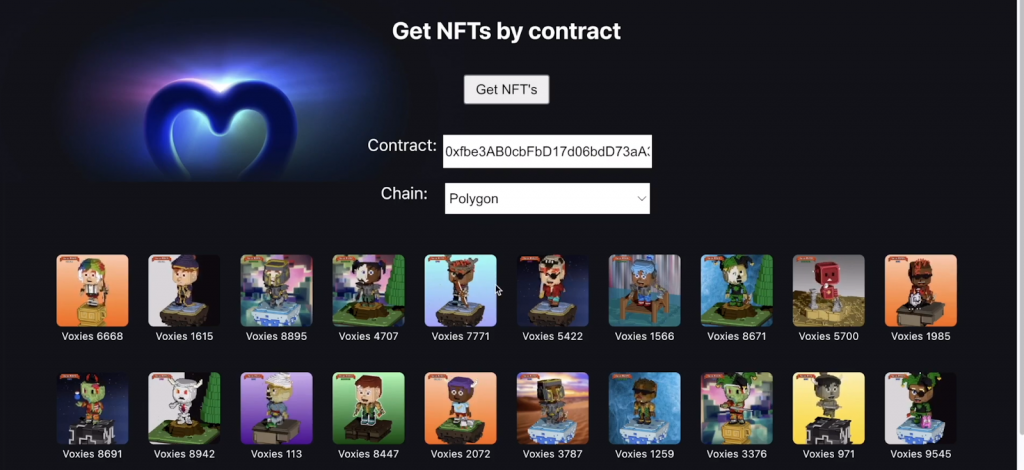
Furthermore, here’s another example (“Voxies” NFTs) on a different chain (Polygon):
If you want to build your own instance of such a great NFT explorer dapp, follow the steps below.
Step 1: Create a NodeJS Backend Dapp
Note: If this is your first time creating a NodeJS application, make sure to use the “Using NodeJS” page in Moralis’ docs. This is where you’ll learn how to install the required dependencies and set up and run an Express server that will start the “index.js” file.
At this point, you should have a basic NodeJS application ready and running on an Express server. Hence, you can focus on creating a proper “index.js” script that will do the heavy lifting on the backend. So, start by defining the required constants at the top of the file:
const express = require("express");
const Moralis = require("moralis").default;
const app = express();
const cors = require("cors");
const port = 3000;
Next, add these two lines of code to use “cors” and “express”:
app.use(cors());
app.use(express.json());
Finally, you get to create the “get” endpoint for all NFTs, and this is where you’ll use the “getContractNFTs” endpoint to get all NFTs from contract. Ultimately, these are the lines of code that will also check for the cursor parameter in case users want to load more NFTs:
app.get("/allNft", async (req, res) => {
  try {
    const { query } = req;

    let NFTs;

    if (query.cursor) {
      NFTs = await Moralis.EvmApi.nft.getContractNFTs({
        address: query.address,
        chain: query.chain,
        cursor: query.cursor,
        limit: 20,
      });
    } else {
      NFTs = await Moralis.EvmApi.nft.getContractNFTs({
        address: query.address,
        chain: query.chain,
        limit: 20,
      });
    }

    const result = NFTs.raw;

    return res.status(200).json({ result });
  } catch (e) {

    console.log(e);
    console.log("something went wrong");
    return res.status(400).json();

  }
});
As you can see, the above lines of code also ensure that the “getContractNFTs” endpoint gets its parameters from the client side (as demonstrated previously). As far as the cursor goes, the latter will be connected to the “Load More” button.
Step 2: Obtain Your Moralis API Key
Every time you run your “index.js” file, you want to start your dapp. However, before you do that, you want to initiate Moralis. These are the lines of code that will take care of that:
Moralis.start({
  apiKey: "MORALIS_API_KEY",
}).then(() => {
  app.listen(port, () => {
    console.log(`Listening for API Calls`);
  });
});
By looking at the lines of code above, you can see the “MORALIS_API_KEY” placeholder. You need to replace the latter with your actual Moralis Web3 API key. As such, log in to your Moralis account to access your admin area. From there, you’ll get to go to the “Web3 APIs” page and copy your API key:

By pasting your Web3 API key in place, you should have your backend ready:

Nonetheless, you can access the complete “index.js” script for your backend on GitHub.
Step 3: Create a ReactJS Frontend Dapp
Since you probably have some experience with creating JavaScript applications, you shouldn’t have any problems creating the above-demonstrated frontend. However, to ensure that you get it right, we made the required scripts available on GitHub. As such, use our repo to have your frontend ready in record time. Then, you’ll be able to explore the details of the “App.js” file, which is the core of our dapp’s client side. Furthermore, it is the “fetchNFTs” function that fetches the entered smart contract address and selected chain:
  async function fetchNFTs() {
    let res;
    if (cursor) {
      res = await axios.get(`http://localhost:3000/allNft`, {
        params: { address: address, chain: chain, cursor: cursor },
      });
    } else {
      res = await axios.get(`http://localhost:3000/allNft`, {
        params: { address: address, chain: chain },
      });
    }
Last but not least, you can gain additional insight into the code and functionalities of our example dapp in the video below, starting at 4:10. This is where our in-house expert first covers the gist of the backend. Then, starting at 5:51, you can review the “App.js” file. Nonetheless, you can also see how to explore the functionality of your finished dapp using your browser’s console (7:02). Finally, starting at 9:24, you can learn how to effortlessly change the number of NFTs displayed per query.
How to Get All NFTs from Contract – Summary
In today’s article, you had an opportunity to learn about the basics of NFTs and smart contracts. As such, you now know that smart contracts are responsible for minting NFTs. We also covered the main NFT development tools. Then, you learned about the power of Moralis’ “getContractNFTs” endpoint. Finally, you had a chance to roll up your sleeves and follow our lead building an example NFT explorer dapp. Accordingly, you now know how to easily get all NFTs from contract.
If you enjoyed today’s tutorial, we encourage you to use the Moralis docs and tackle other example projects. In case you want to continue your NFT programming journey, you should focus on the “NFT API” section. On the other hand, you can explore other possibilities that the Moralis Web3 API provides. Also, make sure to use the Moralis YouTube channel and our blog to expand your blockchain development knowledge. Some of our latest articles revolve around what a Web3 provider is, how Web3 for business works, a demonstration of a Web3 JS tutorial, building a Web3 Unity multiplayer game, and much more.
Additionally, you may be interested in landing an incredible job in the crypto sector. If so, becoming blockchain-certified can significantly improve your odds. This is where Moralis Academy enters the picture. There you can find many blockchain development courses, including the one that will teach you how to build an NFT marketplace. Moreover, Moralis Academy is also the place to get expert mentorship, a personalized study path, and become a member of one of the industry’s most advancing communities.
