Uploading files to IPFS is a straightforward process, thanks to Moralis’ enterprise-grade Web3 APIs. If you want to upload files to IPFS, read on as we explain step by step how to set up the complete “upload.js” file so you can utilize the following Moralis endpoint:
const response = await Moralis.EvmApi.ipfs.uploadFolder({
If you already possess solid development skills and don’t feel the need to have the implementation process demonstrated, feel free to access the documentation page immediately for the above endpoint and get started right away. Access it by simply clicking on the following button:
Overview
The conventional web most people are familiar with exists on centralized servers, which are accessible through location-based addressing. However, the centralized aspect of the traditional internet comes with potential issues, such as single points of failure. Consequently, servers are prone to hacks or crashes, making information and data unavailable to users. This is where IPFS (InterPlanetary File System) enters the picture. IPFS is a leading distributed P2P (peer-to-peer) storage network with the potential to remove some of the issues associated with the traditional web storage system. The potential of IPFS is huge, which is why this article illustrates how to upload files to IPFS with Moralis!
Thanks to Moralis’ excellent Web3 APIs, it is possible to upload files to IPFS seamlessly. More specifically, this guide uses Moralis’ ”upload folder” endpoint to demonstrate the process in three simple steps:
- Creating a File and Initializing Moralis
- Defining an Array of Files
- Upload Files to IPFS
In combination with the “upload folder” endpoint, Moralis offers other great tools to aid your development endeavors. An excellent example is the recently launched Web3 Streams API. This API allows you to stream on-chain data into the backend of your Web3 projects through Web3 webhooks!
Nevertheless, if you want to upload files to IPFS in an accessible way or create sophisticated Web3 projects, sign up with Moralis immediately. Creating an account is free, and you will receive immediate access to Moralis’s various APIs!
What is IPFS?
Before illustrating how to upload files to IPFS, this initial part will explore the intricacies of IPFS. If you are already familiar with the system, feel free to skip this initial section and jump straight ahead to the “Upload Files to IPFS with Moralis” section!
IPFS is an abbreviation for ”InterPlanetary File System”. Further, it’s a distributed system for uploading, storing, and accessing websites, applications, data, and files. Moreover, this P2P (peer-to-peer) hypermedia protocol is developed by the organization Protocol Labs with the purpose of preserving and growing humanity’s knowledge. IPFS achieves this by making the web resilient, upgradeable, and open.
Since IPFS is a P2P file-sharing protocol, it enables users to host and access content in a decentralized manner. Within the protocol, user operators host a portion of the overall data, creating a unique and innovative system for storing and sharing files or other content. Instead of being location-based, which the traditional HTTP system is, IPFS utilizes a content-addressing strategy. Consequently, IPFS users can find any file, website, data, etc., based on its contents rather than location.
Within the IPFS ecosystem, all pieces of content have a unique CID (content identifier), which is a hash. As such, to find specific data, IPFS utilize cryptographic hashes unique to the requested content. Moreover, IPFS does not only use content addressing for identifying content but also linking it together. Nevertheless, later, this article further explores the intricacies of how IPFS works in the ”How Does IPFS Work?” section.
With a more profound understanding of IPFS and the system’s basics, it is time to explore how to upload files to IPFS with Moralis!
Upload Files to IPFS with Moralis
It is time to delve deeper into the main section of this guide and explore how to upload files to IPFS. So, to make the process as accessible as possible, this article will illustrate how to store files using Moralis. Also, as mentioned earlier, we’ll utilize Moralis’ ”upload folder” endpoint, allowing you to upload files to IPFS seamlessly! Although we looked at the steps earlier, let’s remind ourselves of this tutorial’s three-step process:
- Creating a File and Initializing Moralis
- Defining an Array of Files
- Upload Files to IPFS
If you follow the steps above, you can easily upload files to IPFS in minutes! However, if you rather watch a quick Moralis YouTube video covering the intricacies of IPFS and outlining the process of uploading files, check out the clip below:
Step 1: Creating a File and Initializing Moralis
To begin with, you can go ahead and open your preferred IDE (integrated development environment) and create a new JS (JavaScript) file. In our case, we are using the VSC (Visual Studio Code) and naming the file ”upload.js”.
With a file at your disposal, you need to initiate a new instance of Moralis. This is relatively straightforward, and you can add the following contents to your file:
const Moralis = require("moralis").default;
const fs = require("fs");

async function uploadToIpfs() {

    await Moralis.start({
        apiKey: "MORALIS_API_KEY",
    });
}
However, you will need to add your Moralis API key to the snippet above by replacing ”MORALIS_API_KEY”. To acquire the key, you need a Moralis account. So, if you have not already, sign up with Moralis immediately. Creating an account only takes a couple of seconds and is entirely free!
Nevertheless, once you log in and find yourself at the Moralis admin panel, you should be able to find the API key by clicking on ”Account” to the left and navigating to the ”Keys” tab, which should take you to the following page where you can find the Web3 API key:
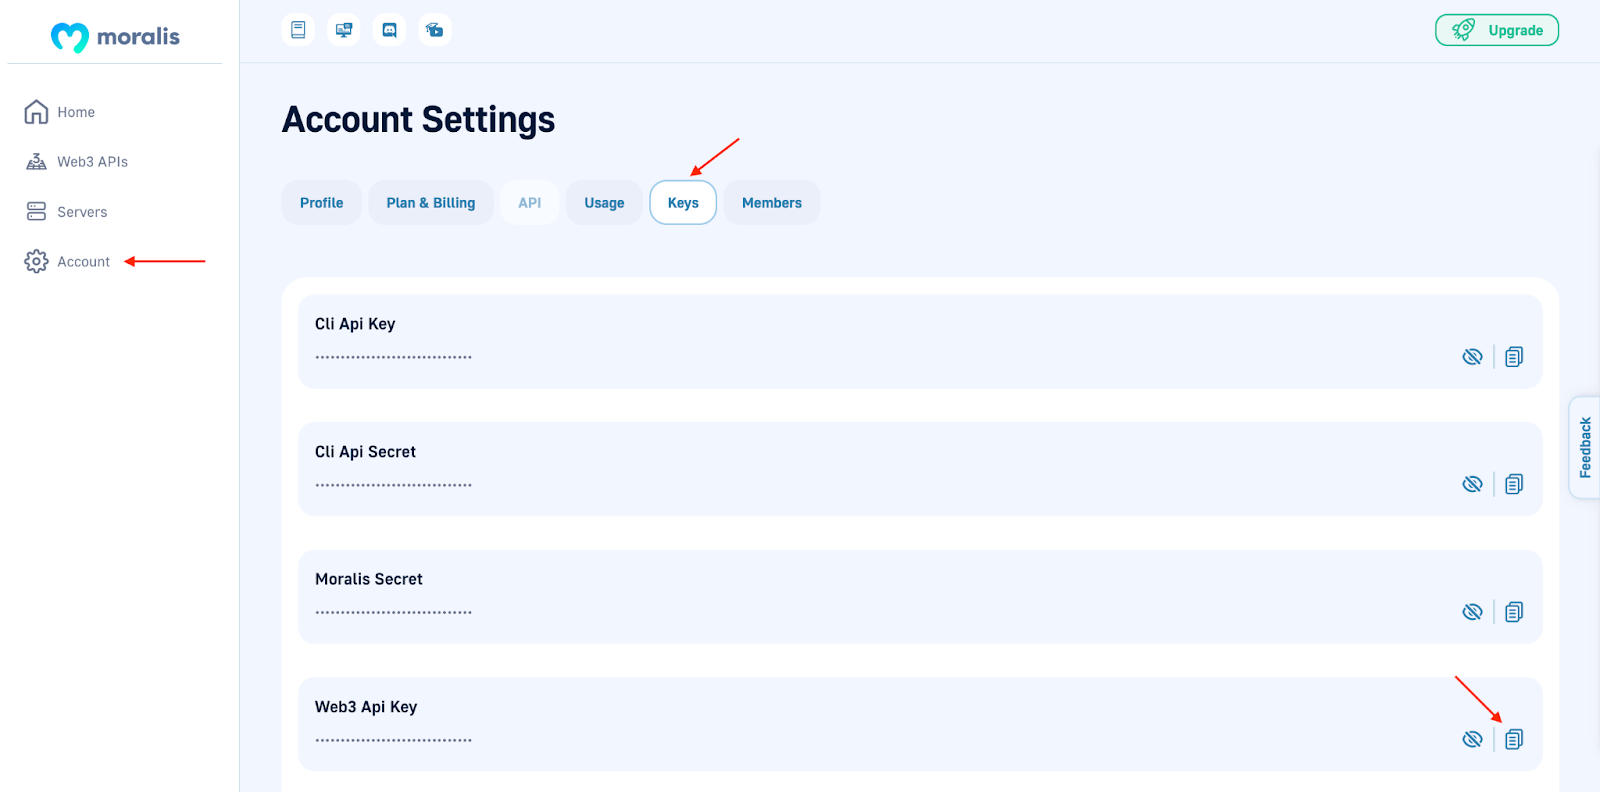
From there, you will need to copy the key and replace ”MORALIS_API_KEY” within the code!
Step 2: Defining an Array of Files
Now that you have initialized a new instance of Moralis, you must define an array of files you wish to upload to IPFS. In doing so, you must define a path to store the file and the content you want to upload. It should look something like this:
const uploadArray = [
        {
            path: "cat.png",
            content: fs.readFileSync('./Cat.png', {encoding: 'base64'})
        },
        {
            path: "favResturants.json",
            content: {
                one: "Red Lobster",
                two: "Chipotle",
                three: "Chic-Fil-A"
            },
        },
    ];
Use the structure above and add the code with your particular configurations following the initialization of the Moralis instance. Furthermore, as the snippet above illustrates, you have the option to add the contents for the array in either Base64 or JSON format!
Step 3: Upload Files to IPFS
All that remains is to fire up Moralis’ ”upload folder” endpoint and pass the file array as a parameter:
const response = await Moralis.EvmApi.ipfs.uploadFolder({
        abi: uploadArray,
    });
From there, you can add the code below to log the response, which provides the IPFS content identifiers when you eventually call the endpoint:
console.log(response.result)
Nevertheless, this should be the complete code of the ”upload.js” file:
const Moralis = require("moralis").default;
const fs = require("fs");

async function uploadToIpfs() {

    await Moralis.start({
        apiKey: "MORALIS_API_KEY",
    });

    const uploadArray = [
        {
            path: "cat.png",
            content: fs.readFileSync('./Cat.png', {encoding: 'base64'})
        },
        {
            path: "favResturants.json",
            content: {
                one: "Red Lobster",
                two: "Chipotle",
                three: "Chic-Fil-A"
            },
        },
    ];

    const response = await Moralis.EvmApi.ipfs.uploadFolder({
        abi: uploadArray,
    });

    console.log(response.result)
}

uploadToIpfs();
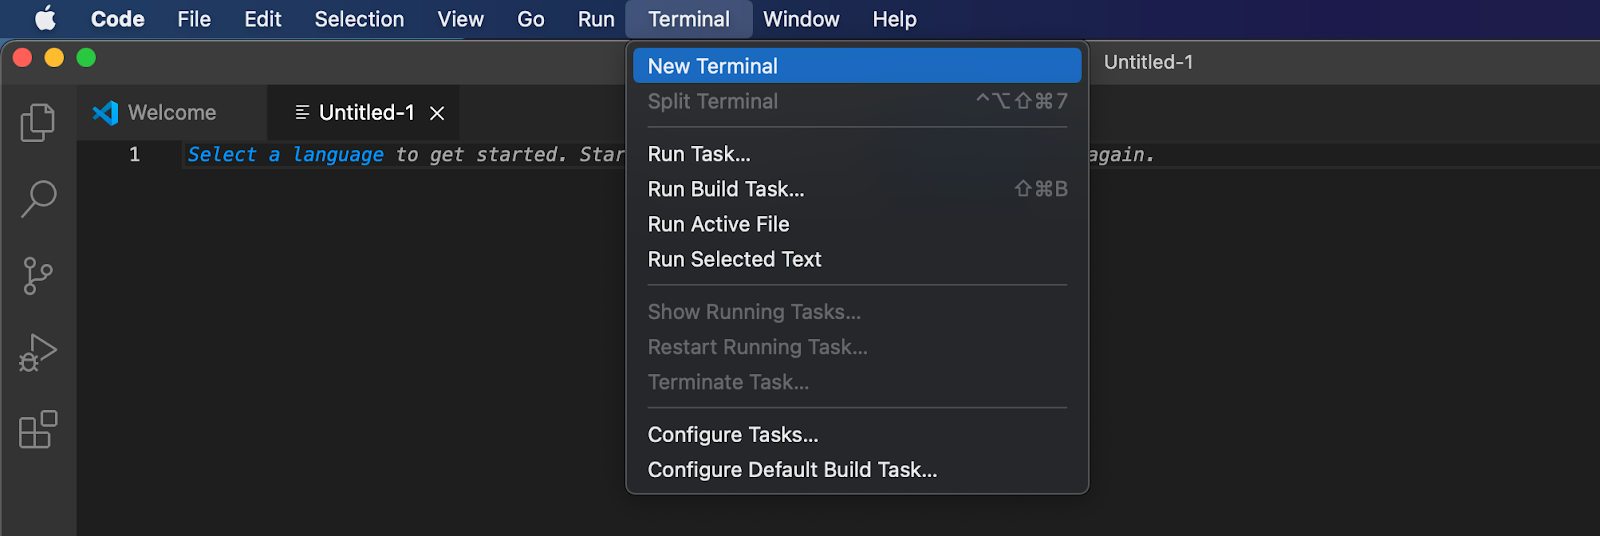
Moreover, once you’ve added your own configurations to the code, you will need to run a terminal command to upload the files to IPFS. If you are using VSC, open a new terminal by clicking on ”Terminal” at the top, followed by ”New Terminal”:
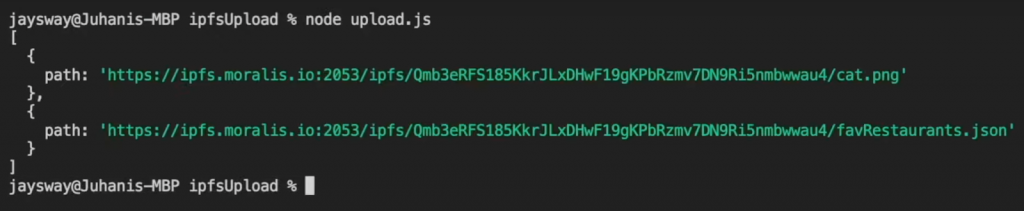
From there, make sure you are in the correct location of the file you set up earlier and run the following command with your file’s name:
node "FILE_NAME"
The terminal should respond by providing unique IPFS content identifiers for the files you upload. Also, you should be provided with a response similar to the one below:
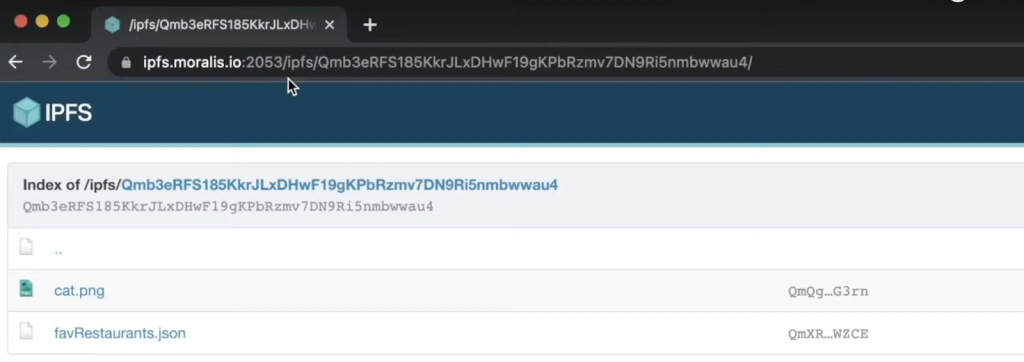
You can now view your files in the browser by appending an IPFS gateway with your CID. You can copy one of the links provided to you in your terminal. Exclude the path to the particular file at the end, and input this into the browser:
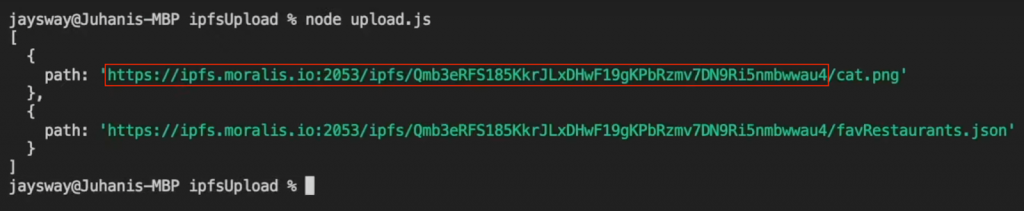
As a result, you should arrive at a page similar to the one presented below:
That’s it for this ”How to Upload Files to IPFS” guide! You should now know how to upload files to IPFS with ease. However, you might still wonder why you should utilize IPFS to store files in a decentralized manner. As this might be the case, the following sections will answer the ”why upload files to IPFS?” question!
Why Upload Files to IPFS? – The Benefits of IPFS
Since IPFS is a decentralized P2P protocol, it provides several benefits to the traditional way of storing and accessing content. Consequently, it is interesting to explore some of the main advantages of IPFS to answer the question, ”why upload files to IPFS?”.

- Efficient and Cheap – In conventional HTTP systems, files are downloaded from one server at a time. In comparison, IPFS’ P2P system retrieves content from a multitude of nodes simultaneously. This makes for a more efficient system since it enables substantial bandwidth savings. Additionally, the boost in efficiency contributes to a cheaper system.
- Resilience – The average lifespan of a website is, according to IPFS’ website, 100 days before it completely disappears, and IPFS does not believe that the system should be that fragile. IPFS provides a more resilient system by making it simple to create networks for mirroring data. Moreover, content addressing ensures that the content of IPFS is autonomously versioned.
- Decentralization – A pervading characteristic of the current internet and methods for storing content is centralization. Centralization makes it easy to censor information and creates issues with single points of failure. The decentralized nature of IPFS removes these problems by providing a flat and open web.
- Availability – IPFS facilitates the creation of resilient networks making for more persistent availability. This results in, for example, increased connectivity for the developing world or simply when using a lousy coffee shop WiFi.
This covers some of the system’s main benefits and why you should upload files to IPFS. Now, if you want to delve deeper into IPFS, the following section briefly covers the intricacies of how IPFS works!
How Does IPFS Work?
IPFS is a P2P storage network where content and files are accessible through peers. These peers can be located anywhere and relay/store information. A central aspect of IPFS is content addressing, where files, websites, etc., are found based on content rather than location.

However, to understand the ins and outs of how this works, there are three essential principles you need to grasp:
- Identification Via Content Addressing – IPFS uses what is known as content addressing to find files, websites, apps, etc. Content is found by “what is in it” rather than “where it is located”. Essentially, this means that every piece of content within the IPFS protocol has a CID (content identifier), which is a hash. Each hash is unique to the content’s origin.
- Content Linking Through DAGs (Directed Acyclic Graphs) – IPFS uses a distributed system that leverages a data structure called DAGs (directed acyclic graphs). More specifically, IPFS utilize Merkle DAGs, in which all nodes have an identifier in the form of a hash of the node’s contents.
Moreover, to build Merkle DAG representations of users’ content, IPFS generally splits it into various parts of blocks. Consequently, different file parts can come from multiple sources and authenticate efficiently. This is similar to using BitTorrent, which can fetch a file from several peers simultaneously. - Content Discovery Via DHTs (Distributed Hash Tables) – To find out what peers are hosting the content you are querying, IPFS utilizes a DHT (distributed hash table). Hash tables are databases of keys to values. As such, a DHT is a table split across the peers in a distributed network, and to find the content, you ask these peers.
Check out their official documentation here if you want more in-depth information regarding how IPFS works!
Summary – How to Upload Files to IPFS
With Moralis, it is possible to easily upload files to IPFS thanks to the ”upload folder” endpoint. In fact, using this Moralis tool allows you to upload files to IPFS in only three simple steps:
- Creating a File and Initializing Moralis
- Defining an Array of Files
- Upload Files to IPFS
If you follow the steps above, you will now be able to store files in a decentralized way. Moreover, IPFS provides several benefits, such as increased efficiency, resilience, availability, etc., which can significantly benefit your Web3 development endeavors!
If you found this ”How to Upload Files to IPFS” guide helpful, make sure to check out more content here at the Moralis Web3 blog. For example, learn how to use Firebase as a proxy API for Web3 or how to write Solana smart contracts!
Also, feel free to enroll in Moralis Academy if you want to advance your Web3 development proficiency. The academy offers a variety of exciting blockchain courses for new and seasoned developers!
Nevertheless, if you want to create Web3 projects or upload files to IPFS, sign up with Moralis immediately!
