Want to upload files to a reliable blockchain storage solution and protect those files by deploying them to a blockchain? If so, this IPFS Ethereum tutorial is just for you! Follow along as we show how to use IPFS with Ethereum by utilizing the Moralis IPFS API, Solidity, MetaMask, and Etherscan. Plus, we’ll also create a contract! While creating an IPFS Ethereum smart contract might sound challenging, we’ll use less than 20 lines of code to create ours! Now, before we can deploy any smart contracts involving IPFS URLs, we must first upload files to IPFS. Fortunately, the following code snippet does all the heavy lifting related to that task:
const res = await Moralis.EvmApi.ipfs.uploadFolder({
    abi: fileUploads
})
If you’ve worked with Moralis before, you know exactly how to implement the above code. However, if this is your first rodeo with the ultimate Web3 API provider, follow our lead as we tackle today’s IPFS Ethereum tutorial; all you need is a free Moralis account!

Overview
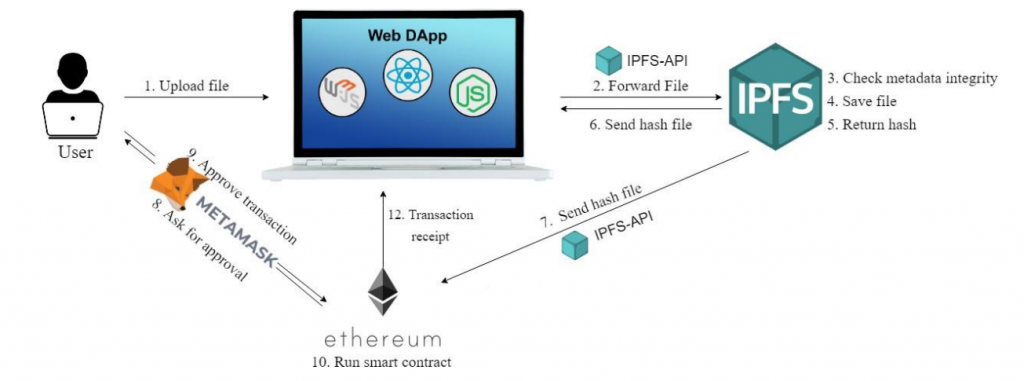
Today’s article includes two primary parts: our IPFS Ethereum tutorial and the theoretical background behind the topic. We’ll first focus on showing you how to use IPFS with Ethereum. We’ll do this by taking an example image file and uploading it to IPFS using a simple NodeJS dapp that incorporates the above-presented code. Along the way, you’ll learn how to obtain your Moralis Web3 API key and work with the Moralis JS SDK. Then, we’ll show you how to create, compile, deploy, and verify a simple IPFS Ethereum smart contract. This contract will enable you to store any uploaded file’s IPFS hash on the Ethereum blockchain, offering a high level of transparency and security.
As for the second part of the article, you’ll have a chance to get your basics in order. You’ll learn what IPFS, Ethereum, and smart contracts are. With that knowledge, you’ll understand exactly (in more detail) what an IPFS Ethereum smart contract is.
Tutorial – How to Use IPFS with Ethereum
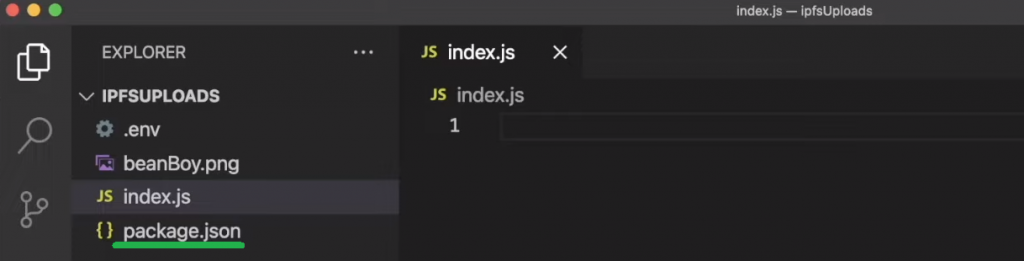
The first stage of this IPFS Ethereum tutorial is all about uploading assets to IPFS using a simple NodeJS script. This is where you’ll learn how to implement the code snippet from the intro. So, create a new project folder, name it “ipfsUploads”, and open it in Visual Studio Code (VSC). Inside your project, you’ll need three items:
- A “.env” file to store your Web3 API key
- A file that you want to store to IPFS (e.g., “beanBoy.png”)
- An “index.js” file to create a simple script that will upload your file to IPFS

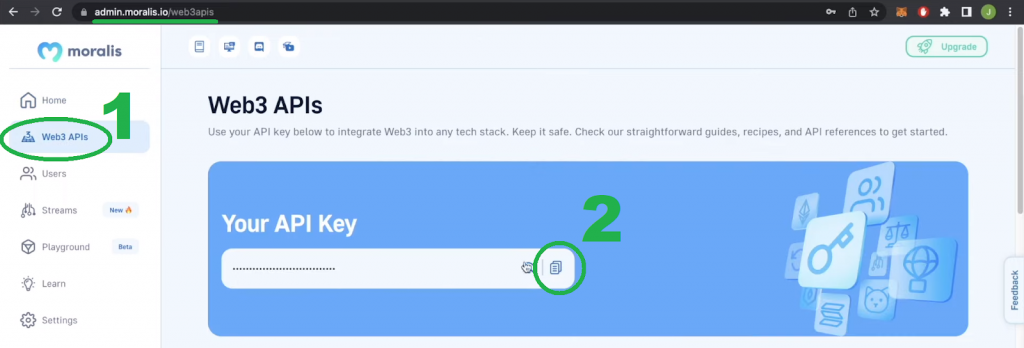
As the above screenshot indicates, you must get your Web3 API key and paste it under the “MORALIS_KEY” variable. So, in case you haven’t created your free Moralis account yet, do so now. You can use the link in the intro or visit “moralis.io” and hit one of the “Start for Free” buttons. With your account ready, you’ll be able to access your admin area. From there, you’ll be able to copy your Web3 API key with two clicks:
With your Web3 API key in place, you can initialize a NodeJS project with the following command:
npm init -y
The above command will generate a new “package.json” file for you:
Next, install all required dependencies with this command:
npm i moralis fs dotenv
After finishing this initial setup, it’s time for you to code the “index.js” script.
Create a Script to Upload Files to IPFS
At the top, you need to import all of the above-installed dependencies:
const Moralis = require("moralis").default;
const fs = require("fs");
require("dotenv").config();
Next, define an array that holds the “ending” path for IPFS locations and the content you want to store. For our example “beanBoy.png” file, the following lines of code get the job done:
const fileUploads = [
  {
      path: "beanBoy.png",
      content: fs.readFileSync("./beanBoy.png", {encoding: "base64"})
  }
]
To actually execute the uploading, your script also needs a proper function:
async function uploadToIpfs(){

    await Moralis.start({
        apiKey: process.env.MORALIS_KEY
    })

    const res = await Moralis.EvmApi.ipfs.uploadFolder({
        abi: fileUploads
    })

    console.log(res.result)

}

uploadToIpfs();
Looking at the lines above, you can see that the “uploadToIpfs” function initializes Moralis via “Moralis.start” and your Web3 API key. Next, you can see how to properly implement the “Moralis.EvmApi.ipfs.uploadFolder” method from the introduction. This method takes in the previously created array. Finally, the “uploadToIpfs” function console logs the result (provides you with the IPFS hash of the uploaded files).
Note: You can use the above script for all sorts of files by tweaking the array to match those files.
Now that your “index.js” script is ready, you need to run it with the following command:
node index.js
The above command will execute your code and upload your file(s) to IPFS. In response, you will see your file’s path in the terminal:

As you can see in the above screenshot, the file address consists of an IPFS hash with the “ending” path defined in your “fileUploads” array.
Note: If you decide to upload multiple files, they’d all have the same hash with different “ending” paths.
As far as the “https://ipfs.moralis.io:2053/ipfs/” part goes, it’s just one of many public IPFS gateways.
IPFS Ethereum Integration
For the sake of this tutorial, you don’t want to waste real ETH. Therefore, we recommend focusing on one of Ethereum’s testnets, such as Goerli, which is the network of our choice herein. As such, make sure to have your MetaMask with the Goerli network ready. You’ll also need some Goerli ETH to deploy your instance of our smart contract. For that, use a reliable Goerli faucet.
Note: The process for deploying smart contracts to the Ethereum mainnet is the same, but instead of using Goerli ETH, you use real ETH.
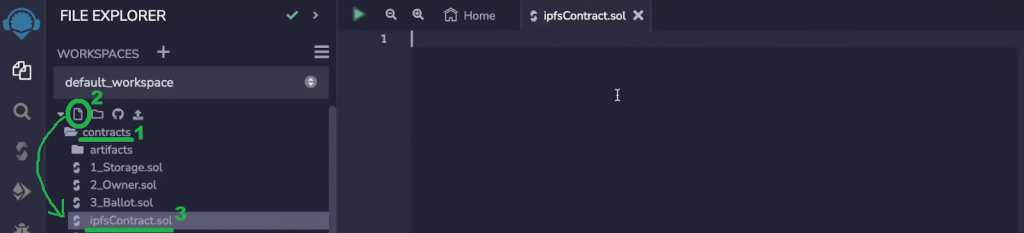
With your MetaMask and Goerli ETH ready, we can head over to “remix.ethereum.org“, where you can use Remix. This online tool offers the simplest way to deploy smart contracts. Once you access the Remix IDE dashboard, click on the default “contracts” folder and create a new “.sol” file. You can follow our lead and name it “ipfsContract.sol”:
IPFS Ethereum Smart Contract Example
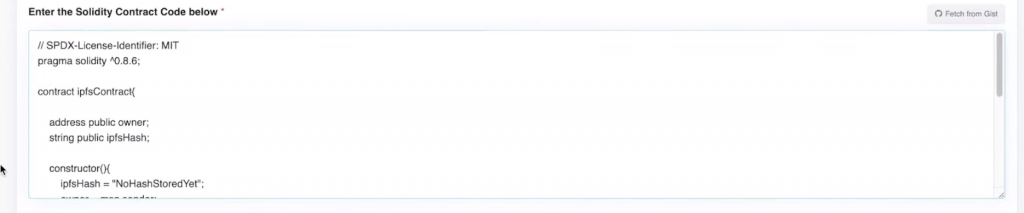
Like all Solidity smart contracts, make sure yours starts with the license and pragma lines:
// SPDX-License-Identifier: MIT
pragma solidity ^0.8.6;
Next, you need to set up the contract by naming it and using the curly brackets for the rest of the logic:
contract ipfsContract{
You only want the contract owner (the address that deploys it) to be able to change the IPFS hash. So, you need to define the corresponding variables: “owner” and “ipfsHash”:
address public owner;
string public ipfsHash;
With “public”, you ensure that anyone can see who the owner of the contract is. Next, you need to add your contract’s constructor function, which is the type of smart contract function that’s run only at deployment:
constructor(){
    ipfsHash = "NoHashStoredYet";
    owner = msg.sender;
}
Looking at the above lines of code, you see that when deployed, this smart contract will set the “ipfsHash” variable to “NoHashStoredYet“. So, you’ll start without assigning any IPFS address to it. As for “owner”, it will ensure the address that deploys the contract becomes its owner.
Finally, you can add the additional two functions, which will carry out the functionality of integrating an IPFS address to Ethereum. One function needs to be able to change the “ipfsHash” variable. You want only the owner of the contract to be able to execute this function:
function changeHash(string memory newHash) public{
    require(msg.sender == owner, "Not Owner of Contract");
    ipfsHash = newHash;
}
The second function needs to fetch the current hash, which enables everyone to view the current “ipfsHash” variable:
    function fetchHash() public view returns (string memory){
        return (ipfsHash);
    }
}
Note: Since the above smart contract defines the “ipfsHash” variable as public, the second function is redundant. Herein, it serves educational purposes, and you’ll get to play with one “write” and one “read” function.
Compile, Deploy, and Verify Your IPFS Ethereum Smart Contract
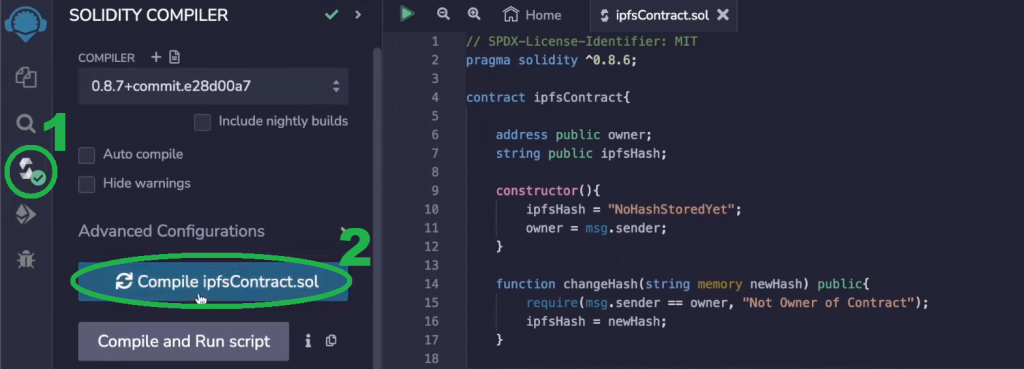
With the above lines of code inside the “ipfsContract.sol” script, you are ready to compile your smart contract. The green checkmark indicates that. So, click on that icon and hit the “Compile” button on that tab:
Next, you can deploy your smart contract via the “Deploy” tab:

As the above screenshot indicates, the “Deploy” button will prompt your MetaMask to confirm the on-chain transaction on the Goerli testnet. Once you click on the “Confirm” button, it will take some time for your example smart contract to go live on Goerli. The message at the bottom of Remix will let you know once your transaction is confirmed:
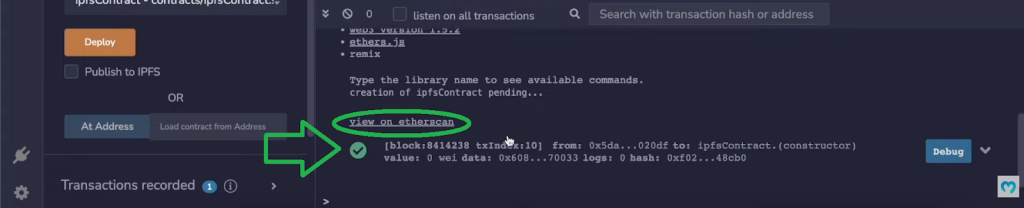
Then, you can click on the “view on etherscan” link above, which will take you to your transaction’s page:
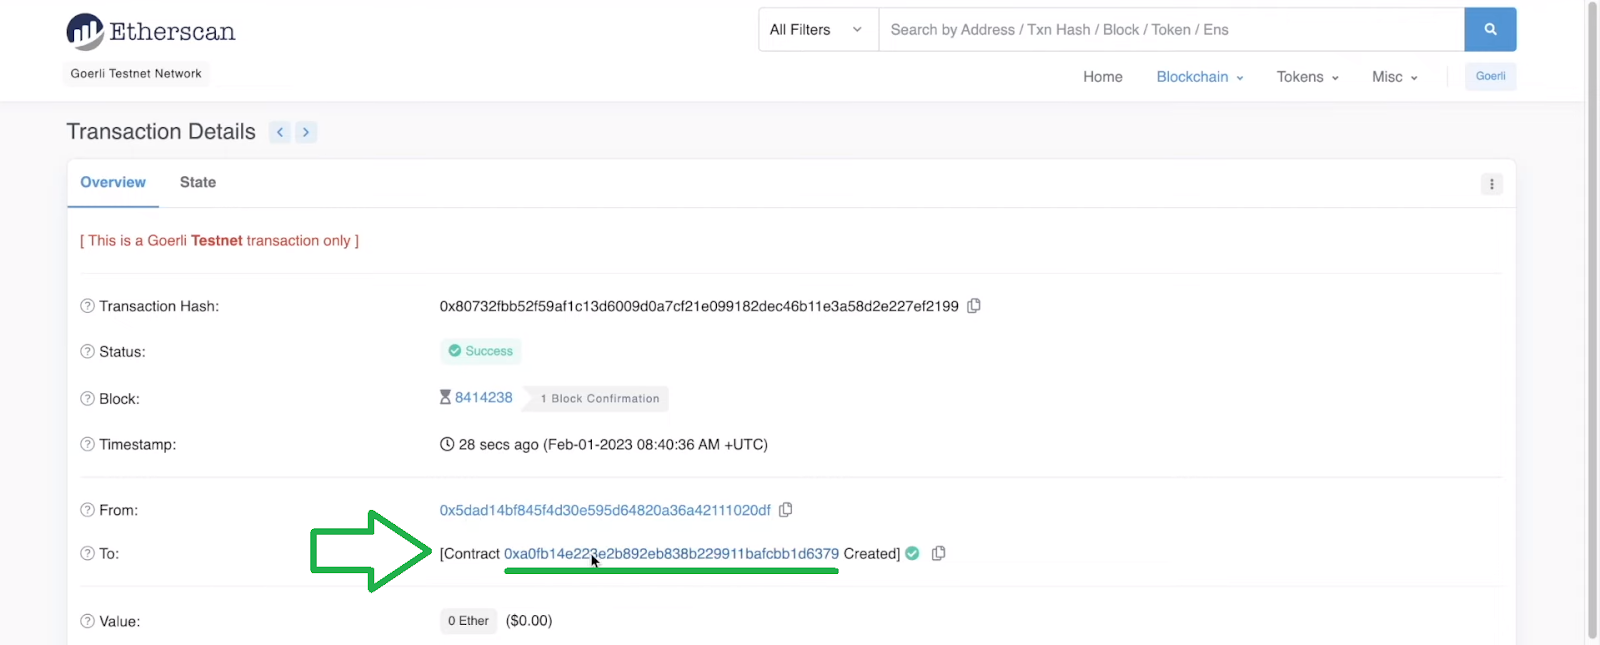
To access your smart contract’s page, click on your smart contract’s address as indicated in the above screenshot. Once on the smart contract page, you’ll be able to verify your contract:

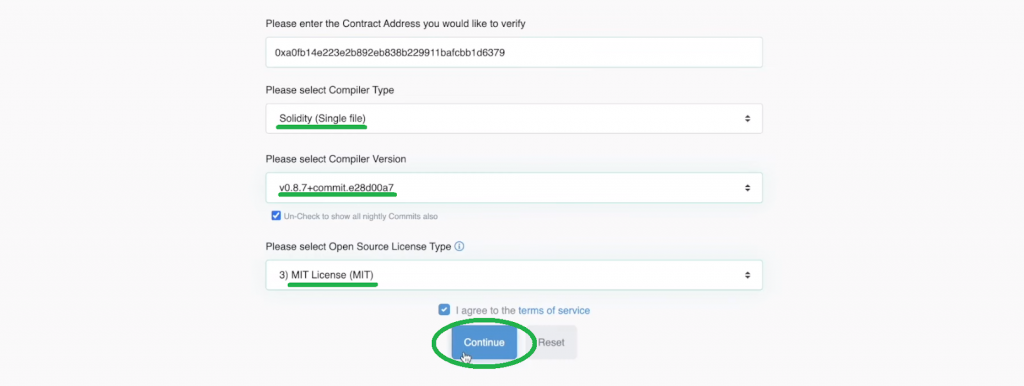
On the next page, select the details that you used in Remix and hit “Continue”:
Then, you need to paste your entire smart contract code into the designated field:
Finally, checkmark the “I’m not a robot” box and click on the “Verify and Publish” button:

After successfully verifying your smart contract, you can use Etherscan to run your contract’s functions:
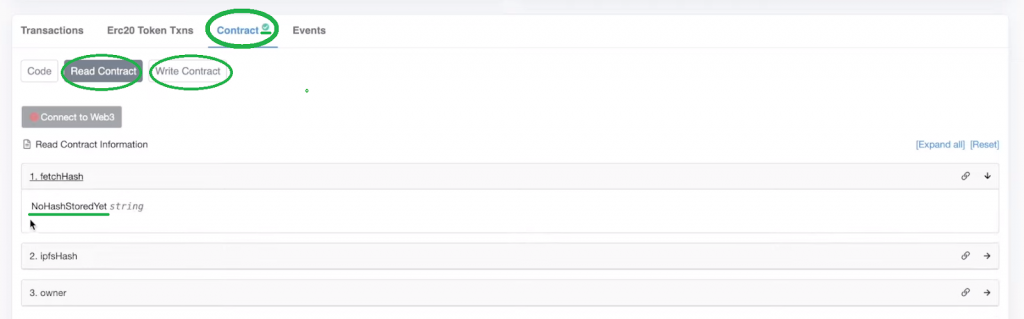
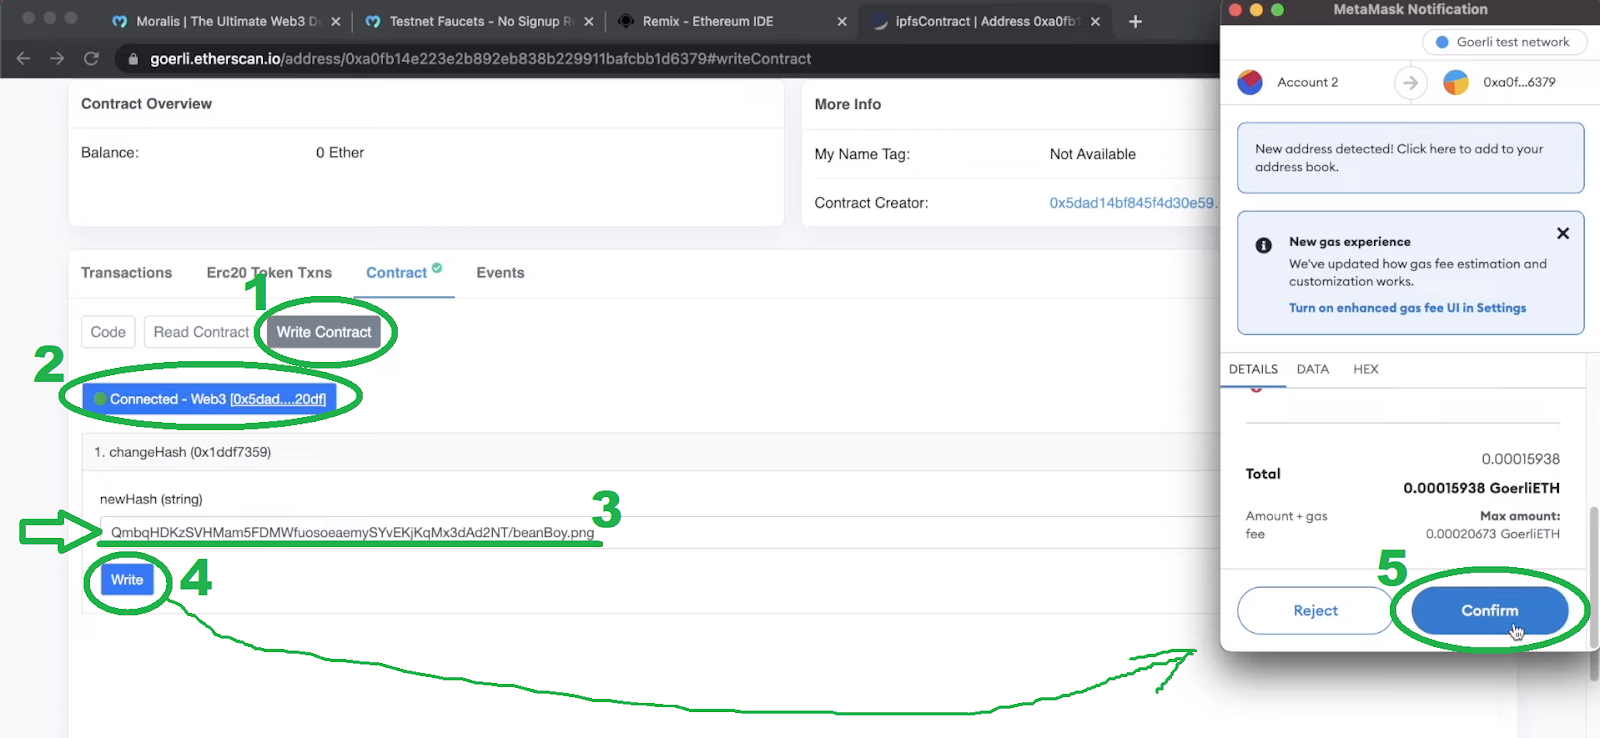
If you select the “Write Contract” tab and connect your MetaMask (with the same account you used to deploy the above contract), you’ll be able to change the “ipfsHash” variable to match your file’s hash:
Once the above transaction goes through, you can read the contract’s “fetchHash” function again to see that your IPFS address is actually stored in your smart contract:

And, if any other address (not owner) tries to execute the “changeHash” function, they will be blocked:

IPFS Ethereum Guide – Exploring IPFS and Ethereum
It’s time we cover the theory behind the above “How to Use IPFS with Ethereum” tutorial. This means you get to find out what IPFS, Ethereum, and smart contracts are. Then, we’ll tackle the “what is an IPFS Ethereum smart contract?” question.

What is IPFS?
InterPlanetary File System, or IPFS, is a peer-to-peer (P2P) decentralized protocol for storing and accessing content. It’s an open-source protocol, so anyone can use it to store and access data, websites, files, and applications. All in all, IPFS continues to be the most popular Web3 storage solution. It serves a wide range of use cases, including many IPFS NFT projects. However, it’s worth pointing out that IPFS is technically not one of the blockchain storage companies as it doesn’t employ blockchain technology.
Unlike Web2 storage solutions, IPFS utilizes ”content-based addressing”. As such, data or content is fetched based on the content itself and not on the location of that content. Consequently, you don’t need to know where the content is located before you wish to fetch it. For this type of addressing to work properly, IPFS assigns files and data with unique identifiers or content IDs (CIDs). CIDs are commonly known as IPFS hashes and are unique for every piece of content stored on IPFS. If you want to learn more about IPFS and how it works, visit the Moralis blog and search for “what is IPFS?”.

What is Ethereum?
Ethereum is the most popular and widely used programmable blockchain. It was the first blockchain to support smart contracts and, in turn, gave birth to altcoins/crypto tokens (fungible and non-fungible), DeFi applications, and countless other decentralized applications (dapps). Anyone with internet access and an Ethereum address (Web3 wallet) can interact with this chain and applications built on top of it.
Like all layer-one (L1) blockchains, Ethereum has its native cryptocurrency: ether (ETH). The latter provides the network’s security through the proof-of-stake (PoS) consensus mechanism and covers transaction fees. If you wish to explore Ethereum further, visit the Moralis blog and search for “what is Ethereum?” or enroll in the “Ethereum Fundamentals” course at Moralis Academy.

Ethereum and Smart Contracts
We mentioned above that Ethereum was the first blockchain network that supported smart contracts. This was a real game-changer compared to the options that Bitcoin offered at that time. After all, smart contracts are on-chain pieces of software that automatically execute predefined actions when predefined conditions are met. As such, smart contracts offer limitless options and can help automate and execute transparent processes.
Currently, ERC-20, ERC-721, and ERC-1155 smart contracts focusing on creating and managing tokens are the most common ones. However, there are countless other standardized and non-standardized smart contracts on Ethereum.
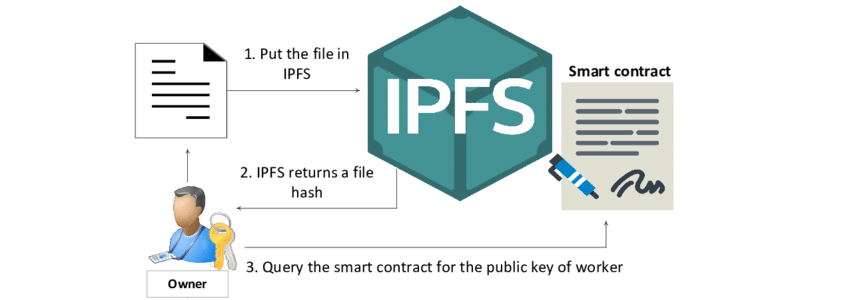
What is an IPFS Ethereum Smart Contract?
An IPFS Ethereum smart contract is a smart contract that includes an IPFS hash and is deployed on the Ethereum network. These kinds of contracts can come in all sorts of forms. However, due to the increased popularity of NFTs in the last couple of years, ERC-721 and ERC-1155 contracts are currently the most common examples of IPFS Ethereum smart contracts. Of course, that’s only true when the projects they serve use IPFS to store NFT metadata files. With that in mind, if you decide to proceed with Web3 contract development, you’ll most likely deploy all sorts of IPFS Ethereum smart contracts.
IPFS Ethereum Tutorial – How to Use IPFS with Ethereum – Summary
Throughout the above sections, you learned how to use IPFS with Ethereum. We first showed you how to utilize the power of the Moralis IPFS API to upload files to that decentralized storage solution. By completing our tutorial, you also learned how to write, compile, deploy, and verify a simple IPFS Ethereum smart contract. As a result, you were able to upload files to IPFS to get their IPFS hash and then store that hash on Ethereum via your smart contract. You also had a chance to cover the theoretical aspects of today’s topic. Hence, you were able to learn what IPFS, Ethereum, smart contracts, and IPFS Ethereum smart contracts are.
It’s worth pointing out that the skills obtained herein apply to all EVM-compatible chains. Moreover, that means you can use the same enterprise blockchain solutions you used throughout our tutorial for many leading and emerging development blockchains. Whether you want to create your own smart contracts or use existing ones, your end goal should be to create killer dapps. This is where using the best blockchain infrastructure companies, such as Moralis, makes a difference.
Aside from the ultimate Web3 Data API, Moralis also provides the best Web3 Authentication API and the top Notify API alternative: the Moralis Streams API. The latter makes Web3 libraries obsolete in many ways. In addition, Moralis offers countless useful resources, including the best gwei to ETH converter and many reliable crypto faucets (Aptos testnet faucet, Polygon Mumbai faucet, Sepolia testnet faucet, etc.). You can also join the Web3 revolution confidently by diving into Web3 programming on the Moralis YouTube channel, crypto blog, and at Moralis Academy. If you are committed to using Web3 storage solutions, make sure to explore “what is web3.storage?”.
