Many who have experienced exorbitant gas fees on Ethereum have turned their attention elsewhere. In doing so, they most likely discovered Polygon (formerly Matic). This decentralized scaling platform enables users to execute on-chain transactions at minimal costs. Because of this, developers who build Polygon dapps can benefit immensely by offering users the benefits of the Polygon network. If this sounds interesting and you’d like to explore Polygon development further, follow along as we explore how to connect dapp to Polygon. Moreover, this article showcases that this task – how to connect to Polygon Network – can be accomplished in minutes without breaking a sweat!
The above task is possible thanks to advancing tools from the current Web3 tech stack. After all, the tech stack has come a long way in recent years. Furthermore, with excellent cross-chain tools and platforms like Moralis, you can use your Web2 dev skills to create killer dapps (decentralized applications) on various networks. Moreover, with Moralis (the leading enterprise-grade Web3 API provider), you can combine the power of NodeJS and Moralis’ EVM API to create a backend dapp and connect to Polygon Network effortlessly.
You can also use the ultimate Ethereum boilerplate, which supports all EVM-compatible chains, including Polygon. This boilerplate is, without question, the fastest way to build and connect dapp to Polygon. Accordingly, we’ll also show you how to use this shortcut in today’s article. So, make sure to create your free Moralis account and follow our lead!
Get the Latest Info on What’s Happening in Web3 Development – join Moralis Magazine!

Polygon Network Explained
Before we dig into the process of how to connect dapp to Polygon Network, let’s explore what the Polygon network entails. Ethereum was the first programmable chain, and we can actually thank Ethereum for the Polygon network. After all, it was the increased adoption of Ethereum that caused network congestion and astronomical transaction fees. Hence, during the recent crypto bull run, it was economically challenging to develop dapps. As such, a scalable solution was suddenly in high demand. One of the reputable solutions was Matic, which rebranded to Polygon in February 2021.
Polygon is a decentralized Ethereum scaling platform. Thus, it is a potential solution to the congestion issue that the Ethereum network faces. In other words, Polygon serves as a more economically sustainable development platform. It helps ensure that devs can create dapps without spending a fortune on gas fees. Moreover, it’s important to note that it does so without compromising the security of the Ethereum blockchain. Accordingly, it makes a lot of sense to connect your dapp to Polygon.

Furthermore, Polygons’ tagline – “bringing the world to Ethereum” – tells you they aren’t competing with Ethereum. Rather, they are working with the leading development blockchain to help create a sound Web3 infrastructure. Because of this relation to Ethereum, there are many similarities between the two networks. For one, Polygon uses the same token standards (ERC-20, ERC-721, and ERC-1155). Also, the native token of Polygon (MATIC) is an ERC-20 token. Regarding MATIC, Polygon users utilize this network’s native currency to govern the chain. Of course, it also serves as a payment for the relatively low transaction fees.
Nonetheless, until the Ethereum merge, Polygon and Ethereum used different consensus mechanisms. However, both chains are now powered by a more scalable alternative – proof-of-stake (PoS).

Is Matic Polygon?
If you read the introduction and the “Polygon Network Explained” section, you already know that Polygon was originally called Matic. While the rebranding took place in February 2021, it didn’t affect the chain’s native token’s symbol. The latter remains MATIC. As such, Matic and MATIC are two different things. The former is the original name of the network that was replaced by “Polygon”, while MATIC is the ticker for Polygon’s native cryptocurrency. It’s worth keeping that in mind as you learn to connect to Polygon network.
In addition, let’s also point out that, like most development blockchains, Polygon offers its testnet/devnet. The latter is called Mumbai, and it uses “test” MATIC as its native currency. This testing currency is completely separate and distinct from Polygon’s native token. So, while you have to buy real MATIC, you can use a Mumbai testnet faucet to get “test” MATIC for free.

Connecting Polygon to Your Dapp with Moralis’ API
Thanks to Moralis’ cross-platform interoperability, there are many ways to connect dapp to Polygon. However, as mentioned, we’ll focus on using NodeJS (or Moralis’ JS SDK) herein. As such, you’ll need to complete the following five steps to connect dapp to Polygon:
- Creating a NodeJS Dapp
- Importing and Setting Up the Latest Moralis JS SDK
- Setting Up a Simple Express Server
- Integrating Your Dapp with Moralis Services
- Fetching Blockchain Data from Polygon
Before you move forward, you need to take care of some prerequisites. So, if you haven’t done so yet, get your free Moralis account set up now. Also, have your favorite code editor (we use Visual Studio Code [VSC]) ready and install NodeJS. With these tasks under your belt, you are ready to connect to Polygon network.

Creating a NodeJS Dapp
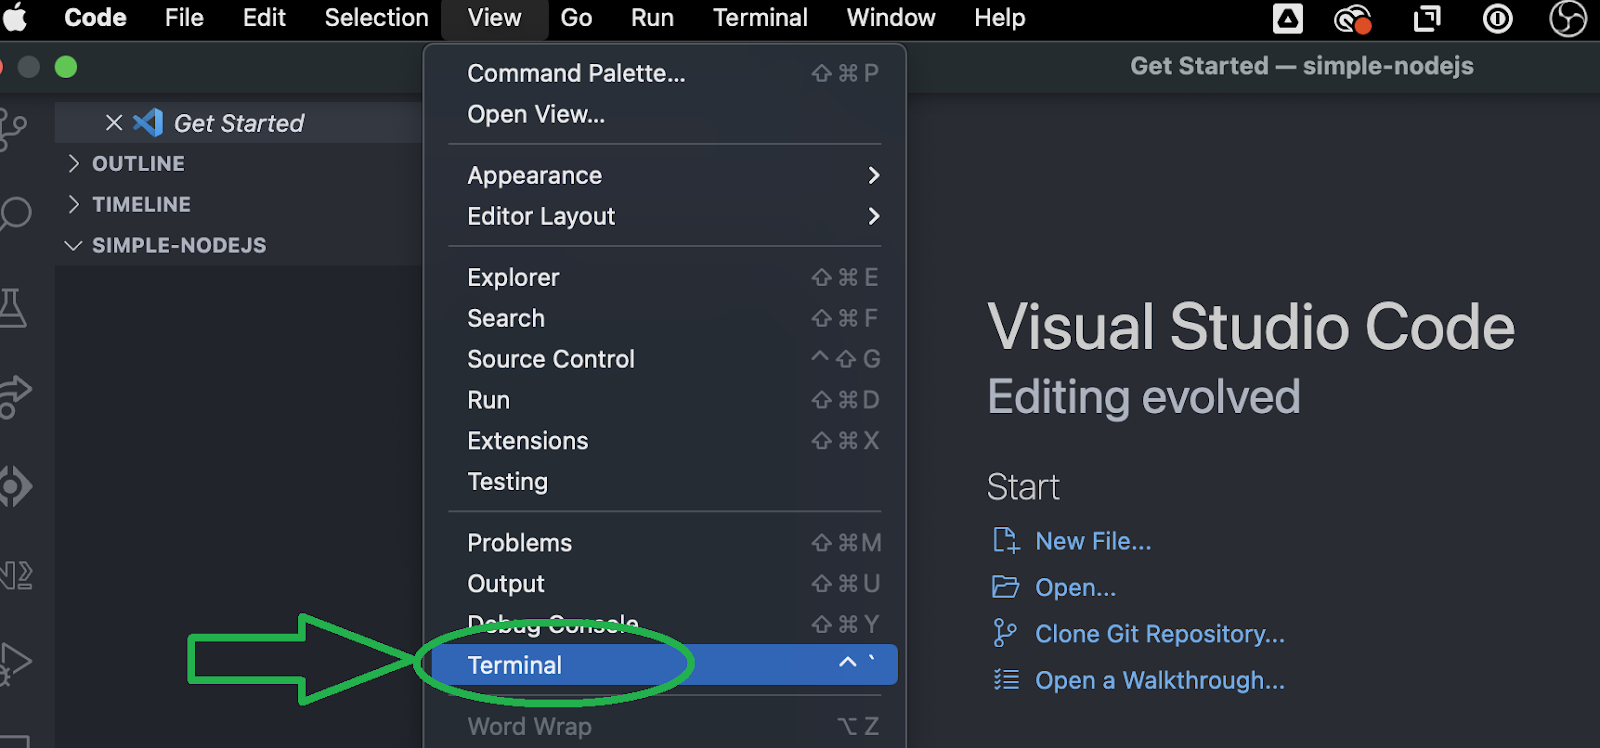
First, create the “Simple-NodeJS” folder and open it in VSC. Of course, you can name your folder as you wish; however, to avoid confusion, we encourage you to use the same name as ours. Next, open a new terminal inside your IDE:
Then, initialize a new project. You do this by entering “npm init” into the terminal. After entering this command, the interface will ask you to name your project and select your preferences. However, feel free to stick to the default options. Hence, simply press “enter” several times. If you’ve successfully initialized your NodeJS project, there should be a “package.json” file in your project’s file tree.
Importing and Setting Up the Latest Moralis JS SDK
It’s time to import and set up the latest Moralis JS SDK. Fortunately, a simple command will take care of that. Essentially, you just need to install the “moralis” dependency. However, to skip a step, let’s at the same time install the “express” dependency as well. Thus, execute the “npm install moralis express” command using your terminal.

Setting Up a Simple Express Server
Since you already installed the “express” dependency, you can focus on setting up your Express server. To do this, you need to create an “index.js” file. Then, populate that file with this code:
const express = require('express')
const app = express()
const port = 3000

app.get('/', (req, res) => {
  res.send('Hello World!')
})

app.listen(port, () => {
  console.log(`Example app listening on port ${port}`)
})
In addition, also make sure you add the “start” script to your “package.json” file:
"scripts": {
  "start": "node index.js"
},
Now you have everything you need to run your Express server. Hence, feel free to execute the “npm run start” command and visit “http://localhost:3000”. You should be greeted by the “Hello World!” message.

Integrating Your Dapp with Moralis Services
By integrating your dapp with Moralis services, you’ll import the Moralis EVM API, which includes the Polygon API. For that purpose, you’ll be using the “index.js” file. Furthermore, this is also where you’ll need to paste in your Moralis Web3 API key. We’ll show you how to obtain your API key soon, but first, add these lines of code at the top of the “index.js” file:
// Import Moralis
const Moralis = require('moralis').default
// Import the EvmChain dataType
const { EvmChain } = require("@moralisweb3/evm-utils")
Next, add the following three variables:
const MORALIS_API_KEY = "replace_me"
const address = "replace_me"
const chain = EvmChain.POLYGON
As you can see, the above-defined variables require specific values. Next to “MORALIS_API_KEY“, you need to paste your API key. For the address, give a valid Polygon chain address. Moreover, since we aim to connect to Polygon network, we need to use the “EvmChain.POLYGON” value.
Note: To see what other chains Moralis supports, visit the “EVM API Overview” documentation page. This is also a place to learn about the topic that the ultimate EVM API covers.
Obtaining Your Moralis Web3 API Key
At this point, you should have your Moralis account up and running. Hence, you can use your credentials to access your Moralis admin area. There, you’ll be able to copy your Moralis Web3 API key in two simple steps. First, select the “Web3 APIs” option from the side menu. Second, click on the “copy” icon next to your API key:

Then, return to your “index.js” file and replace “replace_me” with the above-copied key. Furthermore, do not forget to initialize Moralis by adding these lines of code:
const startServer = async () => {
await Moralis.start({
apiKey: MORALIS_API_KEY,
})
Connect Dapp to Polygon – Fetching Blockchain Data
After initializing Moralis and entering appropriate values, you can start implementing various Web3 API calls. Since the Moralis EVM API offers many options, we won’t be able to cover them all herein. However, by showing you how to fetch the native balance, ERC-20 balances, and NFTs, you can easily explore other API endpoints on your own.

Fetch Native Balance
When you connect dapp to Polygon, you can fetch MATIC balance using Moralis’ “getNativeBalance” endpoint. If you want to do these in a neat manner, we encourage you to create the “getDemoData” function inside the “index.js” file:
async function getDemoData() {
  // Get native balance
  const nativeBalance = await Moralis.EvmApi.balance.getNativeBalance({
    address,
    chain,
  })

  // Format the native balance formatted in ether via the .ether getter
  const native = nativeBalance.result.balance.ether

  return { native }
}
Moreover, the “getNativeBalance” EVM API endpoint takes in the “address” and “chain” parameters. This is where you get to use the previously defined “address” and “chain” values.
Furthermore, make sure you also add the “/crypto-data” endpoint. The latter will return the results of the “getDemoData” function and enable you to use “http://localhost:3000/demo” to view the response:
app.get("/demo", async (req, res) => {
  try {
    // Get and return the crypto data
    const data = await getDemoData()
    res.status(200)
    res.json(data)
  } catch (error) {
    // Handle errors
    console.error(error)
    res.status(500)
    res.json({ error: error.message })
  }
})
By calling the above endpoint, you can view the response in the following format:
{
    "native": "0.169421625822962794"
}
Fetch ERC-20 Balance
Today, there are many ERC-20 tokens. Sure, most of them are on the Ethereum chain, but many are also on Polygon. As such, you can use the “getWalletTokenBalances” endpoint to get the balances of all ERC-20 tokens for a specific address. To implement this functionality, add these lines of code to “getDemoData“:
    // Get token balances
  const tokenBalances = await Moralis.EvmApi.token.getWalletTokenBalances({
    address,
    chain,
  })

  // Format the balances to a readable output with the .display() method
  const tokens = tokenBalances.result.map((token) => token.display())

  // Add tokens to the output
  return { native, tokens }
}

Fetch NFTs
There are several popular NFTs on the Polygon chain, and you can fetch them easily now that you know how to connect to Polygon network. By adding the lines of code below to your “getDemoData” function, you fetch the first ten NFTs for a given address:
   const nftsBalances = await Moralis.EvmApi.nft.getWalletNFTs({
    address,
    chain,
    limit: 10,
  })

  // Format the output to return name, amount and metadata
  const nfts = nftsBalances.result.map((nft) => ({
    name: nft.result.name,
    amount: nft.result.amount,
    metadata: nft.result.metadata,
  }))

  // Add nfts to the output
  return { native, tokens, nfts }
}
Note: To view the entire final code for the “index.js” file presented herein, visit the “Using NodeJS” documentation page. However, remember that the code there focuses on the Ethereum chain. So, if you decide to copy that code and use it to connect dapp to Polygon, replace “ETHEREUM” with “POLYGON”. In addition, you’ll also need to replace the example address with a valid address on the Polygon chain.

Build and Connect Dapp to Polygon Network
Now that you know how to create a NodeJS dapp with Moralis’ EVM API, you know how to take care of backend dapps. Also, Moralis lets you deliver an eye-catching frontend with minimum effort. That’s what the video tutorial below will show you. By following the lead of one of our in-house experts in the video below, you’ll learn to build and connect dapp to Polygon quickly and easily.
Moreover, don’t let the “ethereum-boilerplate” name fool you. After all, you now know that Polygon is an EVM-compatible chain, which means you can use the same boilerplate. All you need to do is enter the Polygon chain’s ID. You’ll learn how to do that in the video below, starting at 3:42. Additionally, keep in mind that this video tutorial focuses on Polygon’s testnet (chain ID 0x13881):

However, if you were to replace that ID with “0x89”, you’d be targeting Polygon’s mainnet.
Ultimately, by using the ultimate Ethereum boilerplate, you get to create a decentralized app in just three steps:
- Clone the Ethereum boilerplate code that awaits you on GitHub.
- Customize specific environment variables and connect to any chain you want.
- Start your instance of this Web3 website template.
By completing the above three steps, you can have a Polygon dapp ready in less than seven minutes.
Tutorial on How to Connect Dapp to Polygon Network – Summary
In this article, we started by teaching you the basics of the Polygon network. As such, you found out that Polygon is an EVM-compatible chain. You also had a chance to clear up the “Matic vs Polygon” confusion once and for all. Accordingly, you now know that Matic was rebranded to Polygon in 2021, while the chain’s native coin remains MATIC. Then, we showed you how to connect Polygon to your dapp with Moralis’ API. Primarily, we focused on creating a backend dapp using NodeJS, which we connected to Moralis’ EVM API. We also demonstrated how to fetch some of the on-chain data once you’ve managed to connect dapp to Polygon. Last but not least, we shared a video tutorial showing you how to create a NextJS dapp in under seven minutes. Hence, you now know how to connect dapp to Polygon or other EVM-compatible chains.
With the knowledge obtained herein, you are ready to take the next step of your Web3 development journey. If you prefer to learn by taking on various example projects, you should explore the Moralis YouTube channel and the Moralis blog. There, you can find a ton of excellent tutorials. Some of the latest articles teach you how to connect PlayFab with Web3 using Azure Functions, how to connect MetaMask to website with NextJS, how to build an Ethereum dapp in five steps, and even how to build a Web3 FIFA clone.
On the other hand, you may wish to embark upon a personalized study path with expert mentorship. The latter awaits you at Moralis Academy, where you get to become blockchain certified. By completing blockchain development courses, such as the Blockchain Business Masterclass course, you increase your chances of landing a perfect crypto job.
