Are you looking for ways to integrate a NodeJS SDK with AWS Lambda? If so, you are precisely where you need to be! This AWS Lambda NodeJS tutorial provides a straightforward example illustrating how you can integrate the Moralis NodeJS SDK with Lambda. In doing so, we will show you how to create a Lambda application with multiple functions in only three steps:
- Prerequisites
- AWS Credential Configuration and Project Setup
- Developing the App
If you follow along, you will learn how to build, test, deploy, and run Web3 JavaScript functions using Lambda! Moreover, if you want to skip straight into the tutorial, jump to the “AWS Lambda NodeJS Tutorial – Example of How to Integrate a NodeJS SDK” section! Additionally, you can check out our AWS Lambda documentation page for more info! You can also visit our GitHub repository page for the project below.
Overview
Amazon Web Services, or AWS, is one of the most comprehensive and well-used cloud computing platforms available. The platform consists of a multitude of PaaS, SaaS, and IaaS offerings, with hundreds of services optimizing large and small organizations’ cloud experiences. Moreover, within this extensive ecosystem of cloud computing solutions, we find AWS Lambda. Lambda is a serverless, event-driven computing service used to execute code without the need to provision or manage servers. What’s more, since Lambda is one of Amazon’s most prominent services, this is where the focus of this article is directed!
Specifically, this article will take a closer look at how you can run JavaScript code with AWS Lambda through NodeJS integration. In doing so, we will illustrate how to integrate Moralis’ NodeJS SDK with Lambda by creating a straightforward application with multiple functions. As such, if you follow along, you will learn how to build, test, deploy, and run Web3-compatible JavaScript functions with AWS Lambda!
Moreover, if you are interested in the Web3 development space, we recommend you check out additional Moralis tools. For example, Moralis supplies a selection of enterprise-grade Web3 APIs allowing you to fully leverage the power of blockchain technology! Among these tools, you can also find the Web3 Streams API, enabling you to stream on-chain data into the backend of your applications via Web3 webhooks. To learn more about this, check out our article on Ethereum webhooks.
Nevertheless, if you want to integrate a NodeJS SDK with Lambda or build Web3 projects in general, sign up with Moralis immediately to access a more seamless blockchain development experience!
Exploring AWS Lambda
AWS (Amazon Web Services) is one of the largest cloud computing platforms available, serving millions of customers worldwide. The AWS ecosystem consists of hundreds of services, and one of the most significant examples is AWS Lambda!
AWS Lambda is an event-driven and serverless computing service. With Lambda, you do not need to worry about managing or provisioning servers, as Lambda takes care of the heavy lifting for you. As such, with Lambda, you can run code from any application or backend service, and all that is required from you is the code.
When working with Lambda, you organize your code into functions, and Lambda only runs them when requested. Moreover, AWS Lambda features a “pay-as-you-go” billing structure, meaning that you only pay for the computing time you consume. Consequently, when using AWS Lambda, you have excellent scaling opportunities and can become significantly more cost-effective.
To summarize, AWS Lambda is one of the most significant computing services on the market, serving millions of customers across the globe. Furthermore, when working with Lambda, you access a complete computing solution fully managed by AWS. As such, you do not need to focus on backend infrastructures and can dedicate more time towards creating higher value for your customers!
What is AWS Lambda NodeJS?
Before getting into the central part of this tutorial, we will briefly take this section to answer the question, “what is AWS Lambda NodeJS?”. However, the answer to this question is relatively straightforward, as AWS Lambda’s NodeJS integration makes it possible to use Lambda to execute JavaScript code.
NodeJS is an open-source, cross-platform JavaScript runtime environment. What’s more, AWS Lambda provides runtimes for NodeJS that run your code to process events. Consequently, your code runs in an environment that includes AWS’ JavaScript SDK, along with credentials from an access management role and AWS identity managed by you.
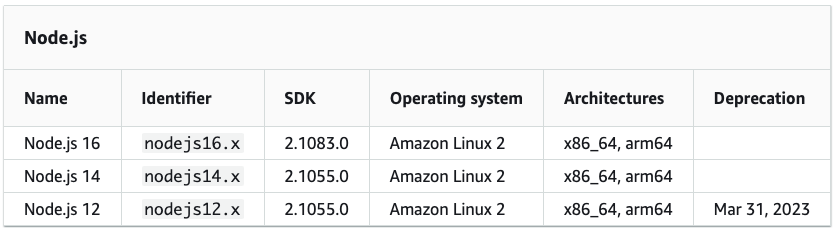
Supported Runtimes:
Nevertheless, put simply, AWS Lambda NodeJS makes it possible to use the service to run JavaScript code. Now, with a better understanding of the NodeJS integration, let us take a closer look at an example of how you can integrate this runtime environment with AWS Lambda!
AWS Lambda NodeJS Tutorial – Example of How to Integrate a NodeJS SDK
With a more profound understanding of NodeJS, it is time to cover the central part of this tutorial by showing you how to integrate Moralis’ NodeJS SDK with AWS Lambda through an example project. In doing so, you will learn how to create a straightforward Lambda application with two functions: “getNativeBalance” and “getWalletNfts“.

Furthermore, to make this AWS Lambda NodeJS tutorial more understandable and easy to follow, the article shows you how to create this application in three steps:
- Prerequisites
- AWS Credential Configuration and Project Setup
- Developing the App
If you complete the steps above, you will learn how to easily integrate Moralis’ NodeJS SDK with AWS Lambda. By following along, you will be able to run Web3-compatible functions through Lambda without managing or provisioning servers!
Nevertheless, let us jump straight into the first step of this AWS Lambda NodeJS tutorial and cover the necessary prerequisites!
Step 1: Prerequisites
Before showing you how to create the application, you must cover the necessary prerequisites, and there are seven in total:
- Create a Moralis Account – If you have not already, you need to sign up with Moralis. Creating an account is free and only takes a couple of seconds!
- Install an IDE – Next, you must install and set up an IDE of your choice. For this tutorial, we use VSC, but you are free to choose the environment you are most comfortable with. However, note that the process might occasionally differ if you select another option.
- Install NodeJS – You need to install the NodeJS runtime environment for this tutorial. You can download NodeJS using the following link: https://nodejs.org/en/.
- Create an AWS Account – If you do not already have one, visit AWS’s official website and create an account immediately.
- AWS CLI (Command Line Interface) – Next up, install the AWS CLI. You will find a comprehensive setup guide by clicking here.
- Serverless Framework – You additionally need to install Serverless Framework, and you can find a tutorial for doing so here.
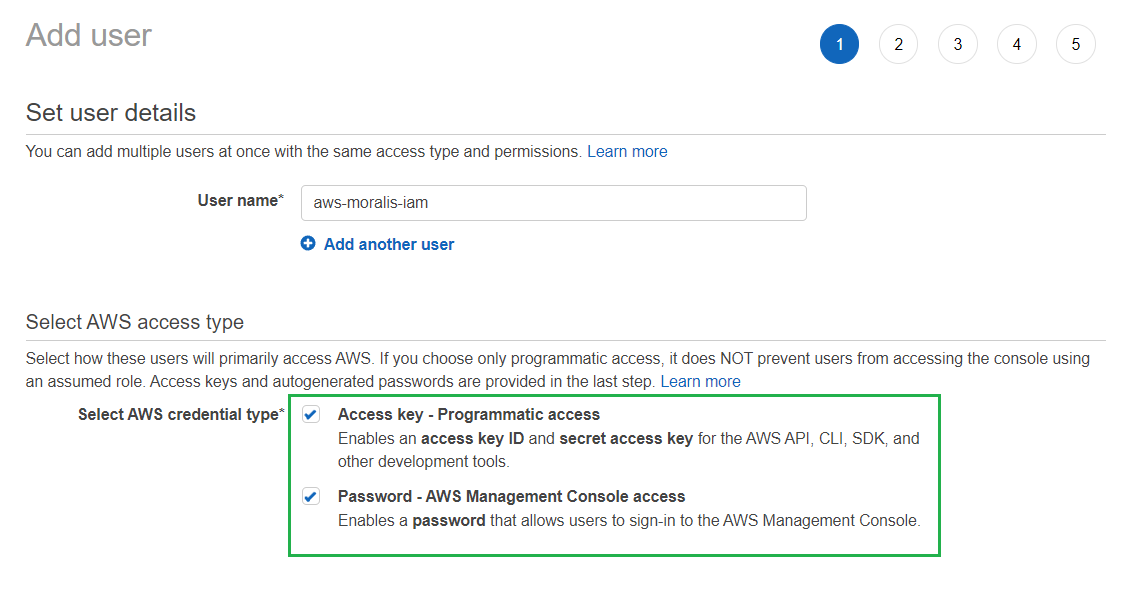
- Create an IAM User – Lastly, you need to create an IAM user, which you can do by logging in to your AWS account and opening the IAM console. From there, click on “Users” and “Add users” in the navigation panel. This should take you to the following page, where you need to add a username and select both AWS credential types:
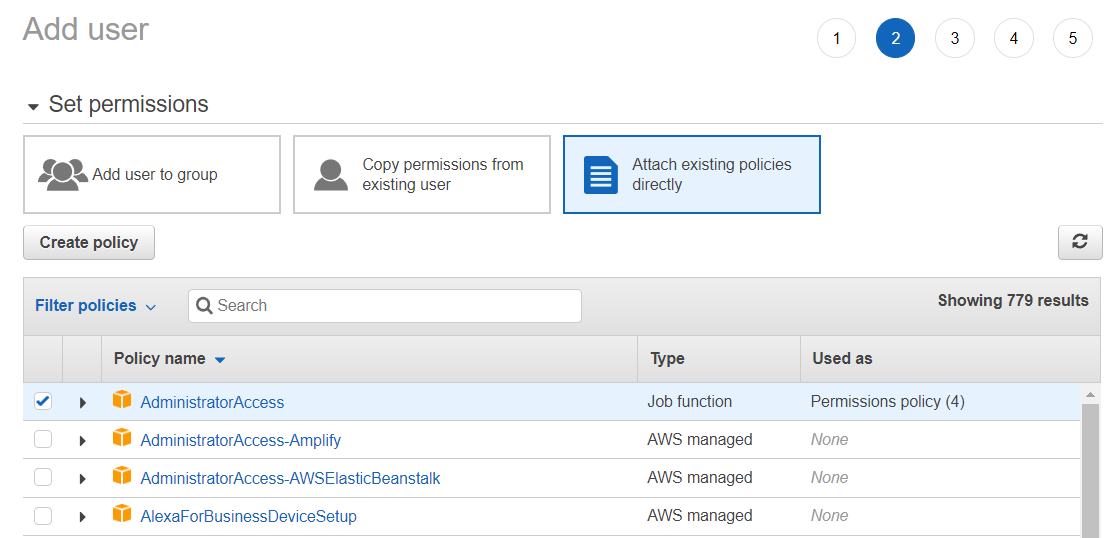
Next up, check the ”AdministratorAccess” box:
Go through each step to configure the account in accordance with your preferences. However, in the fifth step, download your AWS credentials in a ”.csv” format:

That covers the prerequisites! Let’s jump straight into the second step of this AWS Lambda NodeJS tutorial and show you how to set up the project!
Step 2: AWS Credential Configuration and Project Setup
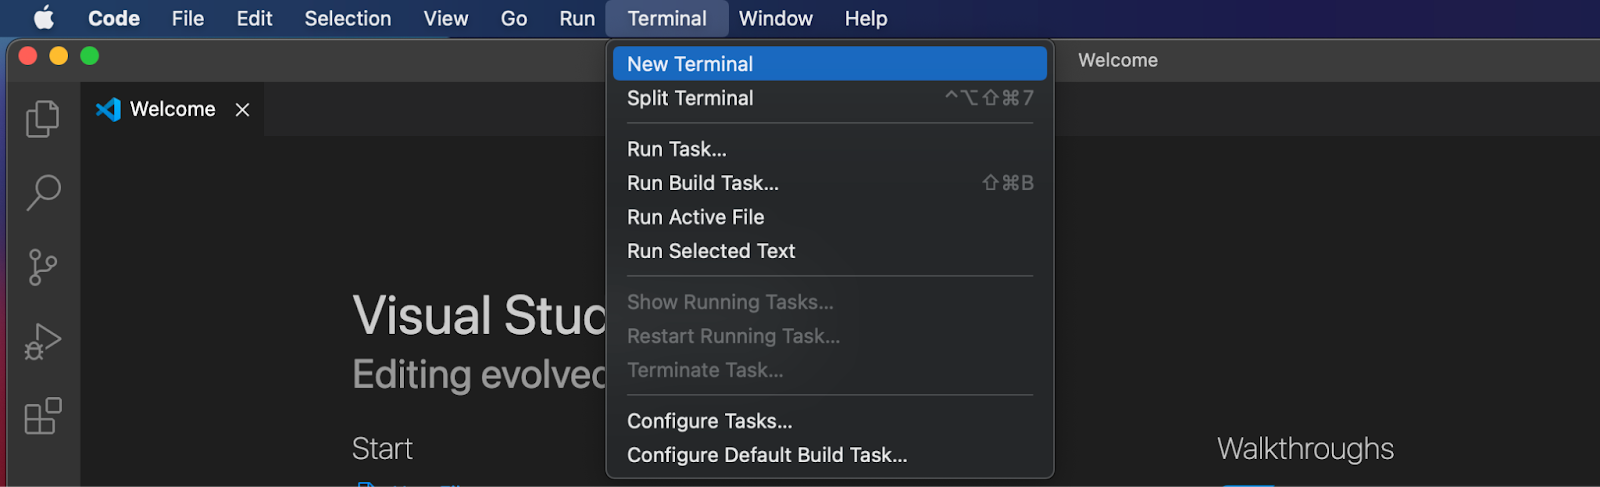
Now, with all prerequisites covered, this second step of the AWS Lambda NodeJS tutorial will show you how to configure your AWS credentials and set up the project. To begin with, we will start with the former by showing you to configure your AWS credentials. As such, you can proceed from here by opening a new terminal. If you are using VSC, you can do so by clicking on the ”Terminal” tab at the top of your IDE, followed by ”New terminal”:
From there, since you installed the AWS CLI in the first step, configure the credentials by running the command below:
aws configure
Running this command prompts your terminal, and you must add your ”AWS Access Key ID” and ”AWS Secret Access Key”. It should look something like this:
AWS Access Key ID [None]: AKIAIOSFODNN7EXAMPLE
AWS Secret Access Key [None]: wJalrXUtnFEMI/K7MDENG/bPxRfiCYEXAMPLEKEY
Default region name [None]: ENTER
Default output format [None]: ENTER
Project Setup
Now that you are done with configuring your AWS credentials, this subsection covers the setup process of the application itself. As such, to begin with, create a new folder and open it with your IDE. From there, open a new terminal once again and run the command below:
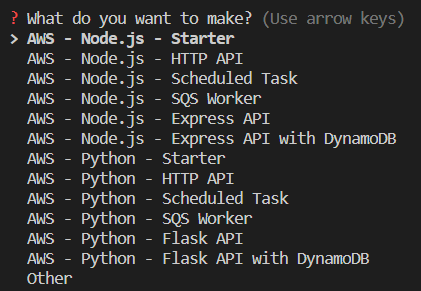
serverless
When running the command above, you are provided with a few options, and in this case, choose ”Starter”:
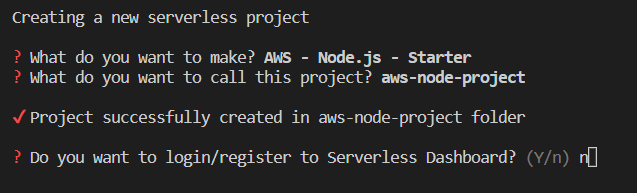
Once you select this option, you are asked to name the project. You can either click enter to set a default name or input one yourself:

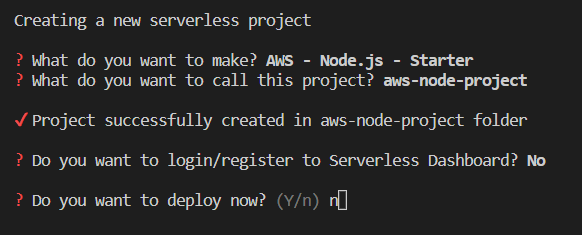
As soon as you name the project, a Serverless Framework template will download. When it completes, your terminal will prompt you to log in. However, for this project, this is not necessary. As such, proceed by entering ”n” and hitting enter:
Lastly, input ”n” and hit enter once more since you do not want to deploy the project just yet:
As a result, you should now have a sample project similar to the one below:

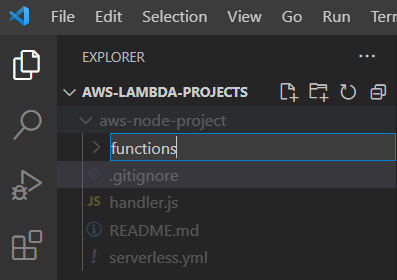
Next up, create a new ”functions” folder:
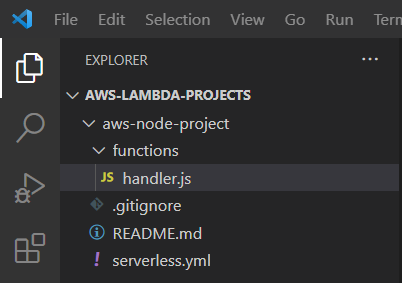
From there, move the ”handler.js” file into this folder:
You can then open the ”serverless.yml” file and set a new location for ”handler.js”:
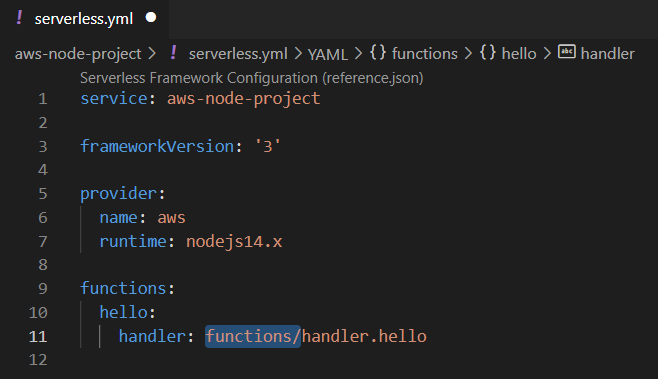
Moreover, add your Moralis API key as an environment variable. To do so, replace the code in ”serverless.yml” with the following snippet:
service: aws-node-project

frameworkVersion: '3'

provider:
  name: aws
  runtime: nodejs14.x
  environment:
    MORALIS_API_KEY: 'replace_me'

functions:
  hello:
    handler: functions/handler.hello
If you inspect the code above, you will notice that you need to set the ”MORALIS_API_KEY” variable to equal your API key. To get the key, log in to Moralis, click on the ”Web3 APIs” tab to the left, copy the key, and insert it into the code:

That’s it for the initial project setup! Let us move on to the core development part of this AWS Lambda JS tutorial!
Step 3: Developing the App
First up, open a terminal and navigate to the root folder of your project. You can do so by running ”cd ’FOLDER_NAME’ ”. From there, you can go ahead and install Moralis by running the following command:
npm install moralis
In the following two subsections, you will learn how to create two functions, ”getNativeBalance” and ”getWalletNfts”. The first returns the native token balance of a specified wallet, and the second returns the wallet’s NFTs. Nevertheless, let us kick things off with the former.
The getNativeBalance Function
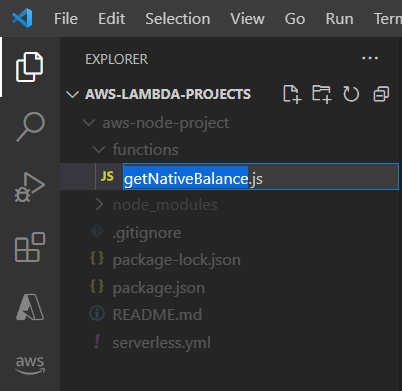
To start with, let us use the already existing ”handler.js” file and rename it ”getNativeBalance.js”:
From there, open the file and replace ”module.exports.hello” with ”module.exports.handler”:
You can then proceed by opening the ”serverless.yml” file and changing the function’s name and handler. It should now look similar to this:
service: aws-node-project

frameworkVersion: '3'

provider:
  name: aws
  runtime: nodejs14.x
  environment:
    MORALIS_API_KEY: 'replace_me'

functions:
  getNativeBalance:
    handler: functions/getNativeBalance.handler
Next up, it is time to customize the function by adding Moralis’ ”getNativeBalance” functionality. To do so, navigate back to ”getNativeBalance.js” and start by adding the Moralis requirements:
const Moralis = require('moralis').default;
You can then add the code snippet below to initialize Moralis using your Web3 API key specified as an environment variable:
const startMoralis = async () => {
  await Moralis.start({
    apiKey: process.env.MORALIS_API_KEY
  });
};

startMoralis();
Lastly, replace the entire ”module.exports.handler” with the code below to implement the desired SDK method:
module.exports.handler = async (event) => {
  // Get native balance
  const nativeBalance = await Moralis.EvmApi.balance.getNativeBalance({
    address: event.address,
    chain: event.chain
  });

  // Format the native balance formatted in ether via the .ether getter
  const nativeBalanceEther = nativeBalance.result.balance.ether;

  return {
    result: nativeBalanceEther
  }
};
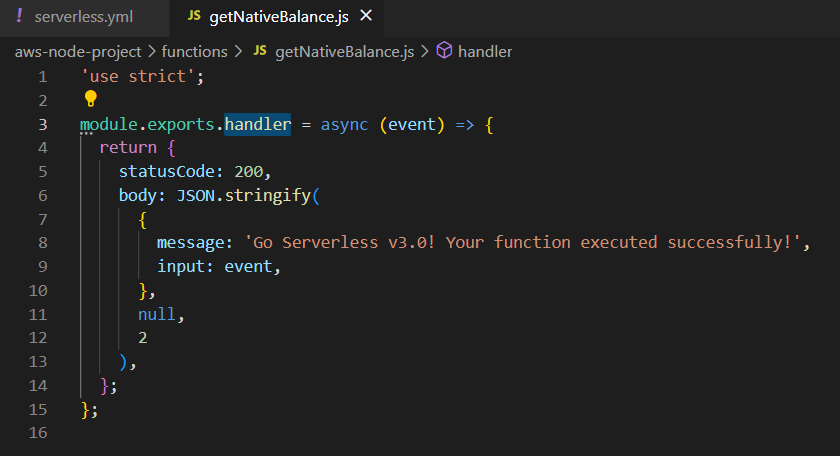
Ultimately, your ”getNativeBalance.js” file should now look something like this:
'use strict';
const Moralis = require('moralis').default;

const startMoralis = async () => {
  await Moralis.start({
    apiKey: process.env.MORALIS_API_KEY
  });
};

startMoralis();

module.exports.handler = async (event) => {
  // Get native balance
  const nativeBalance = await Moralis.EvmApi.balance.getNativeBalance({
    address: event.address,
    chain: event.chain
  });

  // Format the native balance formatted in ether via the .ether getter
  const nativeBalanceEther = nativeBalance.result.balance.ether;

  return {
    result: nativeBalanceEther
  }
};
That covers the initial ”getNativeBalance” function. Let us follow the same procedure to implement the ”getWalletNfts” function in the following subsection!
The getWalletNfts Function
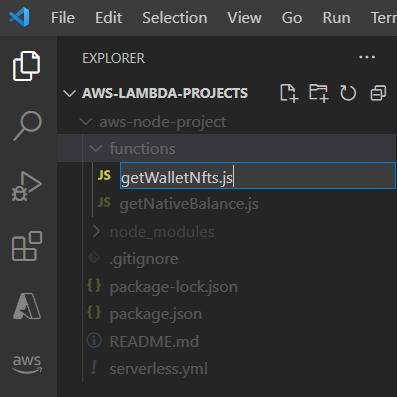
For this function, you need to start by creating a new file in the ”functions” folder. In this case, let us call the folder ”getWalletNfts.js”:
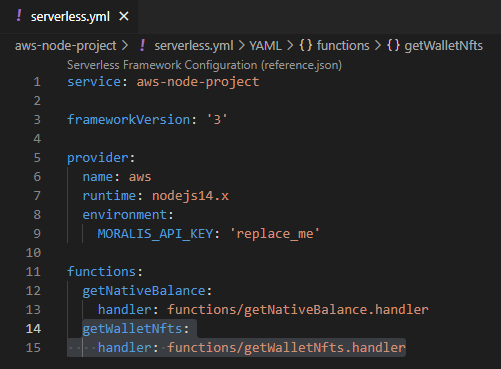
From there, open the ”serverless.yml” file and add the following code in the ”functions” section:
getWalletNfts:
    handler: functions/getWalletNfts.handler
Lastly, complete the ”getWalletNfts” function by adding the following code to the ”getWalletNfts.js” file:
'use strict';
const Moralis = require('moralis').default;

const startMoralis = async () => {
  await Moralis.start({
    apiKey: process.env.MORALIS_API_KEY,
  });
};

startMoralis();

module.exports.handler = async (event) => {
  // Get wallet NFTs
  const nfts = await Moralis.EvmApi.nft.getWalletNFTs({
    address: event.address,
    chain: event.chain,
    limit: 10
  });

  return {
    result: JSON.stringify(nfts)
  }
};
That’s it for this AWS Lambda NodeJS tutorial! If you followed along this far, you now know how to integrate a NodeJS SDK with Lambda using Moralis!
However, you should conduct a local test to ensure everything works as intended. What’s more, once you are happy with the application, you should deploy it to Lambda. Consequently, we will dedicate the final section of this tutorial to showing you how these processes work!
Concluding the AWS Lambda NodeJS Tutorial – Testing and Deploying
To begin with, you want to run a local test to ensure that your Lambda application works as intended. As such, we will dedicate the initial part of this section to showing you how to test your Lambda functions locally!
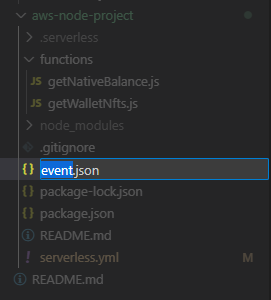
Let us start by creating a new file called ”event.json” in the project’s root folder:
You can then add an ”address” and ”chain” as parameters. It can look something like this:
{
    "address": "0x99EXAMPLEADDRESS",
    "chain": "chain_id"
}
However, as you can see from the code snippet, you need to add the wallet address from which you want the balances and the ID of the chain you want to query. From there, you can test the functions, and as an example, input the following into the terminal to test the ”getNativeBalance” function:
serverless invoke -f getNativeBalance --path event.json
If the test is successful, it should return a message similar to the one below:

Now that you have made sure that everything works fine, all that remains is deploying your project to AWS. To do so, make sure you are in your project’s root folder and run the following command in the terminal:
serverless deploy
If the deployment is successful, you should receive a message similar to this one in return:
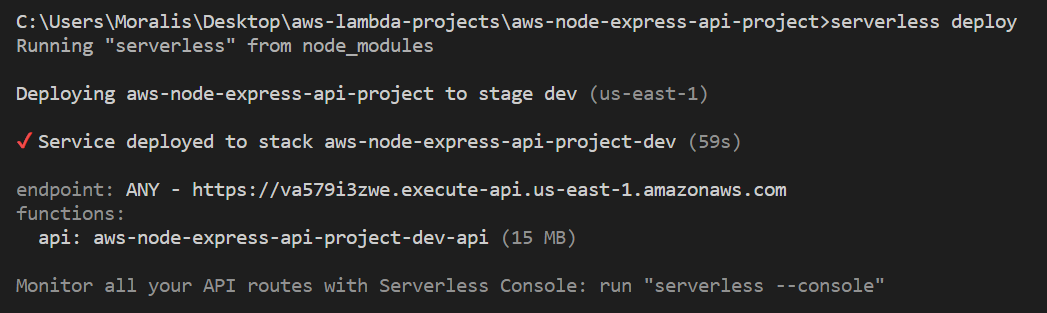
Congratulations; you have now successfully built and deployed a Lambda application with multiple functions!
If you experience any trouble at any point, check out the AWS Lambda documentation for this tutorial. You can also join the Moralis Discord community to receive assistance from our community engineers if any questions remain!
Summary – AWS Lambda NodeJS Tutorial
This article provided an example of how to integrate a NodeJS SDK with AWS Lambda. To illustrate the process, you learned how to integrate Moralis’ NodeJS SDK with Lambda by creating a straightforward application with multiple functions in only three steps:
- Prerequisites
- AWS Credential Configuration and Project Setup
- Developing the App
If you followed along during this AWS Lambda NodeJS example, you now know how to create, test, deploy, and run Web3 functions using Lambda and Moralis’ NodeJS SDK! As such, you can now use the same principles to run JavaScript functions via Lambda in the future, which will prove helpful in your Web3 development endeavors!
If you found this article helpful, you have additional content to explore here at Moralis’ Web3 blog. For example, check out our articles on AWS Lambda and what it is used for or Web3 for business if you want to integrate Web3 infrastructure into your enterprise!
What’s more, you should also know that Moralis bridges the gap between Web2 and Web3 development! As such, sign up with Moralis straight away to leverage the power of blockchain technology to its full potential and access a more seamless developer experience!
