Do you want to learn how to quickly and effectively create a decentralized app? If your answer is ”yes”, you are in the right place. This tutorial will illustrate how to create a decentralized app in only three simple steps using Moralis. If this sounds interesting, read on and explore one of the fastest ways to build dapps! Moreover, if you would like, you can skip the steps of the tutorial and immediately inspect the code for the project using the link below:
The Moralis Ethereum Boilerplate Documentation – https://github.com/ethereum-boilerplate/ethereum-boilerplate
The link above takes you to Moralis’ Ethereum boilerplate GitHub repository, which is how you will be able to create a decentralized app in only three steps. This, combined with amazing development tools such as Moralis’ enterprise-grade Web3 APIs, makes dapp development more accessible, allowing you to create sophisticated Web3 projects markedly quicker!
For example, the Moralis Auth API makes Web3 authentication relatively accessible. Further, with the API, you can add several authentication mechanisms to your projects with single snippets of code, for example. The Ethereum boilerplate initially features MetaMask authentication; however, you can, for instance, easily add a sign in with RainbowKit.
So, are you looking to create a decentralized app? If this is the case, make sure to sign up with Moralis right now to boost your efficiency and effectiveness!
What is a Decentralized App?
Decentralized apps – often abbreviated ”dapps” – are blockchain-based, which is why they’re considered unique compared to conventional Web2 applications. Moreover, Web2 and Web3 apps usually fulfill the same functionality, but the latter is equipped with blockchain functionality, making them more powerful.
Developers build dapps on P2P networks, and they function through the use of smart contracts. Furthermore, smart contracts are essential features of the Web3 development space, facilitating the opportunity for a higher degree of innovation. Now, if you are not all that familiar with Web3 contracts, you might find it interesting to explore these further.
Nevertheless, since decentralized applications operate on blockchain networks, they have several benefits making them more attractive than Web2 apps. Below, we will present a few examples:
- Decentralized applications are censorship-resistant.
- Decentralization is a crucial characteristic of decentralized apps, and it removes the single point of failure generally existing within the Web2 development space. As such, it becomes harder for single authorities to censor or block a network.
- Dapps are commonly open-source.
- This drives innovation within the space and encourages development.
- Decentralized apps are blockchain-based.
- As dapps function through smart contracts and run on blockchain networks, it becomes easy to integrate cryptocurrencies into the project’s functionality.
However, the benefits/advantages above are only a few examples, and there is much more to dapps for you to discover on your own. Nevertheless, now that you have an overview of decentralized applications, it is time to move on to the main section, where we will illustrate how to create a decentralized app in just three steps using Moralis!
How to Create a Decentralized App in 3 Steps
From this point onwards, we will show you how to create a decentralized app using Moralis. The process becomes relatively straightforward thanks to Moralis’ tools and the Ethereum boilerplate. Moreover, all you need to do is follow these three steps:
- Go into our GitHub repository and clone the Ethereum boilerplate code.
- Once you’ve cloned the code, you must customize specific environment variables.
- Finally, start the decentralized application!
Thanks to the accessibility of Moralis, you will be able to create a decentralized app in record time. However, before we get into the nitty-gritty of the process itself, we will take the following section to dive deeper into Moralis’ Ethereum boilerplate code. This will clearly illustrate what you are working towards and demonstrate the template’s capabilities.
Nevertheless, if you want to watch a YouTube clip explaining the process instead, you have the opportunity to do so. In the video below from Moralis’ YouTube channel, a Moralis team member explains the Ethereum boilerplate in further detail and shows you how to create a decentralized app with ease:
The Ethereum Boilerplate Code from Moralis
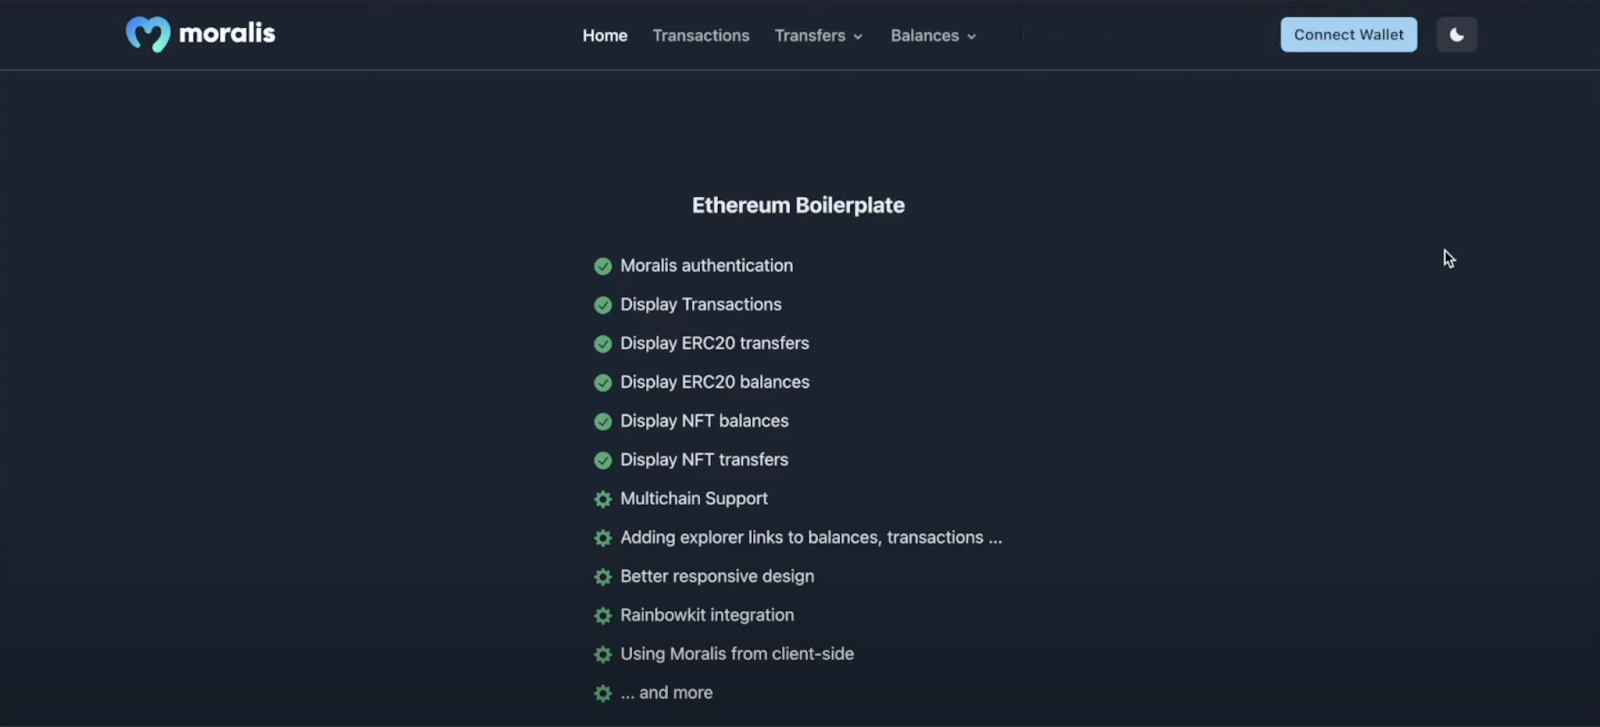
To show you what we aim to create, we will take this section to explore Moralis’ Ethereum boilerplate. However, this is simply a template helping you create the fundamentals of a decentralized app. Hence, you might want to use this boilerplate as a foundation and add/remove features that are not part of your targeted segment’s needs. Nevertheless, this is the landing page for the Ethereum boilerplate:
Let’s begin by inspecting the navigation bar at the top of the dapp. As you can see, there is a ”Connect Wallet” button on the far right:

If you click on this button, it will open your MetaMask wallet and allow you to authenticate your Web3 identity. Once you sign the message, it will autonomously populate the additional tabs you can see at the top with information regarding your wallet. So, if you, for example, click on the ”Transactions” tab, you will be presented with a page looking something like this:
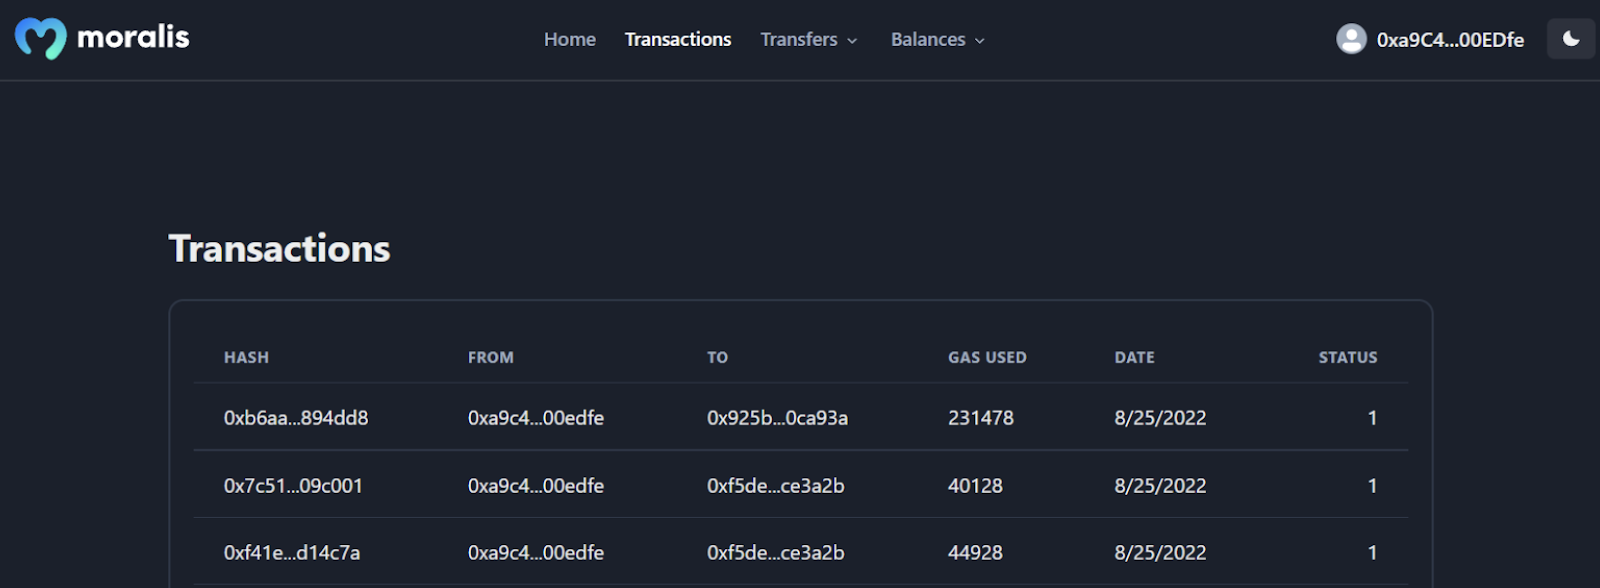
The table above shows the transaction history of your wallet. Further, you can view the hash, addresses, gas price, date, etc., regarding particular transactions. Also, both the ”Transfers” and ”Balances” tabs have drop-down menus allowing you to toggle between ”NFTs” and ”ERC-20” tokens:

If we take the ”Balances” tab as an example, you can filter between your wallet’s assets. This is what it might look like if you press the ”ERC-20” option:

Lastly, the boilerplate features both dark and light modes. To toggle between these two options, you can use the button at the top:

That basically covers the essential parts of the Ethereum boilerplate code. Now that you know how it works and what you are working towards, we can begin breaking down the tutorial and show you how to create a decentralized app!
Create a Decentralized App in 3 Steps – Full Breakdown
To make this ”create a decentralized app” tutorial more comprehensible, we will divide this section into three sub-sections – one for each step. Accordingly, we will initiate the tutorial by showing you how to clone the Moralis Ethereum boilerplate. Next, you will need to configure some environment variables. Finally, all that remains from there is to start the application where you, yourself, can ensure everything is working as intended.
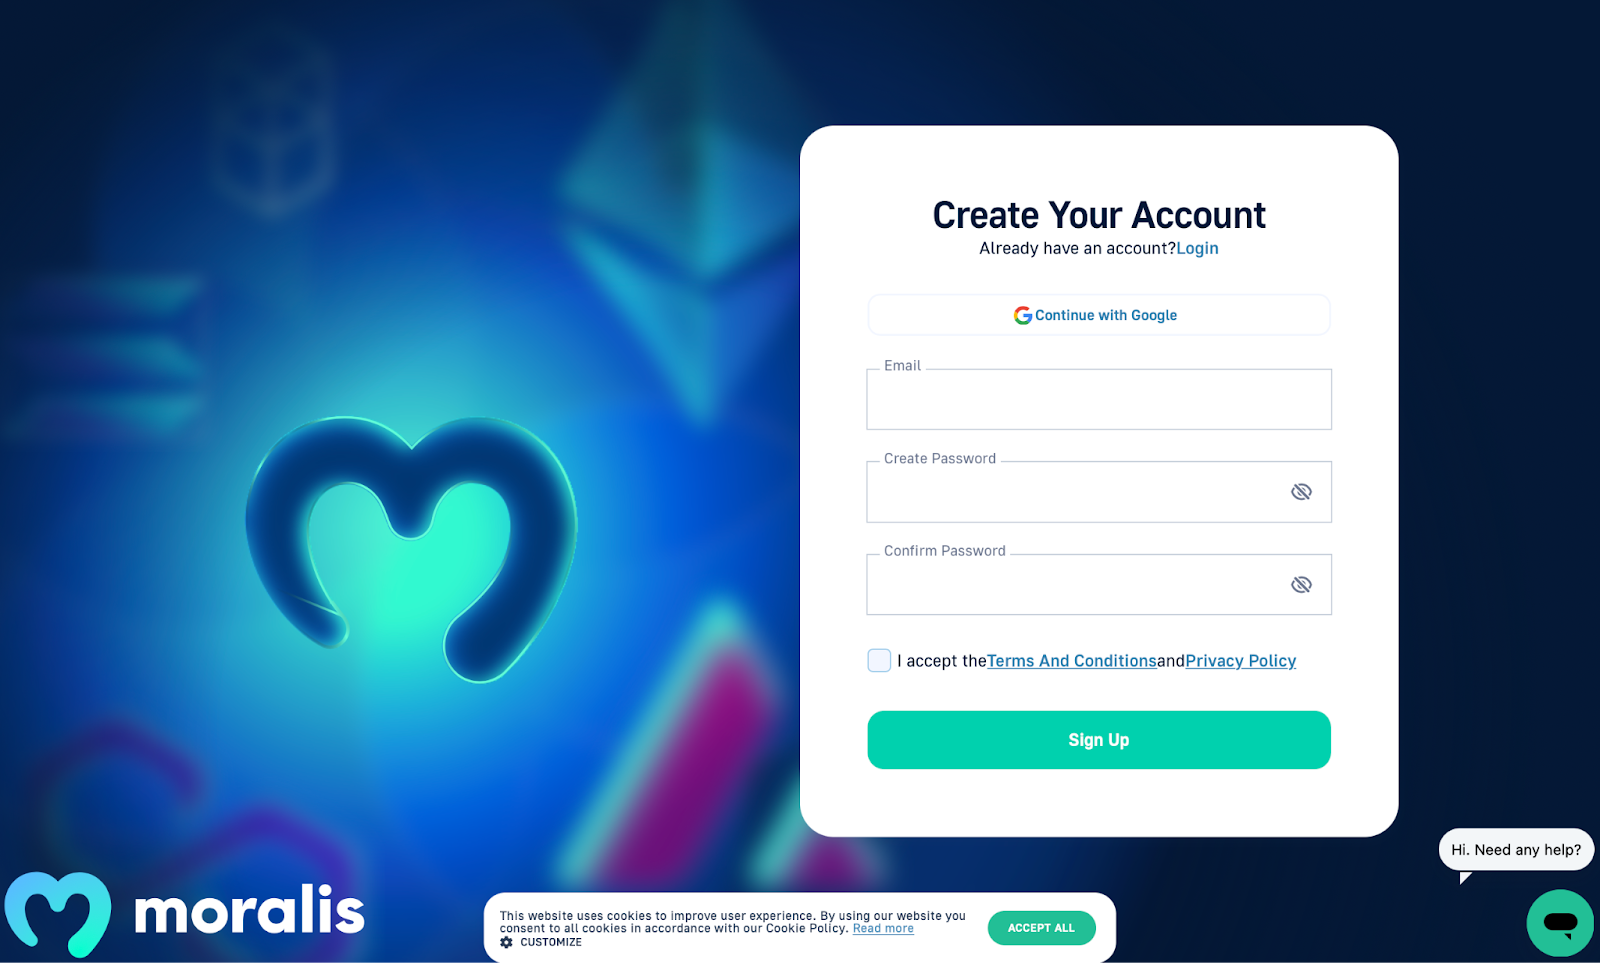
However, before we move on to show you how to clone the template, you must possess a Moralis account. Furthermore, this is a requirement when customizing the environment variables. So, if you have not already, you can sign up with Moralis by clicking on ”Start for Free” at the top right of the Moralis website:

From there, all you need to do is follow the instruction and input an email, create a password, check the ”I accept” box, and hit ”Sign Up”:
Step 1: Clone the Moralis Ethereum Boilerplate Code
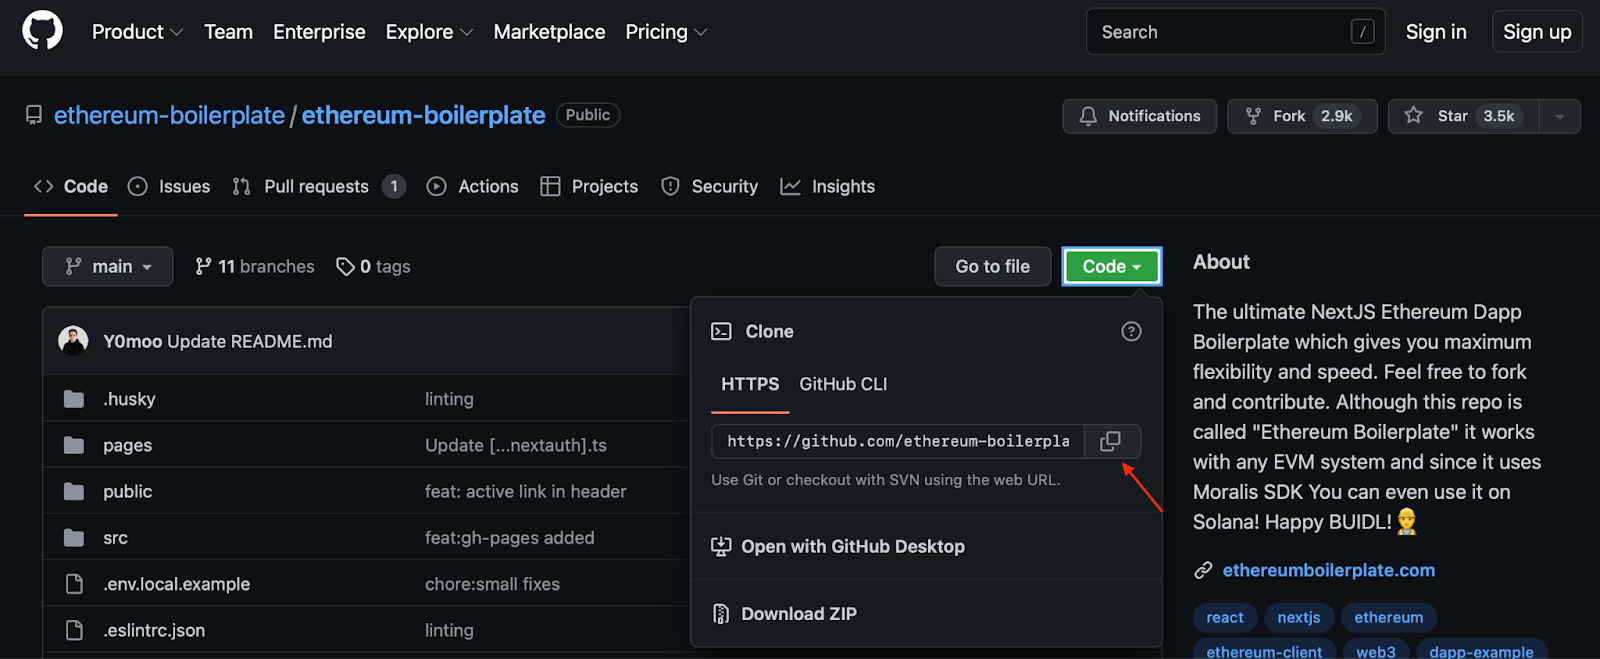
The first thing you will need in order to create a decentralized app is to clone Moralis’ Ethereum boilerplate code. To do so, please navigate to the Ethereum boilerplate GitHub repository, which we initially linked at the outset of this article. Once you click on this link, you can proceed by clicking on the green ”Code” button and copying the URL:
From there, you can open an IDE (integrated development environment) of your choice. We are using VSC (Visual Studio Code); however, feel free to choose the environment you are most familiar with. Just note that the process can potentially differ if you are not using VSC.
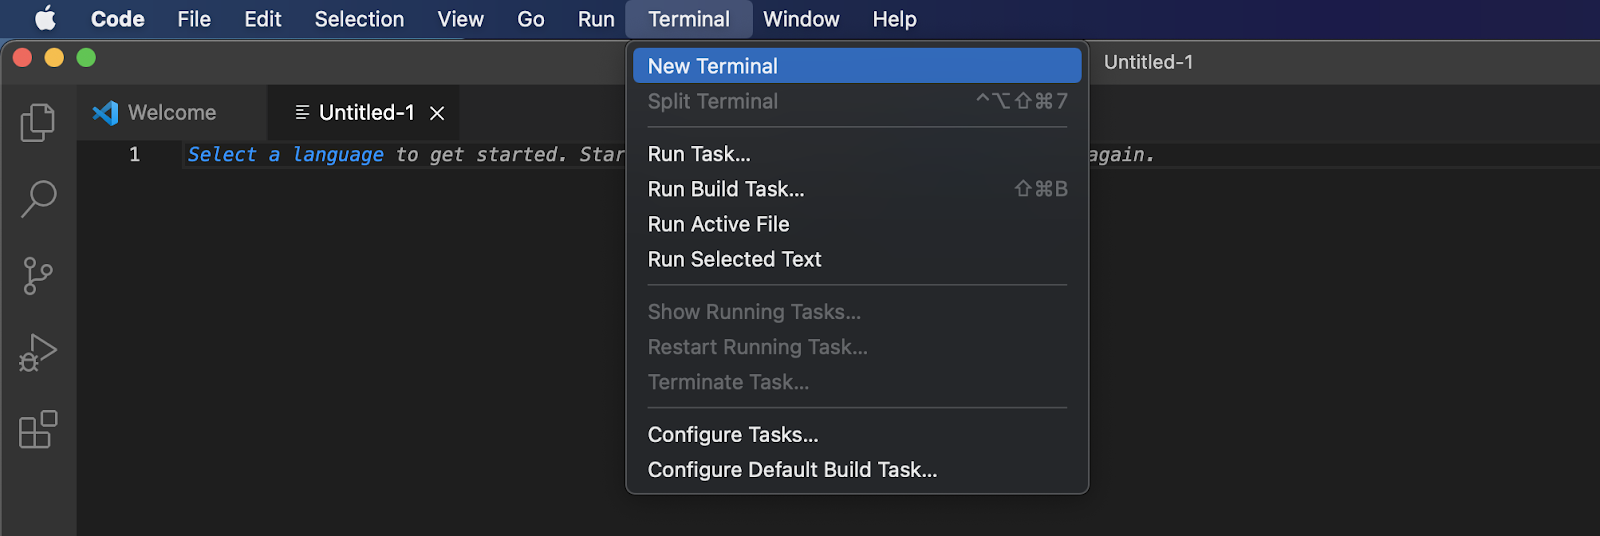
Nevertheless, once you open the IDE, you can continue by creating a new folder. You can call the folder whatever you want, but we will name ours ”BOILERPLATE”. With the folder at hand, the next thing you must do is open a new terminal. For VSC users, you can do so by clicking on the ”Terminal” tab at the top and then hitting ”New Terminal”:
With a new terminal open, make sure you are in the correct location of the file you just created, and run the following command using the GitHub repository URL:
git clone “BOILERPLATE_URL”
This will clone the Ethereum boilerplate to your local directory, and from there, you can navigate to the proper folder by inputting the following into the terminal:
cd ethereum-boilerplate
If everything worked as intended, you should have the following structure in your local directory:

Now, with the Ethereum boilerplate at hand, the next part you must deal with to create a decentralized app is to customize a bunch of environment variables!
Step 2: Customize Environment Variables
Now that you have the Ethereum boilerplate in your local directory, it is time to customize the environment variables. To do so, you can navigate to the ”.env.local.example” file:
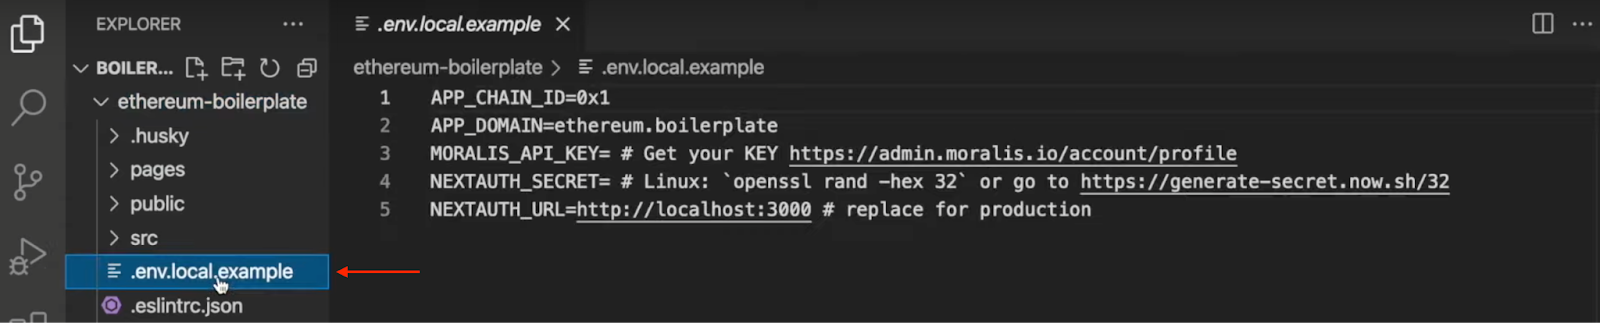
The first thing you can do is rename this file to ”.env.local” by simply removing ”.example” at the end. Next up, as the image above illustrates, there are five environment variables; however, you only need to consider three of them for now. As such, we will initiate by taking a closer look at ”APP_CHAIN_ID”.
The ”APP_CHAIN_ID” variable equals ”0x1”, which is the chain ID for Ethereum. Accordingly, if you want to create a decentralized app for the Ethereum network, you do not need to configure this variable. However, if you, for example, want to build a Polygon dapp, you need to change the variable to ”0x89”. You can find more information about supported chains here.
Next, you need to add an API key to ”MORALIS_API_KEY”, which is why you need a Moralis account. To fetch your key, you need to log in to your account, hit ”Account”, navigate to the ”Keys” tab, and copy the key:

From there, you simply need to add this value to the code. Next, you have the ”NEXTAUTH_SECRET” variable. You can use the following link to generate a value to implement into the code: https://generate-secret.now.sh/32.
The other two variables can, for now, be left unaltered. For example, ”NEXTAUTH_URL” currently equals “http://localhost:3000“. This works now as you are developing the dapp, allowing you to test your project easily. However, once you finalize the project and plan to launch the app on a network, this value must equal the dapp’s URL.
Final ”.env.local” Code:
APP_CHAIN_ID=0x1
APP_DOMAIN=ethereum.boilerplate
MORALIS_API_KEY= "YOUR_API_KEY"
NEXTAUTH_SECRET= b8e786967d7bcbc0f920d35bcc3f891c
NEXTAUTH_URL=http://localhost:3000
Step 3: Start the App
In this final part of this ”create a decentralized app” guide, we will quickly show you how to start the dapp. First of all, you will need to install the proper dependencies. To do so, all you need is to open a new terminal and input one of the following commands:
npm i
yarn
From here, the final step is to run the dapp on a local host, which you can do through either of these commands:
npm run dev
yarn run dev
Running the dapp on a local host allows you to easily access the application through the link you specified earlier: “http://localhost:3000“. This will enable you to test the dapp in a safe environment and ensure that everything works properly.
With the template at hand, it is now up to you to customize the dapp to fit your targeted segment’s needs. As such, you might need to add or remove features that are missing or that you feel might be unnecessary.
If you found this article interesting, you can find other particular guides to specific chains. For example, learn how to build an Avalanche dapp or build a Cronos dapp in five steps!
Create a Decentralized App – Summary
The article demonstrates one of the fastest ways to create a decentralized app. Furthermore, by following along in this tutorial, you are able to create a decentralized app in only three simple steps, thanks to Moralis’ Ethereum boilerplate:
- Go into our GitHub repository and clone the Ethereum boilerplate code.
- Once you’ve cloned the code, you must customize specific environment variables.
- Finally, start the decentralized application!
Following these steps allows anyone to create a decentralized app in only a few minutes. However, the Ethereum boilerplate is not the only Moralis tool contributing to a more accessible development experience. For example, you can additionally check out Moralis’ Web3 Streams, allowing you to stream on-chain data directly into your dapps.
Moreover, if you found this article interesting, check out additional blockchain-related content here at Moralis’ Web3 blog. For example, you can learn everything you need about the EIP-4361 standard, different types of DAOs, and much more!
So, if you want to create a decentralized app or any other Web3 project, sign up with Moralis right now! Creating a Moralis account only takes seconds, and you can access the platform’s benefits immediately.
