Are you interested in Web3 Python development? If so, Moralis’ Python SDK is your go-to option! With this development kit, you can implement Web3 functionality into any Python application seamlessly in only two straightforward steps:
- Install the Moralis Python SDK with the terminal command below:
pip install moralis
- Make a Moralis Web3 API call. Down below is an example of what it can look like for querying the native balance of a Web3 wallet:
from moralis import evm_api

api_key = "YOUR_API_KEY"

params = {
    "address": "0xd8da6bf26964af9d7eed9e03e53415d37aa96045",
    "chain": "eth",
}

result = evm_api.balance.get_native_balance(
    api_key=api_key,
    params=params,
)

print(result)
If you want more details regarding Moralis as a Python Web3 provider, check out the official Web3 Python SDK documentation. This page features a quick tutorial and additional examples of API calls for fetching NFT metadata, NFTs from an address, NFTs from a collection, how to get all NFTs owned, and much more!
Overview
Python is one of today’s most well-established programming languages and can be used to create everything from straightforward applications to more complex machine-learning software. What’s more, did you know that it is now easier than ever to use Python in Web3 development? With Moralis and the Python SDK, you can seamlessly integrate Web3 functionality into any Python application. If this sounds exciting and you want to learn more, follow along as we explore the intricacies of Python and Web3 further!
To illustrate the accessibility of Moralis, this tutorial demonstrates how to create a Web3 Python application that allows users to sign in with MetaMask. Moreover, thanks to the Python SDK, you will be able to do so in only three steps:
- Creating the Python Flask App
- Launching the Flask App
- Creating the Frontend React App
In combination with the Python SDK, the tutorial also illustrates the power of the Auth API. However, this is only one of Moralis’ various Web3 APIs. Another exciting example is the Streams API, allowing you to stream on-chain data directly into the backend of your dapps via Moralis webhooks!
Nevertheless, no matter what blockchain projects you embark on, sign up with Moralis immediately. With Moralis, you can build faster and smarter as you unlock the full power of blockchain technology!
Exploring Python and Web3
Before jumping into the main section of this tutorial, we will return to basics by briefly covering Python and Web3. If you are already familiar with these two concepts, feel free to jump straight into the ”Tutorial: Python and Web3 for Blockchain Development” section below. Otherwise, join us as we break down Python and Web3 separately to provide an overview of what they entail!
What is Python?
Python is an object-oriented, high-level programming language featuring easy-to-learn syntax focusing on readability. Accordingly, it is quite easy to learn Python, making it a top choice for people getting into programming. This contributes to Python’s high adoption and is a prominent reason why this is one of the most well-used programming languages today.
Furthermore, Python is what is known as a ”general purpose” language, meaning it has many different use cases. As such, developers use Python for building simple applications to more complex endeavors such as machine learning.
What is Web3?
Web3, as the name indicates, refers to the third generation of the internet. As such, it is a catch-all term for a new and improved version of the web. At its very core, Web3 leverages cryptocurrencies, blockchains, and other innovative technologies to create a decentralized web where power is given back to users in the form of ownership.
To better understand Web3, it is a good idea to briefly compare it with the preceding generations of the internet. In short, Web1 was all about static read-only content, and with Web2, it transitioned to dynamic read-write content. Finally, the Web3 era aims for a read-write-own structure.
Moreover, here are three core ideas of Web3’s decentralized web:
- Decentralization
- Native Payments
- Permissionless
With these brief overviews of Python and Web3, let’s combine them and explore if it is possible to use Python for Web3 development!
Is it Possible to Use Python for Web3?
Is it possible to use Python for blockchain development? The answer to this question is yes! However, if you come straight from the traditional Web2 development space, you need to consider some minor differences before embarking on any Python Web3 endeavors. For example, mastery of libraries such as ”Web3.py” is highly beneficial. This Python-based library makes it more seamless to interact with the Ethereum network.
Additionally, there are other development tools that can make your life as a Web3 developer significantly more accessible. If this sounds exciting and you want to learn more about Web3 Python development tools, join us in the next section, where we explore the best Python Web3 provider: Moralis!
Using Web3 in Python Development – Best Python Web3 Provider
Moralis is one of the industry’s best Web3 infrastructure providers, supplying various development tools such as enterprise-grade Web3 APIs, SDKs, and much more. With Moralis, it becomes possible to unlock the full potential of blockchain technology to build dapps and other Web3 projects more seamlessly!
Among these prominent Web3 development tools, a great example is the Moralis Python SDK. Moralis’ Python SDK is the ultimate Web3 tool for Python development, allowing you to create blockchain projects more effectively and efficiently.
Thanks to Moralis’ capabilities as a Python Web3 provider, you can seamlessly integrate blockchain functionality into all your Python applications. Moreover, due to Moralis’ cross-chain compatibility, you can create Web3 Python projects for multiple networks, including Cronos, Solana, Ethereum, and many more!
So, if you want to know more about Moralis as a Python Web3 provider and how this tool works, join us in the next section, where we will show you how to create a Web3 Python application in only three steps!
Tutorial: Python and Web3 for Blockchain Development
With a more profound understanding of Python, Web3, and Moralis as a Web3 Python provider, this section dives deeper into the central part of this article, where we show you how to create a Python application allowing users to sign in with their MetaMask wallets.
By following along, you will learn how to create a backend Python application implementing the required logic for handling Web3 authentication flows. In addition to the backend code, you will also set up a React frontend app demonstrating the authentication mechanism in practice!
What’s more, thanks to Moralis’ Python SDK, you can build this Web3 application in only three steps:
- Creating the Python Flask App
- Launching the Flask App
- Creating the Frontend React App
However, if you would rather watch a video explaining the process, you can check out the clip below from Moralis’ YouTube channel. This video covers the entire process from start to finish, providing a comprehensive walkthrough of this tutorial in video format:
Nevertheless, before jumping into the first step, the following section takes a closer look at the end result of the app, giving you an idea of what you are working towards!
Web3 Python App – End Results
The app you’ll learn to create during this Python and Web3 tutorial is relatively straightforward, featuring the landing page below:

As the image illustrates, the initial login page has a ”Python Web3 Authentication” heading and a ”Login” button. If you click on the button, it launches your MetaMask, asking you to connect your Web3 wallet. When connecting your MetaMask, a new request is sent to the Python application’s backend, prompting Moralis’ Auth API to create a new login challenge.
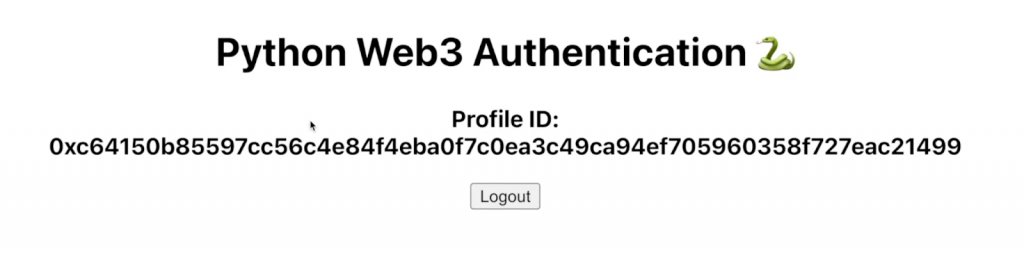
Next, the app sends another request validating your signature. If it matches, and this is your first time logging in, a new user ID is generated, which is displayed on the user page of the app:
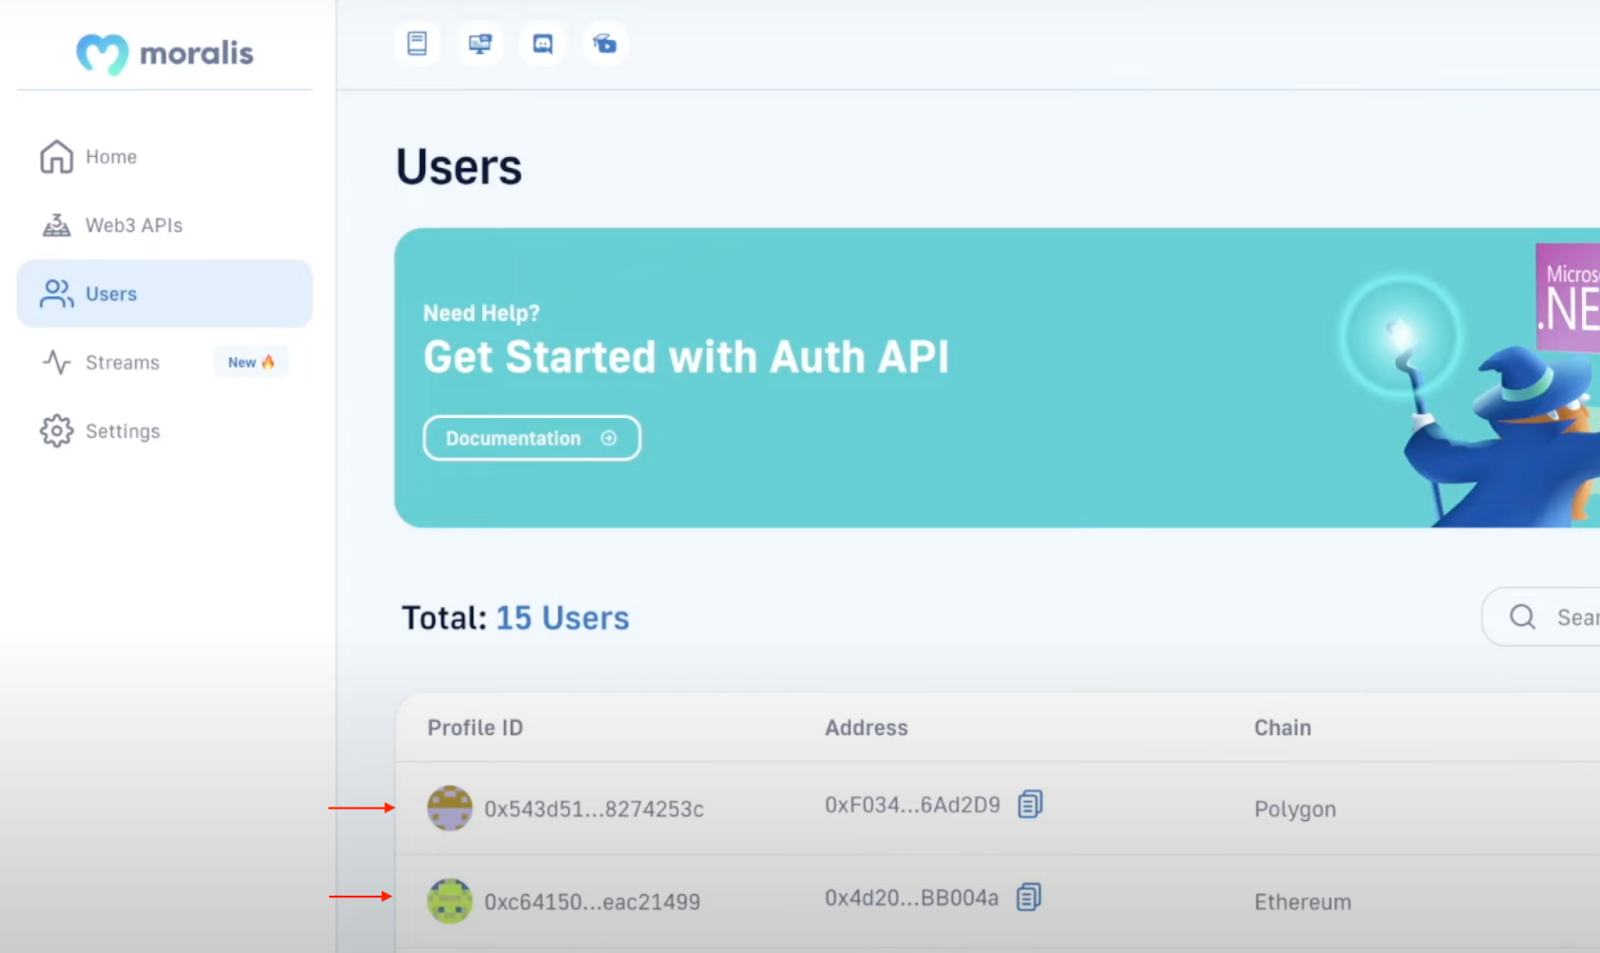
What’s more, as soon as you successfully authenticate yourself, it will autonomously add a new user – with the ID attached – to the ”User” tab on your Moralis admin panel:
That covers the demo of our Web3 Python application! So, now that you have a better understanding of how the app works and what you are working towards, let us jump straight into the first step to show you how to create the Python Flask app for the backend!
Step 1: Creating the Python Flask App
To begin with, the first thing you need to do is set up a new Web3 Python project in your integrated development environment (IDE). For this tutorial, we will be using Visual Studio Code (VSC) to illustrate the process. As such, if you opt for another alternative, note that some steps might occasionally differ.
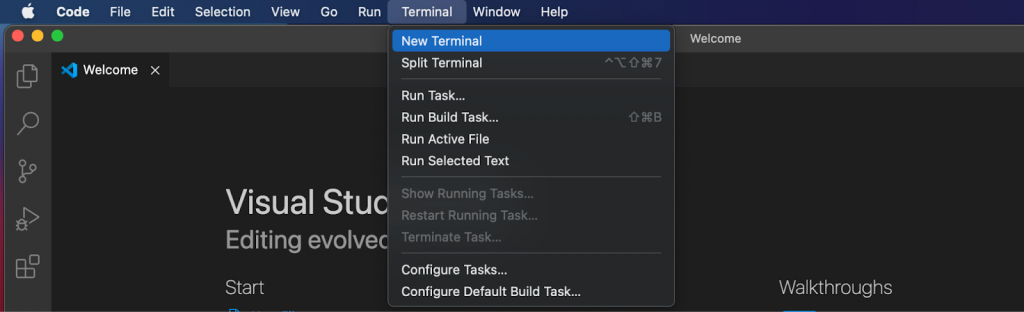
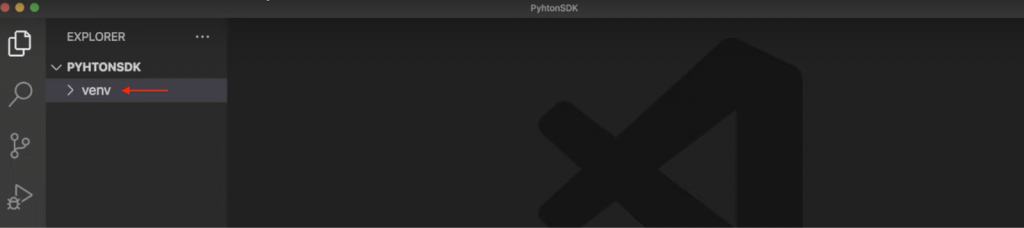
Nevertheless, launch your IDE, create a new project folder, and open a new terminal. If you are using VSC, you can launch a new terminal by clicking on the ”Terminal” tab at the top of the interface, followed by ”New Terminal”:
Next up, ”cd” into the root folder of the project and run the following command in your terminal:
python3 -m venv venv
Running the above command creates a new virtual environment, and you should now find a new ”venv” folder in your local directory:
From there, initialize the environment with the command below:
source venv/bin/activate
Once you have initialized the virtual environment, make sure that you have the latest version of ”pip” by running the following input in the terminal:
pip install --upgrade pip
To top things off, you need to install the required dependencies. For this tutorial, there are three in total, and you will find the commands for installing them down below. Input each separately and run them sequentially:
pip install flask
pip install flask_cors
pip install moralis
Flask Application Code
With the initial setup of the project finalized, it is time to focus on the code. Consequently, this section shows you how to add the necessary endpoints and functions for the Web3 Python application!
First, start by creating a new ”app.py” file in the project’s root folder. Open the file and add the imports for the dependencies at the top:
from flask import Flask
from flask import request
from moralis import auth
from flask_cors import CORS
Below the imports, initialize the application and wrap it in ”CORS” by adding the following code snippet:
app = Flask(__name__)
CORS(app)
Next, add a new variable for your Moralis API key:
api_key = "xxx"
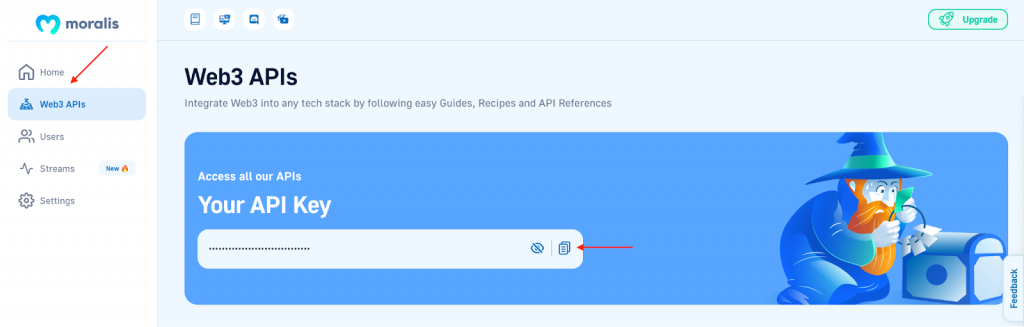
As you might have figured out by now, you need to replace ”xxx” with the value of your actual key. As such, if you have not already, sign up with Moralis, as you need an account to fetch the key. Once you have an account, log in, click on the ”Web3 APIs” tab, copy the key, and input it into the code:
Lastly, add the following two routes:
- ”/requestChallenge” – When users authenticate themselves, they request a challenge from Moralis, which is done through this initial route. The ”/requestChallenge” route contains a ”reqChallenge()” function that acquires the request arguments, adds a ”body” variable, gets the results from the ”/requestChallenge” endpoint, and lastly, passes the results to the client:
@app.route('/requestChallenge', methods=["GET"])
def reqChallenge():

    args = request.args
    body = {
        "domain": "my.dapp",
        "chainId": args.get("chainId"),
        "address": args.get("address"),
        "statement": "Please confirm login",
        "uri": "https://my.dapp/",
        "expirationTime": "2023-01-01T00:00:00.000Z",
        "notBefore": "2020-01-01T00:00:00.000Z",
        "resources": ['https://docs.moralis.io/'],
        "timeout": 30,
    }

    result = auth.challenge.request_challenge_evm(
        api_key=api_key,
        body=body,
    )

    return result
- ”/verifyChallenge” – Once a user signs the message, the results are sent to the app’s backend and verified using this second route. The ”/verifyChallenge” route contains the ”verifyChallenge()” function responsible for fetching request arguments, adding a ”body” variable, getting the results from the Moralis Auth API endpoint, and passing the results to the client:
@app.route('/verifyChallenge', methods=["GET"])
def verifyChallenge():

    args = request.args
    body={
        "message": args.get("message"),
        "signature": args.get("signature"),
    }

    result = auth.challenge.verify_challenge_evm(
        api_key=api_key,
        body=body
    )

    return result
Moreover, add the snippet below specifying where you want to run the application:
if __name__ == "__main__":
    app.run(host="127.0.0.1", port=3000, debug=True)
That covers the Web3 Python Flask application code! All in all, the ”app.py” file should now look something like this:
from flask import Flask
from flask import request
from moralis import auth
from flask_cors import CORS

app = Flask(__name__)
CORS(app)

api_key = "xxx"

@app.route('/requestChallenge', methods=["GET"])
def reqChallenge():

    args = request.args
    body = {
        "domain": "my.dapp",
        "chainId": args.get("chainId"),
        "address": args.get("address"),
        "statement": "Please confirm login",
        "uri": "https://my.dapp/",
        "expirationTime": "2023-01-01T00:00:00.000Z",
        "notBefore": "2020-01-01T00:00:00.000Z",
        "resources": ['https://docs.moralis.io/'],
        "timeout": 30,
    }

    result = auth.challenge.request_challenge_evm(
        api_key=api_key,
        body=body,
    )

    return result


@app.route('/verifyChallenge', methods=["GET"])
def verifyChallenge():

    args = request.args
    body={
        "message": args.get("message"),
        "signature": args.get("signature"),
    }

    result = auth.challenge.verify_challenge_evm(
        api_key=api_key,
        body=body
    )

    return result


if __name__ == "__main__":
    app.run(host="127.0.0.1", port=3000, debug=True)
Step 2: Launching the Flask App
Now that you have added the Web3 Python application code, you need to launch the project. As such, open a new terminal and run the following command:
python3 app.py
Now that’s it! Your Web3 Python Flask application should spin up on local host 3000, which you specified in the previous step!
However, if you plan on launching the application to the public, it might be a good idea to add error handling. Unfortunately, this falls outside the scope of this article. So, if you want to go above and beyond, you must figure this out yourself.
Nonetheless, now that you have launched the Web3 Python backend application, let us take a closer look at the frontend!
Step 3: Creating the Frontend React App
As this is a Python and Web3 tutorial, this section will briefly show you how to quickly set up a React frontend application from which you can call the endpoints to handle the Web3 authentication. We will not cover the details of how this application works. But, if you are interested in this, check out the video from the section above.
Nevertheless, to make this as straightforward as possible, we will be using an already-prepared template for the application:
Python and Web3 Application Docs – https://github.com/MoralisWeb3/youtube-tutorials/tree/main/Web3AuthPython
To set up the React application, visit the GitHub repository above and clone the project to your local directory. Doing so should provide a file structure similar to the one in the print screen below:

Once you have a local copy of the project, you should now be able to launch the React app. As such, open a terminal, ”cd” into the project’s root folder, input the following command, and hit enter:
npm run start
That covers the entire ”Python and Web3” tutorial! If you have followed along this far, you should now be able to create a Web3 Python application for handling Web3 authentication flows!
What’s more, you can now use the same fundamental principles to add other Web3 Python backend functionality. If you would like to learn more about this and the capabilities of Moralis as a Web3 Python provider, check out our official Web3 Python SDK documentation.
Summary – How to Combine Python and Web3
This tutorial taught you how to add Web3 functionality to any Python application by exploring Moralis as a Web3 Python provider. To illustrate the process, this article demonstrated how to create a straightforward Python application. Also, with the app, users could sign in with MetaMask. What’s more, thanks to Moralis and the Python SDK, you were able to create this project in only three steps:
- Creating the Python Flask App
- Launching the Flask App
- Creating the Frontend React App
In combination with the Python SKD, you used Moralis’ Auth API to add the MetaMask login functionality. However, MetaMask is only one of many wallet connectors supported by the Auth API. If you want to explore other options, check out Moralis’ Web3 blog for additional articles. For example, learn how to add Coinbase Wallet login functionality or add a sign in with RainbowKit.
Furthermore, consider joining Moralis Academy if you want to become a more proficient Web3 developer. For example, learn the basics of Web3 development with the ”Ethereum 101” course. Or, learn everything you need to know about React with ”React Web Development 101”!
Nonetheless, sign up with Moralis to create blockchain-compatible Python applications more seamlessly. Creating an account only takes a couple of seconds and is completely free!
