The above video (the guideline for this article) covers an extensive example project showing you how to build a Chainlink NFT. As you may already know, Chainlink is an oracle blockchain project offering several neat solutions. One of these is Chainlink’s VRF (verifiable random function), which is also one of the primary tools we’ll use in this tutorial to mint random non-fungible tokens. Essentially, we’ll create a dapp with an NFT-minting smart contract incorporating Chainlink’s VRF.
For our contract to build the NFT, we also need NFT-representing files (images) and metadata files, which we will store in IPFS. This is where Moralis’ IPFS API enters the equation. For this, the following code snippet will do the heavy lifting:
result = evm_api.ipfs.upload_folder(
    api_key=api_key,
    body=body,
)
With the files in IPFS, we’ll be able to include metadata URIs in our smart contract. This is the initial Solidity line of code of our smart contract:
contract RandomNFT is ERC721URIStorage, VRFConsumerBaseV2, Ownable {
As far as our dapp goes, it will consist of a JavaScript frontend and a Python backend. When it comes to fetching on-chain data, Moralis’ ultimate NFT API will simplify things via the following lines of code:
result = evm_api.nft.get_nft_owners(
    api_key=api_key,
    params=params,
)
If you are ready to take on today’s Chainlink NFT tutorial, create your free Moralis account and follow our lead!
TRUSTED BY INDUSTRY LEADERS


Overview
Moving forward, we will dive into the steps you need to complete to build a Chainlink NFT minter. This dapp randomly takes NFT-representing files and their metadata and mint NFTs when users click on the “Mint!” button on the frontend. Now, to make such a dapp work, there are many aspects to cover, so the following description will highlight the essential aspects, and refer to the above video for details. Here are the core steps that you need to cover to complete our Chainlink NFT tutorial:
- Set up your Chainlink VRF.
- Write your unique smart contract script in Solidity or copy our template.
- Prepare the NFT-representing and metadata files and upload them to IPFS or use our example files.
- Deploy your Solidity smart contract that can build a Chainlink NFT.
- Build frontend and backend portions of an NFT minting dapp that ties it all together.
Following our lead, you also need several tools to complete the above steps. These include Chainlink VRF, MetaMask, Visual Studio Code (VSC), Brownie or Remix, an Ethereum faucet, a Chainlink faucet, and Moralis. We will also do a quick demonstration of the final build in the “Build a Chainlink NFT” section.
Below the actual tutorial, you can also find several sections that will help you better understand the theoretical aspects of today’s topic. This is where you can learn what Chainlink and Chainlink NFTs are and explore the gist of the aforementioned tools.
Chainlink NFT Tutorial – How to Build a Chainlink NFT
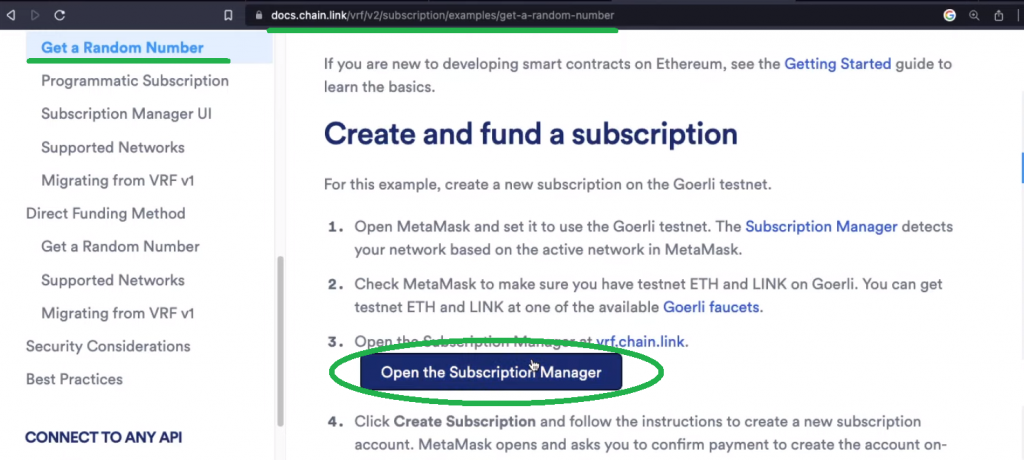
As outlined above, we can dive right into the first step – setting up your Chainlink VRF. Use the video above, starting at 2:21, for more details about VRF. Now, start by opening Chainlink’s subscription manager from Chainlink’s docs:
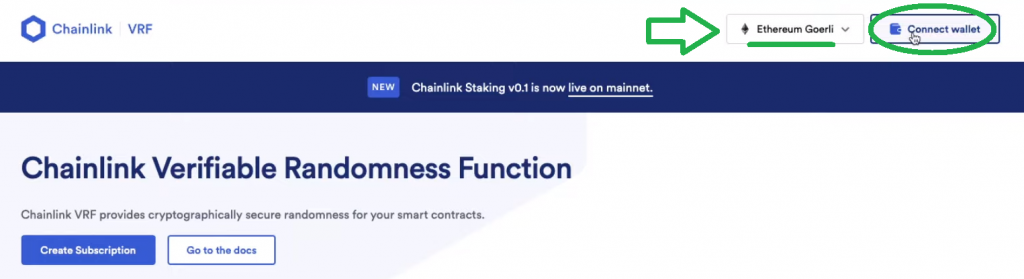
Next, select “Ethereum Goerli” and connect your MetaMask via the “Connect wallet” button:
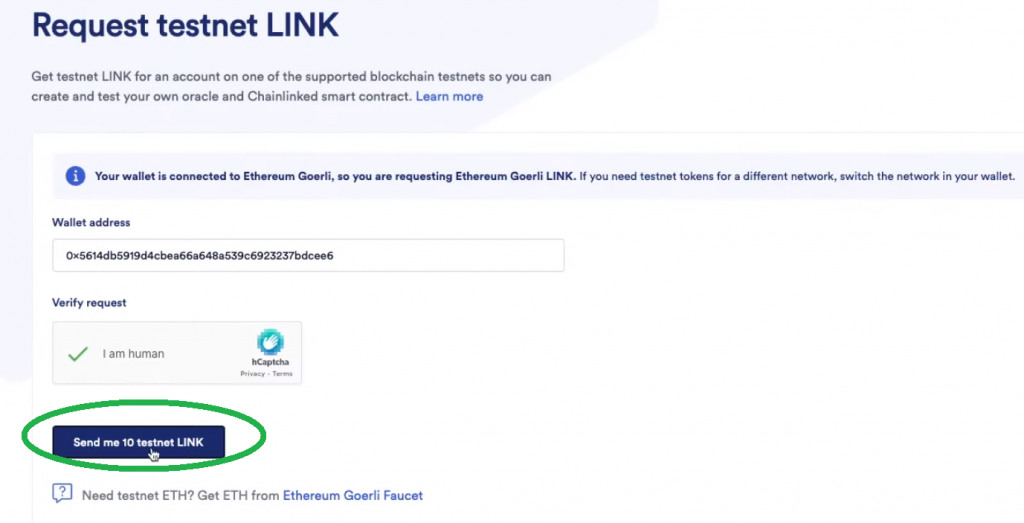
Once your wallet is connected, click on “Create Subscription” and confirm the transaction with your MetaMask wallet. Then, you need to make sure your account has enough funds. Since you are on the testnet, you can use the Chainlink testnet faucet to get testnet LINK. Just connect your wallet and request ten testnet LINK tokens:
Next, return to “vrf.chain.link“ and select your subscription:

On the next page, use the “Add Funds” button:

Then, add ten testnet LINK to your subscription:
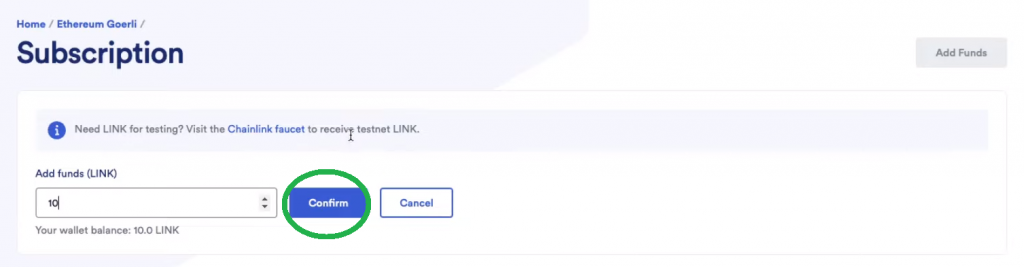
Note: After clicking on the “Confirm” button, you must confirm the transfer of tokens with your MetaMask.
By completing the above steps, you should have an active subscription with a balance of ten LINK tokens ready:

You will use your subscription ID and the funds to get a random number by using the Chainlink VRF smart contract. You can access that smart contract template via the “Get random number documentation page”:
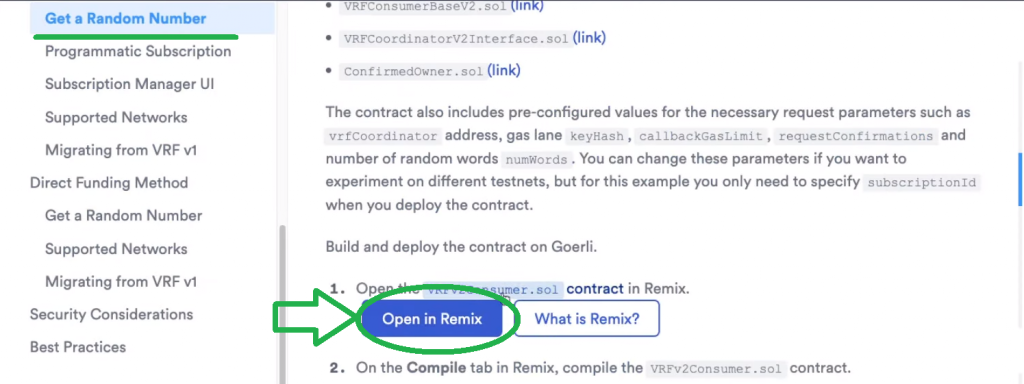
Use the video above (6:56) for a quick code walkthrough of that VRF contract template. All in all, “requestRandomWords” is the function that generates the randomness and the “fulfillRandomWords” function executes the action based on the received random number. Then, use Remix to deploy that smart contract (7:50):

After you’ve deployed your instance of the above smart contract, you’ll be able to copy its address:

With the deployed contract address copied, return to your Chainlink VRF subscription page and add a new consumer:

Build a Chainlink NFT Smart Contract
Now that you know how to set up your Chainlink VRF subscription and use it for the template contract, it’s time you do this for our example NFT smart contract: “RandomNFT.sol“. Use the video above (9:32) to follow along with our in-house expert as he writes this contract, or copy the complete code from GitHub via the “RandomNFT.sol” link.
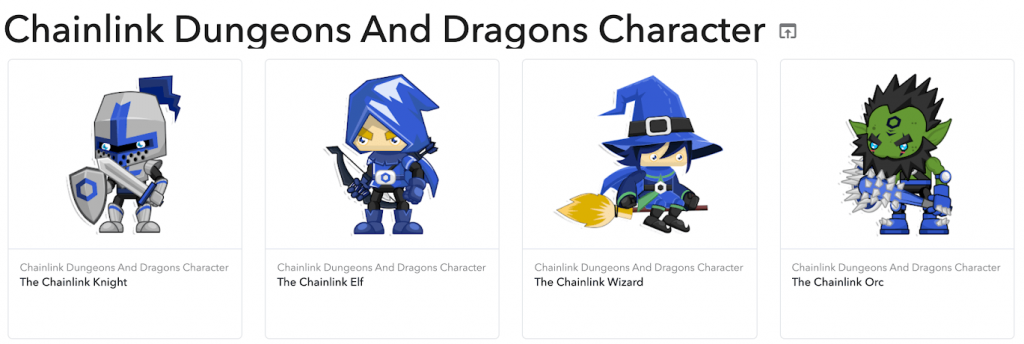
This contract incorporates Chainlink VRF’s randomness for minting our three example NFTs and is designed to build a Chainlink NFT. So, its purpose is to create an ERC721 token based on selecting one of our NFT metadata files. These files also include URLs pointing to our three example images. Both the NFT-representing files and metadata files are stored in IPFS. For the sake of this tutorial, you can use our files; however, you may also use your own files.
Note: Of course, you can also go with a greater number of NFTs than just three, but in that case, you need to tweak the code accordingly.
Storing Images and Metadata to IPFS
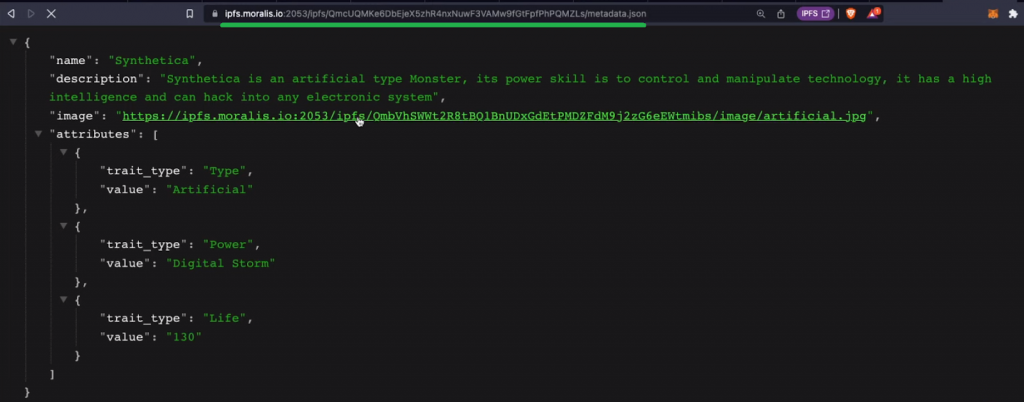
Whether you decide to use Brownie or Remix, you need to have your NFT-representing files and corresponding metadata in IPFS. For the purpose of uploading images, generating metadata files using images’ URLs, and uploading metadata to IPFS, we created two Python scripts: “ipf_img.py” and “ipfs-upload.py“. The first one uploads the images to IPFS, while the second construct the metadata files and uploads them to IPFS. Here’s one of our three example metadata files already uploaded to IPFS:
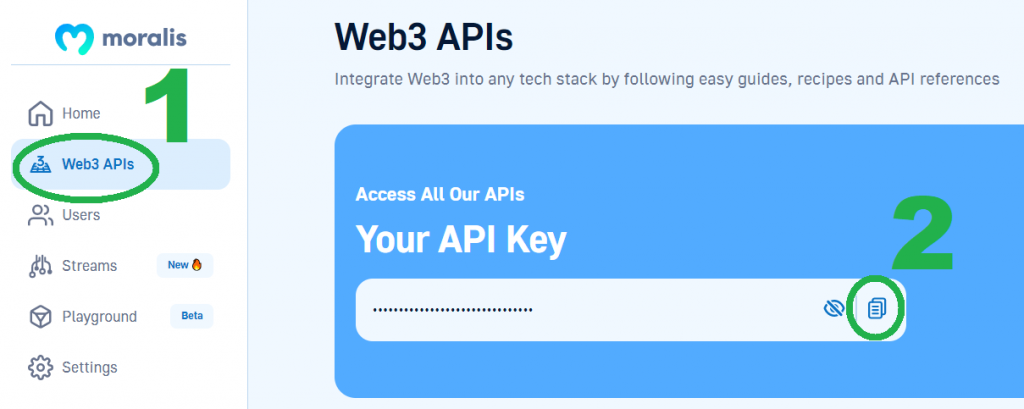
So, if you want to create your unique NFTs, you need to have your images inside the “img” folder and tweak the descriptions in the “ipfs-upload.py” script accordingly. Furthermore, both of these scripts use Moralis’ “evm_api.ipfs.upload_folder” method. As such, make sure to get your Web3 API key and store it inside a “.env” file under “MORALIS_API_KEY“. You can get your API key from the Moralis admin area in these two steps:
Note: If you need more guidance with uploading your files to IPFS, use our video guide on how to upload NFT collections to IPFS.
Deploy Your Solidity Smart Contract with Brownie or Remix
Our “RandomNFT.sol” contract is constructed to be deployed with Brownie. For the deployment purpose via this method, we have several scripts: “helpful_script.py“, “deploy_random_nft.py“, and “brownie-confi.yaml” (30:08). Inside the latter, you need to add your Chainlink VRF subscription ID:

To use these deployment scripts, you also need a private wallet key, Infura project ID, and Etherscan API key. Make sure to store these variables inside another “.env” file:

Note: If you need guidance with obtaining these variables, use the video at the top of the article, starting at 34:00.
With all of the above in place, you’re ready to deploy your smart contract using the following command line:
brownie run scripts/deploy_random_nft.py --network goerli
In case you’re not familiar with Brownie, you can instead use Remix to deploy your smart contract. In that case, the code requires some minor tweaks, so make sure to use the “RandomNFTForRemix.sol” script instead.
Whichever deployment method you use, make sure to copy your deployed contract’s address and use it to add a new consumer to your Chanlink VRF subscription, just like we did for the “VRF” contract template above.
Build Frontend and Backend Portions of an NFT Minting Dapp
To wrap up our Chainlink NFT tutorial, you must also build a simple frontend JavaScript dapp and a simple backend Python dapp. Of course, you don’t need to code the required scripts from scratch. Instead, you can use our complete code that awaits you on GitHub. To complete the process, you need the above-deployed smart contract’s address and ABI. You can follow our in-house expert’s lead to do this with the help of the “update_frontend.py” script (38:57).
As far as the frontend goes, “App.js” does the trick (40:16). This is where we import the ethers.js Web3 library and use its modules to cover the Web3 functionality behind the “Connect Wallet” and “Mint!” buttons of our frontend.
Regarding the “Get My NFTs” button, you get to use the power of Moralis’ API and implement the final of the three code snippets showcased in the intro of today’s article. For this purpose, we use the “services.py” script:
from moralis import evm_api
import os
from dotenv import load_dotenv

load_dotenv()

api_key = os.getenv("MORALIS_API_KEY")

def get_nft_owners(address: str):
    params = {
        "address": address,
        "chain": "goerli",
        "format": "decimal",
        "limit": 100,
        "cursor": "",
        "normalizeMetadata": True,
    }

    result = evm_api.nft.get_nft_owners(
        api_key=api_key,
        params=params,
    )

    return result
To make the above script work, you must get the connected wallet address from the frontend. This is where the “view.py” script enters the scene. Don’t forget to add the “get_owners/” endpoint to your project settings (inside the “urls.py” script). Finally, to see how the “App.js” script utilizes the on-chain data fetched with the “evm_api.nft.get_nft_owners” method, use the video at the top (44:23).
Build a Chainlink NFT
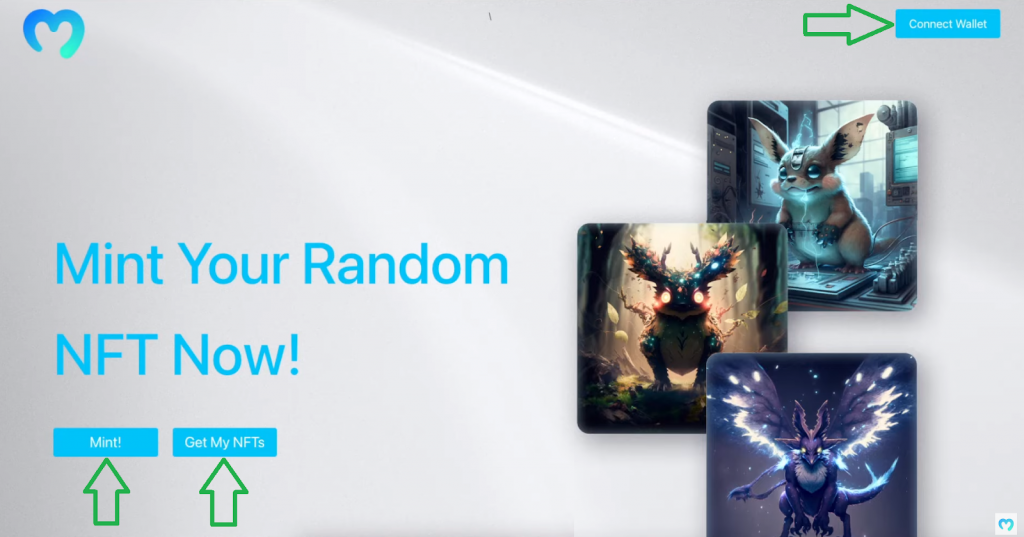
By following the steps outlined in the previous section in combination with the above video, you should be able to build a neat random NFT minter. On the frontend, our example dapp is pretty simple; it only has three buttons:
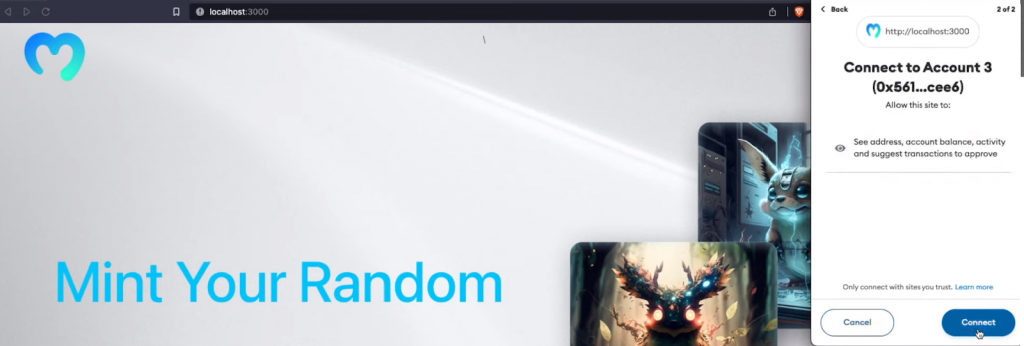
Once we click on the “Connect Wallet” button, the MetaMask extension pops up, asking us to select our account:
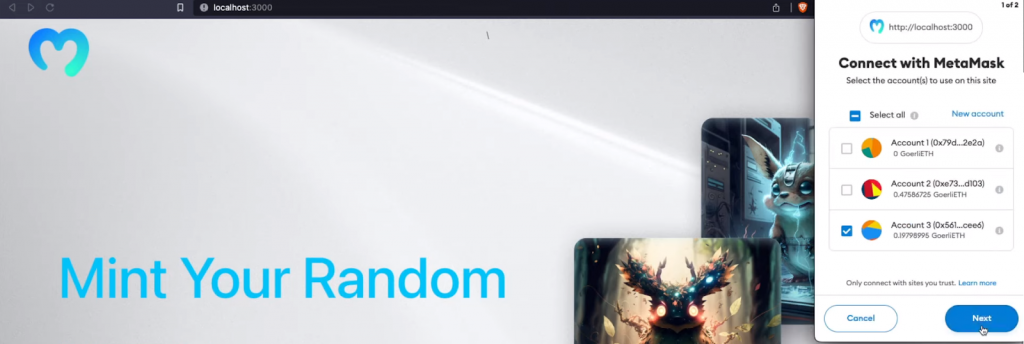
With the account selected, we need to click on the “Next” button. In the second step, we finally connect our wallet via the “Connect” button:
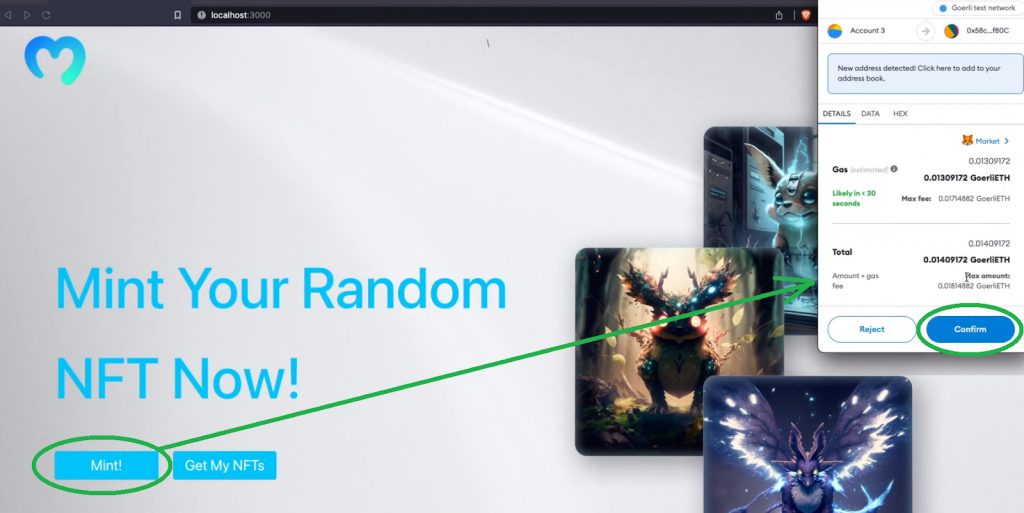
After successfully connecting our wallet, the “Connect Wallet” button changes to “Connected”. Then, we can use the “Mint!” and “Get My NFTs” buttons. The first one will trigger our smart contract and mint one of the three random NFTs we used as examples. It will also assign ownership to the connected Web3 wallet. Since minting an NFT requires an on-chain transaction, the “Mint!” button triggers MetaMask, where we need to confirm the minting transaction and cover the gas fees:
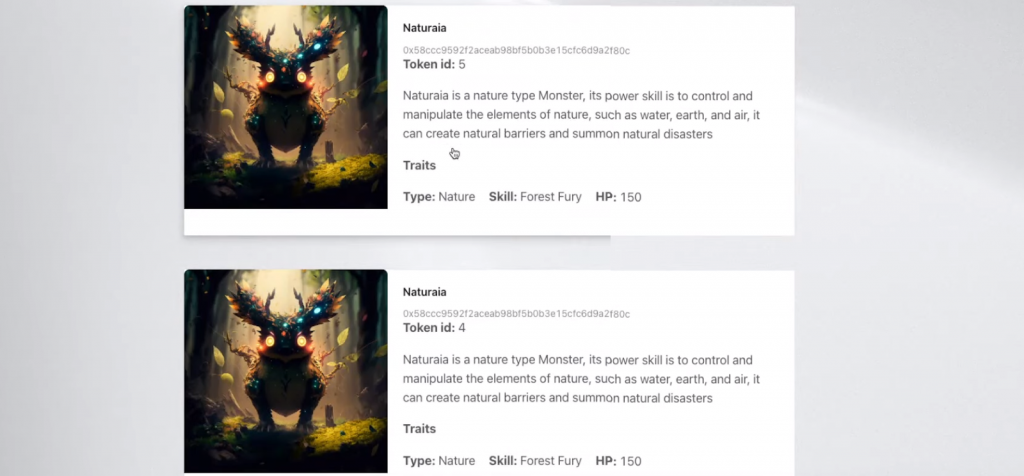
If we hit the “Get My NFTs” button, our dapp displays all the NFTs owned by the connected wallets that were minted using this project’s smart contract at the bottom of the page. For example, this connected wallet owns two NFTs:
Exploring Chainlink and NFTs
If you want to learn the ins and outs of NFTs, we recommend you dive into the “NFT” content that awaits you on the Moralis blog. There, you’ll be able to explore the basics as well as more detailed aspects, such as learning about the difference between the ERC721 and ERC1155 token standards. When it comes to exploring Chainlink and its products, the official Chainlink website and the Chainlink documentation are the resources to use. However, you can use the following sections to cover the essential basics to make the most out of today’s Chainlink NFT tutorial.

What is Chainlink?
Chainlink is a decentralized network of oracles built on the Ethereum blockchain. The core purpose of Chainlink is to facilitate the transfer of tamper-proof data from off-chain sources (real-world data) to on-chain smart contracts. Tamper-proof inputs, outputs, and computations that Chainlink provides support advanced smart contracts. Thanks to Chainlink, traditional systems can connect to the emerging blockchain industry. This can generate more security, efficiency, and transparency in social and business processes. Chainlink oracles collectively retrieve data from multiple sources, aggregate it, and deliver a validated, single data point to the smart contract to trigger its execution. As a result, it removes any centralized point of failure.
Current Chainlink products include market and data feeds, VRF, automation, proof of reserve, and cross-chain bridging (CCIP). They offer countless use cases, including randomizing NFTs, as utilized in our example project above.
What is a Chainlink NFT?
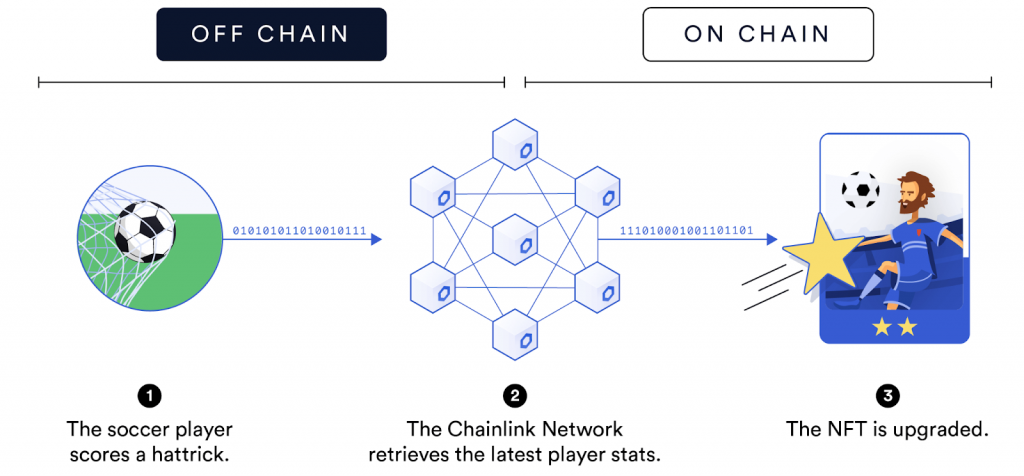
A Chainlink NFT is a non-fungible token whose creation somehow involves Chainlink. On the one hand, this means that a Chainlink NFT uses one of Chainlink’s products, such as VRF, in its creation process. This is the type of NFT we created in today’s tutorial. Here are two examples of NFTs utilizing Chainlink:
- Utilizing Chainlink’s market and data feed:
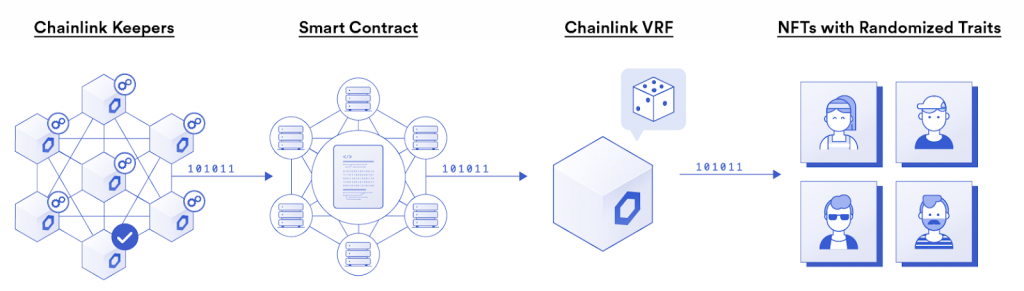
- Utilizing Chainlink’s VRF:
On the other hand, a Chainlink NFT can also be a non-fungible token that was created by the Chainlink core team or another Chainlink-associated party. These kinds of Chainlink NFTs typically include Chainlink trademarks, such as the logo. Here’s an example:
Exploring “Chainlink Build Deploy NFT” Tools
If you followed along in the above tutorial, you used several powerful Web3 development tools that all play a vital role in the “Chainlink build deploy NFT” feat. So, let’s quickly cover each of those tools:
- Chainlink VRF – This is one of Chainlink’s products that provides cryptographically secure randomness. It is the tool to use whenever you want to introduce true randomness into blockchain-based projects.
- MetaMask – MetaMask is the leading Web3 wallet that comes in the form of a mobile application and browser extension. The latter is also a must-have tool for Web3 devs. It enables you to connect to dapps, confirm on-chain transactions when deploying or interacting with smart contracts, send and receive crypto assets, and more. As such, MetaMask is an important “Chainlink build deploy NFT” tool.
- Visual Studio Code (VSC) – VSC is arguably the most popular IDE and code editor.
- Brownie – Brownie is a Python-based development and testing framework. It enables you to create, deploy, verify, and test smart contracts that target Ethereum Virtual Machine (EVM).
- Remix – Remix is an online IDE that enables you to write, deploy, verify, and interact with smart contracts using your favorite browser.
- Ethereum Faucet – An Ethereum faucet is a crypto faucet providing “test” crypto assets for Ethereum testnets. For example, in today’s tutorial, we focused on the Goerli testnet. If you’d like more info on Goerli, check our guide exploring how to get Goerli ETH.
- Moralis – Moralis is the ultimate Web3 API provider that empowers you to create all sorts of dapps the easy way. That said, Moralis specializes in tools needed by crypto wallets and portfolio trackers. Moralis offers the Web3 Auth API, Web3 Streams API (for smart contract and crypto wallet monitoring), and the ultimate Web3 Data API. What’s more, they are all accessible with a free Moralis account.

Chainlink NFT Tutorial – How to Build a Chainlink NFT – Summary
In today’s article, you had an opportunity to build a Chainlink NFT minting dapp that uses an array of NFT-representing files and metadata files. You now know that you can complete this challenge with the following five steps:
- Set up your Chainlink VRF.
- Write your unique smart contract script in Solidity or copy our template.
- Prepare the NFT-representing and metadata files and upload them to IPFS or use our example files.
- Deploy your Solidity smart contract that can build a Chainlink NFT.
- Build frontend and backend portions of an NFT minting dapp that ties it all together.
In addition to our Chainlink NFT tutorial, we also explained what Chainlink is and what a Chainlink NFT is. Also, we covered the gist of the tools required to build a Chainlink NFT. With the skills and knowledge obtained herein, you should be ready to create your own randomized non-fungible tokens.
If you want to explore other blockchain development topics or tackle some beginner-friendly tutorials, make sure to visit the Moralis documentation, the Moralis YouTube channel, and the Moralis blog. Some of our latest topics cover a list of Web3 libraries, the wei to gwei conversion, and explores the “create ERC20 token” tutorial. Additionally, you can learn more about the Solana Python API, the Web3 get block function, the best Polygon Mumbai faucet, and much more. Last but not least, if you want to become blockchain certified, enroll in Moralis Academy. There, you should first learn more about blockchain and Bitcoin fundamentals.
