In this article, we will create an ERC-20 token, and we will do so with the help of a few tools, such as Moralis, Remix, and MetaMask. In fact, thanks to Moralis, we can create an ERC-20 token with the following code snippet:
contract MoralisSmartToken is ERC20 {
    constructor(string memory _name, string memory _symbol) ERC20(_name, _symbol) {
      _mint(msg.sender, 1000 * 10 ** 18);
    }
}
Creating a token following the ERC-20 standard is as easy as that; however, there are a few more steps we must take care of before we can utilize the code snippet above. If you’d like to dive into this article’s step-by-step tutorial, starting with the prerequisites, make sure to first create your free Moralis account and then jump into the “Prerequisites” section of this tutorial!

Overview
Ethereum is undoubtedly the largest smart contract-enabled blockchain around and hosts a vast ecosystem of dapps. These dapps generally run on Ethereum-based ERC-20 tokens. Furthermore, Ethereum is the origin of the EVM (Ethereum Virtual Machine), which is now extensively used by other popular chains such as Polygon. Because of this, many chains also apply the Ethereum ERC-20 token standard to their own networks. For this reason, we’re going to look closer at how to create your own ERC-20 token in just ten minutes. Essentially, after we’ve taken care of the required prerequisites, we will complete the ERC-20 token creation process in the following four steps:
- Add a Pragma Line and Import an OpenZeppelin Package
- Create the ERC-20 Token Contract
- Test the Token Contract
- Deploy the ERC-20 Token
Now, you might be asking yourself, “create your own ERC-20 token in just 10 minutes? What sorcery is this?”. In fact, it is neither sorcery nor magic – it’s just Moralis. Creating an ERC-20 token does not have to be difficult, not with the right tools. The best tool and platform for this job is Moralis, which does all the heavy backend lifting for you.
In addition to industry-leading Web3 APIs, Moralis provides numerous resources for blockchain developers. Its Web3 documentation features Web3 tutorials, guides, API reference pages, etc. Also, Moralis’ blog features excellent how-to guides and tutorials so you can take your development skills to the next level. At the blog, you can explore how to implement a Web3 get block feature, enable Supabase authentication, learn how to use a Polygon Mumbai faucet, and sit ringside while watching the ERC721 vs ERC1155 match.
Now, without further ado, let’s dig into this tutorial and see how to create an ERC-20 token!
Prerequisites
Before we go into how to develop your own ERC-20 token, there are a few preparations to be made. Of course, as we’ve already mentioned, you need an active Moralis account. Once you have that, you can go ahead and get the following prerequisites set up:
- Set Up a MetaMask Account – We need to set up a MetaMask account.
- Acquire Test Tokens – In order for us to deploy our token once we’ve actually created it, we need to have “test” tokens. Why test tokens? Since we are about to deploy our token on Ethereum’s testnet, Goerli, we need to obtain Goerli ETH to cover the transaction fee required for deployment. The best way to do this is to use Moralis’ testnet faucet list. Once you’re on that page, select the Goerli faucet. Then, simply choose the Goerli option, followed by ERC20 tokens, enter your wallet address, and click on the submit button. For a more detailed guide on how to connect to the Goerli network and use a Goerli faucet, read the following article: “What is a Goerli Faucet?”.
If you are already familiar with these prerequisites, feel free to jump straight into the tutorial! Now, let’s get started by going through the process of setting up our MetaMask account.
Set Up a MetaMask Account
MetaMask is one of the most popular cryptocurrency wallets on the market, with over 30,000,000 users worldwide. Along with being an extensively used wallet, the platform also acts as a gateway to the decentralized web providing users with a safe way to access the extensive Ethereum ecosystem of dapps. Furthermore, there are several other use cases for MetaMask, one of which is used to acquire and view the token that we are about to create in this article. We also need a MetaMask account to hold the tokens that we’ll use to pay for the deployment fee of our token.

Creating a MetaMask account is simple and only takes a couple of minutes. To access MetaMask, we must either download the browser extension or the mobile application.
Moralis comes with native support for authenticating users with MetaMask when developing your dapps. Moreover, if you’d like to explore other ways how to add Web3 authentication into your projects, such as dynamic Web3 authentication, see our articles exploring crypto wallet integration and how to create a Web3 Firebase login with MetaMask!
Acquire Test Tokens
The final part before actually developing our token is to acquire the token of the blockchain we plan to use. So, if we want to create a Polygon token, we must first acquire MATIC tokens. However, since we will be creating an ERC-20 token on the Goerli testnet, we need to acquire Goerli ETH.
That said, if your dapp had already been through the crucial test phases and you were instead ready to deploy on the mainnet, then you would have had to acquire Ethereum’s native token, ether. There are several different ways in which we can acquire ether. One example is to buy it with fiat currency through a platform such as Coinbase. Another example is to use a decentralized exchange or DEX, such as Uniswap, to swap one token for another.
However, there are other ways we can acquire tokens. If we, for example, are planning on deploying a token to the Mumbai testnet of Polygon, we don’t want to obtain real MATIC. Instead, we want to acquire tokens for the testnet, which enables us to deploy the ERC-20 token to that specific blockchain. This can be done by inputting our crypto wallet address into the leading Mumbai faucet for the Polygon network: “https://faucet.polygon.technology/”. However, before doing so, we also need to change our MetaMask network to the Mumbai testnet.
Now that we have a MetaMask account and the token for the blockchain we are opting for, let’s move on to the main topic of this article: ”How to Create Your Own ERC-20 Token in 10 Minutes”.
How to Create Your Own ERC-20 Token in just 10 Minutes
Creating an ERC-20 token using Moralis can be accomplished in four different steps:
- Add a Pragma Line and Import an OpenZeppelin Package
- Create the ERC-20 Token Contract
- Test the Token Contract
- Deploy the ERC-20 Token
The complete process is relatively easy; however, we’ll walk you through these steps to make it as simple as possible.
For this example, we’ll use the Remix IDE to create our Ethereum token. However, if you are using another IDE, the foundational principles remain the same; the main difference is in the “compile” and “deployment” processes of the token.
Before we move further, we want to point out that in the following video (same as the one at the beginning of this article), one of our in-house developers explains the entire development process in more detail. Accordingly, if you feel like you need a more in-depth explanation of some of the contents outlined herein, make sure to watch that video!
Step 1 – Add a Pragma Line and Import an OpenZeppelin Package
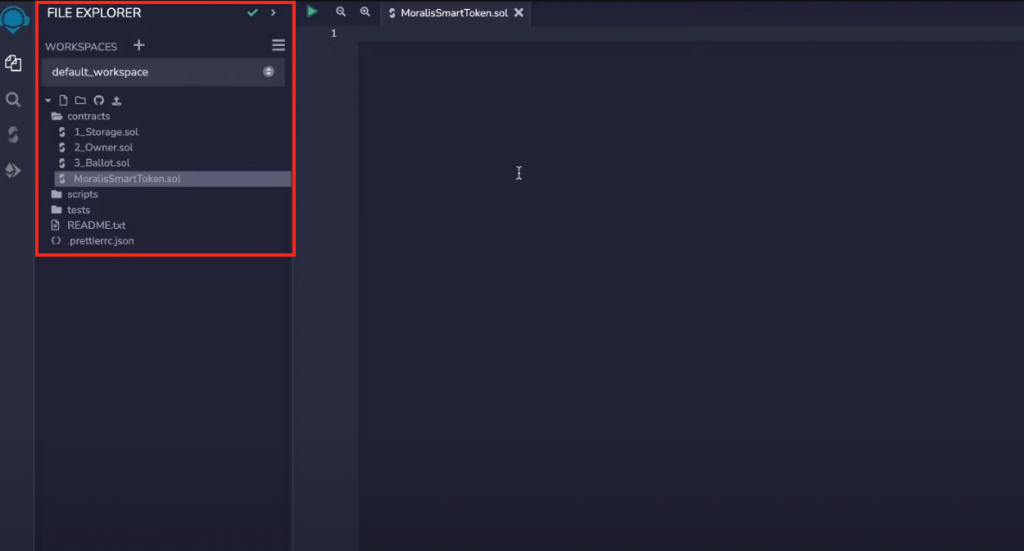
We need to do three things: first, we need to add a license identifier, then add the pragma line, and lastly, import the proper OpenZeppelin package. Moreover, in case you missed it earlier, we will perform all these steps in Remix. To be able to add the previously mentioned identifier, pragma line, and package import, create a new file within the contracts folder in Remix called “MoralisSmartToken.sol”:
- License Identifier – The license identifier will determine and signal the licensing status of our token. In this example, we’ll use the MIT license, which is open-source and free. To determine our license, we can input the following line of code into our project file:
// SPDX-License-Identifier: MIT
- Pragma Line – Below the license identifier, we can add the pragma line. This will signal which version we’re going to use when compiling the token contract. This is very elementary, and in the example below, we signal that any Solidity version greater than 0.8.0 works:
pragma solidity ^0.8.0;
- Importing the OpenZeppelin Package – Lastly, to finish the preparations before getting to the contract itself, we must also import the proper OpenZeppelin package:
import “https://github.com/OpenZeppelin/openzeppelin-contracts/blob/master/contracts/token/ERC20/ERC20.sol”;
Step 2 – Create the ERC-20 Token Contract
As we’ve added the license identifier and the pragma line and imported the OpenZeppelin package, we can move on to creating the ERC-20 token itself. As we mentioned previously, we will create an Ethereum contract, and for this example, we’ll call it “MoralisSmartToken“. Consequently, on our first line of code, our token looks something like this:
contract MoralisSmartToken is ERC20 {
In the example above, the name of the contract is set to “MoralisSmartToken”, which is something we can change. One thing that might pop up in your head is the thought of a “symbol” name. For example, we know Bitcoin is a currency, and its symbol is BTC. So, in our case, could we add a symbol for our “MoralisSmartToken” asset? Yes, we absolutely could. One way of doing so is to hardcode the “constructor” like this:
constructor() ERC20(“Moralis Smart Token”, “MST”){}
However, in our case, we don’t want to hardcode it like this. We prefer letting the user that deploys the contract actually choose themselves. Therefore, we implement the following line of code:
constructor(string memory _name, string memory _symbol) ERC20(_name, _symbol) {
The “constructor” is a special function that gets called the first time the contract gets deployed to the network.
Another thing we might want to do is to give some of these tokens to ourselves. For that, we implement the mint function. This function takes two parameters: the address to send to and the number of tokens. It looks like this:
_mint(msg.sender, 1000 * 10 ** 18);
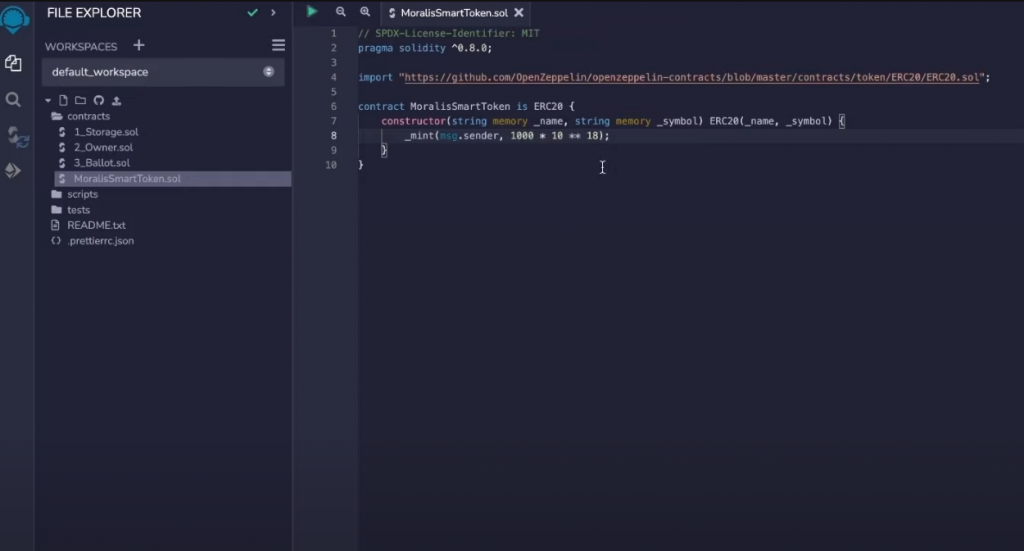
Creating a token like this is quite simple and is possible with no prior development skills. Templates for all different types of tokens are available on the OpenZeppelin website, allowing us to create tokens effortlessly. All in all, the entire code structure should now look like this:
// SPDX-License-Identifier: MIT
pragma solidity ^0.8.0;

import “https://github.com/OpenZeppelin/openzeppelin-contracts/blob/master/contracts/token/ERC20/ERC20.sol”;

contract MoralisSmartToken is ERC20 {
  constructor(string memory _name, string memory _symbol) ERC20(_name, _symbol) {
    _mint(msg.sender, 1000 * 10 ** 18);
  }
}
Congratulations! That’s all you need to create your own ERC-20 token. All that remains is to check if the token is working correctly.
Step 3 – Test the Token Contract
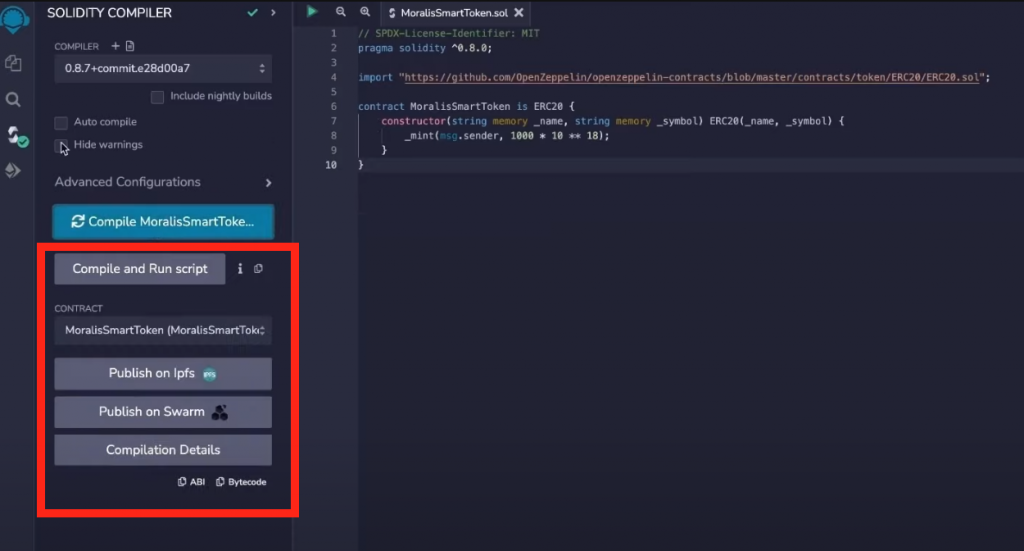
To check if the contract is working, all we need to do is compile the token. To compile the contract, go to the “Solidity Compiler” page inside Remix:
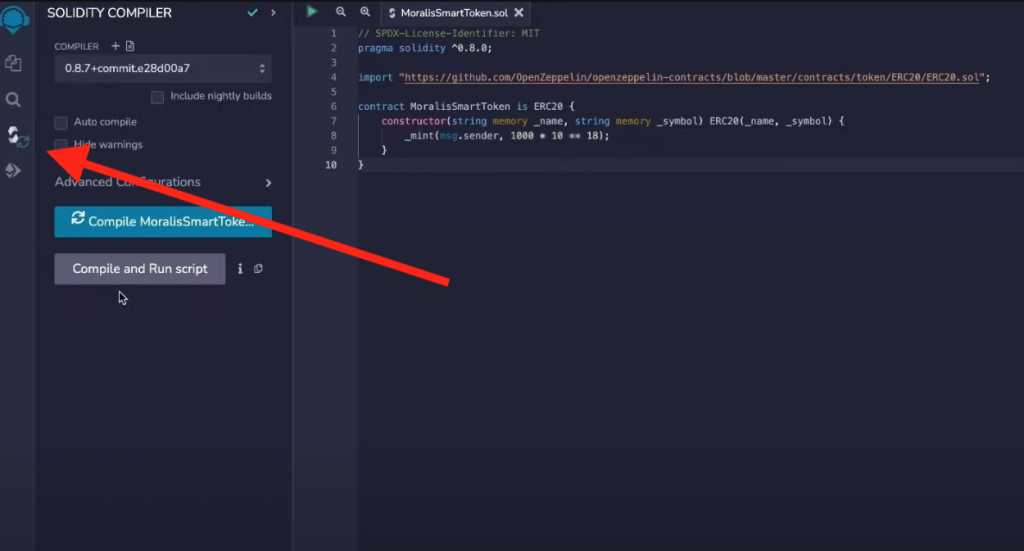
Once on the compiler page, click on the “Compile MoralisSmartToken” button. If there’s nothing wrong with it, you’ll see the following:
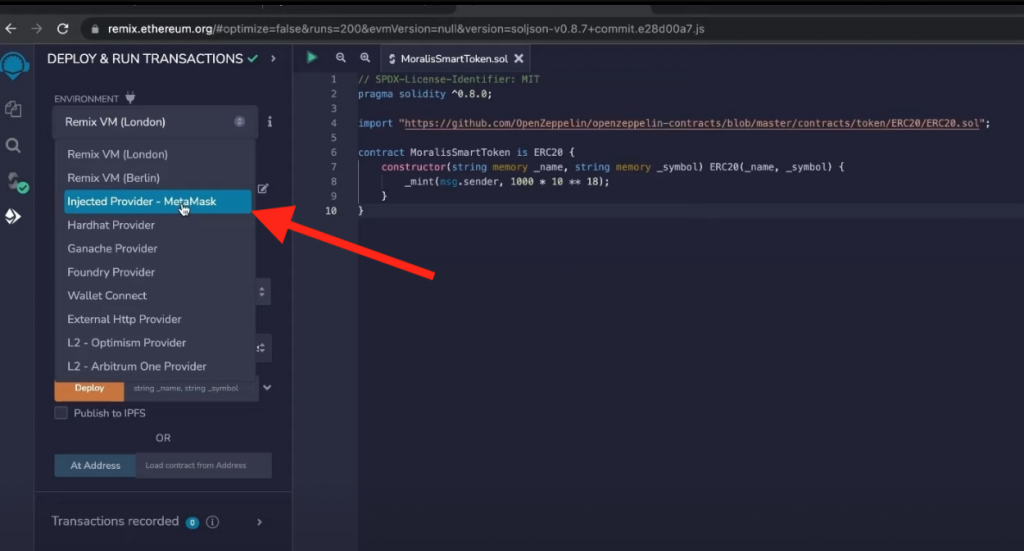
Step 4 – Deploy the ERC-20 Token
So, now that our token is complete, we can move on and deploy the contract to the blockchain. Thus, we can move on to the “Deploy & run transactions” page. Once on that page, we select the “Injected Provider – MetaMask” option. Remember, in this step, you can choose other networks and node providers if you like. If so, make sure you first add the desired network in your MetaMask wallet first, then select the suitable environment in Remix.
If we then click on the “Deploy” drop-down option, we’ll see the variables where we see the name and symbol for our token contract. To illustrate, let’s type “Moralis Smart Token” in the “_name:” entry field and “MST” in the “_symbol” field. Once done, we click on the transact button. As such, we will receive a MetaMask prompt:
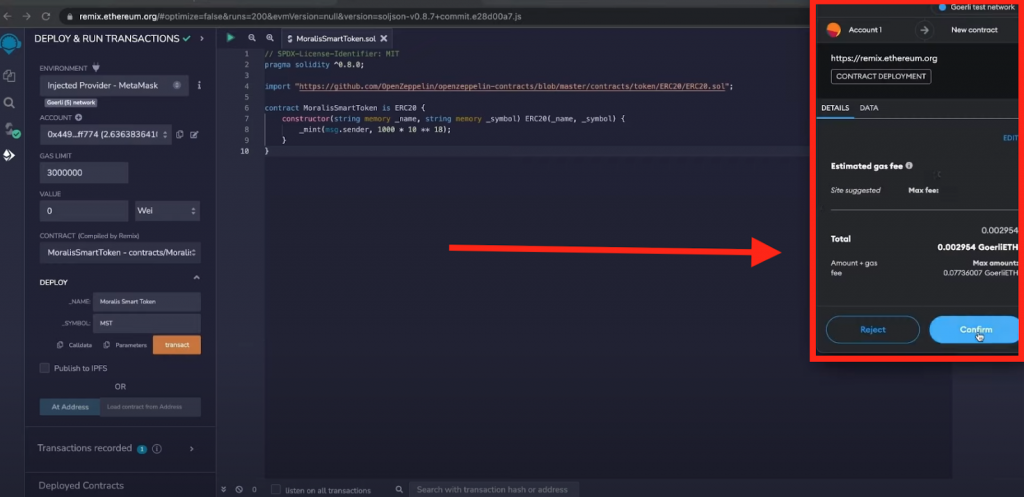
Once the MetaMask prompt shows up, click on “Confirm”. In the bottom-left corner, we’ll see the deployed contract. In addition, we also see the “view on etherscan” link:

If we click on the link, we’ll see the transaction details on Etherscan:
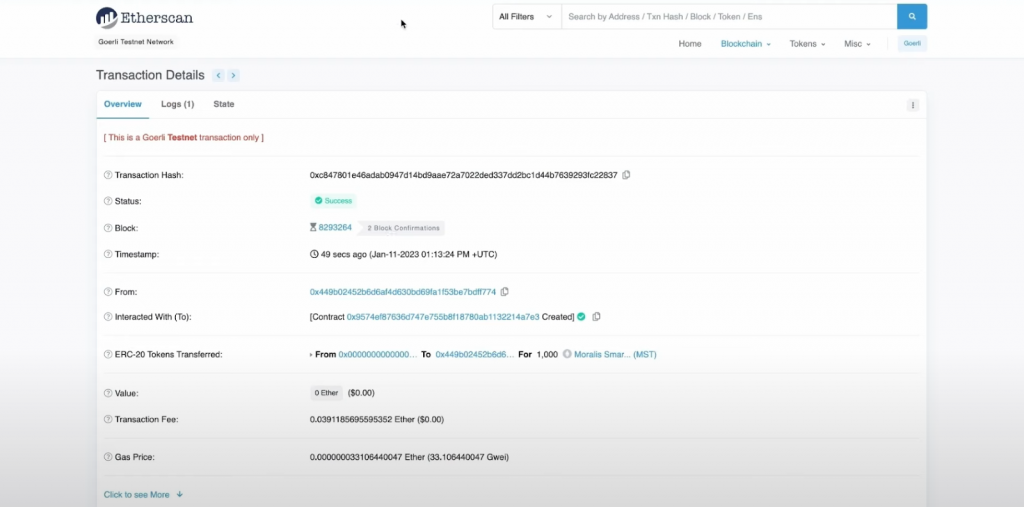
How to Create Your Own ERC-20 Token – View the Ethereum Token
With our token deployed on the blockchain, we can also add the token to our MetaMask wallet. To do this, we need to copy the address provided to us when deploying the contract.

We must also make sure our MetaMask account is set to the correct blockchain network, which can be done by clicking the ”Networks” tab at the top of our MetaMask interface.
With the correct network chosen, we can move on to the assets tab and hit ”Add Token”. In some cases, you might also see the “Import tokens” options. If so, make sure to click on it. We’ll need to input the contract address, and then MetaMask should auto-fill the other two fields. And finally, we can hit ”Add custom token” followed by “Import tokens” to add our token:

Once we do so, we should see our newly created ERC-20 token in our MetaMask:

This was the complete process of creating, compiling, testing, and deploying your contract to the blockchain. If anyone asks you, you will now know the four simple steps for how to create your own ERC-20 token in ten minutes using Moralis! If you still have questions regarding the process, we recommend checking out this video from the Moralis YouTube channel!
What are ERC-20 Tokens?
When it comes to the Ethereum blockchain and dapps, tokens are one of the essential features. Within the Ethereum ecosystem, ERC-20 tokens have the ability to represent virtually anything. A few examples are lottery tickets, points on an online platform, skills for a character in a game, fiat currency, etc. This feature is quite powerful and needs to be regulated by a standard, and that’s why the ERC-20 exists.

The ERC-20 standard ensures that tokens have the same identical properties. This further means that tokens share the same type and value, making them interchangeable. As such, ERC-20 are fungible tokens, enabling us to measure the value of a token and compare it to another. But what exactly does this mean for the tokens themselves?
The ERC-20 standard implements an API for tokens with smart contracts. The API provides functionality, enabling developers to set a total token supply, get token balances from accounts, and transfer the tokens from one account to another. However, these are just some of the features of an ERC-20 token. For a token to be valid as an ERC-20, the token needs to implement the following methods and events:
Methods:

Events:

How to Create Your Own ERC-20 Token in 10 Minutes – Summary
Creating your own ERC-20 token does not have to be difficult, especially when using Moralis. With Moralis, it is possible to create your own ERC-20 token in just ten minutes by following this “how-to” guide. All you need is to make a few preparations and then follow the following four simple steps:
- Add a Pragma Line and Import an OpenZeppelin Package
- Create the ERC-20 Token Contract
- Test the Token Contract
- Deploy the ERC-20 Token
With Moralis, this process is quick and easy, as the platform does most of the heavy lifting for you. In short, the answer to the “how to create your own ERC-20 token in 10 minutes?” question is simply Moralis.
Furthermore, the Moralis platform does not only help with creating Ethereum tokens. With a fully managed backend infrastructure from Moralis, it’s possible to shorten the time to market for all your blockchain projects. Along with this, the website provides a vast selection of excellent guides. Here are just two of many examples: ”How to Build an NFT Game App in Minutes” or “How to Authenticate Users with WalletConnect”.
So, if you are looking to increase efficiency when developing your blockchain projects, we highly recommend signing up with Moralis today! You can do so for free, and this will give you access to all the platform’s services!
